


前言
这一篇开始动手第一个简单模块开发,一步一步的来。
Hello Nginx!
(一) 将自己的模块编译进Nginx
(直接在源码下开发)
1,在<nginx-source-path>/src/http/modules目录下增加自己的.c文件,命名按照Nginx Style;
以mytest模块为例,也是书中开发实例。我的.c文件为ngx_http_mytest_module.c。
2,在同一目录下增加config文件;
原因:运行configrure脚本时,
执行auto/option脚本时,会设置NGX_ADDONS变量。具体可以看下<nginx-source-path>/auto/option脚本:
--add-module=*) NGX_ADDONS="$NGX_ADDONS $value" ;;
if test -n "$NGX_ADDONS"; then

    echo configuring additional modules

    for ngx_addon_dir in $NGX_ADDONS
    do
        echo "adding module in $ngx_addon_dir"

        if test -f $ngx_addon_dir/config; then
            . $ngx_addon_dir/config

            echo " + $ngx_addon_name was configured"

        else
            echo "$0: error: no $ngx_addon_dir/config was found"
            exit 1
        fi
    done
fi
最后,执行auto/make脚本负责将模块编译进Nginx:
# the addons sources

if test -n "$NGX_ADDON_SRCS"; then

    ngx_cc="\$(CC) $ngx_compile_opt \$(CFLAGS) $ngx_use_pch \$(ALL_INCS)"

    for ngx_src in $NGX_ADDON_SRCS
    do
        ngx_obj="addon/`basename \`dirname $ngx_src\``"

        ngx_obj=`echo $ngx_obj/\`basename $ngx_src\` \
            | sed -e "s/\//$ngx_regex_dirsep/g"`

        ngx_obj=`echo $ngx_obj \
            | sed -e "s#^\(.*\.\)cpp\\$#$ngx_objs_dir\1$ngx_objext#g" \
                  -e "s#^\(.*\.\)cc\\$#$ngx_objs_dir\1$ngx_objext#g" \
                  -e "s#^\(.*\.\)c\\$#$ngx_objs_dir\1$ngx_objext#g" \
                  -e "s#^\(.*\.\)S\\$#$ngx_objs_dir\1$ngx_objext#g"`

        ngx_src=`echo $ngx_src | sed -e "s/\//$ngx_regex_dirsep/g"`

        cat << END                                            >> $NGX_MAKEFILE

$ngx_obj:	\$(ADDON_DEPS)$ngx_cont$ngx_src
	$ngx_cc$ngx_tab$ngx_objout$ngx_obj$ngx_tab$ngx_src$NGX_AUX

END
     done

fi
config文件内容如下:
ngx_addon_name=模块完整名称
HTTP_MODULES="$HTTP_MODULES 模块完整名称"
NGX_ADDON_SRCS="$NGX_ADDON_SRCS $ngx_addon_dir/源代码文件名"

我的config文件如下:
ngx_addon_name=ngx_http_mytest_module
HTTP_MODULES="$HTTP_MODULES ngx_http_mytest_module"
NGX_ADDON_SRCS="$NGX_ADDON_SRCS $ngx_addon_dir/ngx_http_mytest_module.c"
./configure --prefix=安装目录 --add-module=模块源代码文件目录可以察看运行中的命令行信息,或者运行结束查看ngx_moudles.c的模块数组中查看是否添加成功。

按照这种方法,在完成模块代码开发后,就可以直接运行Makefile完成编译。
另外,也可以手动修改Makefile等。(对于新手而言,这种方法暂时不适合)
(二) Nginx模块开发流程
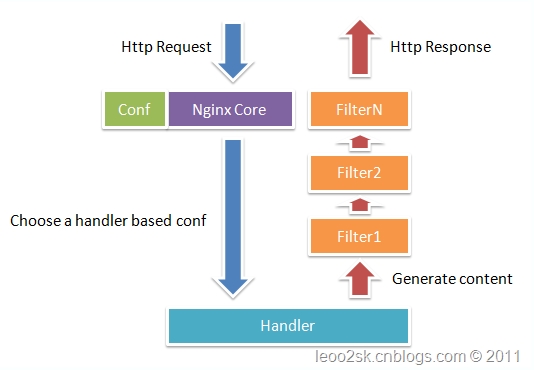
先看下Nginx模块的处理流程,这里从博文《Nginx模块开发入门》摘张图,我个人觉得这个图已经相当美观了。
整个Http请求处理过程非常流畅,一目了然:
开发工作三部曲
1,定义自己的HTTP模块
这里先简单看看ngx_module_t数据结构,它代表一个Nginx模块,其中比较重要的部分,注释说明。
#define NGX_MODULE_V1          0, 0, 0, 0, 0, 0, 1
#define NGX_MODULE_V1_PADDING  0, 0, 0, 0, 0, 0, 0, 0

typedef struct ngx_module_s      ngx_module_t;
struct ngx_module_s {
    /* START */
    /* ctx_index用于表达模块优先级以及在模块数组中的位置 */
    /* 以下几个成员由上面定义的NGX_MODULE_V1赋值即可 */
    ngx_uint_t            ctx_index;
    ngx_uint_t            index;

    ngx_uint_t            spare0;
    ngx_uint_t            spare1;
    ngx_uint_t            spare2;
    ngx_uint_t            spare3;

    ngx_uint_t            version;
    /* END */

    /* !!!重要!!!
     * 指向某一类模块的上下文结构体,对于HTTP类型模块来说,
     * 这里指向我定义的ngx_http_module_t类型的ngx_http_mytest_module_ctx
     */
    void                 *ctx;

    /* !!!重要!!!
     * 处理nginx.conf文件中的配置项
     */
    ngx_command_t        *commands;

    /* !!!重要!!!
     * 定义一个HTTP模块,需要将type设置成NGX_HTTP_MODULE
     */
    ngx_uint_t            type;

    /* START */
    /* 在Nginx的启动和停止过程中,以下7个函数指针代表7种调用方法,暂不涉及不解释 */
    ngx_int_t           (*init_master)(ngx_log_t *log);

    ngx_int_t           (*init_module)(ngx_cycle_t *cycle);

    ngx_int_t           (*init_process)(ngx_cycle_t *cycle);
    ngx_int_t           (*init_thread)(ngx_cycle_t *cycle);
    void                (*exit_thread)(ngx_cycle_t *cycle);
    void                (*exit_process)(ngx_cycle_t *cycle);

    void                (*exit_master)(ngx_cycle_t *cycle);
    /* END */

    /* 以下8个为保留字段,可用NGX_MODULE_V1_PADDING宏填充 */
    uintptr_t             spare_hook0;
    uintptr_t             spare_hook1;
    uintptr_t             spare_hook2;
    uintptr_t             spare_hook3;
    uintptr_t             spare_hook4;
    uintptr_t             spare_hook5;
    uintptr_t             spare_hook6;
    uintptr_t             spare_hook7;
};
/* 在读取、重载配置时定义的接口,8个成员表示8个阶段
 * HTTP框架在启动过程中会在每个阶段都调用其中相应的方法
 * 这里做简单模块,并没有什么工作需要在初始化中完成,因此可以设为NULL
 */
typedef struct {
    ngx_int_t   (*preconfiguration)(ngx_conf_t *cf);
    ngx_int_t   (*postconfiguration)(ngx_conf_t *cf);

    void       *(*create_main_conf)(ngx_conf_t *cf);
    char       *(*init_main_conf)(ngx_conf_t *cf, void *conf);

    void       *(*create_srv_conf)(ngx_conf_t *cf);
    char       *(*merge_srv_conf)(ngx_conf_t *cf, void *prev, void *conf);

    void       *(*create_loc_conf)(ngx_conf_t *cf);
    char       *(*merge_loc_conf)(ngx_conf_t *cf, void *prev, void *conf);
} ngx_http_module_t;
typedef struct ngx_command_s     ngx_command_t;
struct ngx_command_s {
    ngx_str_t             name; // 配置项名
    ngx_uint_t            type; // 配置项类型,指定配置项可以出现的位置,比如出现在server块还是location块
    char               *(*set)(ngx_conf_t *cf, ngx_command_t *cmd, void *conf); // 如果出现name项,调用此方法处理
    ngx_uint_t            conf;
    ngx_uint_t            offset; // 在配置文件的偏移量
    void                 *post; // 读取配置后的处理方法
};

#define ngx_null_command  { ngx_null_string, 0, NULL, 0, 0, NULL }
介绍结束,我自定义的HTTP模块如下,在文件ngx_http_mytest_module.c中。如下:
static ngx_command_t ngx_http_mytest_commands[] = {

    { ngx_string("mytest"),
      NGX_HTTP_MAIN_CONF|NGX_HTTP_SRV_CONF|NGX_HTTP_LOC_CONF|
      NGX_HTTP_LMT_CONF|NGX_CONF_NOARGS,
      ngx_http_mytest,
      NGX_HTTP_LOC_CONF_OFFSET,
      0,
      NULL},

	  ngx_null_command
};

static ngx_http_module_t  ngx_http_mytest_module_ctx = {
    NULL,                                  /* preconfiguration */
    NULL,                                  /* postconfiguration */

    NULL,                                  /* create main configuration */
    NULL,                                  /* init main configuration */

    NULL,                                  /* create server configuration */
    NULL,                                  /* merge server configuration */

    NULL,                                  /* create location configuration */
    NULL                                   /* merge location configuration */
};

ngx_module_t  ngx_http_mytest_module = {
    NGX_MODULE_V1,
    &ngx_http_mytest_module_ctx,           /* module context */
    ngx_http_mytest_commands,              /* module directives */
    NGX_HTTP_MODULE,                       /* module type */
    NULL,                                  /* init master */
    NULL,                                  /* init module */
    NULL,                                  /* init process */
    NULL,                                  /* init thread */
    NULL,                                  /* exit thread */
    NULL,                                  /* exit process */
    NULL,                                  /* exit master */
    NGX_MODULE_V1_PADDING
};在ngx_http_mytest_commands中,ngx_http_mytest即为我们的set方法,当我们在读取配置文件时,出现了mytest配置项,那么,我们将会调用此方法。以下是ngx_http_mytest实现:
static char *
ngx_http_mytest(ngx_conf_t *cf, ngx_command_t *cmd, void *conf)
{
    ngx_http_core_loc_conf_t *clcf;

    /* 找到mytest配置项所在的配置块 */
    clcf = ngx_http_conf_get_module_loc_conf(cf, ngx_http_core_module);

    /* 请求处理模块入口 */
    clcf->handler = ngx_http_mytest_handler;

    return NGX_CONF_OK;
}
2,处理用户请求
在上面提到请求处理的方法,ngx_http_mytest_handler。原型为:
typedef ngx_int_t (*ngx_http_handler_pt)(ngx_http_request_t *r);先分析下ngx_http_request_t结构类型(太尼玛长了...),摘暂时用到的:
typedef struct ngx_http_request_s     ngx_http_request_t;
struct ngx_http_request_s {
    ...
    ngx_http_headers_in_t             headers_in;     // 接收的HTTP头部
    ngx_http_headers_out_t            headers_out;    // 响应的HTTP头部

    ngx_http_request_body_t          *request_body;   // 请求中的包体,我们这里直接丢弃,以后处理以后再说

    time_t                            lingering_time; // 这些看名字猜吧
    time_t                            start_sec;
    ngx_msec_t                        start_msec;

    ngx_uint_t                        method;         // 方法名
    ngx_uint_t                        http_version;   // 协议版本

    ngx_str_t                         request_line;
    ngx_str_t                         uri;            // 请求中的URI
    ngx_str_t                         args;           // URI参数
    ngx_str_t                         exten;
    ngx_str_t                         unparsed_uri;
    ...
}这里为什么要丢弃:有些客户端可能会一直试图发送包体,而如果HTTP模块不接收发来的TCP流,有可能造成客户端发送超时。因此必须接收,但是接收了又不处理,所以需要丢弃。
3,发送响应
根据请求处理的过程,发送响应自然也就包括发送响应头和响应包体了。这一块直接贴上完整的Hello Nginx带注释代码:
static ngx_int_t ngx_http_mytest_handler(ngx_http_request_t *r)
{
	// 必须是GET或者HEAD方法,否则返回405 Not Allowed
	if (!(r->method & (NGX_HTTP_GET | NGX_HTTP_HEAD))) {
		return NGX_HTTP_NOT_ALLOWED;
	}

	// 丢弃请求中的包体
	ngx_int_t rc = ngx_http_discard_request_body(r);
	if (rc != NGX_OK) {
		return rc;
	}

	// 设置返回的Content-Type
	ngx_str_t type = ngx_string("text/plain");
	// 返回包体内容
	ngx_str_t response = ngx_string("Hello Nginx!\n");
	// 设置返回状态码
	r->headers_out.status = NGX_HTTP_OK;
	// 响应包内容长度
	r->headers_out.content_length_n = response.len;
	// 设置Content-Type
	r->headers_out.content_type = type;

	// 发送HTTP头部
	rc = ngx_http_send_header(r);
	if (rc == NGX_ERROR || rc > NGX_OK || r->header_only) {
		return rc;
	}

	// 构造ngx_buf_t结构体发送包体
	ngx_buf_t *b;
	b = ngx_create_temp_buf(r->pool, response.len);
	if (b == NULL) {
		return NGX_HTTP_INTERNAL_SERVER_ERROR;
	}

	// 将Hello Nginx复制到buf中
	ngx_memcpy(b->pos, response.data, response.len);
	// 设置last指针
	b->last = b->pos + response.len;
	// 声明最后一块缓冲区
	b->last_buf = 1;

	// 构造发送时的ngx_chain_t结构体
	ngx_chain_t out;
	out.buf = b;
	out.next = NULL;

	// 发送包体,最后调用ngx_http_finalize_request方法结束请求
	return ngx_http_output_filter(r, &out);
}
(三) 最后效果
最后,修改nginx.conf文件,增加我的mytest配置块:
server {
    listen       80;
    server_name  localhost;

    ...
    location /mytest {
        mytest;
    }
    ...
}
执行make,生成执行文件。启动Nginx,效果如图。


总结
开发的这个东西嘛,动手才有发言权。另外,写笔记确实是一个非常好的梳理流程的方法。。。
主要参考
《深入理解Nginx》


 391
391

 被折叠的 条评论
为什么被折叠?
被折叠的 条评论
为什么被折叠?
 到【灌水乐园】发言


