


Spring Boot 整合 Redis(简单入门,存储一个对象)
简介
Redis是一种高性能的键值存储数据库,常被用作缓存、队列、会话存储等场景。在Spring Boot中,我们可以很方便地通过Spring Data Redis来实现与Redis的整合。本篇博客将介绍如何在Spring Boot项目中整合Redis,并演示最最最常见的Redis操作。
准备工作
在开始之前,请确保你已经完成以下准备工作:
- 安装并启动Redis服务器。
- 创建一个Spring Boot项目。你可以使用Spring Initializr来快速创建一个基本的Spring Boot项目。
添加依赖
在pom.xml文件中添加Spring Data Redis的依赖:
<dependency>
    <groupId>org.springframework.boot</groupId>
    <artifactId>spring-boot-starter-data-redis</artifactId>
</dependency>
配置Redis连接
在application.properties或application.yml文件中配置Redis连接信息:
spring.redis.host=127.0.0.1
spring.redis.port=6379
# 如果Redis有密码,则需要配置以下参数
# spring.redis.password=your_password
创建Redis配置类(可以不用,因为依赖导入的是starter)
创建一个Java配置类,用于配置RedisTemplate和Redis连接工厂:
import org.springframework.beans.factory.annotation.Value;
import org.springframework.context.annotation.Bean;
import org.springframework.context.annotation.Configuration;
import org.springframework.data.redis.connection.RedisConnectionFactory;
import org.springframework.data.redis.connection.jedis.JedisConnectionFactory;
import org.springframework.data.redis.core.RedisTemplate;
import org.springframework.data.redis.serializer.StringRedisSerializer;

@Configuration
public class RedisConfig {

   // @Value("${spring.redis.host}")
   // private String host;

   // @Value("${spring.redis.port}")
  //  private int port;

    // 如果Redis有密码,则需要添加以下字段
    // @Value("${spring.redis.password}")
    // private String password;

	//如果导入了spring-boot-starter-data-redis,则不需要这一步,因为starter中已经自动配置了
   // @Bean
   /** public RedisConnectionFactory redisConnectionFactory() {
        JedisConnectionFactory factory = new JedisConnectionFactory();
        factory.setHostName(host);
        factory.setPort(port);
        // 如果有密码,则设置密码
        // factory.setPassword(password);
        return factory;
    }
   **/

 	/**
 		配置redis序列化,按实际情况添加
 	**/
  @Bean
	public RedisTemplate<Object, Object> redisTemplate(RedisConnectionFactory redisConnectionFactory) {
		RedisTemplate<Object, Object> template = new RedisTemplate<>();
		template.setConnectionFactory(redisConnectionFactory);
		/* 使用Json序列化,默认是JDK序列化 */
		Jackson2JsonRedisSerializer<Object> serializer = new Jackson2JsonRedisSerializer<>(Object.class);
		template.setDefaultSerializer(serializer);
		return template;
	}
}
上述配置类中,我们主要自定义了RedisTemplate的序列化方式,使其存储格式为json格式。
使用RedisTemplate进行操作
接下来,我们可以在Spring Boot的任何组件中注入RedisTemplate来操作Redis。
下面是一个测试代码,演示了如何使用RedisTemplate将Student对象存储到Redis中:
首先,我们用到了lombok的@Data注解,还是用到了fastjson的相关方法,我们需要在pom.xml文件中导入相关依赖(lombok在平常项目中经常使用到)
<dependency>
      <groupId>org.projectlombok</groupId>
      <artifactId>lombok</artifactId>
      <optional>true</optional>
</dependency>

<dependency>
       <groupId>com.alibaba</groupId>
       <artifactId>fastjson</artifactId>
       <version>2.0.33</version>
</dependency>
import com.alibaba.fastjson2.JSON;
import lombok.Data;
import org.junit.jupiter.api.Test;
import org.springframework.beans.factory.annotation.Autowired;
import org.springframework.boot.test.context.SpringBootTest;
import org.springframework.data.redis.core.StringRedisTemplate;

@SpringBootTest
class ApplicationTests {
    @Autowired
    StringRedisTemplate redisTemplate;

    @Test
    void setRedis() {
        Student student=new Student();
        student.setId("12");
        student.setName("韩梅梅");
        //使用fastjson,将这个类中的属性用json的格式转化为字符串
        String s = JSON.toJSONString(student);
        //使用redis存储一个kv对(string类型):k为student1,v为student对象转化为json格式的字符串
        redisTemplate.opsForValue().set("student1",s);
    }

    @Test
    void getRedis(){
    	//通过get方法,获取到redis中k为student1的内容
        String student1 = redisTemplate.opsForValue().get("student1");
        //使用fastjson将拿到的内容转化为相关类对象(存储的时候用json格式存的,这里可以直接转化)
        Student student = JSON.parseObject(student1, Student.class);
        System.out.println("学生学号为:"+student.getId()+"====姓名为:"+student.getName());
    }

    @Data
    class Student{
        private String id;
        private String name;
    }
}
运行setRedis方法成功后,我们使用redis相关工具(这里使用Redis Desktop Manager)来查看运行的结果:
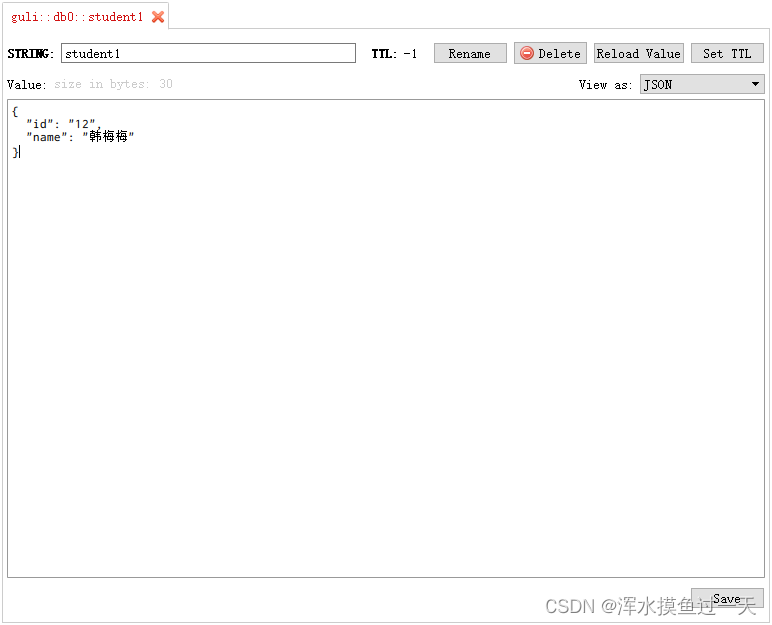
可以看到我们存了一个k为student1,v为一个json字符串的kv对。
我们再运行下面的getRedis方法:
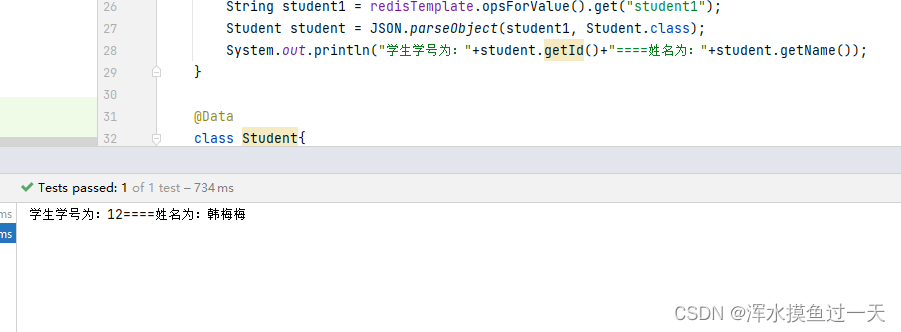
发现可以使用fastjson工具来将我们存储的json格式字符串转化为Student类对象。
在上述代码中,我们通过redisTemplate.opsForValue()来获取Redis中的Value操作对象,然后使用set方法将Student对象存储到Redis中。同样地,我们使用get方法来获取存储在Redis中的Student对象。
总结
通过以上步骤,我们成功地在Spring Boot项目中整合了Redis,并实现了一些常见的Redis操作。现在你可以在项目中使用Redis来加速数据访问和缓存,提高系统性能。当然,在实际开发中,还有更多高级的Redis用法和技巧等待你去探索。祝你在使用Redis时能够获得愉快的开发体验!


 21万+
21万+


 被折叠的 条评论
为什么被折叠?
被折叠的 条评论
为什么被折叠?
 到【灌水乐园】发言


