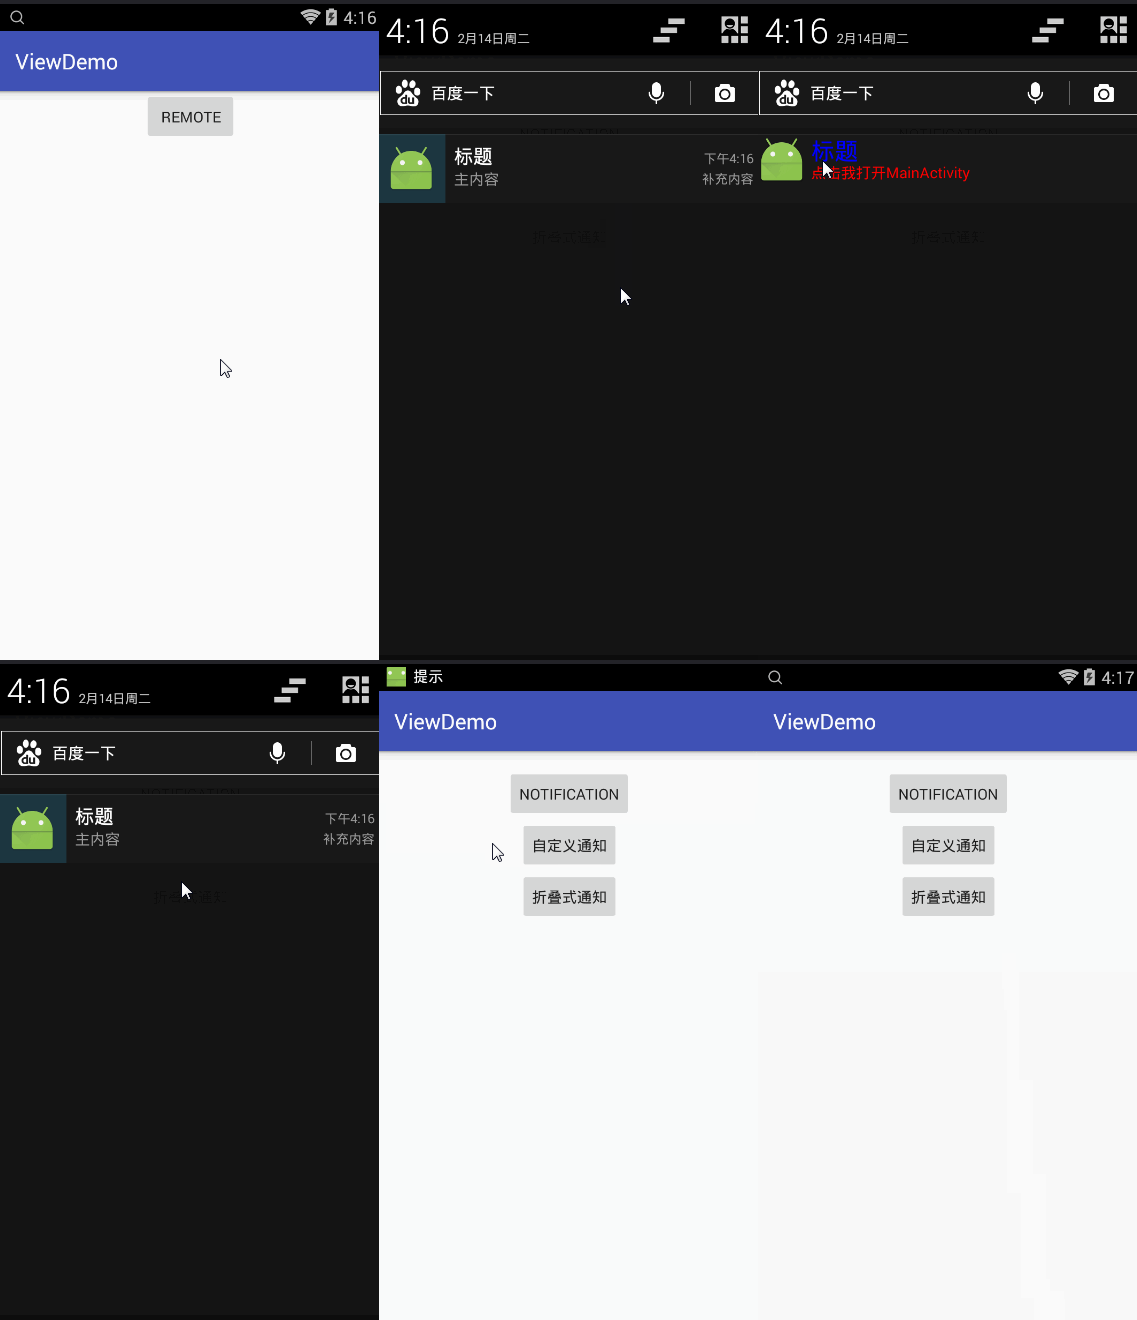
状态栏的通知是很常见的,本篇只是写了通知的用法。
建于API19以上。低版本的通知写法并未涉及!
效果如下
下面开始代码部分
先贴出xml文件
自定义通知的布局
demo_notification.xml
<?xml version="1.0" encoding="utf-8"?>
<LinearLayout xmlns:android="http://schemas.android.com/apk/res/android"
    android:orientation="vertical" android:layout_width="match_parent"
    android:layout_height="match_parent">

    <LinearLayout
        android:orientation="horizontal"
        android:layout_width="match_parent"
        android:layout_height="wrap_content"
        android:layout_gravity="center_horizontal">

        <LinearLayout
            android:orientation="vertical"
            android:layout_width="match_parent"
            android:layout_height="match_parent"
            android:layout_weight="6">

            <ImageView
                android:layout_width="wrap_content"
                android:layout_height="wrap_content"
                android:id="@+id/iv_img" />
        </LinearLayout>

        <LinearLayout
            android:orientation="vertical"
            android:layout_width="match_parent"
            android:layout_height="match_parent"
            android:layout_weight="1">

            <TextView
                android:layout_width="match_parent"
                android:layout_height="26dp"
                android:textAppearance="?android:attr/textAppearanceLarge"
                android:text="Large Text"
                android:id="@+id/tv_title" />

            <TextView
                android:layout_width="match_parent"
                android:layout_height="20dp"
                android:text="New Text"
                android:id="@+id/tv_nr" />
        </LinearLayout>

    </LinearLayout>

</LinearLayout>
按钮界面布局
activity_notification.xml
<?xml version="1.0" encoding="utf-8"?>
<RelativeLayout xmlns:android="http://schemas.android.com/apk/res/android"
    xmlns:tools="http://schemas.android.com/tools"
    android:layout_width="match_parent"
    android:layout_height="match_parent"
    android:paddingBottom="@dimen/activity_vertical_margin"
    android:paddingLeft="@dimen/activity_horizontal_margin"
    android:paddingRight="@dimen/activity_horizontal_margin"
    android:paddingTop="@dimen/activity_vertical_margin"
    tools:context=".NotificationActivity">

    <Button
        android:layout_width="wrap_content"
        android:layout_height="wrap_content"
        android:text="notification"
        android:id="@+id/mr"
        android:layout_alignParentTop="true"
        android:layout_centerHorizontal="true" />

    <Button
        android:layout_width="wrap_content"
        android:layout_height="wrap_content"
        android:text="自定义通知"
        android:id="@+id/zdy"
        android:layout_below="@+id/mr"
        android:layout_centerHorizontal="true" />

    <Button
        android:layout_width="wrap_content"
        android:layout_height="wrap_content"
        android:text="折叠式通知"
        android:id="@+id/zds"
        android:layout_below="@+id/zdy"
        android:layout_centerHorizontal="true" />

</RelativeLayout>

全部代码
NotificationActivity.java
package com.gjn.viewdemo;

import android.app.Notification;
import android.app.NotificationManager;
import android.app.PendingIntent;
import android.content.Intent;
import android.graphics.BitmapFactory;
import android.graphics.Color;
import android.os.Bundle;
import android.support.v7.app.AppCompatActivity;
import android.view.View;
import android.widget.Button;
import android.widget.RemoteViews;

public class NotificationActivity extends AppCompatActivity {

    private NotificationManager manager;
    private Button btn1,btn2,btn3;
    private PendingIntent pendingIntent;

    @Override
    protected void onCreate(Bundle savedInstanceState) {
        super.onCreate(savedInstanceState);
        setContentView(R.layout.activity_notification);

        manager = (NotificationManager) getSystemService(NOTIFICATION_SERVICE);

        Intent intent = new Intent(this, MainActivity.class);
        pendingIntent = PendingIntent.getActivity(this, 0, intent,
                PendingIntent.FLAG_CANCEL_CURRENT);

        findview();
        onclick();

    }

    private void findview() {
        btn1 = (Button) findViewById(R.id.mr);
        btn2 = (Button) findViewById(R.id.zdy);
        btn3 = (Button) findViewById(R.id.zds);
    }

    private void onclick() {
        btn1.setOnClickListener(new View.OnClickListener() {
            @Override
            public void onClick(View v) {
                notification();
            }
        });
        btn2.setOnClickListener(new View.OnClickListener() {
            @Override
            public void onClick(View v) {
                demonotification();
            }
        });
        btn3.setOnClickListener(new View.OnClickListener() {
            @Override
            public void onClick(View v) {
                notification2();
            }
        });
    }

    private void notification2() {
        Notification notification = new Notification.Builder(this)
                .setContentInfo("补充内容")
                .setContentText("主内容")
                .setContentTitle("标题")
                .setSmallIcon(R.mipmap.ic_launcher)
                .setTicker("提示")
                .setAutoCancel(true)
                .setWhen(System.currentTimeMillis())
                .setContentIntent(pendingIntent)
                .build();
        RemoteViews remoteViews = new RemoteViews(getPackageName(),
                R.layout.demo_notification);
        notification.bigContentView = remoteViews;
        manager.notify(2, notification);
    }

    private void demonotification() {

        RemoteViews remoteViews = new RemoteViews(getPackageName(),
                R.layout.demo_notification);

        remoteViews.setTextViewText(R.id.tv_title,"标题");
        remoteViews.setTextColor(R.id.tv_title, Color.BLUE);
        remoteViews.setTextViewText(R.id.tv_nr,"点击我打开MainActivity");
        remoteViews.setTextColor(R.id.tv_nr, Color.RED);
        remoteViews.setImageViewResource(R.id.iv_img,R.mipmap.ic_launcher);
        remoteViews.setOnClickPendingIntent(R.id.tv_nr,pendingIntent);

        Notification notification = new Notification.Builder(this)
                .setSmallIcon(R.mipmap.ic_launcher)
                .setLargeIcon(BitmapFactory.decodeResource(getResources(),R.mipmap.ic_launcher))
                .setTicker("提示")
                .setContent(remoteViews)
                .build();
        manager.notify(1, notification);
    }

    private void notification() {
        Notification notification = new Notification.Builder(this)
                .setContentInfo("补充内容")
                .setContentText("主内容")
                .setContentTitle("标题")
                .setSmallIcon(R.mipmap.ic_launcher)
                .setTicker("提示")
                .setAutoCancel(true)
                .setWhen(System.currentTimeMillis())
                .setContentIntent(pendingIntent)
                .build();
        manager.notify(0, notification);
    }


}
解析代码
1.默认的最普通的通知
代码块如下
    private void notification() {
        Notification notification = new Notification.Builder(this)
                .setContentInfo("补充内容")
                .setContentText("主内容")
                .setContentTitle("标题")
                .setSmallIcon(R.mipmap.ic_launcher)
                .setTicker("提示")
                .setAutoCancel(true)
                .setWhen(System.currentTimeMillis())
                .setContentIntent(pendingIntent)
                .build();
        manager.notify(0, notification);
}属性上面都有提及
2.自定义通知
代码块如下
    private void demonotification() {

        RemoteViews remoteViews = new RemoteViews(getPackageName(),
                R.layout.demo_notification);

        remoteViews.setTextViewText(R.id.tv_title,"标题");
        remoteViews.setTextColor(R.id.tv_title, Color.BLUE);
        remoteViews.setTextViewText(R.id.tv_nr,"点击我打开MainActivity");
        remoteViews.setTextColor(R.id.tv_nr, Color.RED);
        remoteViews.setImageViewResource(R.id.iv_img,R.mipmap.ic_launcher);
        remoteViews.setOnClickPendingIntent(R.id.tv_nr,pendingIntent);

        Notification notification = new Notification.Builder(this)
                .setSmallIcon(R.mipmap.ic_launcher)
                .setLargeIcon(BitmapFactory.decodeResource(getResources(),R.mipmap.ic_launcher))
                .setTicker("提示")
                .setContent(remoteViews)
                .build();
        manager.notify(1, notification);
}3.折叠式通知
代码块如下
    private void notification2() {
        Notification notification = new Notification.Builder(this)
                .setContentInfo("补充内容")
                .setContentText("主内容")
                .setContentTitle("标题")
                .setSmallIcon(R.mipmap.ic_launcher)
                .setTicker("提示")
                .setAutoCancel(true)
                .setWhen(System.currentTimeMillis())
                .setContentIntent(pendingIntent)
                .build();
        RemoteViews remoteViews = new RemoteViews(getPackageName(),
                R.layout.demo_notification);
        notification.bigContentView = remoteViews;
        manager.notify(2, notification);
}在出现通知上面下拉可以出现bigContentView创建的通知界面!
本篇就做了一个用法记录!


 1810
1810

 被折叠的 条评论
为什么被折叠?


