


基于pytorch的transformer代码实现
2017年谷歌再nips上发表的《Attention Is All You Need》,完全基于Attention机制,解决RNN和CNN同时存在的问题,又将两者的优点结合。
首先会介绍一下Transformer的由来以及结构,然后再介绍具体的实现代码,结合机器翻译实现。
Transformer
Motivation
RNN的递归无法并行,长距离依赖问题
- 尽管加入Atten的RNN解决了依赖问题,但是任然无法并行
CNN可以并行,但复杂度却和输入输出的规模成比例,而且考虑局部的信息
-
CNN不能直接用于处理变长的序列样本但可以实现并行计算,但非常占内存
-
基于CNN的Seq2Seq+attention
- 优点:基于CNN的Seq2Seq模型具有捕捉long distance dependency的能力,此外,最大的优点是可以并行化实现,效率比基于RNN的Seq2Seq模型高。
- 缺点:计算量较大,参数多
Model
整体结构
- 编码层——6层Attention堆叠,包含2个子层
- 解码层——6层Attention堆叠,包含3个子层
- 子结构——Attention
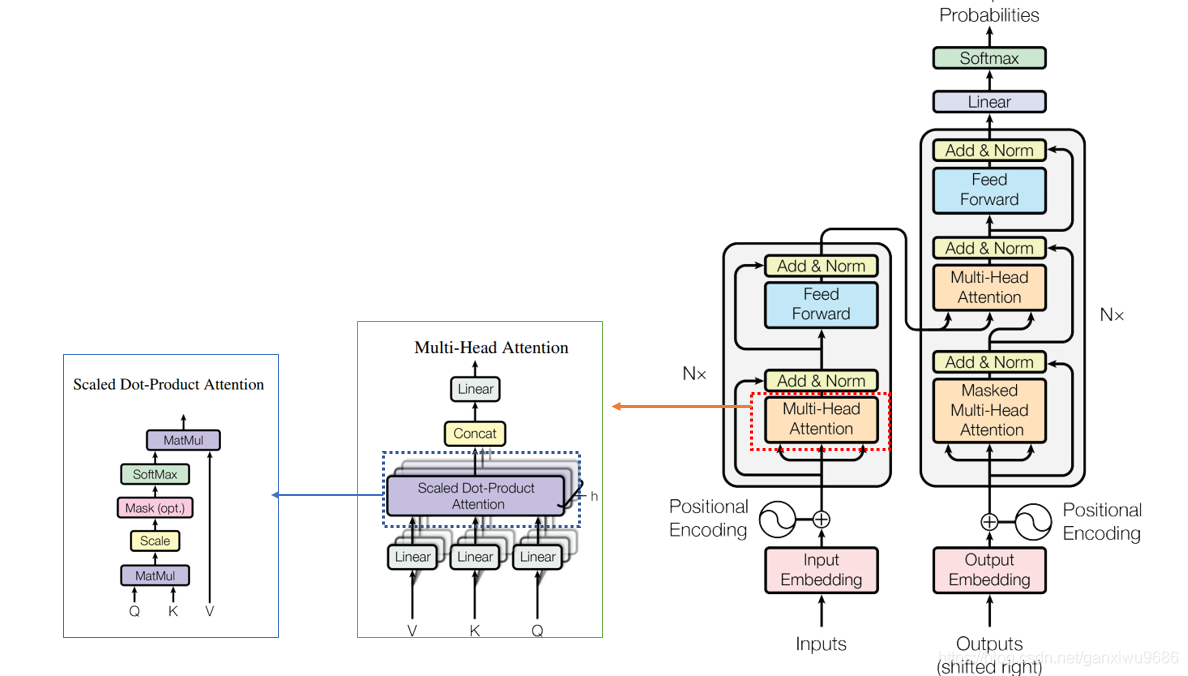
注意力层–Scaled Dot-Product Attention
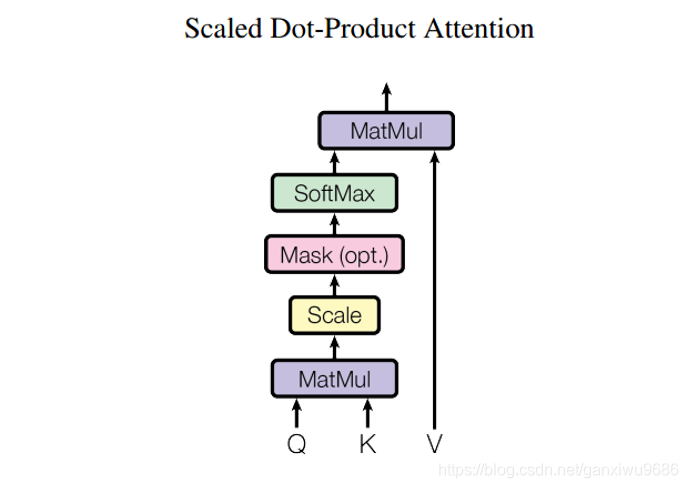
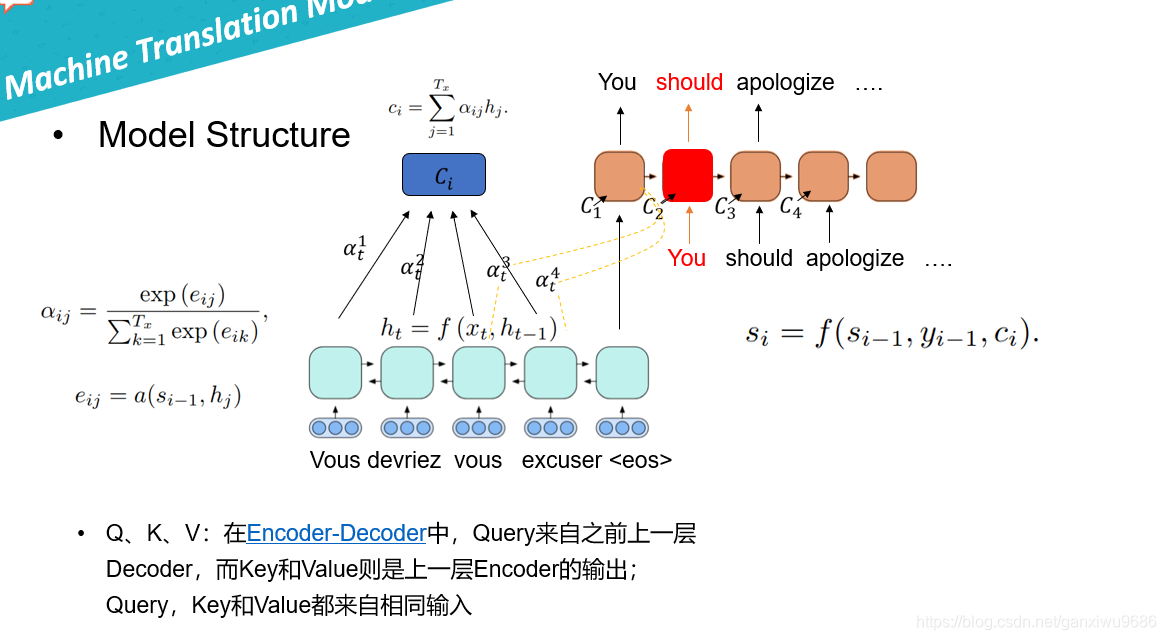
Q、K、V:在Encoder-Decoder中,Query来自之前上一层Decoder,而Key和Value则是上一层Encoder的输出;Query,Key和Value都来自相同输入

additive attention vs dot-product attention
- faster and more space-efficient in practice
dk很大的话,使得点乘的结果过大,经过softmax之后的梯度很小,不利于反向传播的进行,所以我们通过对点乘的结果进行尺度化。
区别于之前的做法,特意画了一个图:
注意力层-- Multi-Head Attention

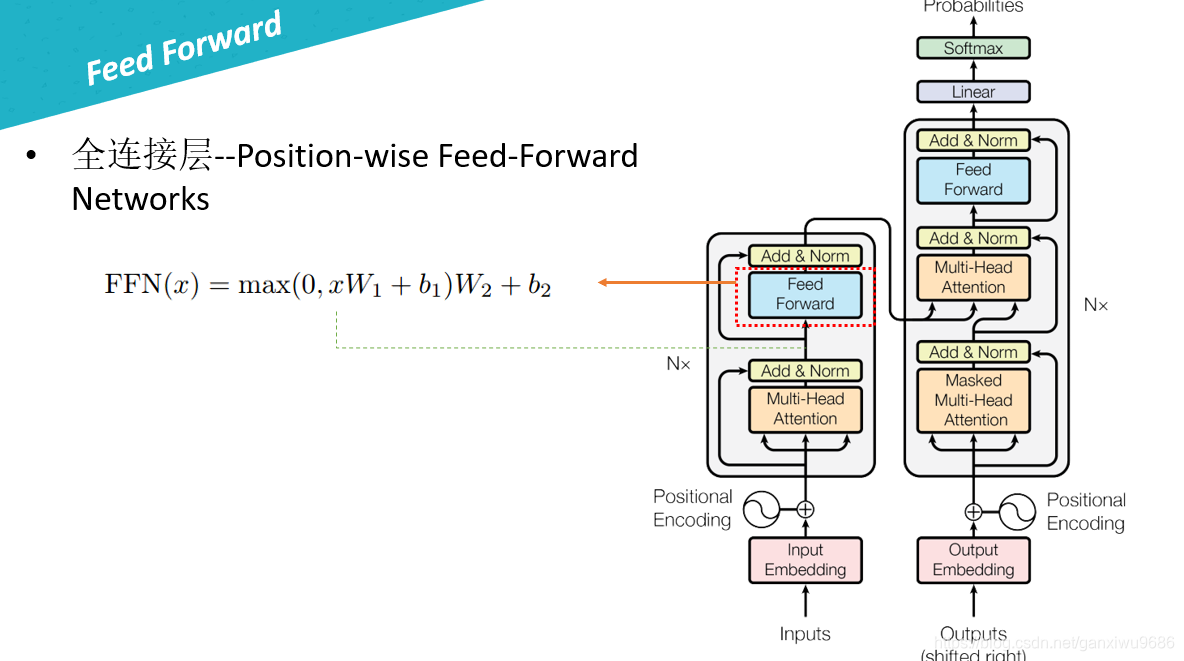
接着跟一层全连接:
因为transformer他没有考虑句子的顺序信息,因此在输入之前增加了一个Positional encoding。
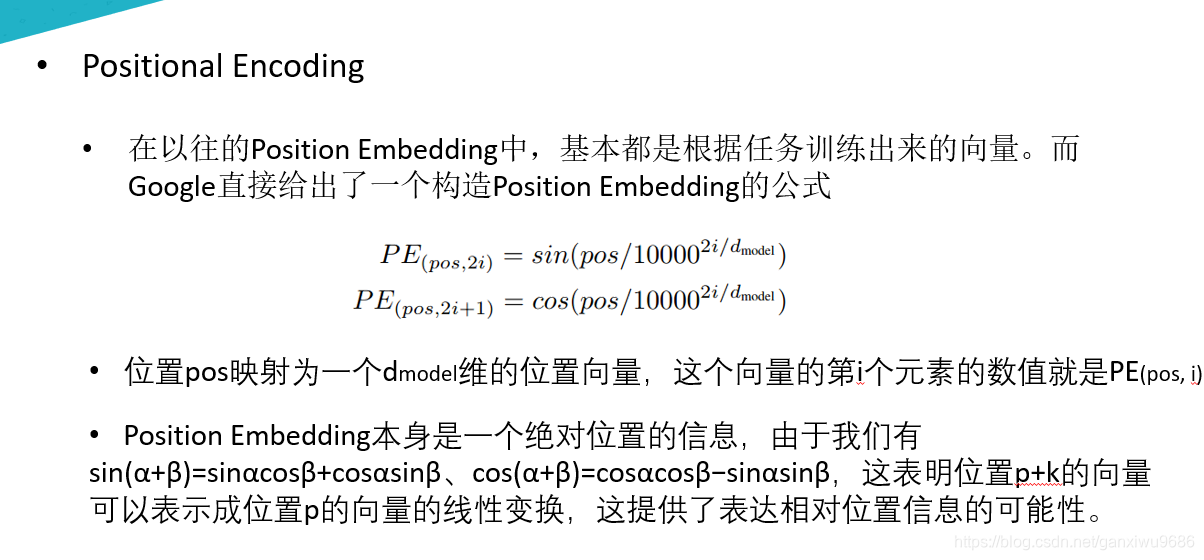
Positional Encoding
Since our model contains no recurrence and no convolution, in order for the model to make use of the order of the sequence
使网络可以获得输入序列的位置(positions)之间的一个相对或者绝对位置信息

理论讲完了,下面结合代码实现每一个Module
代码部分
Scaled dot-product attention的实现
import torch
import torch.nn as nn


class ScaledDotProductAttention(nn.Module):
    """Scaled dot-product attention mechanism."""

    def __init__(self, attention_dropout=0.0):
        super(ScaledDotProductAttention, self).__init__()
        self.dropout = nn.Dropout(attention_dropout)
        self.softmax = nn.Softmax(dim=2)

    def forward(self, q, k, v, scale=None, attn_mask=None):
        """前向传播.

        Args:
        	q: Queries张量,形状为[B, L_q, D_q]
        	k: Keys张量,形状为[B, L_k, D_k]
        	v: Values张量,形状为[B, L_v, D_v],一般来说就是k
        	scale: 缩放因子,一个浮点标量
        	attn_mask: Masking张量,形状为[B, L_q, L_k]

        Returns:
        	上下文张量和attetention张量
        """
        attention = torch.bmm(q, k.transpose(1, 2))
        if scale:
        	attention = attention * scale
        if attn_mask:
        	# 给需要mask的地方设置一个负无穷
        	attention = attention.masked_fill_(attn_mask, -np.inf)
		# 计算softmax
        attention = self.softmax(attention)
		# 添加dropout
        attention = self.dropout(attention)
		# 和V做点积
        context = torch.bmm(attention, v)
        return context, attention
Multi-head attention的实现
import torch
import torch.nn as nn


class MultiHeadAttention(nn.Module):

    def __init__(self, model_dim=512, num_heads=8, dropout=0.0):
        super(MultiHeadAttention, self).__init__()

        self.dim_per_head = model_dim // num_heads
        self.num_heads = num_heads
        self.linear_k = nn.Linear(model_dim, self.dim_per_head * num_heads)
        self.linear_v = nn.Linear(model_dim, self.dim_per_head * num_heads)
        self.linear_q = nn.Linear(model_dim, self.dim_per_head * num_heads)

        self.dot_product_attention = ScaledDotProductAttention(dropout)
        self.linear_final = nn.Linear(model_dim, model_dim)
        self.dropout = nn.Dropout(dropout)
		# multi-head attention之后需要做layer norm
        self.layer_norm = nn.LayerNorm(model_dim)

    def forward(self, key, value, query, attn_mask=None):
		# 残差连接
        residual = query

        dim_per_head = self.dim_per_head
        num_heads = self.num_heads
        batch_size = key.size(0)

        # linear projection
        key = self.linear_k(key)
        value = self.linear_v(value)
        query = self.linear_q(query)

        # split by heads
        key = key.view(batch_size * num_heads, -1, dim_per_head)
        value = value.view(batch_size * num_heads, -1, dim_per_head)
        query = query.view(batch_size * num_heads, -1, dim_per_head)

        if attn_mask:
            attn_mask = attn_mask.repeat(num_heads, 1, 1)
        # scaled dot product attention
        scale = (key.size(-1) // num_heads) ** -0.5
        context, attention = self.dot_product_attention(
          query, key, value, scale, attn_mask)

        # concat heads
        context = context.view(batch_size, -1, dim_per_head * num_heads)

        # final linear projection
        output = self.linear_final(context)

        # dropout
        output = self.dropout(output)

        # add residual and norm layer
        output = self.layer_norm(residual + output)

        return output, attention
Residual connection
这个残差连接比较简单,目的就是减少梯度消失的影响。
def residual(sublayer_fn,x):
	return sublayer_fn(x)+x
实际操作只要 x + F ( x ) x + F(x) x+F(x)
Layer normalization
Normalization有很多种,但是它们都有一个共同的目的,那就是把输入转化成均值为0方差为1的数据。我们在把数据送入激活函数之前进行normalization(归一化),因为我们不希望输入数据落在激活函数的饱和区。
Batch Normalization
首先介绍一下Batch Normalization,目前常用的深度学习基础模型包括前向神经网络(MLP),CNN 和 RNN。目BN 在这些基础网络结构都有尝试,总体而言,BN 在 MLP 和 CNN 是非常成功的,在 RNN 上效果不明显。

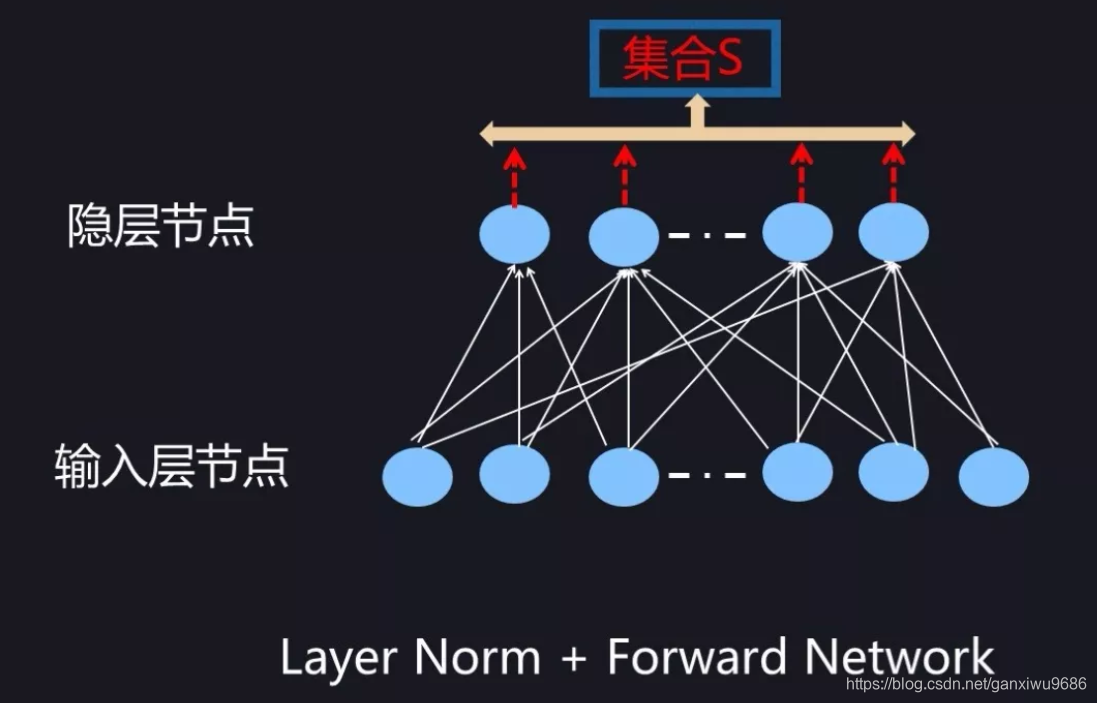
对于前向神经网络来说,BatchNorm 在计算隐层某个神经元 k 激活的规范值的时候,对应的神经元集合 S 范围是如何划定呢?图 6 给出了示意。因为对于 Mini-Batch 训练方法来说,根据 Loss 更新梯度使用 Batch 中所有实例来做,所以对于神经元 k 来说,假设某个 Batch 包含 n 个训练实例,那么每个训练实例在神经元 k 都会产生一个激活值,也就是说 Batch 中 n 个训练实例分别通过同一个神经元 k 的时候产生了 n 个激活值,BatchNorm 的集合 S 选择入围的神经元就是这 n 个同一个神经元被 Batch 不同训练实例激发的激活值。划定集合 S 的范围后,归一化即可。
Layer normalization
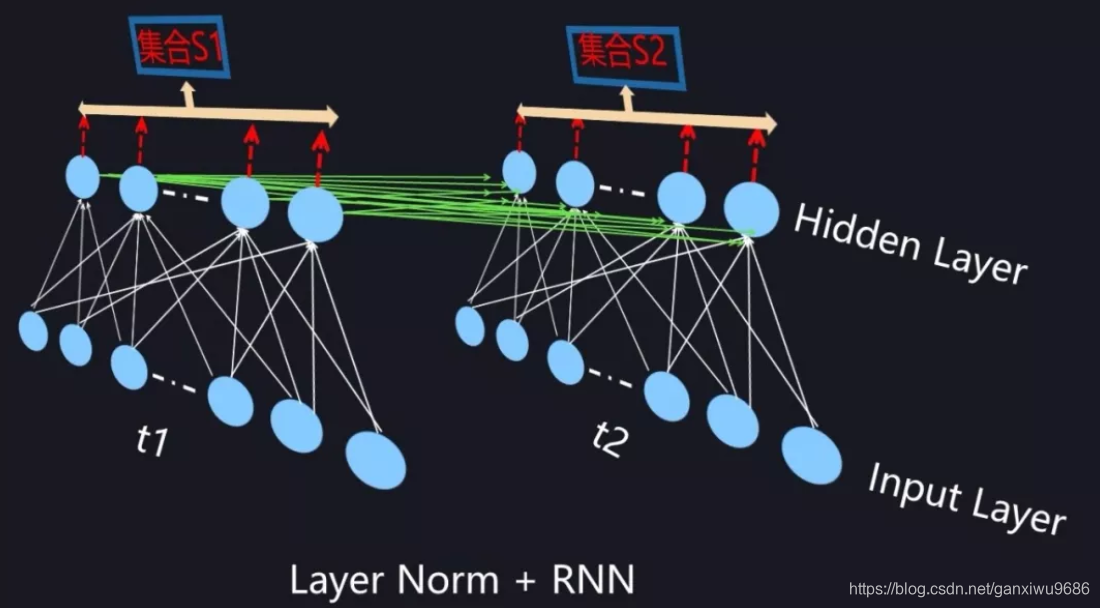
为了能够在只有当前一个训练实例的情形下,也能找到一个合理的统计范围,一个最直接的想法是:MLP 的同一隐层自己包含了若干神经元;同理,CNN 中同一个卷积层包含 k 个输出通道,每个通道包含 mn 个神经元,整个通道包含了 km*n 个神经元;类似的,RNN 的每个时间步的隐层也包含了若干神经元。那么我们完全可以直接用同层隐层神经元的响应值作为集合 S 的范围来求均值和方差。这就是 Layer Normalization 的基本思想。
实现代码如下:
import torch
import torch.nn as nn


class LayerNorm(nn.Module):
    """实现LayerNorm。其实PyTorch已经实现啦,见nn.LayerNorm。"""

    def __init__(self, features, epsilon=1e-6):
        """Init.

        Args:
            features: 就是模型的维度。论文默认512
            epsilon: 一个很小的数,防止数值计算的除0错误
        """
        super(LayerNorm, self).__init__()
        # alpha
        self.gamma = nn.Parameter(torch.ones(features))
        # beta
        self.beta = nn.Parameter(torch.zeros(features))
        self.epsilon = epsilon

    def forward(self, x):
        """前向传播.

        Args:
            x: 输入序列张量,形状为[B, L, D]
        """
        # 根据公式进行归一化
        # 在X的最后一个维度求均值,最后一个维度就是模型的维度
        mean = x.mean(-1, keepdim=True)
        # 在X的最后一个维度求方差,最后一个维度就是模型的维度
        std = x.std(-1, keepdim=True)
        return self.gamma * (x - mean) / (std + self.epsilon) + self.beta
两种Mask
就是对某些值进行mask,使其不产生效果。Transformer模型里面涉及两种mask。分别是padding mask和sequence mask。
padding mask在所有的scaled dot-product attention里面都需要用到,而sequence mask只有在decoder的self-attention里面用到。目的是解码第t个词的时候,不希望看到t+1之后的词。
Padding mask
什么是padding mask呢?我们的每个批次输入序列长度是不一样的!也就是说,我们要对输入序列进行对齐!具体来说,就是给在较短的序列后面填充0。因为这些填充的位置,其实是没什么意义的,所以我们的attention机制不应该把注意力放在这些位置上,所以我们需要进行一些处理。
具体的做法是,把这些位置的值设置一个非常大的负数(可以是负无穷)(可以见ScaledDotProductAttention类),这样的话,经过softmax,这些位置的概率就会接近0!
def get_attn_pad_mask(seq_q, seq_k):
    assert seq_q.dim() == 2 and seq_k.dim() == 2
    b_size, len_q = seq_q.size()
    b_size, len_k = seq_k.size()
    pad_attn_mask = seq_k.data.eq(0).unsqueeze(1)  # b_size x 1 x len_k
    return pad_attn_mask.expand(b_size, len_q, len_k)  # b_size x len_q x len_k
Sequence mask
文章前面也提到,sequence mask是为了使得decoder不能看见未来的信息。也就是对于一个序列,在time_step为t的时刻,我们的解码输出应该只能依赖于t时刻之前的输入,而不能依赖t之后的输出。因此我们需要想一个办法,把t之后的信息给隐藏起来。
那么具体怎么做呢?也很简单:产生一个上三角矩阵,上三角的值全为1,下三角的值全为0,对角线也是0。把这个矩阵作用在每一个序列上,就可以达到我们的目的.
def get_attn_subsequent_mask(seq):
    assert seq.dim() == 2
    attn_shape = [seq.size(0), seq.size(1), seq.size(1)]
    subsequent_mask = np.triu(np.ones(attn_shape), k=1)
    subsequent_mask = torch.from_numpy(subsequent_mask).byte()
    if seq.is_cuda:
        subsequent_mask = subsequent_mask.cuda()

    return subsequent_mask
Positional encoding的实现
PE的实现也不难,按照论文的公式即可。代码如下:
import torch
import torch.nn as nn


class PositionalEncoding(nn.Module):

    def __init__(self, d_model, max_seq_len):
        """初始化。

        Args:
            d_model: 一个标量。模型的维度,论文默认是512
            max_seq_len: 一个标量。文本序列的最大长度
        """
        super(PositionalEncoding, self).__init__()

        # 根据论文给的公式,构造出PE矩阵
        position_encoding = np.array([
          [pos / np.pow(10000, 2.0 * (j // 2) / d_model) for j in range(d_model)]
          for pos in range(max_seq_len)])
        # 偶数列使用sin,奇数列使用cos
        position_encoding[:, 0::2] = np.sin(position_encoding[:, 0::2])
        position_encoding[:, 1::2] = np.cos(position_encoding[:, 1::2])

        # 在PE矩阵的第一行,加上一行全是0的向量,代表这`PAD`的positional encoding
        # 在word embedding中也经常会加上`UNK`,代表位置单词的word embedding,两者十分类似
        # 那么为什么需要这个额外的PAD的编码呢?很简单,因为文本序列的长度不一,我们需要对齐,
        # 短的序列我们使用0在结尾补全,我们也需要这些补全位置的编码,也就是`PAD`对应的位置编码
        pad_row = torch.zeros([1, d_model])
        position_encoding = torch.cat((pad_row, position_encoding))

        # 嵌入操作,+1是因为增加了`PAD`这个补全位置的编码,
        # Word embedding中如果词典增加`UNK`,我们也需要+1。看吧,两者十分相似
        self.position_encoding = nn.Embedding(max_seq_len + 1, d_model)
        self.position_encoding.weight = nn.Parameter(position_encoding,
                                                     requires_grad=False)
    def forward(self, input_len):
        """神经网络的前向传播。

        Args:
          input_len: 一个张量,形状为[BATCH_SIZE, 1]。每一个张量的值代表这一批文本序列中对应的长度。

        Returns:
          返回这一批序列的位置编码,进行了对齐。
        """

        # 找出这一批序列的最大长度
        max_len = torch.max(input_len)
        tensor = torch.cuda.LongTensor if input_len.is_cuda else torch.LongTensor
        # 对每一个序列的位置进行对齐,在原序列位置的后面补上0
        # 这里range从1开始也是因为要避开PAD(0)的位置
        input_pos = tensor(
          [list(range(1, len + 1)) + [0] * (max_len - len) for len in input_len])
        return self.position_encoding(input_pos)
Position-wise Feed-Forward network
import torch
import torch.nn as nn


class PositionalWiseFeedForward(nn.Module):

    def __init__(self, model_dim=512, ffn_dim=2048, dropout=0.0):
        super(PositionalWiseFeedForward, self).__init__()
        self.w1 = nn.Conv1d(model_dim, ffn_dim, 1)
        self.w2 = nn.Conv1d(model_dim, ffn_dim, 1)
        self.dropout = nn.Dropout(dropout)
        self.layer_norm = nn.LayerNorm(model_dim)

    def forward(self, x):
        output = x.transpose(1, 2)
        output = self.w2(F.relu(self.w1(output)))
        output = self.dropout(output.transpose(1, 2))

        # add residual and norm layer
        output = self.layer_norm(x + output)
        return output
Transformer的实现
所有的细节都已经解释完了。现在来完成我们Transformer模型的代码。
首先,我们需要实现6层的encoder和decoder。
encoder代码实现如下:
import torch
import torch.nn as nn


class EncoderLayer(nn.Module):
	"""Encoder的一层。"""

    def __init__(self, model_dim=512, num_heads=8, ffn_dim=2018, dropout=0.0):
        super(EncoderLayer, self).__init__()

        self.attention = MultiHeadAttention(model_dim, num_heads, dropout)
        self.feed_forward = PositionalWiseFeedForward(model_dim, ffn_dim, dropout)

    def forward(self, inputs, attn_mask=None):

        # self attention
        context, attention = self.attention(inputs, inputs, inputs, padding_mask)

        # feed forward network
        output = self.feed_forward(context)

        return output, attention


class Encoder(nn.Module):
	"""多层EncoderLayer组成Encoder。"""

    def __init__(self,
               vocab_size,
               max_seq_len,
               num_layers=6,
               model_dim=512,
               num_heads=8,
               ffn_dim=2048,
               dropout=0.0):
        super(Encoder, self).__init__()

        self.encoder_layers = nn.ModuleList(
          [EncoderLayer(model_dim, num_heads, ffn_dim, dropout) for _ in
           range(num_layers)])

        self.seq_embedding = nn.Embedding(vocab_size + 1, model_dim, padding_idx=0)
        self.pos_embedding = PositionalEncoding(model_dim, max_seq_len)

    def forward(self, inputs, inputs_len):
        output = self.seq_embedding(inputs)
        output += self.pos_embedding(inputs_len)

        self_attention_mask = padding_mask(inputs, inputs)

        attentions = []
        for encoder in self.encoder_layers:
            output, attention = encoder(output, self_attention_mask)
            attentions.append(attention)

        return output, attentions
同样的,我们的decoder代码如下:
import torch
import torch.nn as nn


class DecoderLayer(nn.Module):

    def __init__(self, model_dim, num_heads=8, ffn_dim=2048, dropout=0.0):
        super(DecoderLayer, self).__init__()

        self.attention = MultiHeadAttention(model_dim, num_heads, dropout)
        self.feed_forward = PositionalWiseFeedForward(model_dim, ffn_dim, dropout)

    def forward(self,
              dec_inputs,
              enc_outputs,
              self_attn_mask=None,
              context_attn_mask=None):
        # self attention, all inputs are decoder inputs
        dec_output, self_attention = self.attention(
          dec_inputs, dec_inputs, dec_inputs, self_attn_mask)

        # context attention
        # query is decoder's outputs, key and value are encoder's inputs
        dec_output, context_attention = self.attention(
          enc_outputs, enc_outputs, dec_output, context_attn_mask)

        # decoder's output, or context
        dec_output = self.feed_forward(dec_output)

        return dec_output, self_attention, context_attention


class Decoder(nn.Module):

    def __init__(self,
               vocab_size,
               max_seq_len,
               num_layers=6,
               model_dim=512,
               num_heads=8,
               ffn_dim=2048,
               dropout=0.0):
        super(Decoder, self).__init__()

        self.num_layers = num_layers

        self.decoder_layers = nn.ModuleList(
          [DecoderLayer(model_dim, num_heads, ffn_dim, dropout) for _ in
           range(num_layers)])

        self.seq_embedding = nn.Embedding(vocab_size + 1, model_dim, padding_idx=0)
        self.pos_embedding = PositionalEncoding(model_dim, max_seq_len)

    def forward(self, inputs, inputs_len, enc_output, context_attn_mask=None):
        output = self.seq_embedding(inputs)
        output += self.pos_embedding(inputs_len)

        self_attention_padding_mask = padding_mask(inputs, inputs)
        seq_mask = sequence_mask(inputs)
        self_attn_mask = torch.gt((self_attention_padding_mask + seq_mask), 0)

        self_attentions = []
        context_attentions = []
        for decoder in self.decoder_layers:
            output, self_attn, context_attn = decoder(
            output, enc_output, self_attn_mask, context_attn_mask)
            self_attentions.append(self_attn)
            context_attentions.append(context_attn)

        return output, self_attentions, context_attentions
把encoder和decoder组成Transformer模型:
import torch
import torch.nn as nn


class Transformer(nn.Module):

    def __init__(self,
               src_vocab_size,
               src_max_len,
               tgt_vocab_size,
               tgt_max_len,
               num_layers=6,
               model_dim=512,
               num_heads=8,
               ffn_dim=2048,
               dropout=0.2):
        super(Transformer, self).__init__()

        self.encoder = Encoder(src_vocab_size, src_max_len, num_layers, model_dim,
                               num_heads, ffn_dim, dropout)
        self.decoder = Decoder(tgt_vocab_size, tgt_max_len, num_layers, model_dim,
                               num_heads, ffn_dim, dropout)

        self.linear = nn.Linear(model_dim, tgt_vocab_size, bias=False)
        self.softmax = nn.Softmax(dim=2)

    def forward(self, src_seq, src_len, tgt_seq, tgt_len):
        context_attn_mask = padding_mask(tgt_seq, src_seq)

        output, enc_self_attn = self.encoder(src_seq, src_len)

        output, dec_self_attn, ctx_attn = self.decoder(
          tgt_seq, tgt_len, output, context_attn_mask)

        output = self.linear(output)
        output = self.softmax(output)

        return output, enc_self_attn, dec_self_attn, ctx_attn
至此,Transformer模型已经实现了!
参考文章
参考代码
1.jadore801120/attention-is-all-you-need-pytorch
欢迎大家有问题及时给我留言!有关NLG方面的问题,也可以及时讨论,下一步博主要写的将会涉及到抽取式阅读理解任务,可能会进行一个综述类的介绍。
以及BERT、XLNET、ALBERT等预训练模型。喜欢的小伙伴可以点一下关注!


 1496
1496


 被折叠的 条评论
为什么被折叠?
被折叠的 条评论
为什么被折叠?
 到【灌水乐园】发言


