


Rsync 是 Linux 系统下的数据镜像备份工具,使用快速增量备份工具 Remote Sync 可以远程同步,可以在不同主机之间进行同步,可实现全量备份与增量备份,保持链接和权限,传输前执行压缩,因此非常适合用于架构集中式备份或异地备份等应用。
官方网站:https://rsync.samba.org/
与 SCP 的比较:scp 无法备份大量数据,类似 Windows 的复制。而 rsync 边复制,边统计,边比较。
- Rysnc 特性和优点
- 可以镜像保存整个目录树和文件系统。
- 可以很容易做到保持原来文件的属性、权限、时间、软硬链接等等。
- 无须特殊权限即可安装。
- 快速:第一次同步时 rsync 复制全部内容,但在下一次只传输修改过的文件。
- 压缩传输:rsync 在传输数据的过程中可以实行压缩及解压缩操作,因此可以使用更少的带宽。
- 安全性:可以使用 scp、ssh 等方式来传输文件,当然也可以通过直接的 socket 连接。选择性保持:符号连接,硬链接,文件属性,权限,时间等。
- 常见备份分类
- 完整备份:每次都备份所有数据。
- 差异备份:每次备份和第一次完全备份相比的“差异”部分数据。

- 增量备份:除第一次备份以外,每次只备份增长数据。

- RSYNC 原理
运行模式和端口:
采用 C/S 模式(客户端/服务器模式)[ 实际上是一个点到点的传输,直接使用 rsync 命令即可完成 ]
rsync 监听的端口:873 - 四个名词的解释:
发起端:负责发起 rsync 同步操作的客户机叫做发起端,通知服务器我要备份你的数据。
备份源:负责响应来自客户机 rsync 同步操作的服务器叫做备份源,需要备份的服务器。
服务端:运行 rsyncd 服务,一般来说,需要备份的服务器。
客户端:存放备份数据。

- 数据同步方式:
- 推 push:一台主机负责把数据传送给其他主机,服务器开销很大,比较适合后端服务器少的情况。
拉 pull:所有主机定时去找一台主机拉数据,可能就会导致数据缓慢。 -
从 数据源服务器 往 备份服务器 push (推,相当于备份操作)
-
从 数据源服务器 往 备份服务器 pull (拉,相当于还原操作)
- 推:目的主机配置为 rsync 服务器,源主机周期性的使用 rsync 命令把要同步的目录推过去(需要备份的机器是客户端,存储备份的机器是服务端)。
拉:源主机配置为 rsync 服务器,目的主机周期性的使用 rsync 命令把要同步的目录拉过来(需要备份的机器是服务端,存储备份的机器是客户端)。
两种方案,rsync 都有对应的命令来实现。
rsync 命令示例说明 push 和 pull

- CentOS 7 系统之前 xinetd 管理 Rsync 工作原理

- 使用 rsync 来同步是先通过 xinetd 监听 873 号端口,如果 rsync 进来的是 873 号端口,那么xinetd 就会通知它所管辖的 rsync 服务来做回应,接下来就是 rsync 俩服务于之间的通讯。
-
rsync 命令的基本用法:
格式:rsync 【选项】 源文件 目标文件 -
常见的选项:
-a,--archive(存档) 归档模式,表示以递归的方式传输文件,并且保持文件属性,等同于加了参数-rlptgoD
-v:显示 rsync 过程中详细信息。
-r,–recursive 对子目录以递归模式处理
-l,--links 表示拷贝链接文件
-p , --perms 表示保持文件原有权限
-t , --times 表示保持文件原有时间
-g , --group 表示保持文件原有属用户组
-o , --owner 表示保持文件原有属主
-D , --devices 表示块设备文件信息
-z , --compress 表示压缩传输
-H 表示硬连接文件
-A 保留 ACL 属性信息
-P 显示传输进度
--delete 删除那些目标位置有而原始位置没有的文件
例: rsync --delete /原始位置(要同步的数据) username@192.168.2.2:/目标位置 -
--password-file=/etc/rsync.passwd 从文件读取用户名、密码
-
实验环境
-
数据服务器 CentOS 8.3.2011 192.168.2.2
备份服务器 CentOS 7.8.2003 192.168.2.3 -
iptables、selinux 均为关闭状态,firewalld 已经添加 873 端口
-
备份(push) C8 的 /usr/share/nginx/html/ 目录下所有文件到 C7 的/bak/databak
-
sudo rsync -avP --delete /usr/share/nginx/html/ root@192.168.2.3:/bak/databak PS:注意这里的斜杠,不然会将 html 目录一同备份!
-
-a,--archive(存档) 归档模式,表示以递归的方式传输文件,并且保持文件属性,等同于加了参数-rlptgoD
-z , --compress 表示传输前压缩
-P 显示传输进度
--delete 删除那些目标位置有而原始位置没有的文件,保障源文件和目标文件一致


- 在备份服务器端查看文件数量、大小及权限是否一致


- 移除 C8 服务器端的文件,从 C7 pull 还原


- 执行 还原 (pull)操作
- rsync -avzP root@192.168.2.3:/bak/databak/ /usr/share/nginx/html/
- PS:注意这里的斜杠,不然会将 databak 目录一同还原!


-
不加 / 会将 html 一同备份


- 使用 ssh 密钥实现无交互备份。做成脚本,将 C8 的数据,定期备份到 C7 上
- 首先实现 ssh 密钥无密码登陆


- 编写 shell 脚本 实现自动备份


- 加入 crontab 计划任务

-
安装 Rsync 服务,实现非系统用户备份
-
需要关闭 selinux,否则即使创建/etc/rsyncd.conf 文件之后去启动服务也不会生效。
-
centos6/8 系统使用如下方法启动 rsync
-
yum -y install xinetd rsync
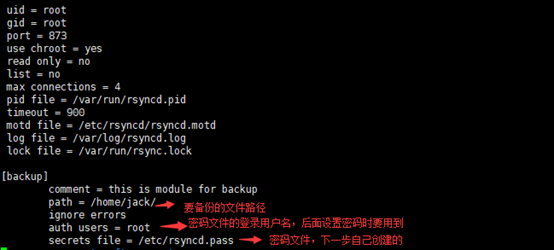
vim /etc/rsyncd.conf -
#Rsync server
uid = root #运行进程的身份
gid = root #运行进程的组
address =192.168.2.2
port = 873
use chroot = yes #是否锁定家目录
max connections = 100 #最大连接数
timeout = 600 #超时时间
log file = /var/log/rsyncd.log #日志文件
ignore errors #忽略错误
read only = false #设置服务端文件读写权限
hosts allow = 192.168.2.0/24 #*代表所有
hosts deny = 0.0.0.0/32
[wwwroot]
path = /usr/share/nginx/html/
comment = used for web-data root
list = yes
auth users = rsyncuser
secrets file = /etc/rsync.passwd

-
vim /etc/rsync.passwd
rsyncuser:password123 -
必须更改密码文件权限为600或者400!
-
chmod 600 /etc/rsync.passwd

-
临时开启 rsync 服务
-
rsync --daemon --config=/etc/rsyncd.conf
netstat -antpu|grep 873 -
配置 rsync 开机自启动
- vim /etc/xinetd.d/rsync
# default: off
# description: rsyncserver
# allows crc checksumming etc.
service rsync
{
disable = no
flags =IPv4
socket_type =stream
wait = no
user = root
server = /usr/bin/rsync
server_args = --daemon --config=/etc/rsyncd.conf
log_on_failure +=USERID
}
- systemctl enable xinetd --now


-
重启验证

-
测试
-
在 C7 上 安装 rsync 从 C8 pull 数据
- 创建密码文件
- vim /etc/rsync.passwd
password123 - 注意文件权限必须为 600或者400
- chmod 600 /etc/rsync.passwd

- rsync -avzP rsyncuser@192.168.2.2::wwwroot /bak/databak/ --delete --password-file=/etc/rsync.passwd

- 测试
-
删除 C8 上的源文件,从 C7 恢复


-
rsync+sersync 实现数据实时同步
- C8 安装 sersync、C7 安装 rsync 服务
sersync 服务器(数据源,源机器):C8 192.168.2.2
rsync 客户端(备份端,目标机器):C7 192.168.2.3 -
特点
- sersync 可以记录被监听目录中发生变化的(增,删,改)具体某个文件或目录的名字。
- rsync 在同步时,只同步发生变化的文件或目录(每次发生变化的数据相对整个同步目录数据来说很小,rsync 在遍历查找对比文件时,速度很快),因此效率很高。
-
同步过程和原理
- 用户实时的往 sersync 服务器上写入更新文件数据。
- 此时需要在同步主服务器(C8)上配置 sersync 服务。
- 在另一台服务器(C7)开启 rsync 守护进程服务,以同步拉取来自 sersync 服务器上的数据。
-
或者在另一台服务器(C7)开启 rsync 守护进程服务,使 sersync (C8) push 文件过来,生产环境一般采取此种方式。

- 通过 rsync 的守护进程服务后可以发现,实际上 sersync 就是监控本地的数据写入或更新事件,然后,在调用 rsync 客户端的命令,将写入或更新事件对应的文件通过 rsync 推送到目标服务器
- 下载 sersync
在 google code 下载 sersync 的可执行文件版本,里面有配置文件与可执行文件
wget https://storage.googleapis.com/google-code-archive-downloads/v2/code.google.com/sersync/sersync2.5.4_64bit_binary_stable_final.tar.gz

- 将解压好的文件夹更名
- mv ./GNU-Linux-x86 ./sersync
- 进入文件夹备份原始文件
- cd sersync/
- cp confxml.xml confxml.xml.bak

- 编辑 配置文件
- vim confxml.xml
- 修改配置文件中的以下内容:
<sersync>
<localpath watch="/usr/share/nginx/html"> #本地同步数据目录。
<remote ip="192.168.2.3" name="wwwroot"/> #备份服务器IP地址以及 rsync 模块名称.
<rsync>
<commonParams params="-artuz"/>
<auth start="true" users="rsyncuser" passwordfile="/etc/rsync.passwd"/> #认证部分(rsync 密码认证)
<userDefinedPort start="false" port="874"/><!-- port=874 --> <timeout start="false" time="100"/><!-- timeout=100 -->
<ssh start="false"/>

- 开启 sersync 守护进程同步数据。
/home/gf/sersync/sersync2 -d -r -o /home/gf/sersync/confxml.xml - -d 在后台运行
- -r 先执行一遍完整同步
- -o 指定配置文件

-
然后在 C7 上安装、启动 rsyncd
- yum -y install xinetd rsync
- systemctl enable xinetd --now
- vim /etc/xinetd.d/rsync
-
# default: off
# description: rsyncserver
# allows crc checksumming etc.
service rsync{
disable = no
flags =IPv4
socket_type =stream
wait = no
user = root
server = /usr/bin/rsync
server_args = --daemon --config=/etc/rsyncd.conf
log_on_failure +=USERID
}

-
编辑 /etc/syncd.conf

-
修改 C8 和 C7 的 /etc/rsync.passwd
-
注意该文件的属性必须是 600,名称必须一样!!


- 编写脚本监控服务运行


- 在 C8 的/usr/share/nginx/html 目录 增加、删除、或改目录文件。
查看 C7 /web-back 目录的变化
watch ls -l


-
设置 sersync 监控开机自动执行
编辑 rc.local 文件,在最后添加一行。 - vim /etc/rc.d/rc.local
/home/gf/sersync/sersync2 -d -r -o /home/gf/sersync/confxml.xml #设置开机自动运行脚本。
chmod 755 /etc/rc.d/rc.local #添加执行权限。

- 重启验证


-
使用脚本监控 sersync 是否正常运行
vim /opt/check_sersync.sh #编辑脚本,添加以下代码。
#!/bin/sh
sersync="/home/gf/sersync/sersync2"
confxml="/home/gf/sersync/confxml.xml"
status=$(ps aux |grep 'sersync2'|grep -v 'grep'|wc -l)
if [[ $status -eq 0 ]]; then
$sersync -d -r -o $confxml &
else
exit 0;
fi

- 加入计划任务


- 重启验证


rsync 常见错误与解决方法整理
- 在rsyncd.log日志文件里面或.err文件里面查看
- 注意windows下面我们需要给SvcwRsync用户,管理同步目录的所有权限,基本上这样就可以了
- 问题一:
- @ERROR: chroot failed
- rsync error: error starting client-server protocol (code 5) at main.c(1522) [receiver=3.0.3]
- 原因:
- 服务器端的目录不存在或无权限,创建目录并修正权限可解决问题。
- 问题二:
- @ERROR: auth failed on module tee
- rsync error: error starting client-server protocol (code 5) at main.c(1522) [receiver=3.0.3]
- 原因:
- 服务器端该模块(tee)需要验证用户名密码,但客户端没有提供正确的用户名密码,认证失败。
- 提供正确的用户名密码解决此问题。
- 问题三:
- @ERROR: Unknown module ‘tee_nonexists'
- rsync error: error starting client-server protocol (code 5) at main.c(1522) [receiver=3.0.3]
- 原因:
- 服务器不存在指定模块。提供正确的模块名或在服务器端修改成你要的模块以解决问题。
- 问题1:
- 在client上遇到问题:
- rsync -auzv --progress --password-file=/etc/rsync.pas root@192.168.133.128::backup /home/
- rsync: could not open password file "/etc/rsync.pas": No such file or directory (2)
- Password:
- @ERROR: auth failed on module backup
- rsync error: error starting client-server protocol (code 5) at main.c(1506) [Receiver=3.0.7]
- 遇到这个问题:client端没有设置/etc/rsync.pas这个文件,而在使用rsync命令的时候,加了这个参数--
- password-file=/etc/rsync.pas
- 问题2:
- rsync -auzv --progress --password-file=/etc/rsync.pas root@192.168.133.128::backup /home/
- @ERROR: auth failed on module backup
- rsync error: error starting client-server protocol (code 5) at main.c(1506) [Receiver=3.0.7]
- 遇到这个问题:client端已经设置/etc/rsync.pas这个文件,里面也设置了密码111111,和服务器一致,但是
- 服务器段设置有错误,服务器端应该设置/etc/rsync.pas ,里面内容root:111111 ,这里登陆名不可缺少
- 问题3:
- rsync -auzv --progress --password-file=/etc/rsync.pas root@192.168.133.128::backup /home/
- @ERROR: chdir failed
- rsync error: error starting client-server protocol (code 5) at main.c(1506) [Receiver=3.0.7]
- 遇到这个问题,是因为服务器端的/home/backup 其中backup这个目录并没有设置,所以提示:chdir failed
- 问题4:
- rsync: write failed on "/home/backup2010/wensong": No space left on device (28)
- rsync error: error in file IO (code 11) at receiver.c(302) [receiver=3.0.7]
- rsync: connection unexpectedly closed (2721 bytes received so far) [generator]
- rsync error: error in rsync protocol data stream (code 12) at io.c(601) [generator=3.0.7]
- 磁盘空间不够,所以无法操作。
- 可以通过df /home/backup2010 来查看可用空间和已用空间
- 问题5:网络收集问题
- 1、权限问题
- 类似如下的提示:rsync: opendir "/kexue" (in dtsChannel) failed: Permission denied (13)注意查看同步的目录权限是否为755
- 2、time out
- rsync: failed to connect to 203.100.192.66: Connection timed out (110)
- rsync error: error in socket IO (code 10) at clientserver.c(124) [receiver=3.0.5]
- 检查服务器的端口netstat –tunlp,远程telnet测试。
- 可能因为客户端或者服务端的防火墙开启 导致无法通信,可以设置规则放行 rsync(873端口) 或者直接关闭防火墙。
- 还有一种在同步过程中可能会提示没有权限 (将同步目录加上SvcwRsync全部权限即可,更简单的方法就是将SvcwRsync设为管理员即可)
- 3、服务未启动
- rsync: failed to connect to 10.10.10.170: Connection refused (111)
- rsync error: error in socket IO (code 10) at clientserver.c(124) [receiver=3.0.5]
- 启动服务:rsync --daemon --config=/etc/rsyncd.conf
- 4、磁盘空间满
- rsync: recv_generator: mkdir "/teacherclubBackup/rsync……" failed: No space left on device (28)
- *** Skipping any contents from this failed directory ***
- 5、Ctrl+C或者大量文件
- rsync error: received SIGINT, SIGTERM, or SIGHUP (code 20) at rsync.c(544) [receiver=3.0.5]
- rsync error: received SIGINT, SIGTERM, or SIGHUP (code 20) at rsync.c(544) [generator=3.0.5]
- 说明:导致此问题多半是服务端服务没有被正常启动,到服务器上去查查服务是否有启动,然后查看下 /var/run/rsync.pid 文件是否存在,最干脆的方法是杀死已经启动了服务,然后再次启动服务或者让脚本加入系统启动服务级别然后shutdown -r now服务器
- 6、xnetid启动
- rsync: read error: Connection reset by peer (104)
- rsync error: error in rsync protocol data stream (code 12) at io.c(759) [receiver=3.0.5]
- 查看rsync日志
- rsync: unable to open configuration file "/etc/rsyncd.conf": No such file or directory
- xnetid查找的配置文件位置默认是/etc下,根据具体情况创建软链接。例如:
- ln -s /etc/rsyncd/rsyncd.conf /etc/rsyncd.conf
- 或者更改指定默认的配置文件路径,在/etc/xinetd.d/rsync配置文件中。
- Rsync configure:
- 配置一:
- ignore errors
- 说明:这个选项最好加上,否则再很多crontab的时候往往发生错误你也未可知,因为你不可能天天去看每时每刻去看log,不加上这个出现错误的几率相对会很高,因为任何大点的项目和系统,磁盘IO都是一个瓶颈
- Rsync error:
- 错误一:
- @ERROR: auth failed on module xxxxx
- rsync: connection unexpectedly closed (90 bytes read so far)
- rsync error: error in rsync protocol data stream (code 12) at io.c(150)
- 说明:这是因为密码设置错了,无法登入成功,检查一下rsync.pwd,看客服是否匹配。还有服务器端没启动rsync 服务也会出现这种情况。
- 错误二:
- password file must not be other-accessible
- continuing without password file
- Password:
- 说明:这是因为rsyncd.pwd rsyncd.sec的权限不对,应该设置为600。如:chmod 600 rsyncd.pwd
- 错误三:
- @ERROR: chroot failed
- rsync: connection unexpectedly closed (75 bytes read so far)
- rsync error: error in rsync protocol data stream (code 12) at io.c(150)
- 说明:这是因为你在 rsync.conf 中设置的 path 路径不存在,要新建目录才能开启同步
- 错误四:
- rsync: failed to connect to 218.107.243.2: No route to host (113)
- rsync error: error in socket IO (code 10) at clientserver.c(104) [receiver=2.6.9]
- 说明:防火墙问题导致,这个最好先彻底关闭防火墙,排错的基本法就是这样,无论是S还是C,还有ignore errors选项问题也会导致
- 错误五:
- @ERROR: access denied to www from unknown (192.168.1.123)
- rsync: connection unexpectedly closed (0 bytes received so far) [receiver]
- rsync error: error in rsync protocol data stream (code 12) at io.c(359)
- 说明:此问题很明显,是配置选项host allow的问题,初学者喜欢一个允许段做成一个配置,然后模块又是同一个,致使导致
- 错误六:
- rsync error: received SIGINT, SIGTERM, or SIGHUP (code 20) at rsync.c(244) [generator=2.6.9]
- rsync error: received SIGUSR1 (code 19) at main.c(1182) [receiver=2.6.9]
- 说明:导致此问题多半是服务端服务没有被正常启动,到服务器上去查查服务是否有启动,然后查看下 /var/run/rsync.pid 文件是否存在,最干脆的方法是杀死已经启动了服务,然后再次启动服务或者让脚本加入系统启动服务级别然后shutdown -r now服务器
- 错误七:
- rsync: read error: Connection reset by peer (104)
- rsync error: error in rsync protocol data stream (code 12) at io.c(604) [sender=2.6.9]
- 说明:原数据目录里没有数据存在
-
rsync 错误与解决方法整理补充篇
- 查看系统日志
- 命令:cat /var/log/messages
- 问题一:
- @ERROR: auth failed on module bachup
- rsync error: error starting client-server protocol (code 5) at main.c(1522) [receiver=3.0.3]
- 原因:服务器端该模块(backup)需要验证用户名密码,但客户端没有提供正确的用户名密码,认证失败。 提供正确的用户名密码解决此问题。
- 问题二:110错误 -time out
- rsync: failed to connect to 203.100.192.66: Connection timed out (110)
- rsync error: error in socket IO (code 10) at clientserver.c(124) [receiver=3.0.5]
- 原因:
- 检查服务器的端口netstat –tunlp,远程telnet测试。 可能因为客户端或者服务端的防火墙开启 导致无法通信,可以设置规则放行 rsync(873端口) 或者直接关闭防火墙。
- 在这里博主是重启过服务器,然后就报110了,直接开启rsync服务就行。
- 命令:
service rsyncd start - 问题三:113错误 -防火墙
- rsync: failed to connect to 218.107.243.2: No route to host (113) rsync error: error in socket IO (code 10) at clientserver.c(104) [receiver=2.6.9]
- 原因:
- 防火墙问题导致,这个很简单,关闭防火墙就可以。不过博主还是被困在这里几个小时,因为linux防火墙分两种:
- -iptable和-firewall
- 认识到这个问题首先查看系统的防火墙种类,查看防火墙状态即可
- service iptable status
- firewall-cmd --state
- 确定防火墙种类后再按对应方法将防火墙关闭即可。
- 问题四:1516错误
- @ERROR: auth failed on module backup
- rsync error: error starting client-server protocol (code 5) at main.c(1516) [Receiver=3.0.9]

- 解决:这个问题错误差别很大,可查看系统日志查看错误,再搜索解决方法。
- 注意:一般这种情况都建立在可以连通的基础。去服务端查看系统日志,可以查看相关错误。
- 命令:cat /var/log/massages
- cat /var/log/rsyncd.log


 1686
1686


 被折叠的 条评论
为什么被折叠?
被折叠的 条评论
为什么被折叠?
 到【灌水乐园】发言


