


写本篇博客原由:
最近本人在学习Tomcat源码,在研读StandardContext的时候,其中有一个关键类ContextConfig,也就是下面代码:
processServletContainerInitializers(); 方法的调用地方,发现其内部在加载处理 javax.servlet.ServletContainerInitializer,把对象实例保存到 ContextConfig 的 Map 中,待 Wrapper 子容器添加到 StandardContext 子容器中之后,再把 ServletContainerInitializer 加入 ServletContext 中。ServletContainerInitializer 是 servlet3.0 提供的一个 SPI,可以通过 HandlesTypes 筛选出相关的 servlet 类,并可以对 ServletContext 进行额外处理,实现了 ServletContainerInitializer 接口,和 jdk 提供的其它 SPI 一样,需要在 META-INF/services/javax.servlet.ServletContainerInitializer 文件中指定该类名。
然后便想研究一下 SPI机制在servlet3.0的应用,之前也有一篇关于SPI机制的文章。
https://blog.csdn.net/gaohaicheng123/article/details/105824988
/**
     * Scan the web.xml files that apply to the web application and merge them
     * using the rules defined in the spec. For the global web.xml files,
     * where there is duplicate configuration, the most specific level wins. ie
     * an application's web.xml takes precedence over the host level or global
     * web.xml file.
     */
    protected void webConfig() {
        /*
         * Anything and everything can override the global and host defaults.
         * This is implemented in two parts
         * - Handle as a web fragment that gets added after everything else so
         *   everything else takes priority
         * - Mark Servlets as overridable so SCI configuration can replace
         *   configuration from the defaults
         */

        /*
         * The rules for annotation scanning are not as clear-cut as one might
         * think. Tomcat implements the following process:
         * - As per SRV.1.6.2, Tomcat will scan for annotations regardless of
         *   which Servlet spec version is declared in web.xml. The EG has
         *   confirmed this is the expected behaviour.
         * - As per http://java.net/jira/browse/SERVLET_SPEC-36, if the main
         *   web.xml is marked as metadata-complete, JARs are still processed
         *   for SCIs.
         * - If metadata-complete=true and an absolute ordering is specified,
         *   JARs excluded from the ordering are also excluded from the SCI
         *   processing.
         * - If an SCI has a @HandlesType annotation then all classes (except
         *   those in JARs excluded from an absolute ordering) need to be
         *   scanned to check if they match.
         */
        WebXmlParser webXmlParser = new WebXmlParser(context.getXmlNamespaceAware(),
                context.getXmlValidation(), context.getXmlBlockExternal());

        Set<WebXml> defaults = new HashSet<>();
        defaults.add(getDefaultWebXmlFragment(webXmlParser));

        Set<WebXml> tomcatWebXml = new HashSet<>();
        tomcatWebXml.add(getTomcatWebXmlFragment(webXmlParser));

        // 创建 WebXml实例,并解析 web.xml 文件
        WebXml webXml = createWebXml();

        // Parse context level web.xml
        InputSource contextWebXml = getContextWebXmlSource();
        if (!webXmlParser.parseWebXml(contextWebXml, webXml, false)) {
            ok = false;
        }

        ServletContext sContext = context.getServletContext();

        // Ordering is important here

        // Step 1. Identify all the JARs packaged with the application and those
        // provided by the container. If any of the application JARs have a
        // web-fragment.xml it will be parsed at this point. web-fragment.xml
        // files are ignored for container provided JARs.
        Map<String,WebXml> fragments = processJarsForWebFragments(webXml, webXmlParser);

        // Step 2. Order the fragments.
        Set<WebXml> orderedFragments = null;
        orderedFragments =
                WebXml.orderWebFragments(webXml, fragments, sContext);

        // Step 3. Look for ServletContainerInitializer implementations
        if (ok) {

        	// !!! 注意此处。。。
            processServletContainerInitializers();
        }

        if  (!webXml.isMetadataComplete() || typeInitializerMap.size() > 0) {
            // Step 4. Process /WEB-INF/classes for annotations and
            // @HandlesTypes matches
            Map<String,JavaClassCacheEntry> javaClassCache = new HashMap<>();

            if (ok) {
                WebResource[] webResources =
                        context.getResources().listResources("/WEB-INF/classes");

                for (WebResource webResource : webResources) {
                    // Skip the META-INF directory from any JARs that have been
                    // expanded in to WEB-INF/classes (sometimes IDEs do this).
                    if ("META-INF".equals(webResource.getName())) {
                        continue;
                    }
                    processAnnotationsWebResource(webResource, webXml,
                            webXml.isMetadataComplete(), javaClassCache);
                }
            }

            // Step 5. Process JARs for annotations and
            // @HandlesTypes matches - only need to process those fragments we
            // are going to use (remember orderedFragments includes any
            // container fragments)
            if (ok) {
                processAnnotations(
                        orderedFragments, webXml.isMetadataComplete(), javaClassCache);
            }

            // Cache, if used, is no longer required so clear it
            javaClassCache.clear();
        }

        if (!webXml.isMetadataComplete()) {
            // Step 6. Merge web-fragment.xml files into the main web.xml
            // file.
            if (ok) {
                ok = webXml.merge(orderedFragments);
            }

            // Step 7a
            // merge tomcat-web.xml
            webXml.merge(tomcatWebXml);

            // Step 7b. Apply global defaults
            // Have to merge defaults before JSP conversion since defaults
            // provide JSP servlet definition.
            webXml.merge(defaults);

            // Step 8. Convert explicitly mentioned jsps to servlets
            if (ok) {
                convertJsps(webXml);
            }

            // Step 9. Apply merged web.xml to Context
            if (ok) {
                configureContext(webXml);
            }
        } else {
            webXml.merge(tomcatWebXml);
            webXml.merge(defaults);
            convertJsps(webXml);
            configureContext(webXml);
        }

        if (context.getLogEffectiveWebXml()) {
            log.info("web.xml:\n" + webXml.toXml());
        }

        // Always need to look for static resources
        // Step 10. Look for static resources packaged in JARs
        if (ok) {
            // Spec does not define an order.
            // Use ordered JARs followed by remaining JARs
            Set<WebXml> resourceJars = new LinkedHashSet<>();
            for (WebXml fragment : orderedFragments) {
                resourceJars.add(fragment);
            }
            for (WebXml fragment : fragments.values()) {
                if (!resourceJars.contains(fragment)) {
                    resourceJars.add(fragment);
                }
            }
            processResourceJARs(resourceJars);
            // See also StandardContext.resourcesStart() for
            // WEB-INF/classes/META-INF/resources configuration
        }

        // Step 11. Apply the ServletContainerInitializer config to the
        // context
        if (ok) {
            for (Map.Entry<ServletContainerInitializer,
                    Set<Class<?>>> entry :
                        initializerClassMap.entrySet()) {
                if (entry.getValue().isEmpty()) {
                    context.addServletContainerInitializer(
                            entry.getKey(), null);
                } else {
                    context.addServletContainerInitializer(
                            entry.getKey(), entry.getValue());
                }
            }
        }
    }
此处是上面和核心部分, 寻找一个 ServletContainerInitializer 容器初始化的类对象:
        // Step 3. Look for ServletContainerInitializer implementations
        if (ok) {

        	// !!! 注意此处。。。
            processServletContainerInitializers();
        }
下面我们点入方法查看一下实现:
/**
     * Scan JARs for ServletContainerInitializer implementations.
        扫描包,寻找实现类
     */
    protected void processServletContainerInitializers() {

        List<ServletContainerInitializer> detectedScis;
        try {
            WebappServiceLoader<ServletContainerInitializer> loader = new WebappServiceLoader<>(context);
            // 此处是一个关键的地方。具体加载如何加载实现类。
            detectedScis = loader.load(ServletContainerInitializer.class);
        } catch (IOException e) {
            log.error(sm.getString(
                    "contextConfig.servletContainerInitializerFail",
                    context.getName()),
                e);
            ok = false;
            return;
        }

        for (ServletContainerInitializer sci : detectedScis) {
            initializerClassMap.put(sci, new HashSet<Class<?>>());

            HandlesTypes ht;
            try {
                ht = sci.getClass().getAnnotation(HandlesTypes.class);
            } catch (Exception e) {
                if (log.isDebugEnabled()) {
                    log.info(sm.getString("contextConfig.sci.debug",
                            sci.getClass().getName()),
                            e);
                } else {
                    log.info(sm.getString("contextConfig.sci.info",
                            sci.getClass().getName()));
                }
                continue;
            }
            if (ht == null) {
                continue;
            }
            Class<?>[] types = ht.value();
            if (types == null) {
                continue;
            }

            for (Class<?> type : types) {
                if (type.isAnnotation()) {
                    handlesTypesAnnotations = true;
                } else {
                    handlesTypesNonAnnotations = true;
                }
                Set<ServletContainerInitializer> scis =
                        typeInitializerMap.get(type);
                if (scis == null) {
                    scis = new HashSet<>();
                    typeInitializerMap.put(type, scis);
                }
                scis.add(sci);
            }
        }
    }
关键的地方就是这里
List<ServletContainerInitializer> detectedScis;
try {
WebappServiceLoader<ServletContainerInitializer> loader = new WebappServiceLoader<>(context);
// 此处是一个关键的地方。具体加载如何加载实现类。
detectedScis = loader.load(ServletContainerInitializer.class);
} catch (IOException e) {
log.error(sm.getString(
"contextConfig.servletContainerInitializerFail",
context.getName()),
e);
ok = false;
return;
}
下面我们继续跟入代码:
public List<T> load(Class<T> serviceType) throws IOException {

        // String SERVICES = "META-INF/services/";  这里便是秘密。
        String configFile = SERVICES + serviceType.getName();

        LinkedHashSet<String> applicationServicesFound = new LinkedHashSet<>();
        LinkedHashSet<String> containerServicesFound = new LinkedHashSet<>();

        ClassLoader loader = servletContext.getClassLoader();

        // if the ServletContext has ORDERED_LIBS, then use that to specify the
        // set of JARs from WEB-INF/lib that should be used for loading services
        @SuppressWarnings("unchecked")
        List<String> orderedLibs =
                (List<String>) servletContext.getAttribute(ServletContext.ORDERED_LIBS);
        if (orderedLibs != null) {
            // handle ordered libs directly, ...
            for (String lib : orderedLibs) {
                URL jarUrl = servletContext.getResource(LIB + lib);
                if (jarUrl == null) {
                    // should not happen, just ignore
                    continue;
                }

                String base = jarUrl.toExternalForm();
                URL url;
                if (base.endsWith("/")) {
                    url = new URL(base + configFile);
                } else {
                    url = JarFactory.getJarEntryURL(jarUrl, configFile);
                }
                try {
                    parseConfigFile(applicationServicesFound, url);
                } catch (FileNotFoundException e) {
                    // no provider file found, this is OK
                }
            }

            // and the parent ClassLoader for all others
            loader = context.getParentClassLoader();
        }

        Enumeration<URL> resources;
        if (loader == null) {
            resources = ClassLoader.getSystemResources(configFile);
        } else {
            resources = loader.getResources(configFile);
        }
        while (resources.hasMoreElements()) {
            parseConfigFile(containerServicesFound, resources.nextElement());
        }

        // Filter the discovered container SCIs if required
        if (containerSciFilterPattern != null) {
            Iterator<String> iter = containerServicesFound.iterator();
            while (iter.hasNext()) {
                if (containerSciFilterPattern.matcher(iter.next()).find()) {
                    iter.remove();
                }
            }
        }

        // Add the application services after the container services to ensure
        // that the container services are loaded first
        containerServicesFound.addAll(applicationServicesFound);

        // load the discovered services
        if (containerServicesFound.isEmpty()) {
            return Collections.emptyList();
        }

        // 此处加载 路径下的文件,然后通过反射创建对象返回。
        return loadServices(serviceType, containerServicesFound);
    }
最终创建的 ServletContainerInitializer 放入到 ContextConfig中的属性中:Map<ServletContainerInitializer, Set<Class<?>>> initializerClassMap = new LinkedHashMap<>(); 等待后续被调用。
大致的调用顺序:
tomcat启动时webConfig() 的调用链:
Tomcat.start()->各种代理的start()->org.apache.catalina.core.StandardContext.startInternal->LifecycleBase.fireLifecycleEvent->org.apache.catalina.startup.ContextConfig.lifecycleEvent->configureStart->webConfig->processServletContainerInitializers()->load(Class<T> serviceType);
上面的文章主要是说明Tomcat启动时,用到的SPI机制。
下面我们学习一下,tomcat启动时如何通过SPI和SpringMVC结合到一起的。以及启动方式。
java的类加载机制,servlet3.0新特性,java的spi机制,以及spring-mvc的初始化和加载过程。
到这里不得不说一下tomcat启动项目的两种方式:
- web.xml方式。
- Servlet3.0后的注解形式。
SpringMVC初始化
之前我使用spring和springMVC的时候都是在web.xml里面定义一个 listener org.springframework.web.context.ContextLoaderListener 用来初始化spring和一个 servlet org.springframework.web.servlet.DispatcherServlet 用来初始化springMVC。
我看了下DispatcherServlet的源码初始化流程,如下图DispatcherServlet初始化的时候,会创建一个WebApplicationInitializer。左边三者是一个继承关系。

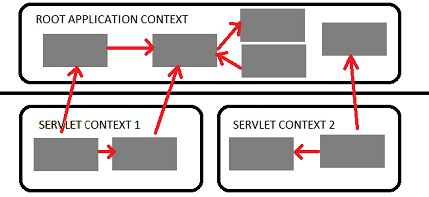
WebApplicationContext和ApplicationContext有什么不同呢? 前者实现了后者,我们可以配置多个servlet对应不同的mapping,每个servlet会对应一个WebApplicationContext(wac),但是ApplicationContext(ac)只有一个,wac之间可以共享ac里面配置的bean,如共享数据源,缓存等,而且如果不需要这些配置,ac也不是必须的。ac和wc是一个parent-child的层级关系。
我们看一下 web.xml:
<?xml version="1.0" encoding="UTF-8"?>
<web-app version="3.0" xmlns="http://java.sun.com/xml/ns/javaee"
     xmlns:xsi="http://www.w3.org/2001/XMLSchema-instance"
     xsi:schemaLocation="http://java.sun.com/xml/ns/javaee http://java.sun.com/xml/ns/javaee/web-app_3_0.xsd">

  <!-- 在Spring框架中是如何解决从页面传来的字符串的编码问题的呢?
  下面我们来看看Spring框架给我们提供过滤器CharacterEncodingFilter
   这个过滤器就是针对于每次浏览器请求进行过滤的,然后再其之上添加了父类没有的功能即处理字符编码。
   其中encoding用来设置编码格式,forceEncoding用来设置是否理会 request.getCharacterEncoding()方法,设置为true则强制覆盖之前的编码格式。-->
  <filter>
    <filter-name>characterEncodingFilter</filter-name>
    <filter-class>org.springframework.web.filter.CharacterEncodingFilter</filter-class>
    <init-param>
      <param-name>encoding</param-name>
      <param-value>UTF-8</param-value>
    </init-param>
    <init-param>
      <param-name>forceEncoding</param-name>
      <param-value>true</param-value>
    </init-param>
  </filter>
  <filter-mapping>
    <filter-name>characterEncodingFilter</filter-name>
    <url-pattern>/*</url-pattern>
  </filter-mapping>
  <!-- 项目中使用Spring 时,applicationContext.xml配置文件中并没有BeanFactory,要想在业务层中的class 文件中直接引用Spring容器管理的bean可通过以下方式-->
  <!--1、在web.xml配置监听器ContextLoaderListener-->
  <!--ContextLoaderListener的作用就是启动Web容器时,自动装配ApplicationContext的配置信息。因为它实现了ServletContextListener这个接口,在web.xml配置这个监听器,启动容器时,就会默认执行它实现的方法。
  在ContextLoaderListener中关联了ContextLoader这个类,所以整个加载配置过程由ContextLoader来完成。
  它的API说明
  第一段说明ContextLoader可以由 ContextLoaderListener和ContextLoaderServlet生成。
  如果查看ContextLoaderServlet的API,可以看到它也关联了ContextLoader这个类而且它实现了HttpServlet这个接口
  第二段,ContextLoader创建的是 XmlWebApplicationContext这样一个类,它实现的接口是WebApplicationContext->ConfigurableWebApplicationContext->ApplicationContext->
  BeanFactory这样一来spring中的所有bean都由这个类来创建
   IUploaddatafileManager uploadmanager = (IUploaddatafileManager)  ContextLoaderListener.getCurrentWebApplicationContext().getBean("uploadManager");
   -->
  <listener>
    <listener-class>org.springframework.web.context.ContextLoaderListener</listener-class>
  </listener>
  <!--2、部署applicationContext的xml文件-->
  <!--如果在web.xml中不写任何参数配置信息,默认的路径是"/WEB-INF/applicationContext.xml,
  在WEB-INF目录下创建的xml文件的名称必须是applicationContext.xml。
  如果是要自定义文件名可以在web.xml里加入contextConfigLocation这个context参数:
  在<param-value> </param-value>里指定相应的xml文件名,如果有多个xml文件,可以写在一起并以“,”号分隔。
  也可以这样applicationContext-*.xml采用通配符,比如这那个目录下有applicationContext-ibatis-base.xml,
  applicationContext-action.xml,applicationContext-ibatis-dao.xml等文件,都会一同被载入。
  在ContextLoaderListener中关联了ContextLoader这个类,所以整个加载配置过程由ContextLoader来完成。-->
  <context-param>
    <param-name>contextConfigLocation</param-name>
    <param-value>classpath:spring/applicationContext.xml</param-value>
  </context-param>

  <!--如果你的DispatcherServlet拦截"/",为了实现REST风格,拦截了所有的请求,那么同时对*.js,*.jpg等静态文件的访问也就被拦截了。-->
  <!--方案一:激活Tomcat的defaultServlet来处理静态文件-->
  <!--要写在DispatcherServlet的前面, 让 defaultServlet先拦截请求,这样请求就不会进入Spring了,我想性能是最好的吧。-->
  <servlet-mapping>
    <servlet-name>default</servlet-name>
    <url-pattern>*.css</url-pattern>
  </servlet-mapping>
  <servlet-mapping>
    <servlet-name>default</servlet-name>
    <url-pattern>*.swf</url-pattern>
  </servlet-mapping>
  <servlet-mapping>
    <servlet-name>default</servlet-name>
    <url-pattern>*.gif</url-pattern>
  </servlet-mapping>
  <servlet-mapping>
    <servlet-name>default</servlet-name>
    <url-pattern>*.jpg</url-pattern>
  </servlet-mapping>
  <servlet-mapping>
    <servlet-name>default</servlet-name>
    <url-pattern>*.png</url-pattern>
  </servlet-mapping>
  <servlet-mapping>
    <servlet-name>default</servlet-name>
    <url-pattern>*.js</url-pattern>
  </servlet-mapping>
  <servlet-mapping>
    <servlet-name>default</servlet-name>
    <url-pattern>*.html</url-pattern>
  </servlet-mapping>
  <servlet-mapping>
    <servlet-name>default</servlet-name>
    <url-pattern>*.xml</url-pattern>
  </servlet-mapping>
  <servlet-mapping>
    <servlet-name>default</servlet-name>
    <url-pattern>*.json</url-pattern>
  </servlet-mapping>
  <servlet-mapping>
    <servlet-name>default</servlet-name>
    <url-pattern>*.map</url-pattern>
  </servlet-mapping>
  <!--使用Spring MVC,配置DispatcherServlet是第一步。DispatcherServlet是一个Servlet,,所以可以配置多个DispatcherServlet-->
  <!--DispatcherServlet是前置控制器,配置在web.xml文件中的。拦截匹配的请求,Servlet拦截匹配规则要自已定义,把拦截下来的请求,依据某某规则分发到目标Controller(我们写的Action)来处理。-->
  <servlet>
    <servlet-name>DispatcherServlet</servlet-name><!--在DispatcherServlet的初始化过程中,框架会在web应用的 WEB-INF文件夹下寻找名为[servlet-name]-servlet.xml 的配置文件,生成文件中定义的bean。-->
    <servlet-class>org.springframework.web.servlet.DispatcherServlet</servlet-class>
    <!--指明了配置文件的文件名,不使用默认配置文件名,而使用dispatcher-servlet.xml配置文件。-->
    <init-param>
      <param-name>contextConfigLocation</param-name>
      <!--其中<param-value>**.xml</param-value> 这里可以使用多种写法-->
      <!--1、不写,使用默认值:/WEB-INF/<servlet-name>-servlet.xml-->
      <!--2、<param-value>/WEB-INF/classes/dispatcher-servlet.xml</param-value>-->
      <!--3、<param-value>classpath*:dispatcher-servlet.xml</param-value>-->
      <!--4、多个值用逗号分隔-->
      <param-value>classpath:spring/dispatcher-servlet.xml</param-value>
    </init-param>
    <load-on-startup>1</load-on-startup><!--是启动顺序,让这个Servlet随Servletp容器一起启动。-->
  </servlet>
  <servlet-mapping>
    <!--这个Servlet的名字是dispatcher,可以有多个DispatcherServlet,是通过名字来区分的。每一个DispatcherServlet有自己的WebApplicationContext上下文对象。同时保存的ServletContext中和Request对象中.-->
    <!--ApplicationContext是Spring的核心,Context我们通常解释为上下文环境,我想用“容器”来表述它更容易理解一些,ApplicationContext则是“应用的容器”了:P,Spring把Bean放在这个容器中,在需要的时候,用getBean方法取出-->
    <servlet-name>DispatcherServlet</servlet-name>
    <!--Servlet拦截匹配规则可以自已定义,当映射为@RequestMapping("/user/add")时,为例,拦截哪种URL合适?-->
    <!--1、拦截*.do、*.htm, 例如:/user/add.do,这是最传统的方式,最简单也最实用。不会导致静态文件(jpg,js,css)被拦截。-->
    <!--2、拦截/,例如:/user/add,可以实现现在很流行的REST风格。很多互联网类型的应用很喜欢这种风格的URL。弊端:会导致静态文件(jpg,js,css)被拦截后不能正常显示。 -->
    <url-pattern>/</url-pattern> <!--会拦截URL中带“/”的请求。-->
  </servlet-mapping>

  <welcome-file-list><!--指定欢迎页面-->
    <welcome-file>login.html</welcome-file>
  </welcome-file-list>
  <error-page> <!--当系统出现404错误,跳转到页面nopage.html-->
    <error-code>404</error-code>
    <location>/nopage.html</location>
  </error-page>
  <error-page> <!--当系统出现java.lang.NullPointerException,跳转到页面error.html-->
    <exception-type>java.lang.NullPointerException</exception-type>
    <location>/error.html</location>
  </error-page>
  <session-config><!--会话超时配置,单位分钟-->
    <session-timeout>360</session-timeout>
  </session-config>
</web-app>
1、spring 框架解决字符串编码问题:过滤器 CharacterEncodingFilter(filter-name)
2、在web.xml配置监听器ContextLoaderListener(listener-class)
ContextLoaderListener的作用就是启动Web容器时,自动装配ApplicationContext的配置信息。因为它实现了ServletContextListener这个接口,在web.xml配置这个监听器,启动容器时,就会默认执行它实现的方法。
3、部署applicationContext的xml文件:contextConfigLocation(context-param下的param-name)
4、DispatcherServlet是前置控制器,配置在web.xml文件中的。拦截匹配的请求,Servlet拦截匹配规则要自已定义,把拦截下来的请求,依据某某规则分发到目标Controller(我们写的Action)来处理。
DispatcherServlet(servlet-name、servlet-class、init-param、param-name(contextConfigLocation)、param-value)
在DispatcherServlet的初始化过程中,框架会在web应用的 WEB-INF文件夹下寻找名为[servlet-name]-servlet.xml 的配置文件,生成文件中定义的bean
通过上面的了解,我们可以看出spring核心配置文件就是listener那块。在监听之前我们已经通过context-param将spring配置文件传到上下文中了(application)。下面我们就来看看spring是如何工作的吧
第一步:
点开listener源码,我们发现他有下面几个方法。和继承的关系。我们发现他实现了ContextLoaderListener这个接口,这个接口在参数设置好之后自动执行contextInitialized方法的。

那么我们来看看contextInitialized方法

public WebApplicationContext initWebApplicationContext(ServletContext servletContext) {
    if (servletContext.getAttribute(WebApplicationContext.ROOT_WEB_APPLICATION_CONTEXT_ATTRIBUTE) != null) {
      throw new IllegalStateException(
          "Cannot initialize context because there is already a root application context present - " +
          "check whether you have multiple ContextLoader* definitions in your web.xml!");
    }

    Log logger = LogFactory.getLog(ContextLoader.class);
    servletContext.log("Initializing Spring root WebApplicationContext");
    if (logger.isInfoEnabled()) {
      logger.info("Root WebApplicationContext: initialization started");
    }
    long startTime = System.currentTimeMillis();

    try {
      // Store context in local instance variable, to guarantee that
      // it is available on ServletContext shutdown.
      if (this.context == null) {
        this.context = createWebApplicationContext(servletContext);
      }
      if (this.context instanceof ConfigurableWebApplicationContext) {
        ConfigurableWebApplicationContext cwac = (ConfigurableWebApplicationContext) this.context;
        if (!cwac.isActive()) {
          // The context has not yet been refreshed -> provide services such as
          // setting the parent context, setting the application context id, etc
          if (cwac.getParent() == null) {
            // The context instance was injected without an explicit parent ->
            // determine parent for root web application context, if any.
            ApplicationContext parent = loadParentContext(servletContext);
            cwac.setParent(parent);
          }
          configureAndRefreshWebApplicationContext(cwac, servletContext);
        }
      }
      servletContext.setAttribute(WebApplicationContext.ROOT_WEB_APPLICATION_CONTEXT_ATTRIBUTE, this.context);

      ClassLoader ccl = Thread.currentThread().getContextClassLoader();
      if (ccl == ContextLoader.class.getClassLoader()) {
        currentContext = this.context;
      }
      else if (ccl != null) {
        currentContextPerThread.put(ccl, this.context);
      }

      if (logger.isDebugEnabled()) {
        logger.debug("Published root WebApplicationContext as ServletContext attribute with name [" +
            WebApplicationContext.ROOT_WEB_APPLICATION_CONTEXT_ATTRIBUTE + "]");
      }
      if (logger.isInfoEnabled()) {
        long elapsedTime = System.currentTimeMillis() - startTime;
        logger.info("Root WebApplicationContext: initialization completed in " + elapsedTime + " ms");
      }

      return this.context;
    }
    catch (RuntimeException ex) {
      logger.error("Context initialization failed", ex);
      servletContext.setAttribute(WebApplicationContext.ROOT_WEB_APPLICATION_CONTEXT_ATTRIBUTE, ex);
      throw ex;
    }
    catch (Error err) {
      logger.error("Context initialization failed", err);
      servletContext.setAttribute(WebApplicationContext.ROOT_WEB_APPLICATION_CONTEXT_ATTRIBUTE, err);
      throw err;
    }
  }
仔细研究官方解释,就是在这里初始化application,这里会用到contextClass+contextConfigLocation两个参数,如果contextClass在context-param提供了,我们就会根据这一个class去初始化application,很显然我们正常配置都没有配这个,而是配置了后者,配置了后者就会去根据contextConfigLocation中提供的配置文件去解析然后创建相关的bean和application操作,这个方法的最后会执行configureAndRefreshWebApplicationContext方法。这个方法就是在根据contextConfigLocation提供的配置文件中创建相关的bean。
springMVC 加载
springMVC其实和spring是一样的,但是他不用再程序开始时访问
  <servlet>
    <!-- 配置DispatcherServlet -->
    <servlet-name>springMvc</servlet-name>
    <servlet-class>org.springframework.web.servlet.DispatcherServlet</servlet-class>
      <!-- 指定spring mvc配置文件位置 不指定使用默认情况 -->
      <init-param>
        <param-name>contextConfigLocation</param-name>
        <param-value>classpath:spring/spring-mvc.xml</param-value>
      </init-param>
    <!-- 设置启动顺序 -->
    <load-on-startup>1</load-on-startup>
  </servlet>

  <!-- ServLet 匹配映射 -->
  <servlet-mapping>
    <servlet-name>springMvc</servlet-name>
    <url-pattern>*.zxh</url-pattern>
  </servlet-mapping>
看DispatcherServlet源码中对contextConfigLocation参数的解释

上面明确指出我们这个参数给XmlWebApplicationContext类的,我们在进入XmlWebApplicationContext类看看究竟。

这样我们很容易理解为什么springmvc默认的配置文件会在WEB-INF/application.xml中。
在dispatcherservlet中有一个初始化方法,这里就初始化配置中一些东西,比如说文件上传适配器的配置等
protected void initStrategies(ApplicationContext context) {
    initMultipartResolver(context);
    initLocaleResolver(context);
    initThemeResolver(context);
    initHandlerMappings(context);
    initHandlerAdapters(context);
    initHandlerExceptionResolvers(context);
    initRequestToViewNameTranslator(context);
    initViewResolvers(context);
    initFlashMapManager(context);
  }
Servlet3.0后的注解形式。
随着servlet3.0的到来,web.xml也不是必须的了,我们可以定义一个WebApplicationInitializer来初始化一个WebApplicationContext,下面我讲讲WebApplicationInitializer的加载机制
看下面介绍的<a href="#ServletContext的性能增强"">servlet3对ServletContext的增强可以知道,javaee容器在启动的时候会通过spi机制来寻找javax.servlet.ServletContainerInitializer的实现类,在spring-web jar包,如下图所示

@HandlesTypes(WebApplicationInitializer.class)
public class SpringServletContainerInitializer implements ServletContainerInitializer {

@Override
    public void onStartup(Set<Class<?>> webAppInitializerClasses, ServletContext servletContext)
            throws ServletException {

        List<WebApplicationInitializer> initializers = new LinkedList<WebApplicationInitializer>();

        if (webAppInitializerClasses != null) {
            for (Class<?> waiClass : webAppInitializerClasses) {
                // Be defensive: Some servlet containers provide us with invalid classes,
                // no matter what @HandlesTypes says...
                if (!waiClass.isInterface() && !Modifier.isAbstract(waiClass.getModifiers()) &&
                        WebApplicationInitializer.class.isAssignableFrom(waiClass)) {
                    try {
                        initializers.add((WebApplicationInitializer) waiClass.newInstance());
                    }
...
}
SpringServletContainerInitializer 的onStartup()方法里面有如下一段注释
Because this class declares @HandlesTypes(WebApplicationInitializer.class), Servlet 3.0+ containers will automatically scan the classpath for implementations of Spring’s WebApplicationInitializer interface and provide the set of all such types to the webAppInitializerClasses parameter of this method.
因为这个类@HandlesTypes注解的是WebApplicationInitializer.class,Servlet3.0容器会自动的扫描classpath下面WebApplicationInitializer接口的实现类,并提供给SpringServletContainerInitializer的onStartup()方法
spring-web中的具体应用
从servlet3.0开始,web容器启动时为提供给第三方组件机会做一些初始化的工作,例如注册servlet或者filtes等,servlet规范中通过ServletContainerInitializer实现此功能。每个框架要使用ServletContainerInitializer就必须在对应的jar包的META-INF/services 目录创建一个名为javax.servlet.ServletContainerInitializer的文件,文件内容指定具体的ServletContainerInitializer实现类,那么,当web容器启动时就会运行这个初始化器做一些组件内的初始化工作。
一般伴随着ServletContainerInitializer一起使用的还有HandlesTypes注解,通过HandlesTypes可以将感兴趣的一些类注入到ServletContainerInitializerde的onStartup方法作为参数传入。
SpringServletContainerInitializer
通过源码发现,配合注解@HandlesTypes它可以将其指定的Class对象作为参数传递到onStartup方法中。进而在onStartup方法中获取Class对象的具体实现类,进而调用实现类中的具体方法。SpringServletContainerInitializer类中@HandlesTypes指定的是Class对象是WebApplicationInitializer.Class。
利用这个机制,若实现WebApplicationInitializer这个接口,我们就可以自定义的注入Servlet,或者Filter,即可以不再依赖web.xml的配置。
Servlet3.0新特性
目前servlet4还正在开发过程中,目前最新的应该就是3了,最新的spring也用到了很多servlet3.0的特性,所以很有必要了解一下。
新特性概述:
- 异步处理支持,之前是servlet一直阻塞直到业务完成,现在可以将耗时任务委派给另外一个线程处理,自己不生成相应的情况下返回到容器
- 新增注解,简化servlet、filter、listener,所以可以无需配置web.xml
- 可插件支持,类似于开发应用时,将jar包放入classpath
异步处理支持
在web.xml配置<async-supported>true</async-supported>或者在注解里面添加asyncSupported = true
新增注解支持
@WebServlet
声明一个类为servlet,注解在部署时被容器自动处理
WebInitParam
通常配合@WebServlet和@WebFilter使用,类似于web.xml里面的<init-param>标签,指定初始化参数
WebFilter
声明一个类为过滤器
WebListener
声明一个类为监听器,该类必须实现如下最少一个接口
ServletContextListener
ServletContextAttributeListener
ServletRequestListener
ServletRequestAttributeListener
HttpSessionListener
HttpSessionAttributeListener
@MultipartConfig
该注解主要是为了辅助 Servlet 3.0 中 HttpServletRequest 提供的对上传文件的支持。
可插性支持
以配置servlet为例,有三种方式
- 最原始的在web.xml里面配置servlet
- 使用servlet3.0的@WebServlet注解
- 利用可插性,将类继承HttpServlet,然后打成jar包,在jar包的META-INF里面放置一个 web-fragment文件,在文件中声明Servlet配置
我觉得spring可能就是利用了可插性,等有时间验证一下。
ServletContext的性能增强
支持运行时,动态的部署servlet、过滤器、监听器,通过ServletContext的方法实现。
ServletContainerInitializer 也是 Servlet 3.0 新增的一个接口,容器在启动时使用SPI来发现 ServletContainerInitializer 的实现类,并且容器将 WEB-INF/lib 目录下 JAR 包中的类都交给该类的 onStartup() 方法处理,我们通常需要在该实现类上使用 @HandlesTypes 注解来指定希望被处理的类,过滤掉不希望给 onStartup() 处理的类。
Implementations of this interface must be declared by a JAR file resource located inside the META-INF/services directory and named for the fully qualified class name of this interface
这个接口的实现必须打包在一个jar文件里面,并且需要在META-INF/services/通过spi来定义


 483
483


 被折叠的 条评论
为什么被折叠?
被折叠的 条评论
为什么被折叠?
 到【灌水乐园】发言


