


一、CXF开发简单的WS服务与客户端
(一)、要求的jar 包
1、CXF版本为 cxf-2.7.8.jar ,其他版本可能会有出入。
2、需要的jar包为:
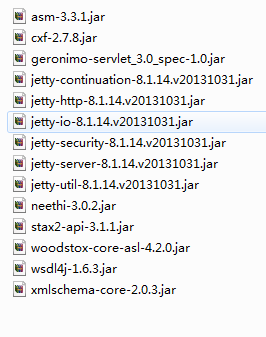
3、因为使用main函数启动发布,所以需要 jetty 包。
4、出现Cannot create a secure XMLInputFactory异常提示时通常是少了woodstox-core-asl-4.2.0.jar或stax2-api这两个包,少这两个包服务能够启动成功,且浏览器访问wsdl正常;但客户端连接web service时就出现错误提示了。加入后可能还需要重启下eclipse。
(二)、服务器端
1、接口:
- package com.ws;
- import java.util.List;
- import javax.jws.WebService;
- import com.ws.bean.Cat;
- import com.ws.bean.User;
- @WebService
- public interface HelloWorld {
- public String sayHi(String name);
- }
2、实现类
- package com.ws.impl;
- import java.text.SimpleDateFormat;
- import java.util.Date;
- import java.util.List;
- import javax.jws.WebService;
- import com.service.UserService;
- import com.service.impl.UserServiceImp;
- import com.ws.HelloWorld;
- import com.ws.bean.Cat;
- import com.ws.bean.User;
- /**
- * endpointInterface,是他实现的接口,记得写全包名 serviceName,服务器名称
- *
- * @author SAM
- *
- */
- // 实现类需要标明 WebService
- // 标明实现的接口,endpointInterface 含包名
- // serviceName 自定义名称
- @WebService(endpointInterface = "com.ws.HelloWorld", serviceName = "HelloSAM")
- public class HelloWorldImpl implements HelloWorld {
- public String sayHi(String name) {
- return name + ",您好!您现在访问的是简单的WS服务端,时间为:" + new SimpleDateFormat().format(new Date());
- }
- }
3、发布
- /**
- * 发布简单的WebService
- */
- public void deployService() {
- System.out.println("Server start ……");
- HelloWorldImpl service = new HelloWorldImpl();
- String address = "http://localhost:8080/helloWorld";
- // 调用Endpoint的publish方法
- Endpoint.publish(address, service);
- System.out.println("server ready ……");
- }
4、分析
1)实现类需要标明 @WebService
2)标明实现的哪个接口,关键字,endpointInterface 含包名。如 endpointInterface = "com.ws.HelloWorld"
3)serviceName 自定义服务器的名称,这个名字随便取,用 wsdl2java 生成客户端时,生成的继承 service的类,就会是这个名字。如我这边取名为 serviceName = "HelloSAM" 。
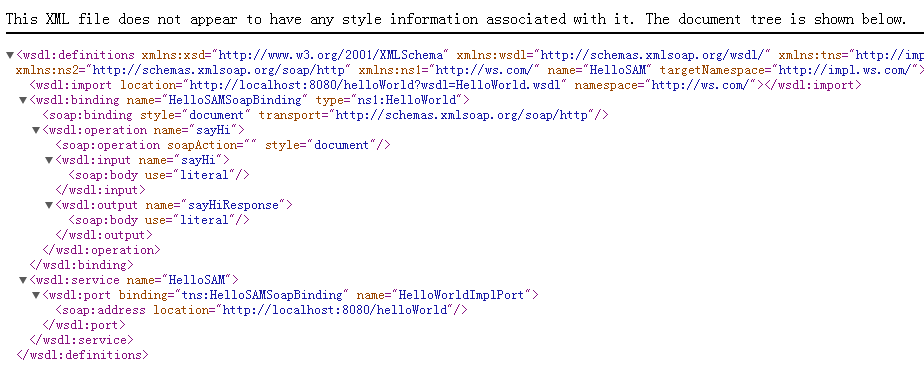
4)使用 Endpoint.publish(address, service) 方法发布WS的服务端。这时,只要访问 http://localhost:8080/helloWorld?wsdl 地址就可以看到WS服务成功发布了。如
(三)、客户端
1、自动生成客户端,在dos窗口,进入eclipse的客户端工程下,使用 wsdl2java + 服务器端的 wsdl 地址。如
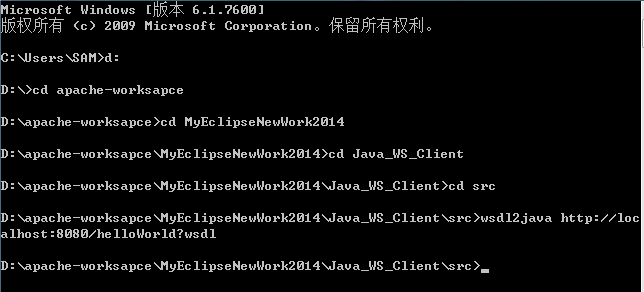
2、CXF会根据自动生成 http://localhost:8080/helloWorld?wsdl 的wsdl文件自动生成客户端需要的文件。
3、客户端调用服务器端代码:需要使用自动生成的继承了Service 类的那个类,这边就是 HelloSAM 即在服务端的那个 serviceName = "HelloSAM" 指定的名称。代码如下:
- /**
- * 简单客户端访问
- */
- private void visitServer() {
- HelloSAM helloFactory = new HelloSAM();// HelloSAM是客户端生成的继承了 service的类
- HelloWorld hw = helloFactory.getHelloWorldImplPort();// 返回远程ws对象的代理,不是服务器中远程对象
- System.out.println(hw.sayHi("SAM-SHO"));
- }
4、这边服务器和客户端启动都是依赖main方法,需要jetty包的支持,到此为止,一次启动服务和客户端,就可以再后台看到如下输出,即简单的WS发布和访问成功。
- SAM-SHO,您好!您现在访问的是简单的WS服务端,现在的时间是:14-11-16 下午10:41
5、另一种方式:利用 JaxWsProxyFactoryBean
- /**
- * 另一种方式访问
- */
- private void visitServer2() {
- // 调用WebService
- JaxWsProxyFactoryBean factory = new JaxWsProxyFactoryBean();
- factory.setServiceClass(HelloWorld.class);
- factory.setAddress("http://localhost:8080/Java_WS_Server/soap/helloWorld");
- HelloWorld service = (HelloWorld) factory.create();
- System.out.println("#############Client sayHi##############");
- System.out.println(service.sayHi("SAM-SAM"));
- }
6、分析详见:Web Service笔记(三):wsdl 与 soap协议详解
二、带javaBean 和 集合的WS
(一)、服务器端
1、在服务器端增加方法:然后创建javaBean 以及其业务类。代码如下:
- package com.ws;
- import java.util.List;
- import javax.jws.WebService;
- import com.ws.bean.Cat;
- import com.ws.bean.User;
- @WebService
- public interface HelloWorld {
- public String sayHi(String name);
- public List<Cat> getCatsByUser(User user);
- }
- package com.ws.impl;
- import java.text.SimpleDateFormat;
- import java.util.Date;
- import java.util.List;
- import javax.jws.WebService;
- import com.service.UserService;
- import com.service.impl.UserServiceImp;
- import com.ws.HelloWorld;
- import com.ws.bean.Cat;
- import com.ws.bean.User;
- /**
- * endpointInterface,是他实现的接口,记得写全包名 serviceName,服务器名称
- *
- * @author SAM
- *
- */
- // 实现类需要标明 WebService
- // 标明实现的接口,endpointInterface 含包名
- // serviceName 自定义名称
- @WebService(endpointInterface = "com.ws.HelloWorld", serviceName = "HelloSAM")
- public class HelloWorldImpl implements HelloWorld {
- /**
- * 简单方法
- */
- public String sayHi(String name) {
- return name + ",您好!您现在访问的是简单的WS服务端,时间为:" + new SimpleDateFormat().format(new Date());
- }
- /**
- * 复杂方法 含javabean 和 集合
- */
- public List<Cat> getCatsByUser(User user) {
- UserService tUserService = new UserServiceImp();
- return tUserService.getCatsByUser(user);
- }
- }
- package com.ws.bean;
- /**
- * User类
- * @author SAM
- *
- */
- public class User {
- private Integer id;
- private String name;
- private String pass;
- private String address;
- public User() {
- super();
- }
- public User(Integer id, String name, String pass, String address) {
- super();
- this.id = id;
- this.name = name;
- this.pass = pass;
- this.address = address;
- }
- public Integer getId() {
- return id;
- }
- public void setId(Integer id) {
- this.id = id;
- }
- public String getName() {
- return name;
- }
- public void setName(String name) {
- this.name = name;
- }
- public String getPass() {
- return pass;
- }
- public void setPass(String pass) {
- this.pass = pass;
- }
- public String getAddress() {
- return address;
- }
- public void setAddress(String address) {
- this.address = address;
- }
- @Override
- public int hashCode() {
- final int prime = 31;
- int result = 1;
- result = prime * result + ((name == null) ? 0 : name.hashCode());
- result = prime * result + ((pass == null) ? 0 : pass.hashCode());
- return result;
- }
- @Override
- public boolean equals(Object obj) {
- if (this == obj)
- return true;
- if (obj == null)
- return false;
- if (getClass() != obj.getClass())
- return false;
- User other = (User) obj;
- if (name == null) {
- if (other.name != null)
- return false;
- } else if (!name.equals(other.name))
- return false;
- if (pass == null) {
- if (other.pass != null)
- return false;
- } else if (!pass.equals(other.pass))
- return false;
- return true;
- }
- }
- package com.ws.bean;
- /**
- * Cat类
- * @author SAM
- *
- */
- public class Cat {
- private Integer id;
- private String name;
- private String color;
- public Cat() {
- super();
- }
- public Cat(Integer id, String name, String color) {
- super();
- this.id = id;
- this.name = name;
- this.color = color;
- }
- public Integer getId() {
- return id;
- }
- public void setId(Integer id) {
- this.id = id;
- }
- public String getName() {
- return name;
- }
- public void setName(String name) {
- this.name = name;
- }
- public String getColor() {
- return color;
- }
- public void setColor(String color) {
- this.color = color;
- }
- @Override
- public String toString() {
- return "Cat [color=" + color + ", id=" + id + ", name=" + name + "]";
- }
- }
- package com.service;
- import java.util.List;
- import com.ws.bean.Cat;
- import com.ws.bean.User;
- public interface UserService {
- List<Cat> getCatsByUser(User user);
- }
- package com.service.impl;
- import java.util.ArrayList;
- import java.util.HashMap;
- import java.util.List;
- import java.util.Map;
- import com.service.UserService;
- import com.ws.bean.Cat;
- import com.ws.bean.User;
- /**
- *
- * UserServiceImp.java
- *
- * @title User业务类
- * @description
- * @author SAM-SHO
- * @Date 2014-11-16
- */
- public class UserServiceImp implements UserService {
- //模拟数据库
- static Map <User,List<Cat>> catDB = new HashMap<User,List<Cat>>();
- //静态初始化
- static{
- List<Cat> catList1 = new ArrayList<Cat>();
- catList1.add(new Cat(1, "加菲猫", "黄色"));
- catList1.add(new Cat(2, "蓝胖子", "蓝色"));
- catDB.put(new User(1, "Sam-Sho", "1234", "soochow"), catList1);
- List<Cat> catList2 = new ArrayList<Cat>();
- catList1.add(new Cat(3, "hello kitty", "粉色"));
- catList1.add(new Cat(4, "熊猫", "黑白色"));
- catDB.put(new User(2, "赵小妞", "4567", "soochow"), catList2);
- }
- public List<Cat> getCatsByUser(User user) {
- return catDB.get(user);
- }
- }
2、服务端发布如下:
- /**
- * 发布javaBean 和集合 的WS
- */
- private void deployComplexService() {
- System.out.println("Server start ……");
- HelloWorldImpl service = new HelloWorldImpl();
- String address = "http://localhost:8080/helloWorld";
- // 调用Endpoint的publish方法
- Endpoint.publish(address, service);
- System.out.println("server ready ……");
- }
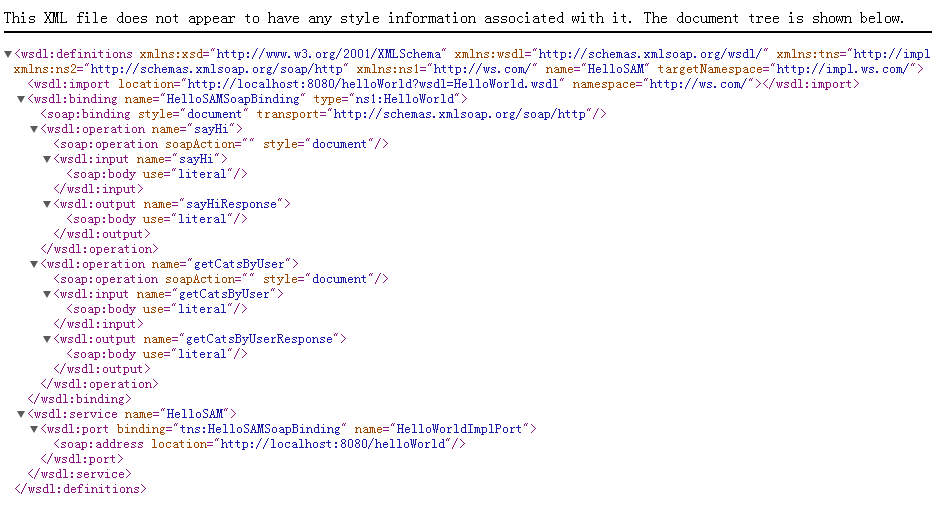
3、在浏览器中调用 http://localhost:8080/helloWorld?wsdl
(二)、客户端
1、使用 wsdl2java ,方法与上面创建客户端一致。
2、客户端调用服务端代码如下:
- /**
- * 访问复杂客户端
- */
- private void visitComplexServer() {
- HelloSAM helloFactory = new HelloSAM();// HelloSAM是客户端生成的继承了 service的类
- HelloWorld hw = helloFactory.getHelloWorldImplPort();// 返回远程ws对象的代理,不是服务器中远程对象
- //1, "Sam-Sho", "1234", "soochow"
- User user = new User();
- user.setId(1);
- user.setName("Sam-Sho");
- user.setPass("1234");
- user.setAddress("soochow");
- System.out.println(hw.getCatsByUser(user));//[com.ws.Cat@1aaf0b3, com.ws.Cat@1a082e2, com.ws.Cat@f0c85e, com.ws.Cat@1f297e7]
- System.out.println(hw.getCatsByUser(user).get(0).getName());//加菲猫
- }
3、【输出】
- SAM-SHO,您好!您现在访问的是简单的WS服务端,时间为:14-11-16 下午11:29
- [com.ws.Cat@1aaf0b3, com.ws.Cat@1a082e2, com.ws.Cat@f0c85e, com.ws.Cat@1f297e7]
- 加菲猫
三、CXF处理Map等不支持的类型
(一)服务端实现
1、使用 @XmlJavaTypeAdapter 注解修饰 CXF 不支持的类型。并且通过其value属性指定特定的类型转换器。
2、这个类型转换器必须继承抽象类 XmlAdapter<ValueType,BoundType>,其中 BoundType 为CXF不支持的类型,而 ValueType 为我们即将把 BoundType 转换为的支持的类型。一般需要自己定义。
3、定义 ValueType 这个转换对象类型,且为CXF 支持的类型。其本质就是模拟实现一个Map即可。
4、服务端涉及的代码如下
1)服务的接口与实现类代码:
- package com.ws;
- import java.util.List;
- import java.util.Map;
- import javax.jws.WebService;
- import javax.xml.bind.annotation.adapters.XmlJavaTypeAdapter;
- import com.adapter.TypeAdapter;
- import com.ws.bean.Cat;
- import com.ws.bean.User;
- @WebService
- public interface HelloWorld {
- public String sayHi(String name);
- public List<Cat> getCatsByUser(User user);
- //value属性指定一个转换器,为自定义的转换器
- @XmlJavaTypeAdapter(value = TypeAdapter.class)
- public Map<String,Cat> getAllCats();
- }
- package com.ws.impl;
- import java.text.SimpleDateFormat;
- import java.util.Date;
- import java.util.List;
- import java.util.Map;
- import javax.jws.WebService;
- import com.service.UserService;
- import com.service.impl.UserServiceImp;
- import com.ws.HelloWorld;
- import com.ws.bean.Cat;
- import com.ws.bean.User;
- /**
- * endpointInterface,是他实现的接口,记得写全包名 serviceName,服务器名称
- *
- * @author SAM
- *
- */
- // 实现类需要标明 WebService
- // 标明实现的接口,endpointInterface 含包名
- // serviceName 自定义名称
- @WebService(endpointInterface = "com.ws.HelloWorld", serviceName = "HelloSAM")
- public class HelloWorldImpl implements HelloWorld {
- /**
- * 简单方法
- */
- public String sayHi(String name) {
- return name + ",您好!您现在访问的是简单的WS服务端,时间为:" + new SimpleDateFormat().format(new Date());
- }
- /**
- * 复杂方法 含javabean 和 集合
- */
- public List<Cat> getCatsByUser(User user) {
- UserService tUserService = new UserServiceImp();
- return tUserService.getCatsByUser(user);
- }
- /**
- * 处理Map
- */
- public Map<String, Cat> getAllCats() {
- UserService tUserService = new UserServiceImp();
- return tUserService.getAllCats();
- }
- }
- package com.service;
- import java.util.List;
- import java.util.Map;
- import com.ws.bean.Cat;
- import com.ws.bean.User;
- public interface UserService {
- List<Cat> getCatsByUser(User user);
- Map<String, Cat> getAllCats();
- }
- package com.service.impl;
- import java.util.ArrayList;
- import java.util.HashMap;
- import java.util.List;
- import java.util.Map;
- import com.service.UserService;
- import com.ws.bean.Cat;
- import com.ws.bean.User;
- /**
- *
- * UserServiceImp.java
- *
- * @title User业务类
- * @description
- * @author SAM-SHO
- * @Date 2014-11-16
- */
- public class UserServiceImp implements UserService {
- //模拟数据库
- static Map <User,List<Cat>> catDB = new HashMap<User,List<Cat>>();
- //静态初始化
- static{
- List<Cat> catList1 = new ArrayList<Cat>();
- catList1.add(new Cat(1, "加菲猫", "黄色"));
- catList1.add(new Cat(2, "蓝胖子", "蓝色"));
- catDB.put(new User(1, "Sam-Sho", "1234", "soochow"), catList1);
- List<Cat> catList2 = new ArrayList<Cat>();
- catList1.add(new Cat(3, "hello kitty", "粉色"));
- catList1.add(new Cat(4, "熊猫", "黑白色"));
- catDB.put(new User(2, "赵小妞", "4567", "soochow"), catList2);
- }
- public List<Cat> getCatsByUser(User user) {
- return catDB.get(user);
- }
- /**
- * 返回Map
- */
- public Map<String, Cat> getAllCats() {
- Map<String, Cat> catMap = new HashMap<String, Cat>();
- int i = 1;
- for(List<Cat> cats: catDB.values()){
- for( Cat cat: cats){
- catMap.put("第"+ i++ + "个", cat);
- }
- }
- return catMap;
- }
- }
2)自定义转换器代码如下:TypeAdapter.class
- package com.adapter;
- import java.util.HashMap;
- import java.util.List;
- import java.util.Map;
- import javax.xml.bind.annotation.adapters.XmlAdapter;
- import com.adapter.StringCat.Entry;
- import com.ws.bean.Cat;
- /**
- *
- * TypeAdapter.java
- *
- * @title 类型转换器
- * @description
- * XmlAdapter<ValueType,BoundType>:
- * 1、BoundType为不支持的类型,即 Map<String,Cat>
- * 2、ValueType 为map即将转换成的支持的类型。自定义即可。
- * @author SAM-SHO
- * @Date 2014-11-19
- */
- public class TypeAdapter extends XmlAdapter<StringCat, Map<String,Cat>> {
- // 即 Map<String, Cat> 转换为 StringCat
- @Override
- public StringCat marshal(Map<String, Cat> v) throws Exception {
- StringCat tStringCat = new StringCat();
- for (String key : v.keySet()) {
- tStringCat.getEntries().add(new Entry(key,v.get(key)));
- }
- return tStringCat;
- }
- // StringCat 即 转换为 Map<String, Cat>
- @Override
- public Map<String, Cat> unmarshal(StringCat v) throws Exception {
- Map<String, Cat> catMap = new HashMap<String, Cat>();
- List<Entry> entryLists = v.getEntries();//
- for (Entry entry : entryLists) {
- catMap.put(entry.getKey(), entry.getValue());
- }
- return catMap;
- }
- }
3)自定义转换的支持类型如下:StringCat.class
- package com.adapter;
- import java.util.ArrayList;
- import java.util.List;
- import com.ws.bean.Cat;
- /**
- * StringCat.java
- *
- * @title 自定义CXF支持的类型
- * @description
- * @author SAM-SHO
- * @Date 2014-11-19
- */
- public class StringCat {
- // 把Map<String,Cat> 转换 Entry
- // 然后把Entry放入List
- private List<Entry> entries = new ArrayList<Entry>();
- //内部类 即 Map<String,Cat>
- public static class Entry{
- private String key;
- private Cat value;
- public Entry() {
- }
- public Entry(String key, Cat value) {
- this.key = key;
- this.value = value;
- }
- public String getKey() {
- return key;
- }
- public void setKey(String key) {
- this.key = key;
- }
- public Cat getValue() {
- return value;
- }
- public void setValue(Cat value) {
- this.value = value;
- }
- }
- public List<Entry> getEntries() {
- return entries;
- }
- public void setEntries(List<Entry> entries) {
- this.entries = entries;
- }
- }
5、这时启动服务就可以访问了:http://localhost:8080/helloWorld?wsdl
- /**
- * 发布含有Map的ws
- */
- private void deployMapService() {
- System.out.println("Server start ……");
- HelloWorldImpl service = new HelloWorldImpl();
- String address = "http://localhost:8080/helloWorld";
- // 调用Endpoint的publish方法
- Endpoint.publish(address, service);
- System.out.println("server ready ……");
- }
6、传入传出的消息(xml片段)为如下:分析wsdl文件得出
- <!--传入-->
- <getAllCats>
- </getAllCats>
- <!--传出-->
- <getAllCatsResponse>
- <return>
- <entries>--出现0-N次
- <key></key>
- <value>
- <color></color>
- <id></id>
- <name></name>
- </value>
- </entries>
- <entries>
- <key></key>
- <value>
- <color></color>
- <id></id>
- <name></name>
- </value>
- </entries>
- </return>
- </getAllCatsResponse>
(二)、客户端实现
1、wsdl2java,重新生成客户端。
2、实现服务端方法getAllCats()的调用
- /**
- * 访问CXF不支持的客户端
- */
- private void visitMapServer() {
- HelloSAM helloFactory = new HelloSAM();// HelloSAM是客户端生成的继承了 service的类
- HelloWorld hw = helloFactory.getHelloWorldImplPort();// 返回远程ws对象的代理,不是服务器中远程对象
- StringCat tStringCat = hw.getAllCats();
- for (Entry entry : tStringCat.getEntries()) {
- System.out.println(entry.getKey()+" : " + entry.getValue().getName());
- }
- }
- 第4个 : 熊猫
- 第3个 : hello kitty
- 第1个 : 加菲猫
- 第2个 : 蓝胖子
四、带拦截器的WS
(一)、WS的拦截器简介:
1、WS的拦截器示意图:
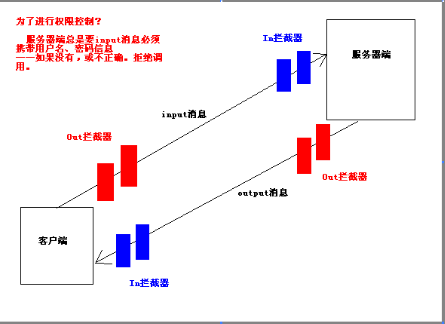
2、服务端与客户端都有 In 与 Out 拦截器。顺序为 客户端Out --> 服务端In --> 服务端Out --> 客户端In 。
(二)、CXF的日志拦截器 LoggingInInterceptor 、LoggingOutInterceptor
1、服务端添加拦截器:
1)利用 EndpointImpl 类的 getInInterceptors() 或 getOutInterceptors() 方法 返回一个拦截器集合,往拦截器集合中add() 添加随意多个拦截器。
2)getInInterceptors().add() 添加的为 In 拦截器;getOutInterceptors().add() 添加的为 Out 拦截器。
3)服务端代码如下:
- /**
- * 发布带拦截器的WS
- */
- private void deployInterceptorService() {
- System.out.println("Server start ……");
- HelloWorldImpl service = new HelloWorldImpl();
- String address = "http://localhost:8080/helloWorld";
- // 调用Endpoint的publish方法
- EndpointImpl ep = (EndpointImpl) Endpoint.publish(address, service);
- // 添加默认拦截器(LoggingInInterceptor 和 LoggingOutInterceptor)
- ep.getInInterceptors().add(new LoggingInInterceptor());//in 拦截器
- ep.getOutInterceptors().add(new LoggingOutInterceptor());// out 拦截器
- System.out.println("server ready ……");
- }
3)客户端访问代码:
- /**
- * 简单客户端访问
- */
- private void visitServer() {
- HelloSAM helloFactory = new HelloSAM();// HelloSAM是客户端生成的继承了 service的类
- HelloWorld hw = helloFactory.getHelloWorldImplPort();// 返回远程ws对象的代理,不是服务器中远程对象
- System.out.println(hw.sayHi("SAM-SHO"));
- }
4)客户端显示:
- SAM-SHO,您好!您现在访问的是简单的WS服务端,时间为:14-11-20 下午1:28
5)服务端显示:主要是LoggingInInterceptor 和 LoggingOutInterceptor 输出的soap消息。
- 2014-11-20 13:28:17 org.apache.cxf.services.HelloSAM.HelloWorldImplPort.HelloWorld
- 信息: Inbound Message
- ----------------------------
- ID: 1
- Address: http://localhost:8080/helloWorld?wsdl
- Http-Method: GET
- Content-Type:
- Headers: {Accept=[text/html, image/gif, image/jpeg, *; q=.2, */*; q=.2], connection=[keep-alive], Content-Type=[null], Host=[localhost:8080], User-Agent=[Java/1.6.0_10-rc2]}
- --------------------------------------
- 2014-11-20 13:28:17 org.apache.cxf.services.HelloSAM.HelloWorldImplPort.HelloWorld
- 信息: Inbound Message
- ----------------------------
- ID: 2
- Address: http://localhost:8080/helloWorld?wsdl=HelloWorld.wsdl
- Http-Method: GET
- Content-Type:
- Headers: {Accept=[text/html, image/gif, image/jpeg, *; q=.2, */*; q=.2], connection=[keep-alive], Content-Type=[null], Host=[localhost:8080], User-Agent=[Java/1.6.0_10-rc2]}
- --------------------------------------
- 2014-11-20 13:28:18 org.apache.cxf.services.HelloSAM.HelloWorldImplPort.HelloWorld
- 信息: Inbound Message
- ----------------------------
- ID: 3
- Address: http://localhost:8080/helloWorld
- Encoding: UTF-8
- Http-Method: POST
- Content-Type: text/xml; charset=UTF-8
- Headers: {Accept=[text/xml, multipart/related, text/html, image/gif, image/jpeg, *; q=.2, */*; q=.2], connection=[keep-alive], Content-Length=[186], content-type=[text/xml; charset=UTF-8], Host=[localhost:8080], SOAPAction=[""], User-Agent=[Java/1.6.0_10-rc2]}
- Payload: <?xml version="1.0" ?><S:Envelope xmlns:S="http://schemas.xmlsoap.org/soap/envelope/"><S:Body><ns2:sayHi xmlns:ns2="http://ws.com/"><arg0>SAM-SHO</arg0></ns2:sayHi></S:Body></S:Envelope>
- --------------------------------------
- 2014-11-20 13:28:18 org.apache.cxf.services.HelloSAM.HelloWorldImplPort.HelloWorld
- 信息: Outbound Message
- ---------------------------
- ID: 3
- Response-Code: 200
- Encoding: UTF-8
- Content-Type: text/xml
- Headers: {}
- Payload: <soap:Envelope xmlns:soap="http://schemas.xmlsoap.org/soap/envelope/"><soap:Body><ns2:sayHiResponse xmlns:ns2="http://ws.com/"><return>SAM-SHO,您好!您现在访问的是简单的WS服务端,时间为:14-11-20 下午1:28</return></ns2:sayHiResponse></soap:Body></soap:Envelope>
- --------------------------------------
2、客户端添加拦截器:使用 ClientProxy 与 Client 类。
- /**
- * 带拦截器的客户端访问
- */
- private void visitInterceptorServer() {
- HelloSAM helloFactory = new HelloSAM();// HelloSAM是客户端生成的继承了 service的类
- HelloWorld hw = helloFactory.getHelloWorldImplPort();// 返回远程ws对象的代理,不是服务器中远程对象
- System.out.println(hw.sayHi("SAM-SHO"));
- // 客户端 增加拦截器
- Client client = ClientProxy.getClient(hw);
- client.getInInterceptors().add(new LoggingInInterceptor());
- client.getOutInterceptors().add(new LoggingOutInterceptor());
- }
(三)、自定义拦截器
1、自定义拦截器
1)自定义的拦截器需要继承 AbstractPhaseInterceptor<SoapMessage> 类,参数 SoapMessage 为请求的 soap消息。
- public class MyIntecepter extends AbstractPhaseInterceptor<SoapMessage> {}
2)实现自己的拦截器时,需要实现handleMessage方法, handleMessage方法中的形参就是被拦截到的SOAP消息,一旦程序获得了这个soap消息,剩下的事情就可以解析soap消息,或修改soap消息
- public void handleMessage(SoapMessage msg) throws Fault {}
3)拦截器拦截的阶段:通过PhaseInterceptor,可以指定拦截器在哪个阶段起作用。定义无参的构造器,调用父类有参构造器。Phase 定义了阶段。
- /*
- * 一定要自己定义一个构造器
- */
- public MyIntecepter() {
- /*
- * 父类构造器中参数String phase,为在哪个阶段调用拦截器
- * Phase.PRE_INVOKE在调用之前调用拦截器
- */
- super(Phase.PRE_INVOKE);
- }
2、解析Soap消息的header信息。soap消息的body是固定遵守 wsdl。header部分可以自定义数据,用于一些数据的校验。一个soap消息可以有多个header。
3、服务端完整的自定义拦截器代码如下:
- package com.intecepter;
- import java.util.List;
- import org.apache.cxf.binding.soap.SoapMessage;
- import org.apache.cxf.headers.Header;
- import org.apache.cxf.interceptor.Fault;
- import org.apache.cxf.phase.AbstractPhaseInterceptor;
- import org.apache.cxf.phase.Phase;
- import org.w3c.dom.Element;
- import org.w3c.dom.NodeList;
- /**
- * 自定义拦截器,需要继承 AbstractPhaseInterceptor
- * 通过PhaseInterceptor,可以指定拦截器在哪个阶段起作用
- * @author SAM
- *
- */
- public class MyIntecepter extends AbstractPhaseInterceptor<SoapMessage> {
- /*
- * 一定要自己定义一个构造器
- */
- public MyIntecepter() {
- /*
- * 父类构造器中参数String phase,为在哪个阶段调用拦截器
- * Phase.PRE_INVOKE在调用之前调用拦截器
- */
- super(Phase.PRE_INVOKE);
- }
- /* 实现自己的拦截器时,需要实现handleMessage方法
- * handleMessage方法中的形参就是被拦截到的SOAP消息
- * 一旦程序获得了这个soap消息,剩下的事情就可以解析soap消息,或修改soap消息
- */
- public void handleMessage(SoapMessage msg) throws Fault {
- System.out.println("++++拦++++截++++器++++开++++始++++调++++用++++");
- // System.out.println("=========================== \n"+ msg+"\n ========================");
- List<Header> headers = msg.getHeaders();
- if(headers==null || headers.size()<1) {
- throw new Fault(new IllegalArgumentException("根本没有Header,别想调用"));
- }
- //假如要求第一个Header携带了用户名、密码信息
- Header firstHeader = headers.get(0);
- Element element = (Element) firstHeader.getObject();
- NodeList userids = element.getElementsByTagName("userId");
- NodeList userPasses = element.getElementsByTagName("userPass");
- if(userids.getLength()!=1) {
- throw new Fault(new IllegalArgumentException("用户名格式不对"));
- }
- if(userPasses.getLength()!=1) {
- throw new Fault(new IllegalArgumentException("密码格式不对"));
- }
- //得到第一个userId元素的文本内容,以该内容作为用户名字
- String userId = userids.item(0).getTextContent();
- String userPass = userPasses.item(0).getTextContent();
- //实际项目中,应该去查询数据库,该用户名、密码是否被授权
- if(!userId.equals("邵小宝")) {
- throw new Fault(new IllegalArgumentException("---------用---户----名---不----正-----确---------!!!!"));
- }
- if(!userPass.equals("sammy999")) {
- throw new Fault(new IllegalArgumentException("--------密---码-----不-----正------确-------!!!!!"));
- }
- System.out.println("拦++++截++++器++++结===============束++++");
- }
- }
4、客户端自定义拦截器代码如下:
- package com.intecepter;
- import java.util.List;
- import javax.xml.namespace.QName;
- import org.apache.cxf.binding.soap.SoapMessage;
- import org.apache.cxf.headers.Header;
- import org.apache.cxf.helpers.DOMUtils;
- import org.apache.cxf.interceptor.Fault;
- import org.apache.cxf.phase.AbstractPhaseInterceptor;
- import org.apache.cxf.phase.Phase;
- import org.w3c.dom.Document;
- import org.w3c.dom.Element;
- /**
- *
- * MyClientIntecepter.java
- *
- * @title 客户端的拦截器
- * @description
- * @author SAM-SHO
- * @Date 2014-11-22
- */
- public class MyClientIntecepter extends AbstractPhaseInterceptor<SoapMessage> {
- private String userId;
- private String userPass;
- //构造器
- public MyClientIntecepter(String userId, String userPass) {
- super(Phase.PREPARE_SEND);//发送消息前调用
- this.userId = userId;
- this.userPass = userPass;
- }
- // 实现的方法
- public void handleMessage(SoapMessage msg) throws Fault {
- List<Header> headers = msg.getHeaders();//得到soap消息的header
- //创建document对象
- Document document = DOMUtils.createDocument();
- Element header = document.createElement("MyHeader");
- //创建一个header元素与服务器一致
- Element userIdEle = document.createElement("userId");
- Element userPassEle = document.createElement("userPass");
- userIdEle.setTextContent(userId);
- userPassEle.setTextContent(userPass);
- header.appendChild(userIdEle);
- header.appendChild(userPassEle);
- headers.add(new Header(new QName("HelloSAM"), header));//把header放入soap的
- }
- public String getUserId() {
- return userId;
- }
- public void setUserId(String userId) {
- this.userId = userId;
- }
- public String getUserPass() {
- return userPass;
- }
- public void setUserPass(String userPass) {
- this.userPass = userPass;
- }
- }
5、把自定义的拦截器装载在服务端,方法与添加CXF的拦截器一致。
- /**
- * 发布带拦截器的WS
- */
- private void deployInterceptorService() {
- System.out.println("Server start ……");
- HelloWorldImpl service = new HelloWorldImpl();
- String address = "http://localhost:8080/helloWorld";
- // 调用Endpoint的publish方法
- EndpointImpl ep = (EndpointImpl) Endpoint.publish(address, service);
- // 添加自定义拦截器
- ep.getInInterceptors().add(new MyIntecepter());
- System.out.println("server ready ……");
- }
6、客户端装载拦截器。
- /**
- * 带拦截器的客户端访问
- */
- private void visitInterceptorServer() {
- HelloSAM helloFactory = new HelloSAM();// HelloSAM是客户端生成的继承了 service的类
- HelloWorld hw = helloFactory.getHelloWorldImplPort();// 返回远程ws对象的代理,不是服务器中远程对象
- // System.out.println(hw.sayHi("SAM-SHO"));
- // 客户端 增加拦截器
- Client client = ClientProxy.getClient(hw);
- client.getOutInterceptors().add(new MyClientIntecepter("邵小宝","sammy999"));
- System.out.println(hw.sayHi("SAM"));
7、运行,调用。
- 2014-11-22 14:26:33 org.apache.cxf.service.factory.ReflectionServiceFactoryBean buildServiceFromWSDL
- 信息: Creating Service {http://impl.ws.com/}HelloSAM from WSDL: http://localhost:8080/helloWorld?wsdl
- Exception in thread "main" javax.xml.ws.soap.SOAPFaultException: --------密---码-----不-----正------确-------!!!!!
- at org.apache.cxf.jaxws.JaxWsClientProxy.inv


 122
122

 被折叠的 条评论
为什么被折叠?
被折叠的 条评论
为什么被折叠?
 到【灌水乐园】发言


