第
1
章 案例:使用
spring
的
IoC
的实现账户的
CRUD
1.1
需求和技术要求
1.1.1
需求
实现账户的
CRUD
操作
1.1.2
技术要求
使用
spring
的
IoC
实现对象的管理
使用
DBAssit
作为持久层解决方案
使用
c3p0
数据源
1.2
环境搭建
1.2.1
拷贝
jar
包
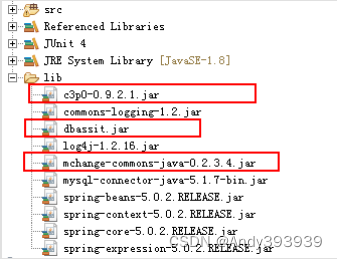
1.2.2 创建数据库和编写实体类
create table account(
id int primary key auto_increment,
name varchar(40),
money float
)character set utf8 collate utf8_general_ci;
insert into account(name,money) values('aaa',1000);
insert into account(name,money) values('bbb',1000);
insert into account(name,money) values('ccc',1000);
/**
* 账户的实体类
*/
public class Account implements Serializable {
private Integer id;
private String name;
private Float money;
public Integer getId() {
return id;
}
public void setId(Integer id) {
this.id = id;
}
public String getName() {
return name;
}
public void setName(String name) {
this.name = name;
}
public Float getMoney() {
return money;
}
public void setMoney(Float money) {
this.money = money;
}
}
1.2.3 编写持久层代码
/**
* 账户的持久层接口
*/

public interface IAccountDao {

/**
* 保存
* @param account
*/

void save(Account account);
/**
* 更新
* @param account
*/
void update(Account account);

/**
* 删除
* @param accountId
*/

void delete(Integer accountId);

/**
* 根据 id 查询
* @param accountId
* @return
*/

Account findById(Integer accountId);

/**
* 查询所有
* @return
*/

List<Account> findAll();
}

/**
* 账户的持久层实现类
*/

public class AccountDaoImpl implements IAccountDao {
private DBAssit dbAssit;
public void setDbAssit(DBAssit dbAssit) {
this.dbAssit = dbAssit;
}
@Override
public void save(Account account) {
dbAssit.update("insert into
account(name,money)values(?,?)",account.getName(),account.getMoney());
}
@Override
public void update(Account account) {
dbAssit.update("update account set name=?,money=? where
id=?",account.getName(),account.getMoney(),account.getId());
}
@Override
public void delete(Integer accountId) {
dbAssit.update("delete from account where id=?",accountId);
}
@Override
public Account findById(Integer accountId) {
return dbAssit.query("select * from account where id=?",new
BeanHandler<Account>(Account.class),accountId);
}
@Override
public List<Account> findAll() {
return dbAssit.query("select * from account where id=?",new
BeanListHandler<Account>(Account.class));
}
}
1.2.4
编写业务层代码
/**
* 账户的业务层接口
*/
public interface IAccountService {
/**
* 保存账户
* @param account
*/
void saveAccount(Account account);
/**
* 更新账户
* @param account
*/
void updateAccount(Account account);
/**
* 删除账户
* @param account
*/
void deleteAccount(Integer accountId);
/**
* 根据 id 查询账户
* @param accountId
* @return
*/
Account findAccountById(Integer accountId);
/**
* 查询所有账户
* @return
*/
List<Account> findAllAccount();
}
/**
* 账户的业务层实现类
*/
public class AccountServiceImpl implements IAccountService {
private IAccountDao accountDao;
public void setAccountDao(IAccountDao accountDao) {
this.accountDao = accountDao;
}
@Override
public void saveAccount(Account account) {
accountDao.save(account);
}
@Override
public void updateAccount(Account account) {
accountDao.update(account);
}
@Override
public void deleteAccount(Integer accountId) {
accountDao.delete(accountId);
}
@Override
public Account findAccountById(Integer accountId) {
return accountDao.findById(accountId);
}
@Override
public List<Account> findAllAccount() {
return accountDao.findAll();
}
}
1.2.5
创建并编写配置文件
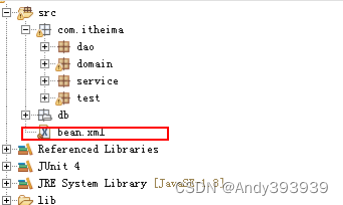
<?xml version="1.0" encoding="UTF-8"?>
<beans xmlns="http://www.springframework.org/schema/beans"
 xmlns:xsi="http://www.w3.org/2001/XMLSchema-instance"
 xsi:schemaLocation="http://www.springframework.org/schema/beans
 http://www.springframework.org/schema/beans/spring-beans.xsd">
</beans>
1.3 配置步骤
1.3.1
配置对象
<?xml version="1.0" encoding="UTF-8"?>
<beans xmlns="http://www.springframework.org/schema/beans"
 xmlns:xsi="http://www.w3.org/2001/XMLSchema-instance"
 xsi:schemaLocation="http://www.springframework.org/schema/beans
 http://www.springframework.org/schema/beans/spring-beans.xsd">

<!-- 配置 service -->
<bean id="accountService"
class="com.itheima.service.impl.AccountServiceImpl">
<property name="accountDao" ref="accountDao"></property>
</bean>
<!-- 配置 dao -->
<bean id="accountDao" class="com.itheima.dao.impl.AccountDaoImpl">
<property name="dbAssit" ref="dbAssit"></property>
</bean>
<!-- 配置 dbAssit 此处我们只注入了数据源,表明每条语句独立事务-->
<bean id="dbAssit" class="com.itheima.dbassit.DBAssit">

<property name="dataSource" ref="dataSource"></property>
</bean>
<!-- 配置数据源 -->
<bean id="dataSource" class="com.mchange.v2.c3p0.ComboPooledDataSource">
<property name="driverClass" value="com.mysql.jdbc.Driver"></property>
<property name="jdbcUrl" value="jdbc:mysql:///spring_day02"></property>
<property name="user" value="root"></property>
<property name="password" value="1234"></property>
</bean>
</beans>
1.4
测试案例
1.4.1
测试类代码
/**
* 测试类
*/
public class AccountServiceTest {
/**
* 测试保存
*/
@Test
public void testSaveAccount() {
Account account = new Account();
account.setName("黑马程序员");
account.setMoney(100000f);
ApplicationContext ac = new ClassPathXmlApplicationContext("bean.xml");
IAccountService as = ac.getBean("accountService",IAccountService.class);
as.saveAccount(account);
}
/**
* 测试查询一个
*/
@Test
public void testFindAccountById() {
ApplicationContext ac = new ClassPathXmlApplicationContext("bean.xml");

IAccountService as = ac.getBean("accountService",IAccountService.class);
Account account = as.findAccountById(1);
System.out.println(account);
}
/**
* 测试更新
*/
@Test
public void testUpdateAccount() {
ApplicationContext ac = new ClassPathXmlApplicationContext("bean.xml");
IAccountService as = ac.getBean("accountService",IAccountService.class);
Account account = as.findAccountById(1);
account.setMoney(20301050f);
as.updateAccount(account);
}
/**
* 测试删除
*/
@Test
public void testDeleteAccount() {
ApplicationContext ac = new ClassPathXmlApplicationContext("bean.xml");
IAccountService as = ac.getBean("accountService",IAccountService.class);
as.deleteAccount(1);
}
/**
* 测试查询所有
*/
@Test
public void testFindAllAccount() {
ApplicationContext ac = new ClassPathXmlApplicationContext("bean.xml");
IAccountService as = ac.getBean("accountService",IAccountService.class);
List<Account> list = as.findAllAccount();
for(Account account : list) {
System.out.println(account);
}
}
}
1.4.2
分析测试了中的问题
通过上面的测试类,我们可以看出,每个测试方法都重新获取了一次
spring 的核心容器,造成了不必要的重复代码,增加了我们开发的工作量。这种情况,在开发中应该避免发生。
有些同学可能想到了,我们把容器的获取定义到类中去。例如:
/**
* 测试类
*/
public class AccountServiceTest {
private ApplicationContext ac = new ClassPathXmlApplicationContext("bean.xml");
private IAccountService as = ac.getBean("accountService",IAccountService.class);
}
这种方式虽然能解决问题,但是扔需要我们自己写代码来获取容器。
能不能测试时直接就编写测试方法,而不需要手动编码来获取容器呢?
请在今天的最后一章节找答案。
第2章 基于注解的
IOC
配置
2.1
明确:写在最前
学习基于注解的
IoC
配置,大家脑海里首先得有一个认知,即注解配置和
xml
配置要实现的功能都是一样的,都是要降低程序间的耦合。只是配置的形式不一样。
关于实际的开发中到底使用
xml
还是注解,每家公司有着不同的使用习惯。所以这两种配置方式我们都需要掌握。
我们在讲解注解配置时,采用上一章节的案例,把
spring
的
xml
配置内容改为使用注解逐步实现。
2.2
环境搭建
2.2.1
第一步:拷贝必备
jar
包到工程的
lib
目录。
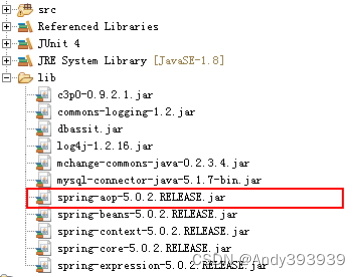
注意:在基于注解的配置中,我们还要多拷贝一个
aop
的
jar
包。如下图:
2.2.2 第二步:使用@Component 注解配置管理的资源
/**
* 账户的业务层实现类
*/
@Component("accountService")
public class AccountServiceImpl implements IAccountService {
private IAccountDao accountDao;
public void setAccountDao(IAccountDao accountDao) {
this.accountDao = accountDao;
}
}
/**
* 账户的持久层实现类
*/
@Component("accountDao")
public class AccountDaoImpl implements IAccountDao {
private DBAssit dbAssit;
}
注意:
1
、当我们使用注解注入时,
set
方法不用写
2.2.3
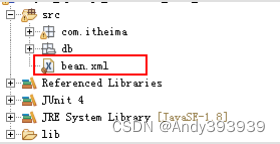
第三步:创建
spring
的
xml
配置文件并开启对注解的支持
注意:
基于注解整合时,导入约束时需要多导入一个
context
名称空间下的约束。
由于我们使用了注解配置,此时不能在继承
JdbcDaoSupport
,需要自己配置一个
JdbcTemplat
<?xml version="1.0" encoding="UTF-8"?>
<beans xmlns="http://www.springframework.org/schema/beans"
xmlns:context="http://www.springframework.org/schema/context"
 xmlns:xsi="http://www.w3.org/2001/XMLSchema-instance"
 xsi:schemaLocation="http://www.springframework.org/schema/beans
 http://www.springframework.org/schema/beans/spring-beans.xsd
 http://www.springframework.org/schema/context
 http://www.springframework.org/schema/context/spring-context.xsd">

<!-- 告知 spring 创建容器时要扫描的包 -->
<context:component-scan base-package="com.itheima"></context:component-scan>
<!-- 配置 dbAssit -->
<bean id="dbAssit" class="com.itheima.dbassit.DBAssit">
<property name="dataSource" ref="dataSource"></property>
</bean>
<!-- 配置数据源 -->
<bean id="dataSource" class="com.mchange.v2.c3p0.ComboPooledDataSource">
<property name="driverClass" value="com.mysql.jdbc.Driver"></property>
<property name="jdbcUrl" value="jdbc:mysql:///spring_day02"></property>
<property name="user" value="root"></property>
<property name="password" value="1234"></property>
</bean>
</beans>
2.3
常用注解
2.3.1
用于创建对象的
相当于:
<bean id="" class="">
2.3.1.1 @Component
作用: 把资源让 spring 来管理。相当于在 xml 中配置一个 bean。
属性: value:指定
bean
的
id
。如果不指定
value
属性,默认
bean
的
id
是当前类的类名。首字母小写。
2.3.1.2 @Controller @Service @Repository
他们三个注解都是针对一个的衍生注解,他们的作用及属性都是一模一样的。
他们只不过是提供了更加明确的语义化。
@Controller
:
一般用于表现层的注解。
@Service
:
一般用于业务层的注解。
@Repository
:
一般用于持久层的注解。
细节:如果注解中有且只有一个属性要赋值时,且名称是
value
,
value
在赋值是可以不写。
2.3.2
用于注入数据的
相当于:
<property name="" ref="">
<property name="" value="">
2.3.2.1 @Autowired
作用:
自动按照类型注入。当使用注解注入属性时,
set
方法可以省略。它只能注入其他
bean
类型。当有多个类型匹配时,使用要注入的对象变量名称作为 bean
的
id
,在
spring
容器查找,找到了也可以注入成功。找不到就报错。
2.3.2.2 @Qualifier
作用: 在自动按照类型注入的基础之上,再按照 Bean
的
id
注入。它在给字段注入时不能独立使用,必须和 @Autowire 一起使用;但是给方法参数注入时,可以独立使用。
属性: value:指定
bean
的
id
。
2.3.2.3 @Resource
作用: 直接按照 Bean
的
id
注入。它也只能注入其他
bean
类型。
属性: name:指定
bean
的
id
。
2.3.2.4 @Value
作用: 注入基本数据类型和 String
类型数据的
属性: value:用于指定值
2.3.3
用于改变作用范围的:
相当于:
<bean id="" class=""
scope=""
>
2.3.3.1 @Scope
作用: 指定 bean
的作用范围。
属性:
value
:指定范围的值。
取值:
singleton prototype
request session globalsession
2.3.4
和生命周期相关的:
(
了解
)
相当于:
<bean id="" class=""
init-method="" destroy-method=""
/>
2.3.4.1 @PostConstruct
作用:
用于指定初始化方法。
2.3.4.2 @PreDestroy
作用:
用于指定销毁方法。
2.3.5
关于
Spring
注解和
XML
的选择问题
注解的优势:
配置简单,维护方便(我们找到类,就相当于找到了对应的配置)。
XML
的优势:
修改时,不用改源码。不涉及重新编译和部署。
Spring
管理
Bean
方式的比较:
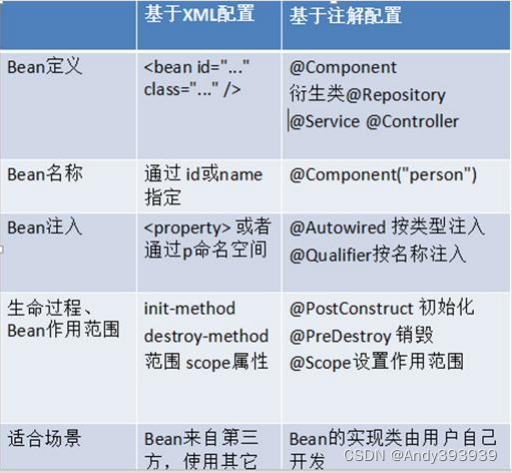
2.4spring 管理对象细节
基于注解的 spring IoC 配置中,bean 对象的特点和基于 XML 配置是一模一样的。
2.5spring 的纯注解配置
写到此处,基于注解的
IoC
配置已经完成,但是大家都发现了一个问题:我们依然离不开
spring
的
xml
配置文件,那么能不能不写这个 bean.xml
,所有配置都用注解来实现呢?
当然,同学们也需要注意一下,我们选择哪种配置的原则是简化开发和配置方便,而非追求某种技术。
2.5.1
待改造的问题
我们发现,之所以我们现在离不开
xml
配置文件,是因为我们有一句很关键的配置:
<!-- 告知spring框架在,读取配置文件,创建容器时,扫描注解,依据注解创建对象,并存入容器中 -->
<context:component-scan base-package="com.itheima"></context:component-scan>
如果他要也能用注解配置,那么我们就离脱离
xml
文件又进了一步。
另外,数据源和
JdbcTemplate
的配置也需要靠注解来实现。
<!-- 配置 dbAssit -->
<bean id="dbAssit" class="com.itheima.dbassit.DBAssit">
<property name="dataSource" ref="dataSource"></property>
</bean>
<!-- 配置数据源 -->
<bean id="dataSource" class="com.mchange.v2.c3p0.ComboPooledDataSource">
<property name="driverClass" value="com.mysql.jdbc.Driver"></property>
<property name="jdbcUrl" value="jdbc:mysql:///spring_day02"></property>
<property name="user" value="root"></property>
<property name="password" value="1234"></property>
</bean>
2.5.2
新注解说明
2.5.2.1 @Configuration
作用:
用于指定当前类是一个
spring
配置类,当创建容器时会从该类上加载注解。获取容器时需要使用
AnnotationApplicationContext(
有
@Configuration
注解的类
.class)
。
属性:
value:
用于指定配置类的字节码
示例代码:
/**
* spring 的配置类,相当于 bean.xml 文件
*/
@Configuration
public class SpringConfiguration {
}
注意:
我们已经把配置文件用类来代替了,但是如何配置创建容器时要扫描的包呢?
请看下一个注解。
2.5.2.2 @ComponentScan
作用:
用于指定
spring
在初始化容器时要扫描的包。作用和在
spring
的
xml
配置文件中的:
<
context:component-scan
base-package
="
com.itheima
"
/>
是一样的。
属性:
basePackages
:用于指定要扫描的包。和该注解中的
value
属性作用一样。
示例代码:
/**
* spring 的配置类,相当于 bean.xml 文件
*/
@Configuration
@ComponentScan("com.itheima")
public class SpringConfiguration {
}
注意:
我们已经配置好了要扫描的包,但是数据源和
JdbcTemplate
对象如何从配置文件中移除呢?
请看下一个注解。
2.5.2.3 @Bean
作用:
该注解只能写在方法上,表明使用此方法创建一个对象,并且放入
spring
容器。
属性:
name
:给当前
@Bean
注解方法创建的对象指定一个名称
(
即
bean
的
id
)。
示例代码:
/**
* 连接数据库的配置类
*/
public class JdbcConfig {
/**
* 创建一个数据源,并存入 spring 容器中
* @return
*/
@Bean(name="dataSource")
public DataSource createDataSource() {
try {
ComboPooledDataSource ds = new ComboPooledDataSource();
ds.setUser("root");
ds.setPassword("1234");
ds.setDriverClass("com.mysql.jdbc.Driver");
ds.setJdbcUrl("jdbc:mysql:///spring_day02");
return ds;
} catch (Exception e) {
throw new RuntimeException(e);
}
}
/**
* 创建一个 DBAssit,并且也存入 spring 容器中
* @param dataSource
* @return
*/
@Bean(name="dbAssit")
public DBAssit createDBAssit(DataSource dataSource) {
return new DBAssit(dataSource);
}
}
注意
:
我们已经把数据源和
DBAssit
从配置文件中移除了,此时可以删除
bean.xml
了。
但是由于没有了配置文件,创建数据源的配置又都写死在类中了。如何把它们配置出来呢?
请看下一个注解。
2.5.2.4 @PropertySource
作用:用于加载.properties 文件中的配置。例如我们配置数据源时,可以把连接数据库的信息写到 properties 配置文件中,就可以使用此注解指定 properties 配置文件的位置。
属性: value[]:用于指定
properties
文件位置。如果是在类路径下,需要写上
classpath:
示例代码:
配置:
/**
* 连接数据库的配置类
*/
public class JdbcConfig {
@Value("${jdbc.driver}")
private String driver;
@Value("${jdbc.url}")
private String url;
@Value("${jdbc.username}")
private String username;
@Value("${jdbc.password}")
private String password;
/**
* 创建一个数据源,并存入 spring 容器中
* @return
*/
@Bean(name="dataSource")
public DataSource createDataSource() {
try {
ComboPooledDataSource ds = new ComboPooledDataSource();
ds.setDriverClass(driver);
ds.setJdbcUrl(url);
ds.setUser(username);
ds.setPassword(password);
return ds;
} catch (Exception e) {
throw new RuntimeException(e);
}
}
}
jdbc.properties
文件:
jdbc.driver=com.mysql.jdbc.Driver
jdbc.url=jdbc:mysql://localhost:3306/day44_ee247_spring
jdbc.username=root
jdbc.password=1234
注意:
此时我们已经有了两个配置类,但是他们还没有关系。如何建立他们的关系呢?
请看下一个注解。
2.5.2.5 @Import
作用:
用于导入其他配置类,在引入其他配置类时,可以不用再写
@Configuration
注解。当然,写上也没问题。
属性:
value[]
:用于指定其他配置类的字节码。
示例代码:
@Configuration
@ComponentScan(basePackages = "com.itheima.spring")
@Import({ JdbcConfig.class})
public class SpringConfiguration {
}
@Configuration
@PropertySource("classpath:jdbc.properties")
public class JdbcConfig{
}
注意:
我们已经把要配置的都配置好了,但是新的问题产生了,由于没有配置文件了,如何获取容器呢?
请看下一小节。
2.5.2.6
通过注解获取容器:
ApplicationContext ac =
new AnnotationConfigApplicationContext(SpringConfiguration.class);
2.5.3
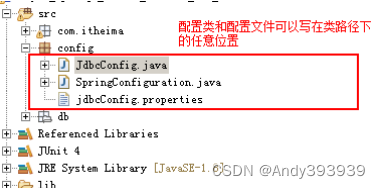
工程结构图
第3章 Spring 整合 Junit
[掌握]
3.1
测试类中的问题和解决思路
3.1.1
问题
在测试类中,每个测试方法都有以下两行代码:
ApplicationContext
ac
=
new
ClassPathXmlApplicationContext(
"bean.xml"
);
IAccountService
as
=
ac
.getBean(
"accountService"
,IAccountService.
class
);
这两行代码的作用是获取容器,如果不写的话,直接会提示空指针异常。所以又不能轻易删掉。
3.1.2
解决思路分析
针对上述问题,我们需要的是程序能自动帮我们创建容器。一旦程序能自动为我们创建
spring
容器,我们就无须手动创建了,问题也就解决了。
我们都知道,
junit
单元测试的原理(在
web
阶段课程中讲过),但显然,
junit
是无法实现的,因为它自己都无法知晓我们是否使用了 spring
框架,更不用说帮我们创建
spring
容器了。不过好在,
junit
给我们暴露了一个注解,可以让我们替换掉它的运行器。
这时,我们需要依靠
spring
框架,因为它提供了一个运行器,可以读取配置文件(或注解)来创建容器。我们只需要告诉它配置文件在哪就行了。
3.2
配置步骤
3.2.1
第一步:拷贝整合
junit
的必备
jar
包到
lib
目录
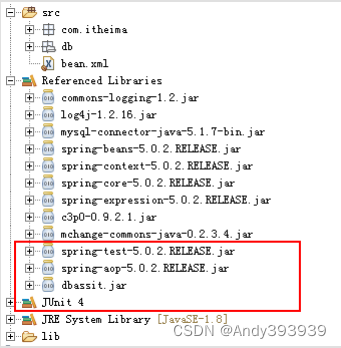
此处需要注意的是,导入
jar
包时,需要导入一个
spring
中
aop
的
jar
包。
3.2.2 第二步:使用@RunWith 注解替换原有运行器
/**
* 测试类
*/
@RunWith(SpringJUnit4ClassRunner.class)
public class AccountServiceTest {
}
3.2.3 第三步:使用@ContextConfiguration 指定 spring 配置文件的位置
/**
* 测试类
*/
@RunWith(SpringJUnit4ClassRunner.class)
@ContextConfiguration(locations= {"classpath:bean.xml"})
public class AccountServiceTest {
}
@ContextConfiguration
注解:
locations
属性:
用于指定配置文件的位置。如果是类路径下,需要用
classpath:
表明
classes
属性:
用于指定注解的类。当不使用
xml
配置时,需要用此属性指定注解类的位置。
3.2.4
第四步:使用
@Autowired
给测试类中的变量注入数据
/**
* 测试类
*/
@RunWith(SpringJUnit4ClassRunner.class)
@ContextConfiguration(locations= {"classpath:bean.xml"})
public class AccountServiceTest {
@Autowired
private IAccountService as ;
}
3.3
为什么不把测试类配到
xml
中
在解释这个问题之前,先解除大家的疑虑,配到
XML
中能不能用呢?
答案是肯定的,没问题,可以使用。
那么为什么不采用配置到
xml
中的方式呢?
这个原因是这样的:
第一:当我们在
xml
中配置了一个
bean
,
spring
加载配置文件创建容器时,就会创建对象。
第二:测试类只是我们在测试功能时使用,而在项目中它并不参与程序逻辑,也不会解决需求上的问题,所以创建完了,并没有使用。那么存在容器中就会造成资源的浪费。
所以,基于以上两点,我们不应该把测试配置到
xml
文件中。


 1万+
1万+

 被折叠的 条评论
为什么被折叠?


