


多进程实践——multiprocessing
笔者最近在实践多进程发现multiprocessing,真心很好用,不仅加速了运算,同时可以GPU调用,而且互相之间无关联,这样可以很放心的进行计算。
譬如(参考:多进程):
from multiprocessing import Pool
import os, time, random

def long_time_task(name):
    print 'Run task %s (%s)...' % (name, os.getpid())
    start = time.time()
    time.sleep(random.random() * 3)
    end = time.time()
    print 'Task %s runs %0.2f seconds.' % (name, (end - start))

if __name__=='__main__':
    print 'Parent process %s.' % os.getpid()
    p = Pool()
    for i in range(5):
        p.apply_async(long_time_task, args=(i,))
    print 'Waiting for all subprocesses done...'
    p.close()
    p.join()
    print 'All subprocesses done.'
- 1
- 2
- 3
- 4
- 5
- 6
- 7
- 8
- 9
- 10
- 11
- 12
- 13
- 14
- 15
- 16
- 17
- 18
- 19
先载入multiprocessing 模块Pool,
然后定义一个函数long_time_task;
创建一个进程池: p = Pool(),
for i in range(5):即为定义开一个进程,此处发现ubuntu里面用spyder中的ipython,开多进程CPU时候,只能开到4个(可能默认开到4个内存占满了);
args是long_time_task函数的参数项,
一定要p.close()之后才能执行后续内容,
然后用p.join()调用join()之前必须先调用close(),调用close()之后就不能继续添加新的Process了。
请注意输出的结果,task 0,1,2,3是立刻执行的,而task 4要等待前面某个task完成后才执行,这是因为Pool的默认大小在我的电脑上是4,因此,最多同时执行4个进程。这是Pool有意设计的限制,并不是操作系统的限制。如果改成:
p = Pool(5)
- 1
就可以同时跑5个进程。
由于Pool的默认大小是CPU的核数,如果你不幸拥有8核CPU,你要提交至少9个子进程才能看到上面的等待效果。
.
延伸一:Caffe Python接口多进程提取特征
那么在做图像处理的时候,进行预测任务的时候,可以开多进程,GPU方案。那么步骤是:
- 1、分割数据;
- 2、多个进程池。
第一步:分割数据,用split_list函数:
def split_list(alist, wanted_parts=1):
    length = len(alist)
    return [ alist[i*length // wanted_parts: (i+1)*length // wanted_parts]
             for i in range(wanted_parts) ]
- 1
- 2
- 3
- 4
第二步:开多个进程池
可参考博客:机器视觉:Caffe Python接口多进程提取特征
.
多线程案例——threading
1、普通的threading
import threading
import time
def haha(max_num):
    """
    随便定义一个函数,要求用户输入一个要打印数字的最大范围
    输入之后就会从0开始打印,直到用户输入的最大范围
    """
    for i in range(max_num):
        """
        每次打印一个数字要间隔1秒,那么打印10个数就要耗时10秒
        """
        time.sleep(1)
        print i
for x in range(3):
    """
    这里的rang(3)是要依次启动三个线程,每个线程都调用函数haha()
    第一个线程启动执行之后,马上启动第二个线程再次执行。最后也相当
    函数执行了3次
    """
    #通过threading.Thread方法实例化多线程类
    #target后面跟的是函数的名称但是不要带括号也不填写参数
    #args后面的内容才是要传递给函数haha()的参数。切记参数一定要以数组的形式填写不然会报错。
    t=threading.Thread(target=haha,args=(10,))
    #将线程设置为守护线程
    t.setDaemon(True)
    #线程准备就绪,随时等候cpu调度
    t.start()
- 1
- 2
- 3
- 4
- 5
- 6
- 7
- 8
- 9
- 10
- 11
- 12
- 13
- 14
- 15
- 16
- 17
- 18
- 19
- 20
- 21
- 22
- 23
- 24
- 25
- 26
- 27
其中setDaemon 这个参数是True,就表示程序流程跑完之后直接就关闭线程然后退出了,根本不管线程是否执行完。
.
2. join()
结果看起来规则一些可以考虑使用join()方法,参考:python 并发执行之多线程
join(timeout)方法将会等待直到线程结束。这将阻塞正在调用的线程,直到被调用join()方法的线程结束。
import threading
import time
def haha(max_num):
    for i in range(max_num):
        time.sleep(1)
        print i
for x in range(3):
    t=threading.Thread(target=haha,args=(5,))
    t.start()
    #通过join方法让线程逐条执行
    t.join()
- 1
- 2
- 3
- 4
- 5
- 6
- 7
- 8
- 9
- 10
- 11
0
1
2
3
4
0
1
2
3
4
0
1
2
3
4
- 1
- 2
- 3
- 4
- 5
- 6
- 7
- 8
- 9
- 10
- 11
- 12
- 13
- 14
- 15
3. 多线程循环
背景:Python脚本:读取文件中每行,放入列表中;循环读取列表中的每个元素,并做处理操作。
核心:多线程处理单个for循环函数调用
#!/usr/bin/env python
#-*- coding: utf8 -*-

import sys
import time
import string
import threading
import datetime
fileinfo = sys.argv[1]

# 读取文件内容放入列表
host_list = []
port_list = []

# 定义函数:读取文件内容放入列表中
def CreateList():
    f = file(fileinfo,'r')
    for line in f.readlines():
        host_list.append(line.split(' ')[0])
        port_list.append(line.split(' ')[1])
    return host_list
    return port_list
    f.close()

# 单线程 循环函数,注释掉了
#def CreateInfo():
#    for i in range(0,len(host_list)):     # 单线程:直接循环列表
#        time.sleep(1)
#        TimeMark = datetime.datetime.now().strftime('%Y-%m-%d %H:%M:%S')
#        print "The Server's HostName is %-15s and Port is %-4d !!! [%s]" % (host_list[i],int(port_list[i]),TimeMark)
#

#  定义多线程循环调用函数
def MainRange(start,stop):     #提供列表index起始位置参数
    for i in range(start,stop):
        time.sleep(1)
        TimeMark = datetime.datetime.now().strftime('%Y-%m-%d %H:%M:%S')
        print "The Server's HostName is %-15s and Port is %-4d !!! [%s]" % (host_list[i],int(port_list[i]),TimeMark)

# 执行函数,生成列表
CreateList()
# 列表分割成:两部分 mid为列表的index中间位置
mid = int(len(host_list)/2)

# 多线程部分
threads = []
t1 = threading.Thread(target=MainRange,args=(0,mid))
threads.append(t1)
t2 = threading.Thread(target=MainRange,args=(mid,len(host_list)))
threads.append(t2)

for t in threads:
    t.setDaemon(True)
    t.start()
t.join()
print "ok"
- 1
- 2
- 3
- 4
- 5
- 6
- 7
- 8
- 9
- 10
- 11
- 12
- 13
- 14
- 15
- 16
- 17
- 18
- 19
- 20
- 21
- 22
- 23
- 24
- 25
- 26
- 27
- 28
- 29
- 30
- 31
- 32
- 33
- 34
- 35
- 36
- 37
- 38
- 39
- 40
- 41
- 42
- 43
- 44
- 45
- 46
- 47
- 48
- 49
- 50
- 51
- 52
- 53
- 54
- 55
- 56
也有一个分拆的步骤,args=(0,mid),args=(mid,len(host_list)
.
4.线程锁与线程同步
当你有多个线程,就需要考虑怎样避免线程冲突。解决办法就是使用线程锁。锁由 Python 的 threading 模块提供,并且它最多被一个线程所持有。当一个线程试图获取一个已经锁在资源上的锁时,该线程通常会暂停运行,直到这个锁被释放。
让我们给这个函数添加锁。有两种方法可以实现。第一种方式是使用 try/finally ,从而确保锁肯定会被释放。下面是示例:
import threading

total = 0
lock = threading.Lock()

def update_total(amount):
    """
    Updates the total by the given amount
    """
    global total
    lock.acquire()
    try:
        total += amount
    finally:
        lock.release()
    print (total)

if __name__ == '__main__':
    for i in range(10):
        my_thread = threading.Thread(
            target=update_total, args=(5,))
        my_thread.start()
- 1
- 2
- 3
- 4
- 5
- 6
- 7
- 8
- 9
- 10
- 11
- 12
- 13
- 14
- 15
- 16
- 17
- 18
- 19
- 20
- 21
- 22
- 23
- 24
由 with 语句作为替代。
import threading

total = 0
lock = threading.Lock()


def do_something():
    lock.acquire()

    try:
        print('Lock acquired in the do_something function')
    finally:
        lock.release()
        print('Lock released in the do_something function')

    return "Done doing something"

def do_something_else():
    lock.acquire()

    try:
        print('Lock acquired in the do_something_else function')
    finally:
        lock.release()
        print('Lock released in the do_something_else function')

    return "Finished something else"

if __name__ == '__main__':
    result_one = do_something()
    result_two = do_something_else()
- 1
- 2
- 3
- 4
- 5
- 6
- 7
- 8
- 9
- 10
- 11
- 12
- 13
- 14
- 15
- 16
- 17
- 18
- 19
- 20
- 21
- 22
- 23
- 24
- 25
- 26
- 27
- 28
- 29
- 30
- 31
可重入锁
为了支持在同一线程中多次请求同一资源,python提供了可重入锁(RLock)。RLock内部维护着一个Lock和一个counter变量,counter记录了acquire的次数,从而使得资源可以被多次require。直到一个线程所有的acquire都被release,其他的线程才能获得资源。
即把 lock = threading.lock() 替换为 lock = threading.RLock(),然后重新运行代码,现在代码就可以正常运行了。
参考文献:
Python 多线程
一文学会 Python 多线程编程
.
python 性能调试工具(line_profiler)
参考:python 性能调试工具(line_profiler)使用
网上大部分都是说在所需要测的函数前面加一个@profile,如文档所说。但是加了@profile后函数无法直接运行,只能优化的时候加上,调试的时候又得去掉。文章中提到了这个问题的解决办法,个人觉得还是有点麻烦,不太能理解这是为什么。我在stackoverflow上看到了另一种关于line_profile的使用方法,简单而且实用。
from line_profiler import LineProfiler
import random

def do_stuff(numbers):
    s = sum(numbers)
    l = [numbers[i]/43 for i in range(len(numbers))]
    m = ['hello'+str(numbers[i]) for i in range(len(numbers))]

numbers = [random.randint(1,100) for i in range(1000)]
lp = LineProfiler()
lp_wrapper = lp(do_stuff)
lp_wrapper(numbers)
lp.print_stats()
- 1
- 2
- 3
- 4
- 5
- 6
- 7
- 8
- 9
- 10
- 11
- 12
- 13
- 14
输出结果:
Timer unit: 1e-06 s

Total time: 0.000649 s
File: <ipython-input-2-2e060b054fea>
Function: do_stuff at line 4
Line # Hits Time Per Hit % Time Line Contents
 <span class="hljs-number">4</span>                                           <span class="hljs-function"><span class="hljs-keyword">def</span> <span class="hljs-title">do_stuff</span><span class="hljs-params">(numbers)</span>:</span>
 <span class="hljs-number">5</span>         <span class="hljs-number">1</span>           <span class="hljs-number">10</span>     <span class="hljs-number">10.0</span>      <span class="hljs-number">1.5</span>      s = sum(numbers)
 <span class="hljs-number">6</span>         <span class="hljs-number">1</span>          <span class="hljs-number">186</span>    <span class="hljs-number">186.0</span>     <span class="hljs-number">28.7</span>      l = [numbers[i]/<span class="hljs-number">43</span> <span class="hljs-keyword">for</span> i <span class="hljs-keyword">in</span> range(len(numbers))]
 <span class="hljs-number">7</span>         <span class="hljs-number">1</span>          <span class="hljs-number">453</span>    <span class="hljs-number">453.0</span>     <span class="hljs-number">69.8</span>      m = [<span class="hljs-string">'hello'</span>+str(numbers[i]) <span class="hljs-keyword">for</span> i <span class="hljs-keyword">in</span> range(len(numbers))]</code><ul class="pre-numbering"><li style="color: rgb(153, 153, 153);">1</li><li style="color: rgb(153, 153, 153);">2</li><li style="color: rgb(153, 153, 153);">3</li><li style="color: rgb(153, 153, 153);">4</li><li style="color: rgb(153, 153, 153);">5</li><li style="color: rgb(153, 153, 153);">6</li><li style="color: rgb(153, 153, 153);">7</li><li style="color: rgb(153, 153, 153);">8</li><li style="color: rgb(153, 153, 153);">9</li><li style="color: rgb(153, 153, 153);">10</li><li style="color: rgb(153, 153, 153);">11</li><li style="color: rgb(153, 153, 153);">12</li></ul></pre>
.
python通过tqdm 执行时间
安装
pip install tqdm
- 1
在迭代器for中使用:
from tqdm import tqdm
for i in tqdm(range(9)):
    ...
- 1
- 2
- 3
同时也可以支持这样的迭代方式:
[i for i in tqdm(range(9))]
- 1
trange的方式:
>>> for i in trange(100):
...     sleep(0.1)
100%|################################################################| 100/100 [00:10<00:00,  9.97it/s]
- 1
- 2
- 3
- 4
当迭代的内容为list:
>>> pbar = tqdm(["a", "b", "c", "d"])
>>> for char in pbar:
...         pbar.set_description("Processing %s" % char)
Processing d: 100%|######################################################| 4/4 [00:06<00:00,  1.53s/it]
- 1
- 2
- 3
- 4
- 5
手动的控制更新
把运行的粒度放宽
>>> with tqdm(total=100) as pbar:
...     for i in range(10):
...         sleep(0.1)
...         pbar.update(10)
100%|################################################################| 100/100 [00:01<00:00, 99.60it/s]
- 1
- 2
- 3
- 4
- 5
- 6
- 7
延伸二:Python 多进程实践
参考:Python 多进程实践
多进程的方式可以增加脚本的并发处理能力, python 支持这种多进程的编程方式
在类unix系统中, python的os 模块内置了fork 函数用以创建子进程
1、fork 方式创建子进程
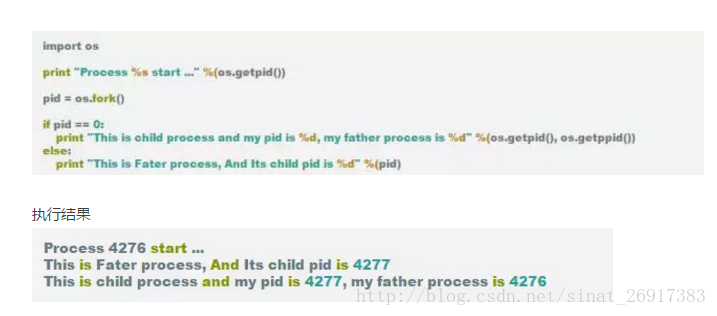
从结果可以看到, 从pid = os.fork() 开始, 下面的部分代码运行了两次, 第一次是父进程运行, 第二次是子进程运行, 且子进程的fork的结果总是0, 所以这个也可以用来作为区分父进程或是子进程标志
那么变量在多个进程之间是否相互影响呢
import os
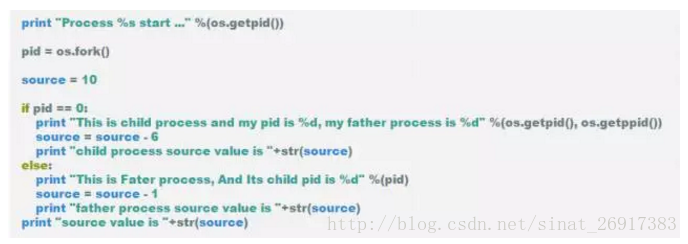
很明显, 初始值为10的source 在父进程中值 减少了 1, 为9, 而子进程明显source的初始值 是10, 也就是说多进程之间并没有什么相互影响


 793
793

 被折叠的 条评论
为什么被折叠?
被折叠的 条评论
为什么被折叠?
 到【灌水乐园】发言


