


接上篇 Bootstrap源码-客户端
1 Handler的添加过程
Netty有一个强大和灵活之处就是基于Pipeline的自定义Handler机制。基于此,可以像添加插件一样自由组合各种各样的Handler来完成业务逻辑。例如,需要处理HTTP数据,那么就可以在Pipeline前添加一个针对HTTP编解码的Handler,然后添加自己的业务逻辑的Handler,这样网络上的数据流就像通过一个管道一样,从不同的Handler中流过并进行编解码,最终到达自定义的Handler中。
先看一下Handler是如何及何时添加到ChannelPipeline中的。看一段用户代码片段:
bootstrap.group(group)
                    .channel(NioSocketChannel.class)
                    .option(ChannelOption.SO_KEEPALIVE,true)
                    .handler(new ChannelInitializer<SocketChannel>() {
                        @Override
                        protected void initChannel(SocketChannel socketChannel) throws Exception {
                            ChannelPipeline pipeline = socketChannel.pipeline();
                            pipeline.addLast(new StringDecoder());
                            pipeline.addLast(new StringEncoder());
                            pipeline.addLast(new ChatClientHandler());
                            System.out.println("初始化channel:" + socketChannel);
                        }
                    });
这段代码就实现了Handler的添加功能,Bootstrap的handler方法接收一个ChannelHandler,而我们传入的参数是一个派生于抽象类ChannelInitializer的匿名类,它也实现了ChannelHandler接口,来看一下ChannelInitializer类,代码如下:
public abstract class ChannelInitializer<C extends Channel> extends ChannelInboundHandlerAdapter {
    private static final InternalLogger logger = InternalLoggerFactory.getInstance(ChannelInitializer.class);
    private final ConcurrentMap<ChannelHandlerContext, Boolean> initMap = PlatformDependent.newConcurrentHashMap();

    public ChannelInitializer() {
    }

    protected abstract void initChannel(C var1) throws Exception;

    public final void channelRegistered(ChannelHandlerContext ctx) throws Exception {
        if (this.initChannel(ctx)) {
            ctx.pipeline().fireChannelRegistered();
        } else {
            ctx.fireChannelRegistered();
        }

    }

    public void exceptionCaught(ChannelHandlerContext ctx, Throwable cause) throws Exception {
        logger.warn("Failed to initialize a channel. Closing: " + ctx.channel(), cause);
        ctx.close();
    }

    public void handlerAdded(ChannelHandlerContext ctx) throws Exception {
        if (ctx.channel().isRegistered()) {
            this.initChannel(ctx);
        }

    }

    private boolean initChannel(ChannelHandlerContext ctx) throws Exception {
        if (this.initMap.putIfAbsent(ctx, Boolean.TRUE) == null) {
            try {
                this.initChannel(ctx.channel());
            } catch (Throwable var6) {
                this.exceptionCaught(ctx, var6);
            } finally {
                this.remove(ctx);
            }

            return true;
        } else {
            return false;
        }
    }

    private void remove(ChannelHandlerContext ctx) {
        try {
            ChannelPipeline pipeline = ctx.pipeline();
            if (pipeline.context(this) != null) {
                pipeline.remove(this);
            }
        } finally {
            this.initMap.remove(ctx);
        }

    }
}
ChannelInitializer是一个抽象类,它有一个抽象方法initChannel(),我们的匿名类正是实现了这个方法,并在这个方法中添加了自定义的Handler。这个initChannel方法是在ChannelInitializer的channelRegistered()方法中被调用的。
接下来关注一下channelRegistered方法。从上面的代码中可以看到,在channelRegistered方法中,会调用initChannel方法,将自定义的Handler添加到ChannelPipeline中,然后调用ctx.pipeline().remove(this)方法将自己从ChannelPipeline中删除。
一开始,ChannelPipeline中只有三个Handler,分别是Head、Tail和我们添加的ChannelInitializer,如下图所示:

接着调用 initChannel方法,添加自定义的Handler,如下图:

最后将 ChannelInitializer删除,如下图:

分析到这里,我们已经简单了解了自定义的Handler是如何添加到ChannelPipeline中的,后面在进行深入探讨。
2 客户端发起连接请求
经过前面的分析,我们已经大致了解了Netty客户端初始化时所做的工作,接下来分析一下客户端是如何发起TCP连接的。
客户端通过调用Bootstrap的connect方法进行连接。在connect方法中进行一些参数检查,并调用doConnect方法,代码如下:
private static void doConnect(final SocketAddress remoteAddress, final SocketAddress localAddress, final ChannelPromise connectPromise) {
        final Channel channel = connectPromise.channel();
        channel.eventLoop().execute(new Runnable() {
            public void run() {
                if (localAddress == null) {
                    channel.connect(remoteAddress, connectPromise);
                } else {
                    channel.connect(remoteAddress, localAddress, connectPromise);
                }

                connectPromise.addListener(ChannelFutureListener.CLOSE_ON_FAILURE);
            }
        });
    }
在doConnect方法中,eventLoop线程会调用Channel的connect方法,而这个Channel的具体类型实际就是NioSocketChannel,前面已经分析过。继续跟踪channel.connect()方法,发现它调用的是DefaultChannelPipeline的connect方法,Pipeline的connect方法代码如下:
public final ChannelFuture connect(SocketAddress remoteAddress, ChannelPromise promise) {
        return this.tail.connect(remoteAddress, promise);
    }
前面分析过,Tail是一个TailContext的实例,而TailContext又是AbstractChannelHandlerContext的子类,并且没有实现connect方法,因此这里调用的其实是AbstractChannelHandlerContext的connect方法,看一下这个方法的代码:
public ChannelFuture connect(final SocketAddress remoteAddress, final SocketAddress localAddress, final ChannelPromise promise) {
        if (remoteAddress == null) {
            throw new NullPointerException("remoteAddress");
        } else if (!this.validatePromise(promise, false)) {
            return promise;
        } else {
            final AbstractChannelHandlerContext next = this.findContextOutbound();
            EventExecutor executor = next.executor();
            if (executor.inEventLoop()) {
                next.invokeConnect(remoteAddress, localAddress, promise);
            } else {
                safeExecute(executor, new Runnable() {
                    public void run() {
                        next.invokeConnect(remoteAddress, localAddress, promise);
                    }
                }, promise, (Object)null);
            }

            return promise;
        }
    }
上面有一行非常关键的代码,
final AbstractChannelHandlerContext next = this.findContextOutbound();这里调用findContextOutbound方法,从DefaultChannelPipeline内的双向链表的Tail开始,不断向前找到第一个Outbound为true的AbstractChannelHandlerContext,然后调用它的invokeConnect方法,代码如下:
private void invokeConnect(SocketAddress remoteAddress, SocketAddress localAddress, ChannelPromise promise) {
        if (this.invokeHandler()) {
            try {
                ((ChannelOutboundHandler)this.handler()).connect(this, remoteAddress, localAddress, promise);
            } catch (Throwable var5) {
                notifyOutboundHandlerException(var5, promise);
            }
        } else {
            this.connect(remoteAddress, localAddress, promise);
        }

    }
前面提到,在DefaultChannelPipeline的构造器中,实例化两个对象:Head和Tail,并形成了双向链表的头和尾。Head是HeadContext的实例,它实现了ChannelOunboundHandler接口,并挨它的Ounbound设置为true。因此在findContextOutbound方法中,找到的AbstractChannelHandlerContext对象其实就是Head,进而在invokeConnect方法中,向上转换为ChannelOuntboundHandler就问题了。而又因为HeadContext重写了connect方法,所以实际上调用的是HeadContext的connect方法。接着跟踪HeadContext的connect方法。
public void connect(ChannelHandlerContext ctx, SocketAddress remoteAddress, SocketAddress localAddress, ChannelPromise promise) throws Exception {
            this.unsafe.connect(remoteAddress, localAddress, promise);
        }
这个方法connect很简单,只是调用了Unsafe的connect方法。回顾一下HeadContext的构造器,就会发现这个Unsafe方法其实就是pipeline.channel().unsafe返回的Channel的Unsafe属性。到这里为止,已经知道,其实是AbstractNioByteChannel.NioByteUnsafe内部类转了一大圈。最后,找到创建Socket连接的关键代码继续跟踪,其实调用的就是AbstractNioUnsafe的connect方法。
public final void connect(final SocketAddress remoteAddress, SocketAddress localAddress, ChannelPromise promise) {
            if (promise.setUncancellable() && this.ensureOpen(promise)) {
                try {
                    if (AbstractNioChannel.this.connectPromise != null) {
                        throw new ConnectionPendingException();
                    }

                    boolean wasActive = AbstractNioChannel.this.isActive();
                    if (AbstractNioChannel.this.doConnect(remoteAddress, localAddress)) {
                        this.fulfillConnectPromise(promise, wasActive);
                    } else {
                        AbstractNioChannel.this.connectPromise = promise;
                        AbstractNioChannel.this.requestedRemoteAddress = remoteAddress;
                        int connectTimeoutMillis = AbstractNioChannel.this.config().getConnectTimeoutMillis();
                        if (connectTimeoutMillis > 0) {
                            AbstractNioChannel.this.connectTimeoutFuture = AbstractNioChannel.this.eventLoop().schedule(new Runnable() {
                                public void run() {
                                    ChannelPromise connectPromise = AbstractNioChannel.this.connectPromise;
                                    ConnectTimeoutException cause = new ConnectTimeoutException("connection timed out: " + remoteAddress);
                                    if (connectPromise != null && connectPromise.tryFailure(cause)) {
                                        AbstractNioUnsafe.this.close(AbstractNioUnsafe.this.voidPromise());
                                    }

                                }
                            }, (long)connectTimeoutMillis, TimeUnit.MILLISECONDS);
                        }

                        promise.addListener(new ChannelFutureListener() {
                            public void operationComplete(ChannelFuture future) throws Exception {
                                if (future.isCancelled()) {
                                    if (AbstractNioChannel.this.connectTimeoutFuture != null) {
                                        AbstractNioChannel.this.connectTimeoutFuture.cancel(false);
                                    }

                                    AbstractNioChannel.this.connectPromise = null;
                                    AbstractNioUnsafe.this.close(AbstractNioUnsafe.this.voidPromise());
                                }

                            }
                        });
                    }
                } catch (Throwable var6) {
                    promise.tryFailure(this.annotateConnectException(var6, remoteAddress));
                    this.closeIfClosed();
                }

            }
        }
在这个connect方法中,又调用了doConnect方法,注意,这个方法并不是AbstractNioUnsafe的方法,而是AbstractNioChannel的抽象方法。doConnect方法是在NioSocketChannel中实现的,因此,进入NioSocketChannel的doConnect方法,代码如下:
protected boolean doConnect(SocketAddress remoteAddress, SocketAddress localAddress) throws Exception {
if (localAddress != null) {
this.doBind0(localAddress);
}
boolean success = false;
boolean var5;
try {
boolean connected = this.javaChannel().connect(remoteAddress);
if (!connected) {
this.selectionKey().interestOps(8);
}
success = true;
var5 = connected;
} finally {
if (!success) {
this.doClose();
}
}
return var5;
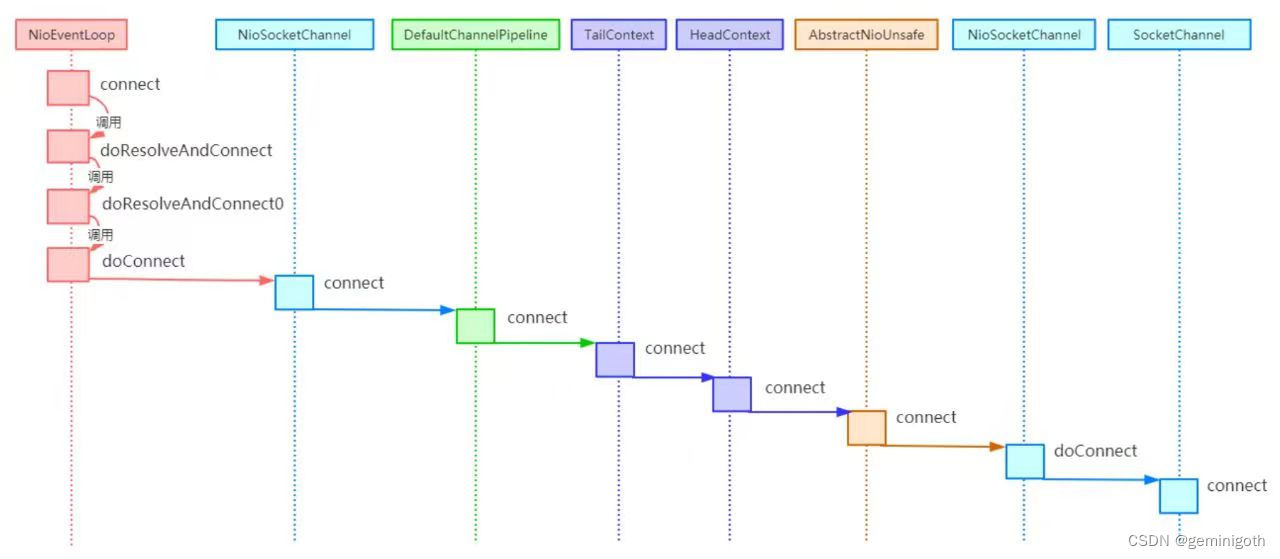
}上面代码的功能是,首先获取Java NIO的SocketChannel,然后获取NioSocketChannel 的newSocket方法返回的SocketChannel对象;在调用SocketChannel的connect方法完成Java NIO底层的Socket连接。总结一下,客户端Bootstrap发起连接请求的流程可以用如下时序图直观展示:


 862
862


 被折叠的 条评论
为什么被折叠?
被折叠的 条评论
为什么被折叠?
 到【灌水乐园】发言


