


目录
springboot到底帮我们配置了什么?我们能不能进行修改?能修改哪些东西?能不能扩展??
- xxxxAutoConfiguraion..向容器中自动配置组件
- xxxxProperties:自动配置类,装配配置文件中自定义的一些内容!
要解决的问题:
- 导入静态资源…
- 首页
- jsp,模板引擎Thymeleaf
- 装配扩展SpringMVC
- 增删改查
- 拦截器
- 国际化!
导入静态资源
WebMvcAutoConfiguration 中 addResourceHandlers()
        public void addResourceHandlers(ResourceHandlerRegistry registry) {


            if (!this.resourceProperties.isAddMappings()) {
                logger.debug("Default resource handling disabled");
                return;
            }
            Duration cachePeriod = this.resourceProperties.getCache().getPeriod();
            CacheControl cacheControl = this.resourceProperties.getCache().getCachecontrol().toHttpCacheControl();
            if (!registry.hasMappingForPattern("/webjars/**")) {
                customizeResourceHandlerRegistration(registry.addResourceHandler("/webjars/**")
                        .addResourceLocations("classpath:/META-INF/resources/webjars/")
                        .setCachePeriod(getSeconds(cachePeriod)).setCacheControl(cacheControl));
            }
            String staticPathPattern = this.mvcProperties.getStaticPathPattern();
            if (!registry.hasMappingForPattern(staticPathPattern)) {
                customizeResourceHandlerRegistration(registry.addResourceHandler(staticPathPattern)
                        .addResourceLocations(getResourceLocations(this.resourceProperties.getStaticLocations()))
                        .setCachePeriod(getSeconds(cachePeriod)).setCacheControl(cacheControl));
            }
        }
1.如何自定义: 寻找自定义资源的配置


application.properties

2.什么是 webjars 方式一 知道,
官网WebJars - Web Libraries in Jars

        <dependency>
            <groupId>org.webjars</groupId>
            <artifactId>jquery</artifactId>
            <version>3.4.1</version>
        </dependency>


3.获取静态资源路径


创建目录

优先级: 高到低 【建议】
- resources 上传文件
- static 静态资源: 图片...
- public 公共的:大家都可以访问的


总结:
1.在springboot,我们可以使用以下方式处理静态资源
- webjars localhost:8080/webjars
- public, static, /**, resources localhost:8080/
2.优先级:resources>static(默认)>public
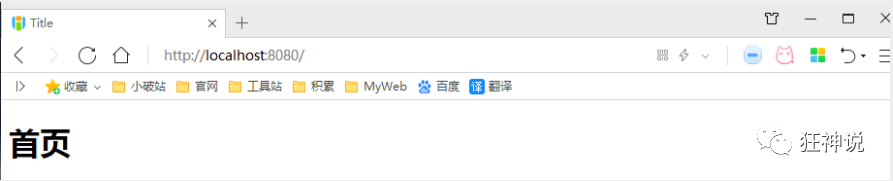
首页和图标定制
首页
//在templates目录下的所有页而,只能通过controller来跳转!
//这个需要模板引擎的支持! thymeleaf
WebMvcAutoConfiguration


图标
版本2.1.7.RELEASE
<properties>
    <java.version>1.8</java.version>
    <project.build.sourceEncoding>UTF-8</project.build.sourceEncoding>
    <project.reporting.outputEncoding>UTF-8</project.reporting.outputEncoding>
    <spring-boot.version>2.1.7.RELEASE</spring-boot.version>
</properties>
application.properties 中
#关闭默认图标
pring.mvc.favicon.enabled=false
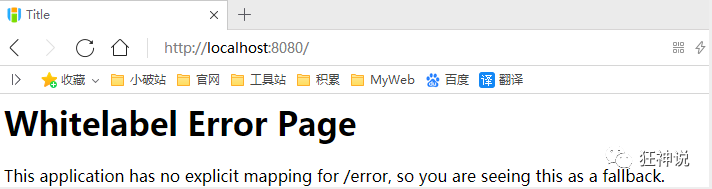
404页面
在templates 下创建error 的文件夹 名字为 404.html

拦截器
1.实现 HandlerInterceptor
public class LoginHandlerInterceptor implements HandlerInterceptor {
    @Override
    public boolean preHandle(HttpServletRequest request, HttpServletResponse response, Object handler) throws Exception {

        Object loginUser = request.getSession().getAttribute("loginUser");
        if (loginUser==null){
            request.setAttribute("msg","权限不够,请登录");
            request.getRequestDispatcher("/index.html").forward(request,response);
            return false;
        }else {
            return true;
        }
    }
}
2.注册bean
@Configuration
public class MyMvcConfig implements WebMvcConfigurer {

    //拦截器的mvc配置
    @Override
    public void addInterceptors(InterceptorRegistry registry) {
        registry.addInterceptor(new LoginHandlerInterceptor()).addPathPatterns("/**") //拦截全部请求
                .excludePathPatterns("/index.html","/user/login","/css/**","/js/**","/img/**","/"); //那些请求不拦截

    }
}
MVC配置原理
地址 :Spring Boot Reference Documentation

Spring MVC Auto-configuration
// Spring Boot为Spring MVC提供了自动配置,它可以很好地与大多数应用程序一起工作。
Spring Boot provides auto-configuration for Spring MVC that works well with most applications.
// 自动配置在Spring默认设置的基础上添加了以下功能:
The auto-configuration adds the following features on top of Spring’s defaults:
// 包含视图解析器
Inclusion of ContentNegotiatingViewResolver and BeanNameViewResolver beans.
// 支持静态资源文件夹的路径,以及webjars
Support for serving static resources, including support for WebJars
// 自动注册了Converter:
// 转换器,这就是我们网页提交数据到后台自动封装成为对象的东西,比如把"1"字符串自动转换为int类型
// Formatter:【格式化器,比如页面给我们了一个2019-8-10,它会给我们自动格式化为Date对象】
Automatic registration of Converter, GenericConverter, and Formatter beans.
// HttpMessageConverters
// SpringMVC用来转换Http请求和响应的的,比如我们要把一个User对象转换为JSON字符串,可以去看官网文档解释;
Support for HttpMessageConverters (covered later in this document).
// 定义错误代码生成规则的
Automatic registration of MessageCodesResolver (covered later in this document).
// 首页定制
Static index.html support.
// 图标定制
Custom Favicon support (covered later in this document).
// 初始化数据绑定器:帮我们把请求数据绑定到JavaBean中!
Automatic use of a ConfigurableWebBindingInitializer bean (covered later in this document).

/*
如果您希望保留Spring Boot MVC功能,并且希望添加其他MVC配置(拦截器、格式化程序、视图控制器和其他功能),则可以添加自己
的@configuration类,类型为webmvcconfiguer,但不添加@EnableWebMvc。如果希望提供
RequestMappingHandlerMapping、RequestMappingHandlerAdapter或ExceptionHandlerExceptionResolver的自定义
实例,则可以声明WebMVCregistrationAdapter实例来提供此类组件。
*/
If you want to keep Spring Boot MVC features and you want to add additional MVC configuration
(interceptors, formatters, view controllers, and other features), you can add your own
@Configuration class of type WebMvcConfigurer but without @EnableWebMvc. If you wish to provide
custom instances of RequestMappingHandlerMapping, RequestMappingHandlerAdapter, or
ExceptionHandlerExceptionResolver, you can declare a WebMvcRegistrationsAdapter instance to provide such components.

// 如果您想完全控制Spring MVC,可以添加自己的@Configuration,并用@EnableWebMvc进行注释。
If you want to take complete control of Spring MVC, you can add your own @Configuration annotated with @EnableWebMvc.
配置自己的视图解析器
//如果。你想diy一些定制化的功能,只要写这个组件,然后将它交给springboot,springboot就会帮我们自动装配!
//拓展springMvc  请求都会经过dispatcherServlet
@Configuration  //@EnableWebMvc  不标注 次注解
public class MyMvcConfig implements WebMvcConfigurer {


    //public interface ViewResolver 实现了视图解析器接口的类,我们就可以把它看做视图解析器
    //2.注册Bean
    @Bean
    public ViewResolver myViewResolver() {
        return new MyViewResolver();
    }

    //1.自定义一个自己的视图解析器MyViewResolver    只需重写resolveViewName 方法
    public static class MyViewResolver implements ViewResolver {
        @Override
        public View resolveViewName(String viewName, Locale locale) throws Exception {
            return null;
        }
    }
}


自动装配原理

修改SpringBoot的默认配置
这么多的自动配置,原理都是一样的,通过这个WebMVC的自动配置原理分析,我们要学会一种学习方式,通过源码探究,得出结论;这个结论一定是属于自己的,而且一通百通。
SpringBoot的底层,大量用到了这些设计细节思想,所以,没事需要多阅读源码!得出结论;
SpringBoot在自动配置很多组件的时候,先看容器中有没有用户自己配置的(如果用户自己配置@bean),如果有就用用户配置的,如果没有就用自动配置的;
如果有些组件可以存在多个,比如我们的视图解析器,就将用户配置的和自己默认的组合起来!
官方文档如下:
我们要做的就是编写一个@Configuration注解类,并且类型要为WebMvcConfigurer,还不能标注@EnableWebMvc注解;我们去自己写一个;我们新建一个包叫config,写一个类MyMvcConfig
MyMvcConfig1
@Configuration
public class MyMvcConfig1 implements WebMvcConfigurer {


    @Override
    public void addViewControllers(ViewControllerRegistry registry) {
        // 浏览器发送/test , 就会跳转到test页面;
        registry.addViewController("/test").setViewName("thymeleaf");
    }
}
我们要扩展SpringMVC,官方就推荐我们这么去使用,既保SpringBoot留所有的自动配置,也能用我们扩展的配置!
分析一下原理:
1、WebMvcAutoConfiguration 是 SpringMVC的自动配置类,里面有一个类WebMvcAutoConfigurationAdapter
2、这个类上有一个注解,在做其他自动配置时会导入:@Import(EnableWebMvcConfiguration.class)
3、我们点进EnableWebMvcConfiguration这个类看一下,它继承了一个父类:DelegatingWebMvcConfiguration
这个父类中有这样一段代码:
public class DelegatingWebMvcConfiguration extends WebMvcConfigurationSupport {
    private final WebMvcConfigurerComposite configurers = new WebMvcConfigurerComposite();

  // 从容器中获取所有的webmvcConfigurer
    @Autowired(required = false)
    public void setConfigurers(List<WebMvcConfigurer> configurers) {
        if (!CollectionUtils.isEmpty(configurers)) {
            this.configurers.addWebMvcConfigurers(configurers);
        }
    }
}
4、我们可以在这个类中去寻找一个我们刚才设置的viewController当做参考,发现它调用了一个
protected void addViewControllers(ViewControllerRegistry registry) {
    this.configurers.addViewControllers(registry);
}
5、我们点进去看一下
public void addViewControllers(ViewControllerRegistry registry) {
    Iterator var2 = this.delegates.iterator();

    while(var2.hasNext()) {
        // 将所有的WebMvcConfigurer相关配置来一起调用!包括我们自己配置的和Spring给我们配置的
        WebMvcConfigurer delegate = (WebMvcConfigurer)var2.next();
        delegate.addViewControllers(registry);
    }

}
所以得出结论:所有的WebMvcConfiguration都会被作用,不止Spring自己的配置类,我们自己的配置类当然也会被调用
全面接管SpringMVC
官方文档:
If you want to take complete control of Spring MVC
you can add your own @Configuration annotated with @EnableWebMvc.
全面接管即:SpringBoot对SpringMVC的自动配置不需要了,所有都是我们自己去配置!
只需在我们的配置类中要加一个@EnableWebMvc。
我们看下如果我们全面接管了SpringMVC了,我们之前SpringBoot给我们配置的静态资源映射一定会无效,我们可以去测试一下;
不加注解之前,访问首页:
给配置类加上注解:@EnableWebMvc
我们发现所有的SpringMVC自动配置都失效了!回归到了最初的样子;
当然,我们开发中,不推荐使用全面接管SpringMVC
思考问题?为什么加了一个注解,自动配置就失效了!我们看下源码:
1、这里发现它是导入了一个类,我们可以继续进去看
@Import({DelegatingWebMvcConfiguration.class})
public @interface EnableWebMvc {
}
2、它继承了一个父类 WebMvcConfigurationSupport
public class DelegatingWebMvcConfiguration extends WebMvcConfigurationSupport {
  // ......
}
3、我们来回顾一下Webmvc自动配置类
@Configuration(proxyBeanMethods = false)
@ConditionalOnWebApplication(type = Type.SERVLET)
@ConditionalOnClass({ Servlet.class, DispatcherServlet.class, WebMvcConfigurer.class })
// 这个注解的意思就是:容器中没有这个组件的时候,这个自动配置类才生效
@ConditionalOnMissingBean(WebMvcConfigurationSupport.class)
@AutoConfigureOrder(Ordered.HIGHEST_PRECEDENCE + 10)
@AutoConfigureAfter({ DispatcherServletAutoConfiguration.class, TaskExecutionAutoConfiguration.class,
    ValidationAutoConfiguration.class })
public class WebMvcAutoConfiguration {

}总结一句话:@EnableWebMvc将WebMvcConfigurationSupport组件导入进来了;
而导入的WebMvcConfigurationSupport只是SpringMVC最基本的功能!
在SpringBoot中会有非常多的扩展配置,只要看见了这个,我们就应该多留心注意
自己写starter :
- Configuration
- 再配一个 Properties
- 两个类打到jar包
- 放到autoconfigure org 包下


 671
671


 被折叠的 条评论
为什么被折叠?
被折叠的 条评论
为什么被折叠?
 到【灌水乐园】发言


