


第四章 页面组件
4.1 组件的定义及属性
组件是页面视图层(WXML)的基本组成单元,组件组合可以构建功能强大的页面结构。
每个组件都由一对标签组成,有开始标签和结束标签,内容放置在开始标签和结束标签之间,内容也可以是组件。其语法格式:
<标签名 属性名=“属性值”>内容···</标签名>
组件通过属性来进一步细化 如id,class,style,hidden,data-*,bind*/catch*等。
4.2容器视图组件
4.2.1 view
view组件是块级组件,没有特殊功能,主要用于布局展示,相当于HTML中的div。其属性:

 view组件的特有属性
4.2.2 scroll-view
通过设置scroll-view组件的相关属性可以实现滚动视图的功能,其属性:

scroll-view组件的相关属性
4.2.3 swiper
swiper组件可以实现轮播图,图片预览,滑动页面效果。其属性:

4.3基础内容组件
4.3.1 icon
icon组件即图标组件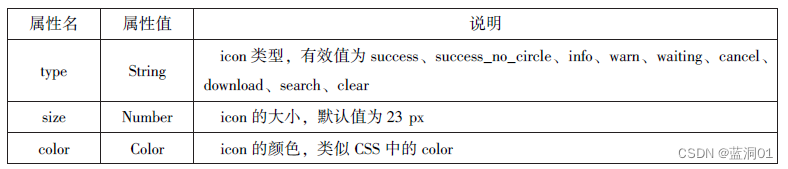
icon组件属性
4.3.2 text
text组件用于展示内容

text组件 属性
4.3.3 progress
progress组件用于显示进度状态,如资源加载
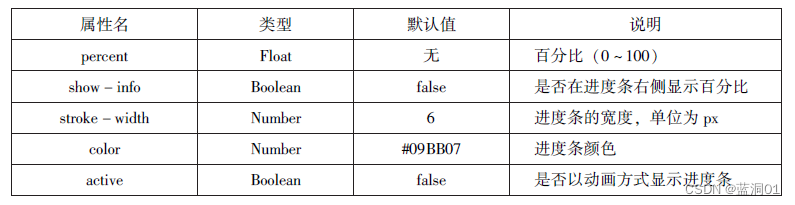
progress组件属性
4.4表单组件
4..4.1 button
button组件用来实现和应用之间的交互,同时按钮的颜色起引导作用。

button组件属性
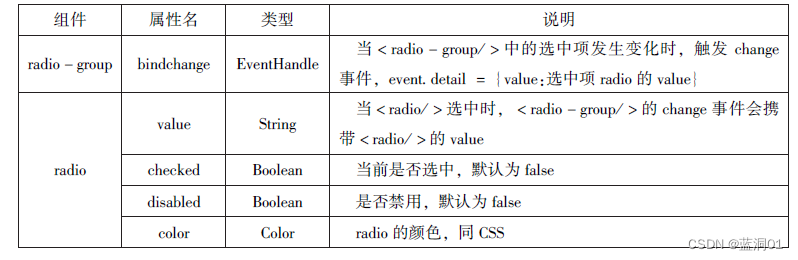
4.4.2 radio
单选框用于从一组选项中选取一个选项。
4.4.3 checkbox
checkbox 用于从一组选项中选取多个选项。

4.4.4 switch
switch组件的作用类似于开关选择器,其属性:

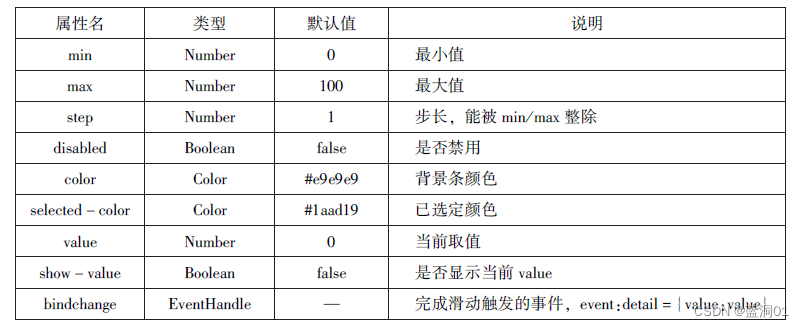
4.4.5 slider
slider 组件为滑动选择器,其属性:
4.4.6 picker
picker 组件为滚动选择器,当点击picker 组件时,系统从底部弹出选择器供用户选择。
1.普通选择器

2.多列选择器
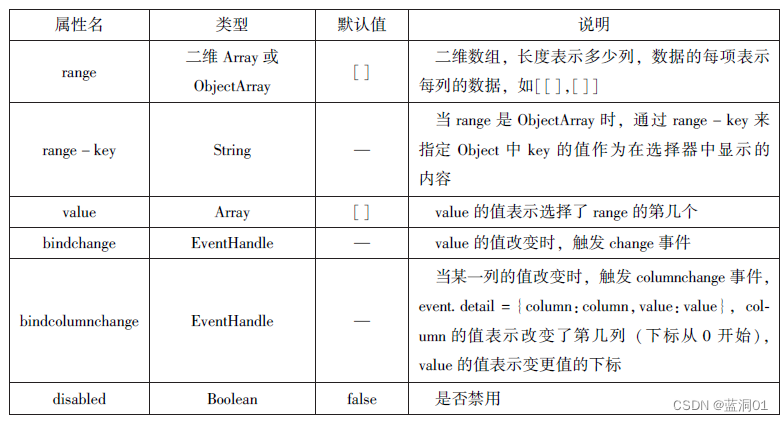
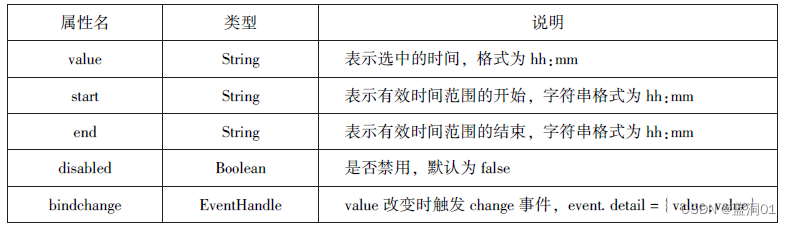
3.时间选择器,日期选择器

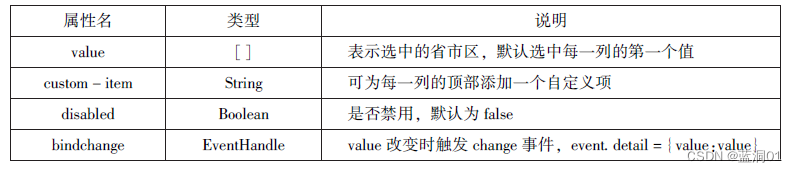
4.省市选择器
4.4.7 picker-view
嵌入页面的滚动选择器。

picker-view组件属性
4.4.8 input
input组件为输入框,用户可以输入对应的信息,其属性:


input组件属性
4.4.9 textarea
textarea组件为多行输入框组件,可实现多行内容的输入,其属性:


textarea组件属性
4.4.10 label
label组件为标签组件,用于提升表单组件的可用性。
代码:
//label.js

Page({
  city:"",
  data:{
    citys:[
      {name:'km',value:'昆明'},
      {name:'sy',value:'三亚'},
      {name:'zh',value:'珠海',checked:'true'},
      {name:'dl',value:'大连'}
    ]
  },
  cityChange:function(e){
    console.log(e.detail.value);
    var city = e.detail.value;
    this.setData({city:city})
  }
})
//label.wxml
<view><checkbox></checkbox>中国</view>
<view><label><checkbox></checkbox>中国</label></view>
<checkbox-group bindchange="cityChange">
<label wx:for="{{citys}}">
<checkbox value="{{item.value}}" checked="{{item.checked}}">{{item.value}}</checkbox>
</label>
</checkbox-group>
<view>您的选择是:{{city}}</view>
运行效果图:

4.4.11 form
from组件为表单组件,用来实现组件内的用户输入信息进行提交。其属性:

form组件属性
4.5多媒体组件
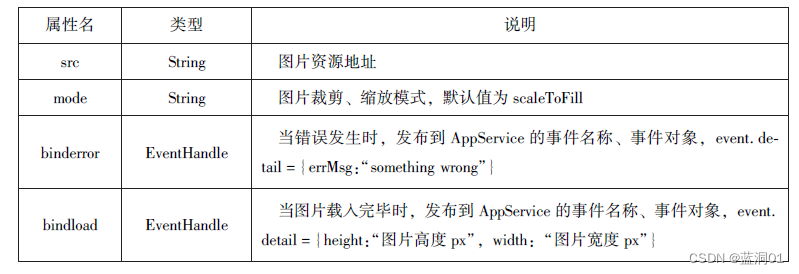
4.5.1 image
image组件图像组件,与HTML中的</img>类似。
4.5.2 audio
audio组件用来实现音乐播放,暂停,其属性:

4.5.3 video
video组件用来实现视频播放,暂停,其属性:

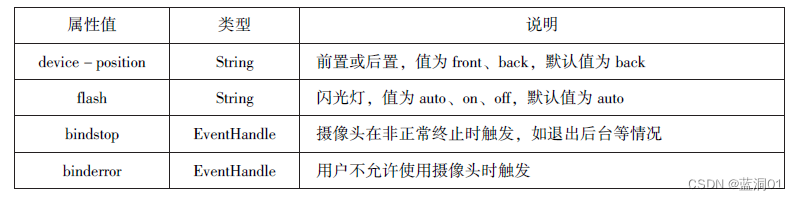
4.5.4 camera
camera组件为系统相机组件,可以实现拍照录像功能。
4.6其他组件
4.6.1 map
map组件用于在页面中显示地图或路径,其属性:

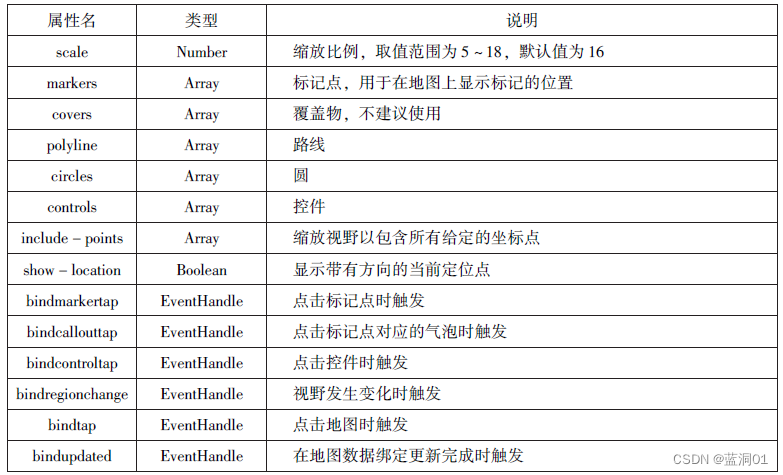
map组件的markers属性用于在于地图上显示标记位置,其属性:

map组件的polyline属性的相关属性:

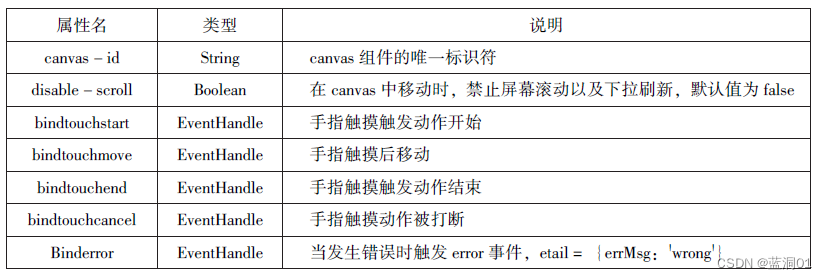
4.6.2 canvas
canvas组件用来绘制图形,相当于一块无色透明的普通画布。
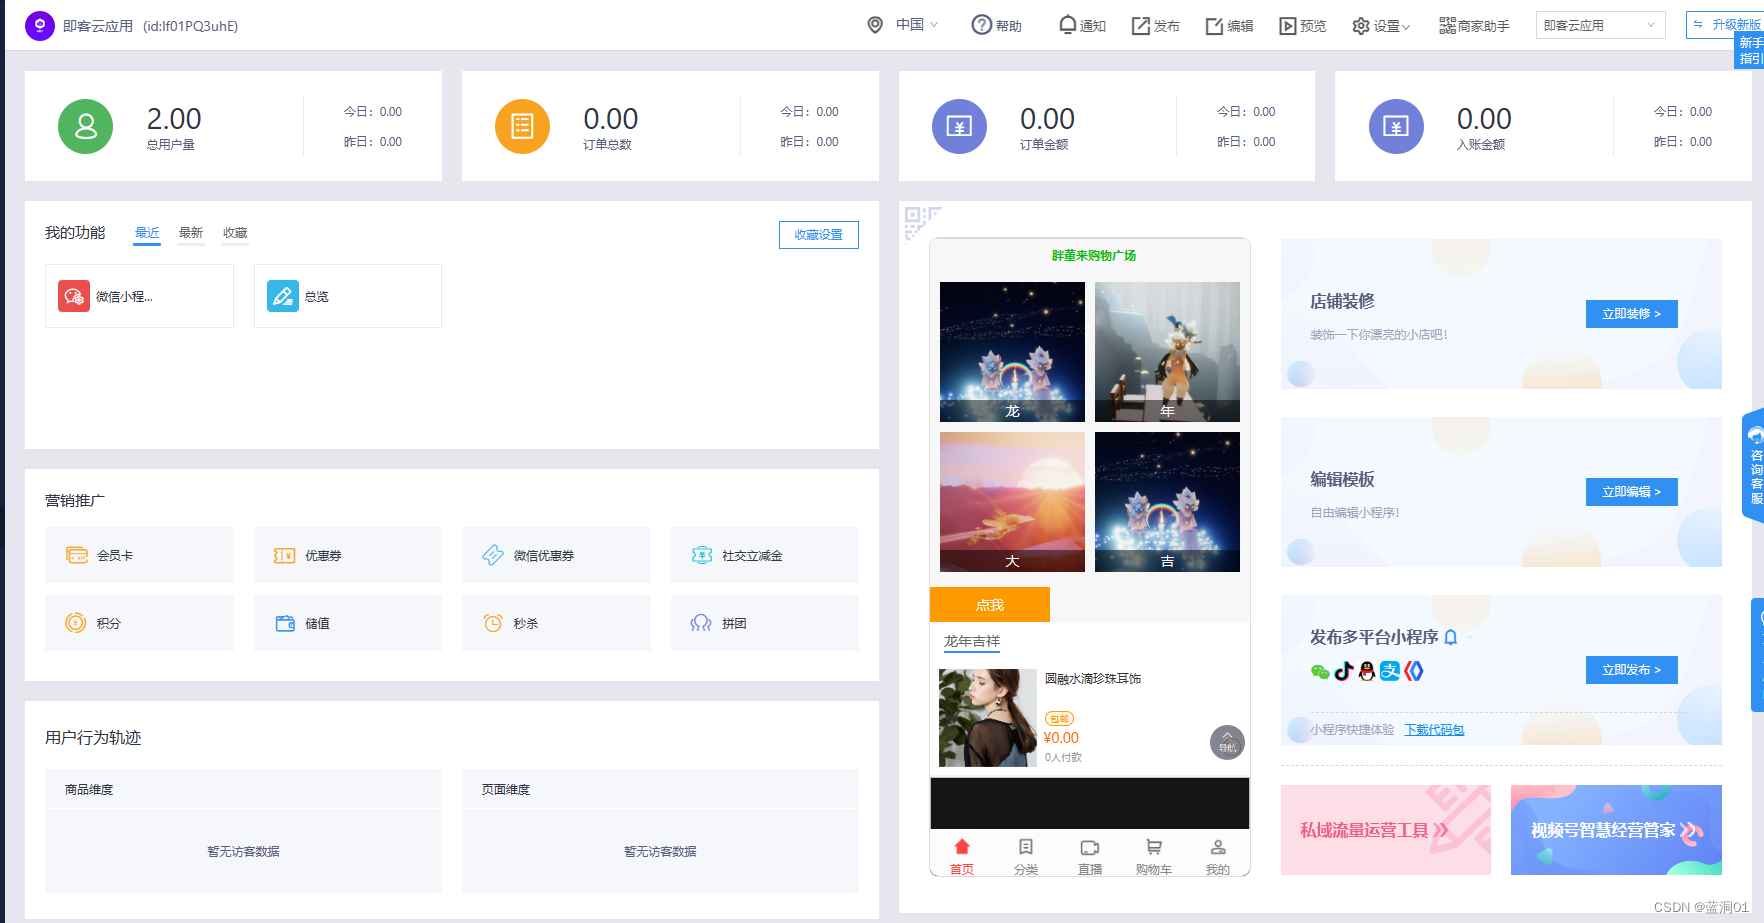
第五章 即速应用
5.1 即速应用优势:
1.开发流程简单,零门槛制作
(1)登录即速应用的官方网站(https://www.jisuapp.cn/),进制作界面,选合适模板
(2)在模板的基础进行简单编辑和个性化制作
(3)制作完成,将代码一键打包并下载
(4)将代码上传微信开发工具
(5)上传成功后,等待审核通过即可。
2.行业模板多样,种类齐全
3.丰富的功能组件和强大的管理后台
5.1.2 即速应用界面
1.菜单栏
2工具栏
3编辑栏
4属性面板栏
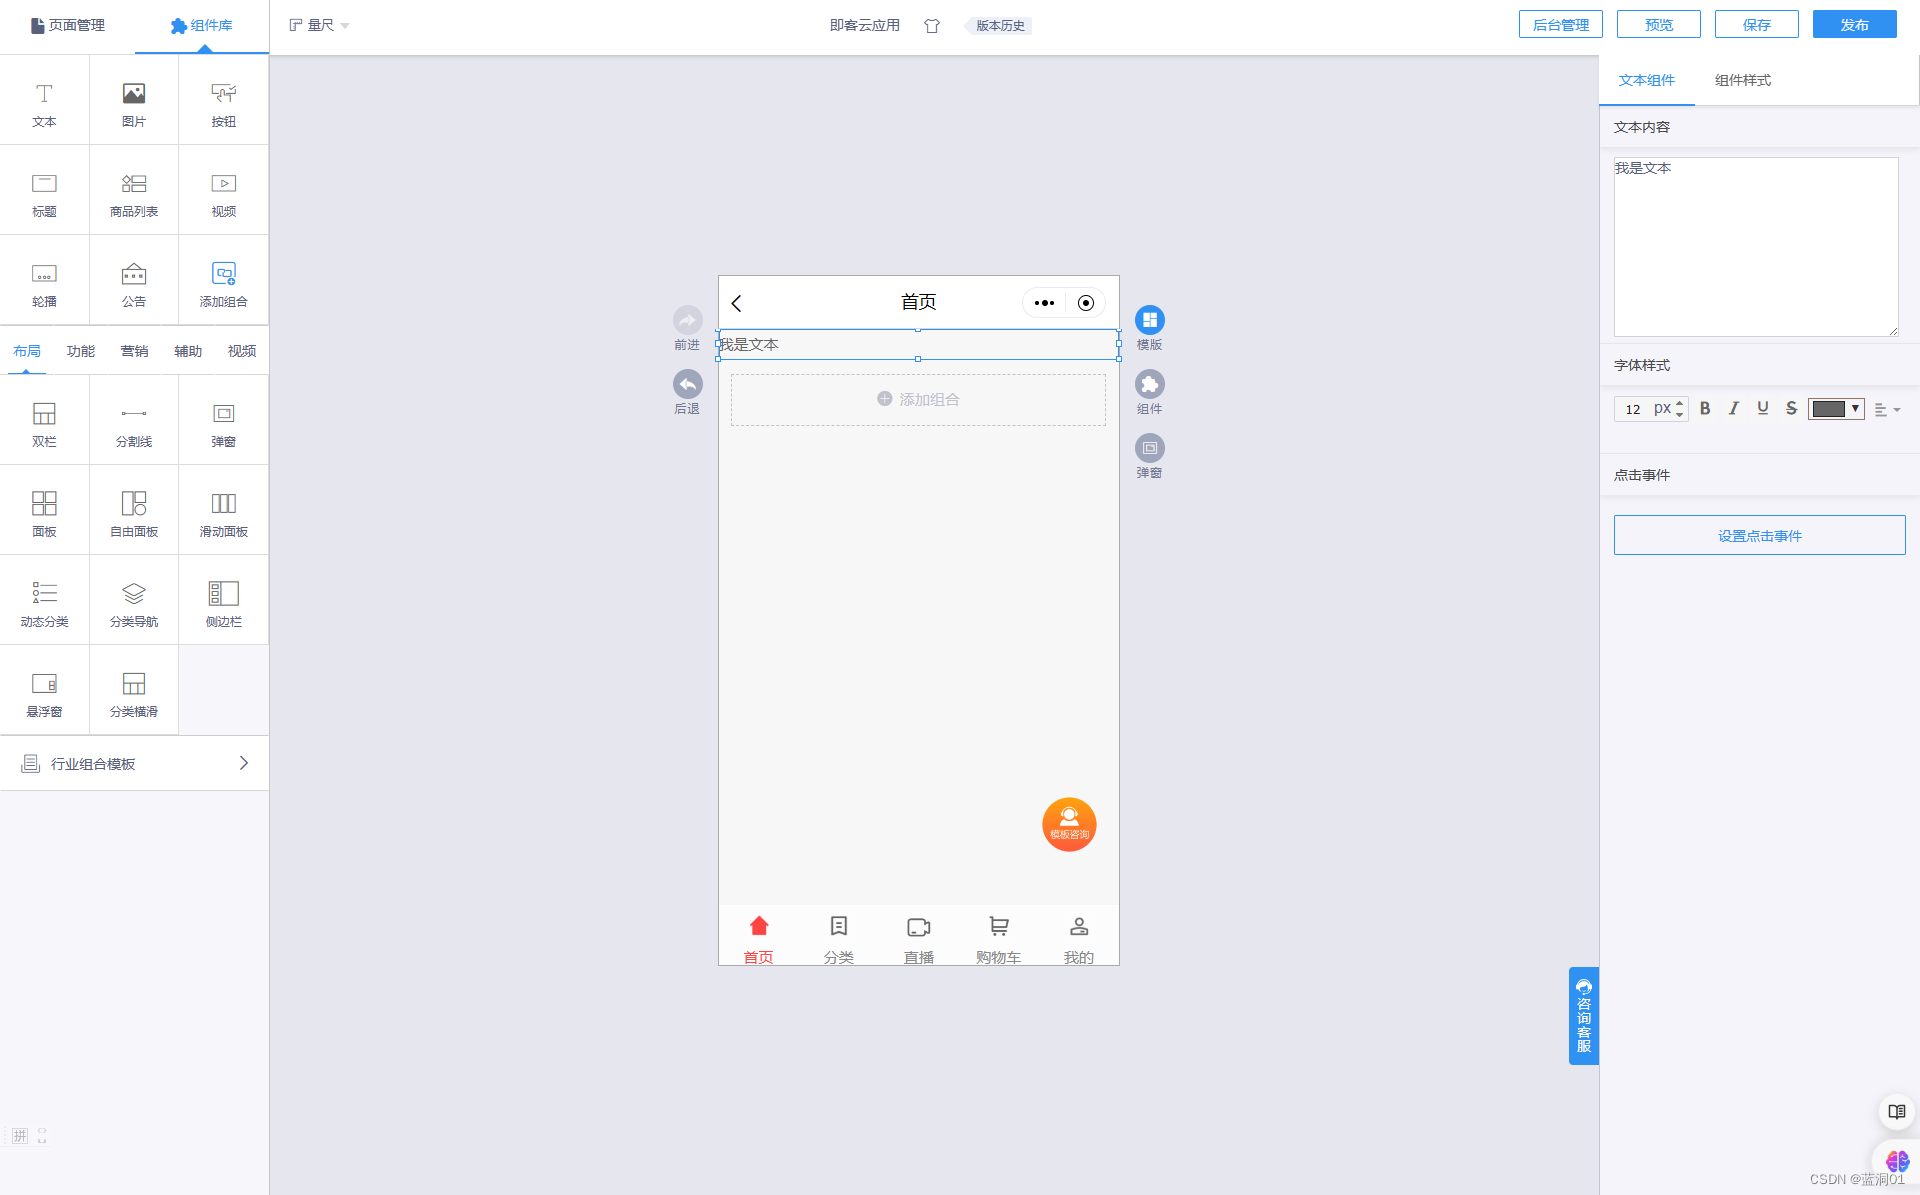
5.2 即速应用组件
组件库:

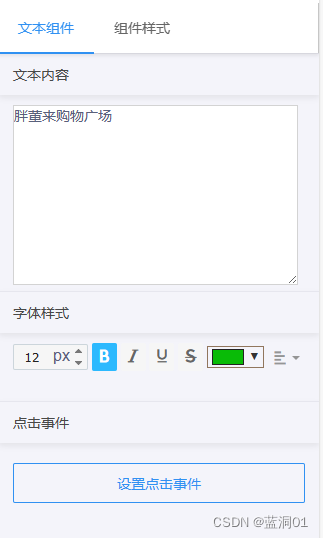
1文本组件
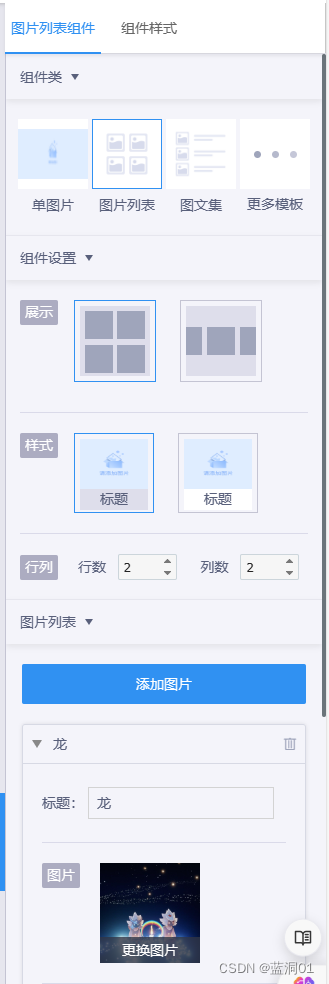
2图片组件
3按钮组件

4标题组件

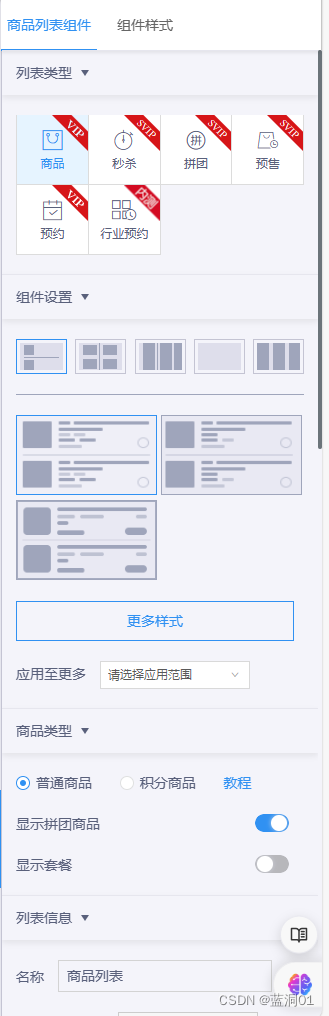
5商品列表组件
6视频组件

7轮播图组件

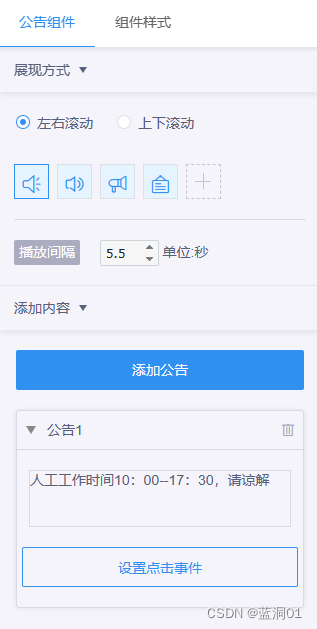
8公告组件
布局组件:
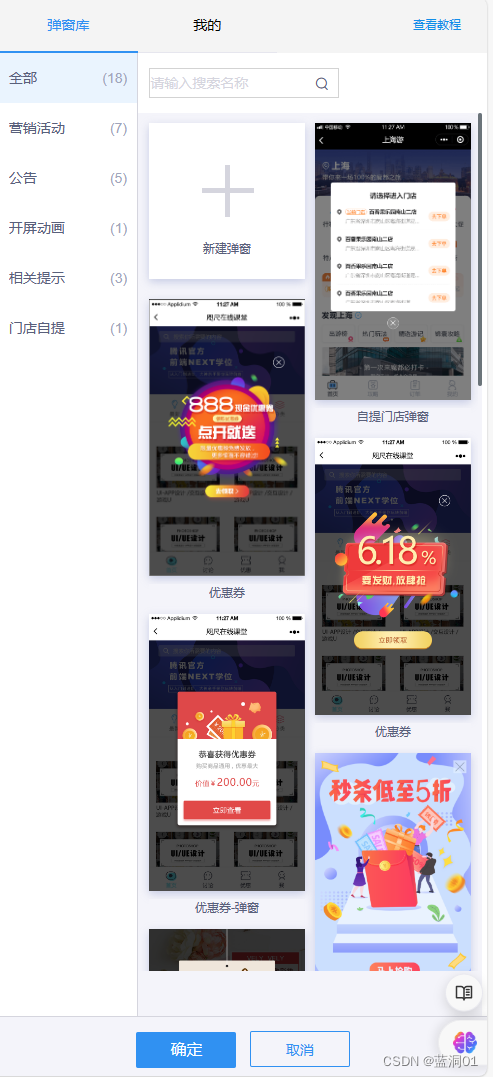
弹窗组件
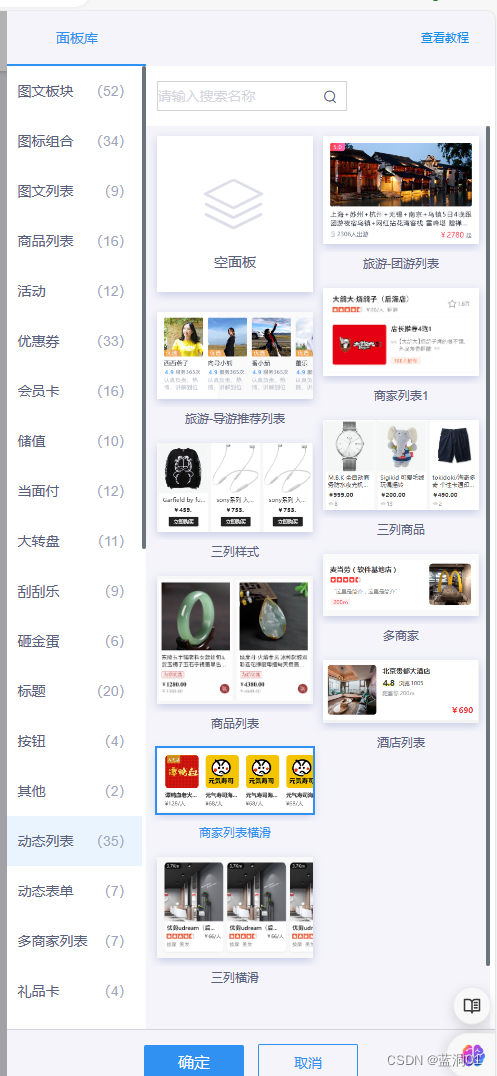
面板组件
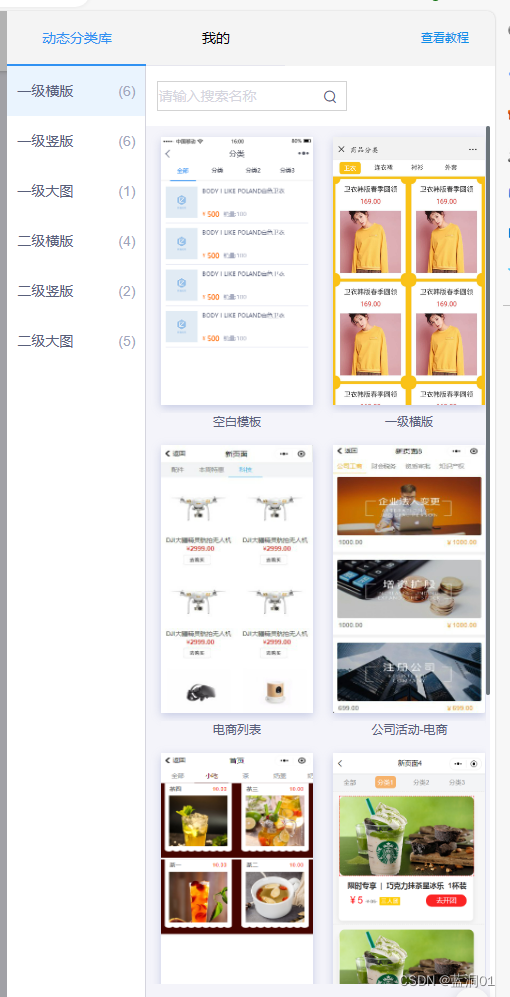
动态分类组件
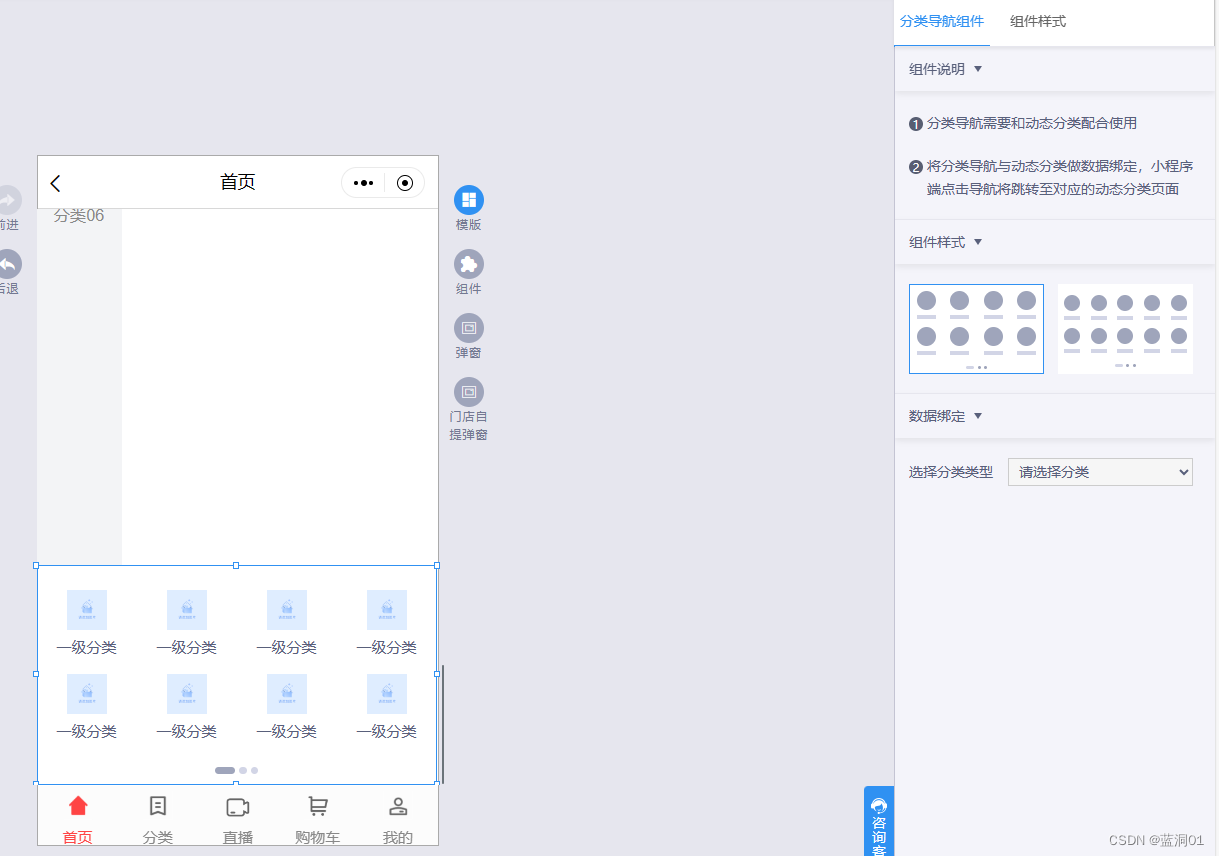
分类导航组件
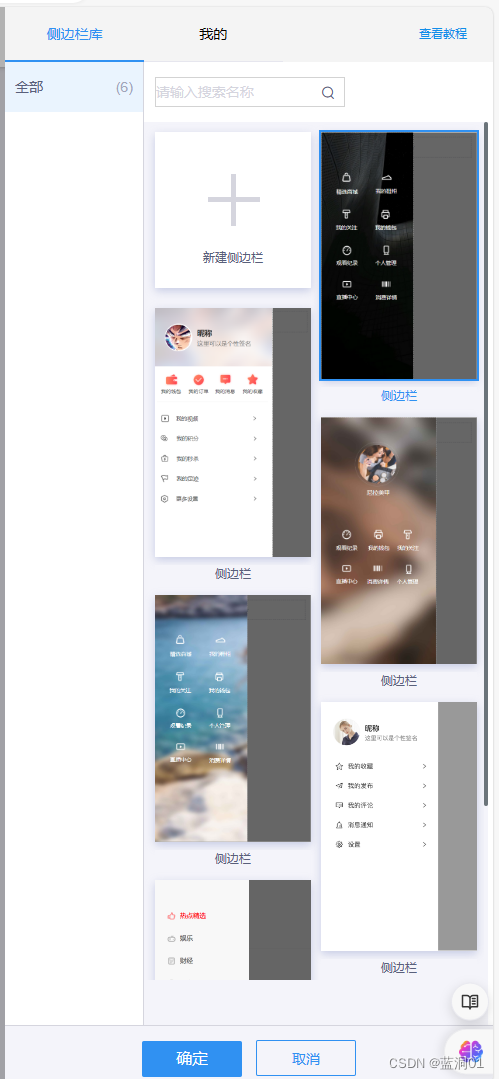
侧边栏组件
悬浮弹窗组件

分类横滑组件

5.3 即速应用后台管理
数据管理
用户管理:
5.4 打包上传
即速应用可以将小程序的代码打包,该代码可以通过微信开发工具来对接微信小程序,进行二次开发。
1. 在自己管理中心找到要上传的小程序,点管理—后台管理

2在侧边栏,找到系统设置—点进微信小程序设置
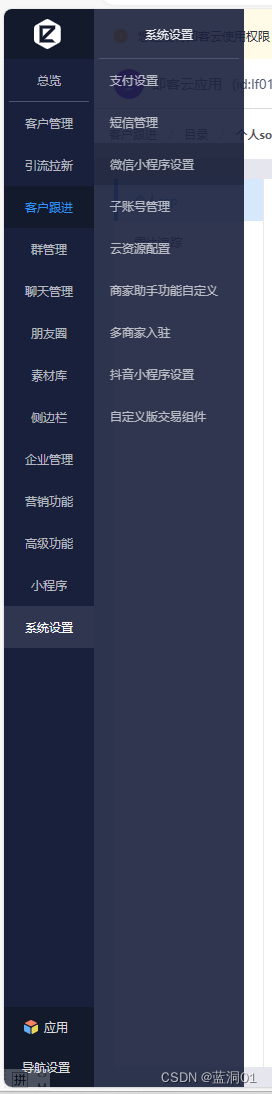
3.需先申请资质,授权,再代码包下载打包

4.打开微信开发工具,新建项目,并填写相关内容,其中项目目录为下载包解压后的目录,点“确认”,打开代码编译代码,填写项目版本号,单击“上传” 。
5.上传成功后,打开微信公众平台的“开发管理”界面,就可以看到小程序版本信息。待审核通过后,就能在“小程序”搜索到。
第六章 API应用
6.1 网络API
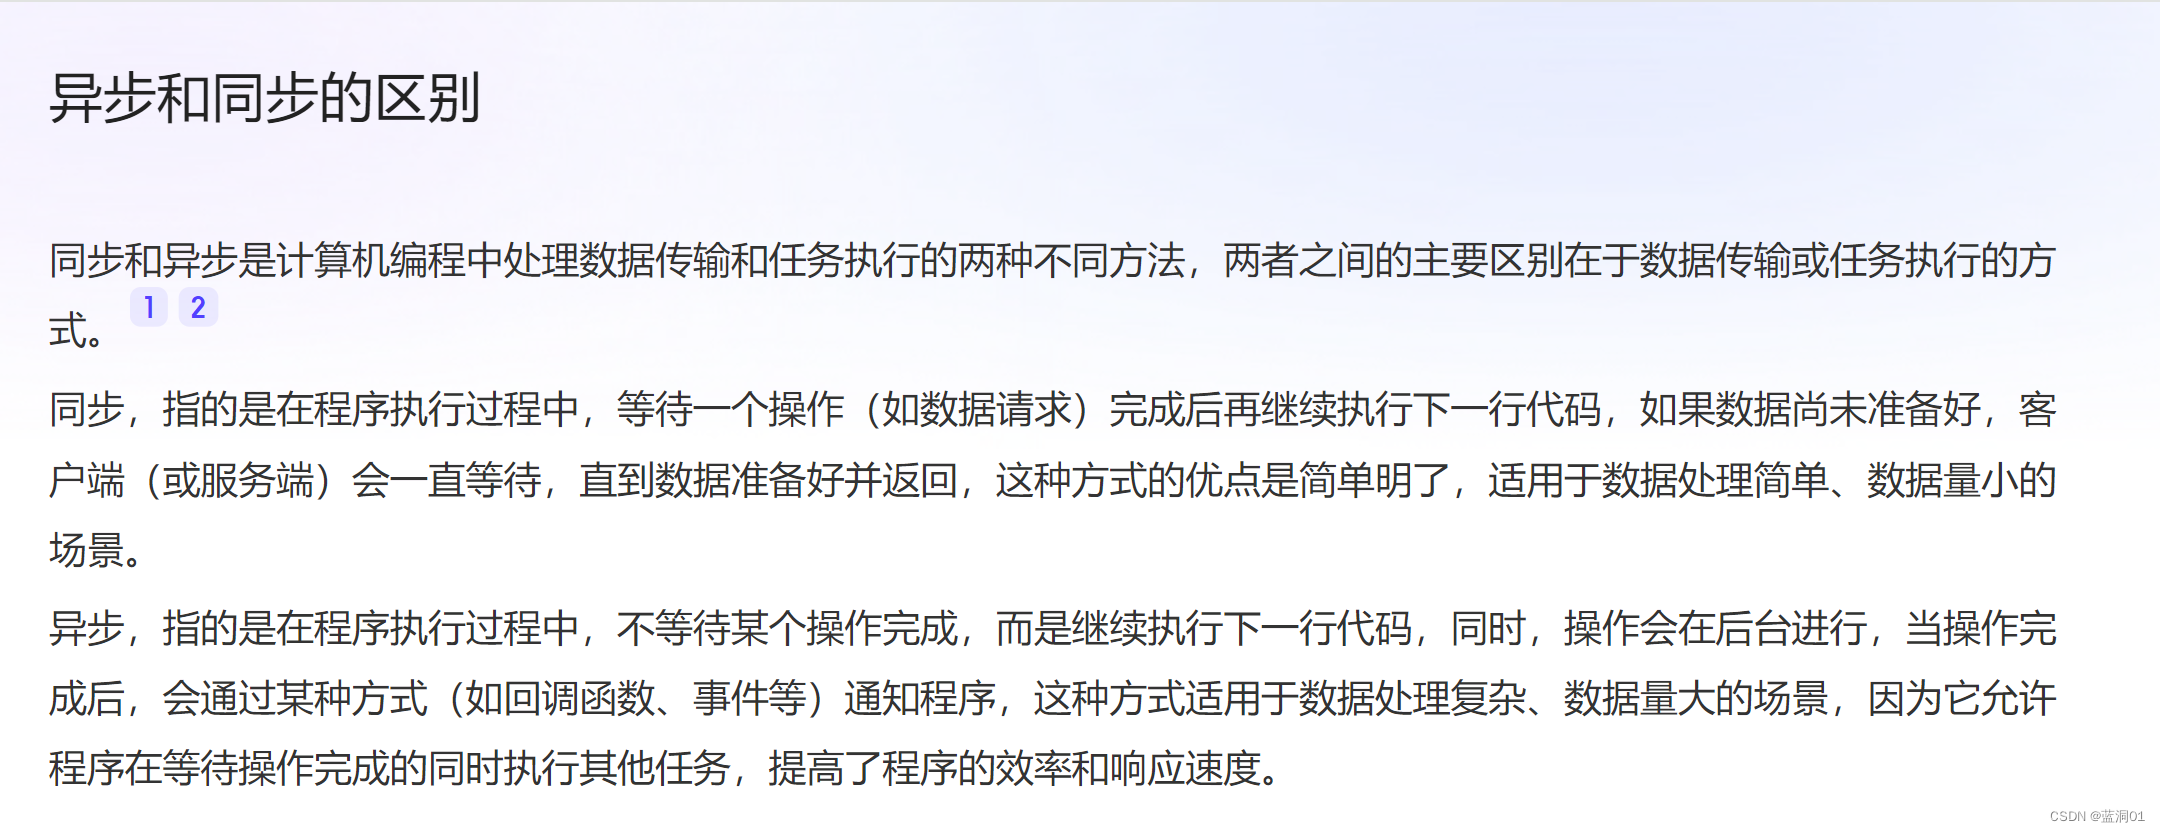
微信小程序处理的数据通常从后台服务器获取,再将处理过的结果保存到后台服务器,这就要求微信小程序要有与后台进行交互的能力。微信原生API接口或第三方API提供了各类接口实现前后端交互。
网络 API可以帮助开发者实现网络URL访问调用、文件的上传和下载、网络套接字的
使用等功能处理。微信开发团队提供了10个网络API接口。
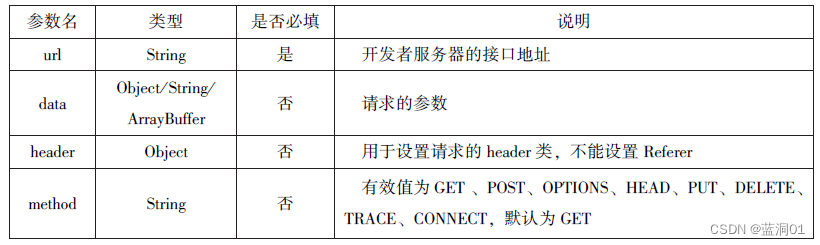
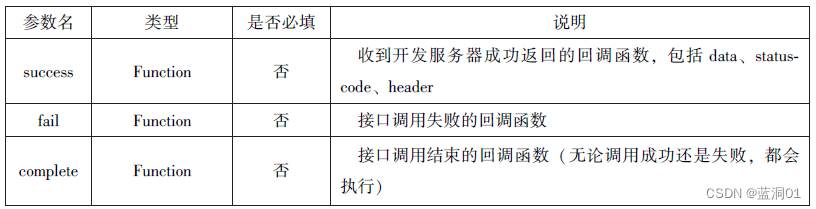
wx.request(0bject)接口用于发起 HTTPS 请求。
■wx.uploadFile(Object)接口用于将本地资源上传到后台服务器。
■wx.downloadFile(Object)接口 用于下载文件资源到本地。
■wx.connectSocket(0bject)接口 用于创建一个 WebSocket 连接。
■wx.sendSocketMessage(0bject)接口用于实现通过 WebSocket 连接发送数据。
■wx.closeSocket(0bject)接口 用于关闭 WebSocket 连接。
■wx.onSocketOpen(CallBack)接口用于监听 WebSocket 连接打开事件。
■wx.onSocketError(CallBack)接口 用于监听 WebSocket 错误。
■wx.onSocketMessage(CallBack)接口用于实现监听WebSocket 接收到服务器的消息
事件。
6.1.1 发起网络请求
wx.request 实现向服务器发送请求,获取数据等各种网络交互操作,相关数据如图:
例如,通过 wx.request(0bject)获取百度( https:/ www.baidu.com)首页的数据。(需要在微信公众平台小程序服务器配置中的request 合法域名中添加“https:// www.baidu.com”。)
//wxml
<button type="primary" bindtap="getbaidutap">获取HTML数据</button>
<textarea value='{{html}}' auto-heightmax length='0'></textarea>
//js
Page({
  data: {
   html:''
  },
  getbaidutap:function(){
    var that=this;
    wx.request({
      url: 'https://www.baidu.com',
      data:{},
      header:{'Content-Type':'application/json'},
      success:function(res){
        console.log(res);
        that.setData({
          html:res.data
        })
      }
    })
  }
});
6.1.2 文件的上传
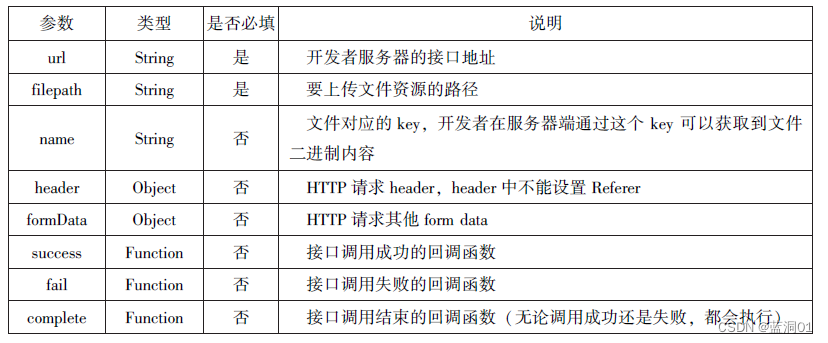
接口用于将本地资源上传到开发者服务器,并且在客户端发一个HTTPS POST请求,相关参数如图:
通过 wx.uploadFile(0bject),可以将图片上传到服务器并显示。
示例代码如下:
//wxml
<button type="primary" bindtap="uploadimage">上转图片</button>
<image src="{{img}}"mode="widthFix"/>
//js
Page({
  data: {
   img:null,

  },
  uploadimage:function(){
    var that=this;
    wx.chooseImage({
      success:function(res){
        var tempFilePaths=res.tempFilePaths
        upload(this.tempFilePaths);
      }
    })
    function upload(page,path){
      wx.showToast({
        title: '长在上传',
      }),
      wx.uploadFile({
        filePath: 'path[0]',
        name: 'file',
        url: "http://localhost/",
        success:function(res){
          console.log(res);
          if(res.statusCode!=200){
            wx.showModal({
              title: '提示',
              content: '上传失败',
              showCancel:false

            })
            return;
          }
        var data=res.data
        page.setData({
  img:path[0]
})
      },
      fail:function(e){
        console.log(e);
        wx.showModal({
          title: '提示',
          content: '上传失败',
         showCancel:false
        })
      },
      complete:function(){
        wx.hideToast();
      }
      })
    }
  }
})
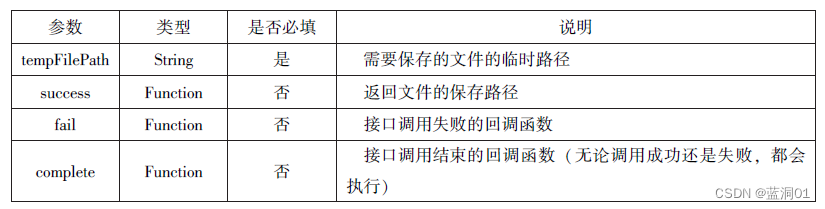
6.1.3 下载文件
wx. downloadFie(0bject)接口用于实现从开发者服务器下载文件资源到本地,在客户端直接发起一个 HTTP GET 请求,返回文件的本地临时路径。其相关参数如表所示。

通过 wx.uploadFile(0bject),可以将图片上传到服务器并显示。
示例代码如下:
//wxml
<button type="primary" bindtap="uploadimage">上转图片</button>
<image src="{{img}}"mode="widthFix"/>
//js
Page({
  data: {
   img:null,

  },
  uploadimage:function(){
    var that=this;
    wx.chooseImage({
      success:function(res){
        var tempFilePaths=res.tempFilePaths
        upload(this.tempFilePaths);
      }
    })
    function upload(page,path){
      wx.showToast({
        title: '长在上传',
      }),
      wx.uploadFile({
        filePath: 'path[0]',
        name: 'file',
        url: "http://localhost/",
        success:function(res){
          console.log(res);
          if(res.statusCode!=200){
            wx.showModal({
              title: '提示',
              content: '上传失败',
              showCancel:false

            })
            return;
          }
        var data=res.data
        page.setData({
  img:path[0]
})
      },
      fail:function(e){
        console.log(e);
        wx.showModal({
          title: '提示',
          content: '上传失败',
         showCancel:false
        })
      },
      complete:function(){
        wx.hideToast();
      }
      })
    }
  }
})
6.2 多媒体API
6.2.1 图片API
主要包括以下四个API接口:
1.wx.chooselmage(Object)接口 用于从本地相册选择图片或使用相机拍照。


//js
wx.chooseImage({
count:2,
sizeType:['original','compressed'],
sourceType:['album','camera'],
success:function(res){
var tempFilePaths=res.tempFilePaths
var tempFile=res.tempFile;
console.log(tempFilePaths)
console.log(tempFile)
}
})
2.wx.previewImage(Object)接口 用于预览图片

//js
wx.previewImage({
current:"http://bmob-cdn-16488.b0.upaiyun.com/2018/02/05/2.png",
urls:["http://bmob-cdn-16488.b0.upaiyun.com/2018/02/055/1.png",
"http://bmob-cdn-16488.b0.upaiyun.com/2018/02/055/2.png",
"http://bmob-cdn-16488.b0.upaiyun.com/2018/02/055/3.png"
]
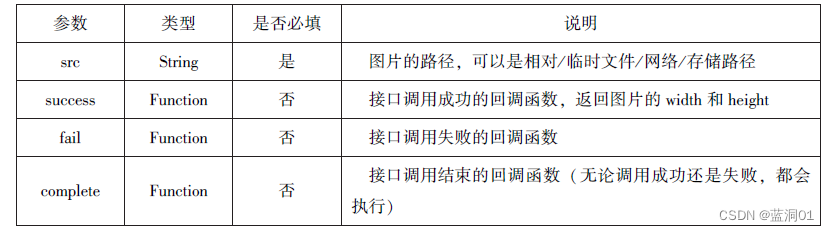
})3.wx.getImageInfo(Object)接口 用于获取图片信息
//js
wx.chooseImage({
success:function(res){
wx.getImageInfo({
src:res.tempFilePaths[0],
success:function(e){
console.log(e.width)
console.log(e.heidth)
}
})
},
})
4.wx.saveImageToPhotosAlbum(Object)接口 用于保存图片到系统相册。
//js
wx.chooseImage({
success:function(res){
wx.saveImageToPhotosAlbum({
filePath:res.tempFilePaths[0],
success:function(e){
console.log(e)
}
})
},
})
6.2.2 录像API
主要包括2个API:
1.开始录音
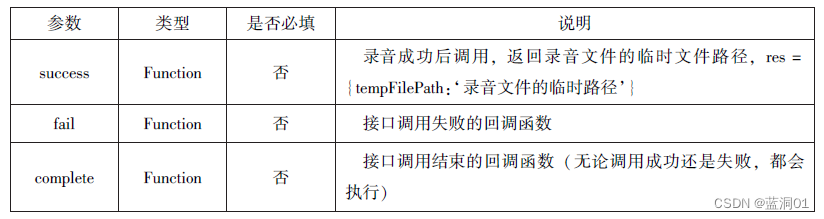
wx.startRecord(Object)接口,实现开始录音
2.停止录音
wx.stopRecord(Object)接口用于实现主动调用停止录音示

//js
wx.startRecord({
  success:function(res){
    var tempFilePath=res.tempFilePath
  },
  fail:function(res){
//录音失败

  }
  })
   setTimeout(function(){
//结束录音
     wx.stopRecord()
   },10000)
6.2.3 音频播放控制API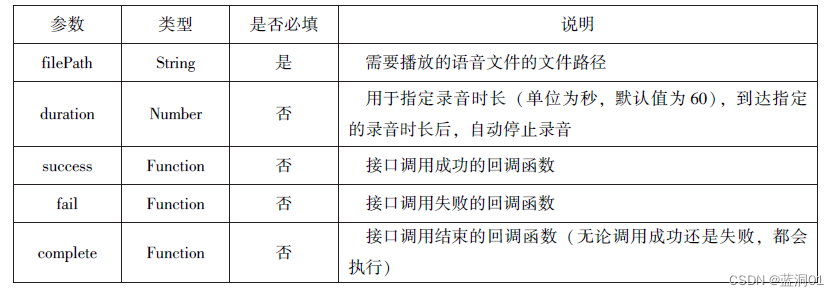
包括播放,暂停,停止及audio组件的控制,主要包括以下3个API:
1.wx.playVoice(Object)接口 用于实现开始播放语音
//js
wx.startRecord({
success:function(res){
var temFilePath=res.tempFilePath
wx.playVoice({
filePath:tempFilePath,
complete:function(){
}
})
}
})
2.wx.pauseVoice(Object)接口 用于实现暂停正在播放的语音
//js
wx.startRecord({
  success:function(res){
    var tempFilePath=res.tempFilePath
    wx.playVoice({
      filePath: 'tempFilePath'
    })
    setTimeout(function(){
      wx.pauseVoice()
    },5000)
      }
  })
3.wx.stopVoice(Object)接口 用于实现结束播放语音
//js
wx.startRecord({
success:function(res){
var tempFilePath=res.tempFilePath
wx.playVoice({
filePath: 'tempFilePath'
})
setTimeout(function(){
wx.pauseVoice()
},5000)
}
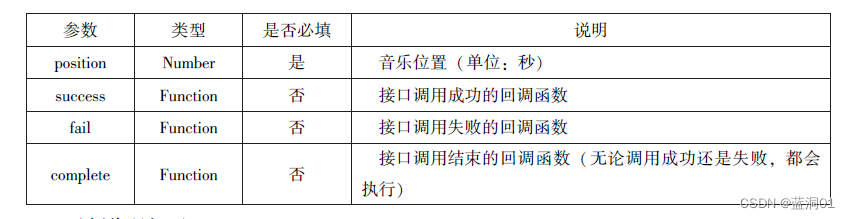
})6.2.4 音乐播放控制API
音乐播控制API包括8个API:
1.播放音乐
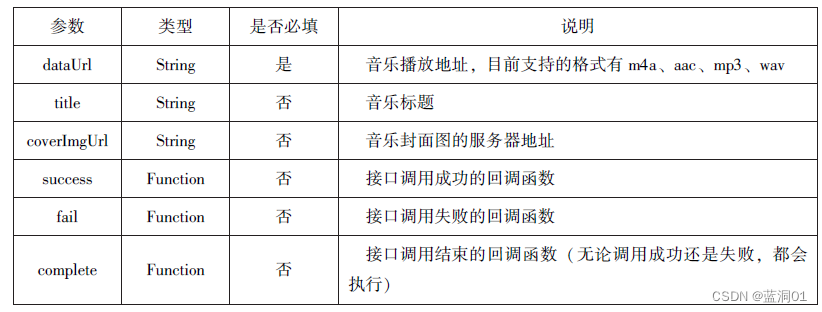
2.获取音乐播放状态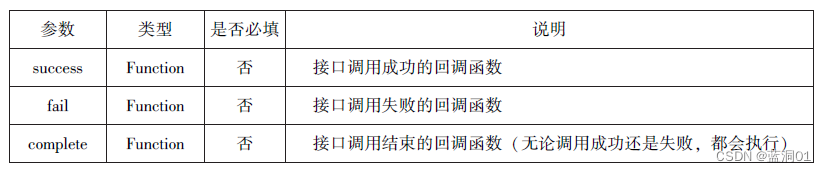
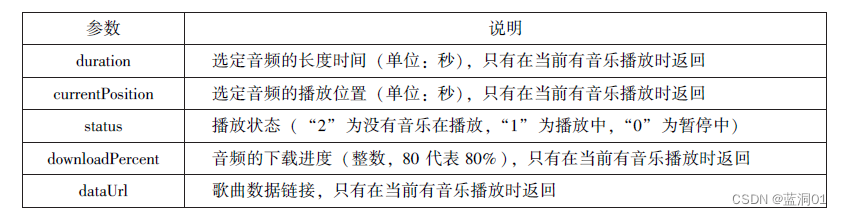 3.控制音乐播放进度
6.3 文件API
文件API提供了打开,保存,删除等本地文件能力,主要包括以下5个API接口:
1.保存文件
wx.saveFile(Object)接口 用于保存文件到本地。
//js
saveImg:function(){
wx.chooseImage({
count:1,
sizeType:['original','compressed'],
sourceType:['album','camera'],
success:function(res){
var tempFilePaths=res.tempFilePath[0]
wx.saveFile({
tempFilePath:tempFilePaths,
success:function(res){
var saveFilePath=res.saveFilePath;
console.log(saveFilePath)
}
})
}
})
}
2.获取本地文件列表
wx.getSavedFileList(Object)接口 用于获取本地文件已保存的文件信息。

//js
// wx.getSavedFileList({
//success:function(res){
//that.setData({
//fileList:res.fileList
//})
//}
//})
3.获取本地文件的文件信息
wx.getSaveFileInfo(Object)接口 用于获取本地文件的文件信息。

//js

wx.chooseImage({
count:1,
sizeType:['original','compressed'],
sourceType:['album','carmera'],
success:function(res){
var tempFilePaths=res.tempFilePaths[0]
success:function(res){
var saveFilePath=res.savedFilePath;
wx.getSavedFilePath,
success:function(res){
console.log(res.size)
})
}
})
}
})
4.删除本地的文件
wx.removeSaveFile(Object)接口 用于删除本地存储的文件。

//js
//wx.getSavedFileList({
//  success:function(res){
//    if(res.fileList.length > 0){
//      wx.removeSavedFile({
//     filepath:res.fileList[0].filePath,
//     complete:function(res){
//       console.log(res)
//     }
//      })
//    }
//  }
// })
5.打开文档
wx.openDocument(Object)接口 用于新开页面打开文档,支持格式:doc,xls,ppt,pdf,docx,xlsx,ppts。

//js
wx.downloadFile({
url:"file:///C:/Users/%E5%BE%90%E5%86%AC%E5%86%AC/Desktop/%E9%9B%B6%E6%97%B6%E6%96%87%E4%BB%B6%E5%A4%B9/vue.pdf",
success:function(res){
var tempFilePath=res.tempFilePath;
wx.openDocument({
filePath: tempFilePath,
success:function(res){
console.log("打开成功")
}
})
}
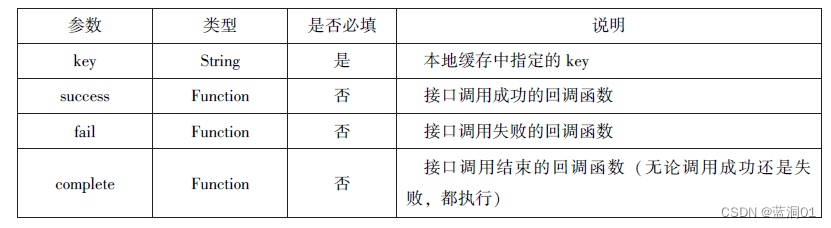
})6.4 本地数据及缓存API
6.4.1 保存数据
1 wx.setStorage()

代码:
//js

wx.setStorage({

key:'name',
data:'sdy',
success:function(res){
console.log(res)
}
})
6.4.2 获取数据
1.wx.getStorage()
代码:
//js
wx.getStorage({
key:'name',
success:function(res){
console.log(res.data)
},
})6.4.3 删除数据
1 wx.removeStorage

代码:
//js

 wx.removeStorage({
   key: 'name',
   success:function(res){
     console.log("删除成功")
   },
   fail:function(){
     console.log("删除失败")
   }

  })
6.4.4 清空数据
1 wx.clearStorage
//js

wx.getStorage({
  key:'key',
  success:function(res){
    wx.clearStorage()
  },
})
2.wx.clearStorageSync
//js

try{
  wx.clearStorageSync()
}catch(e){

}
6.5 位置信息API
6.5.1 获取位置信息
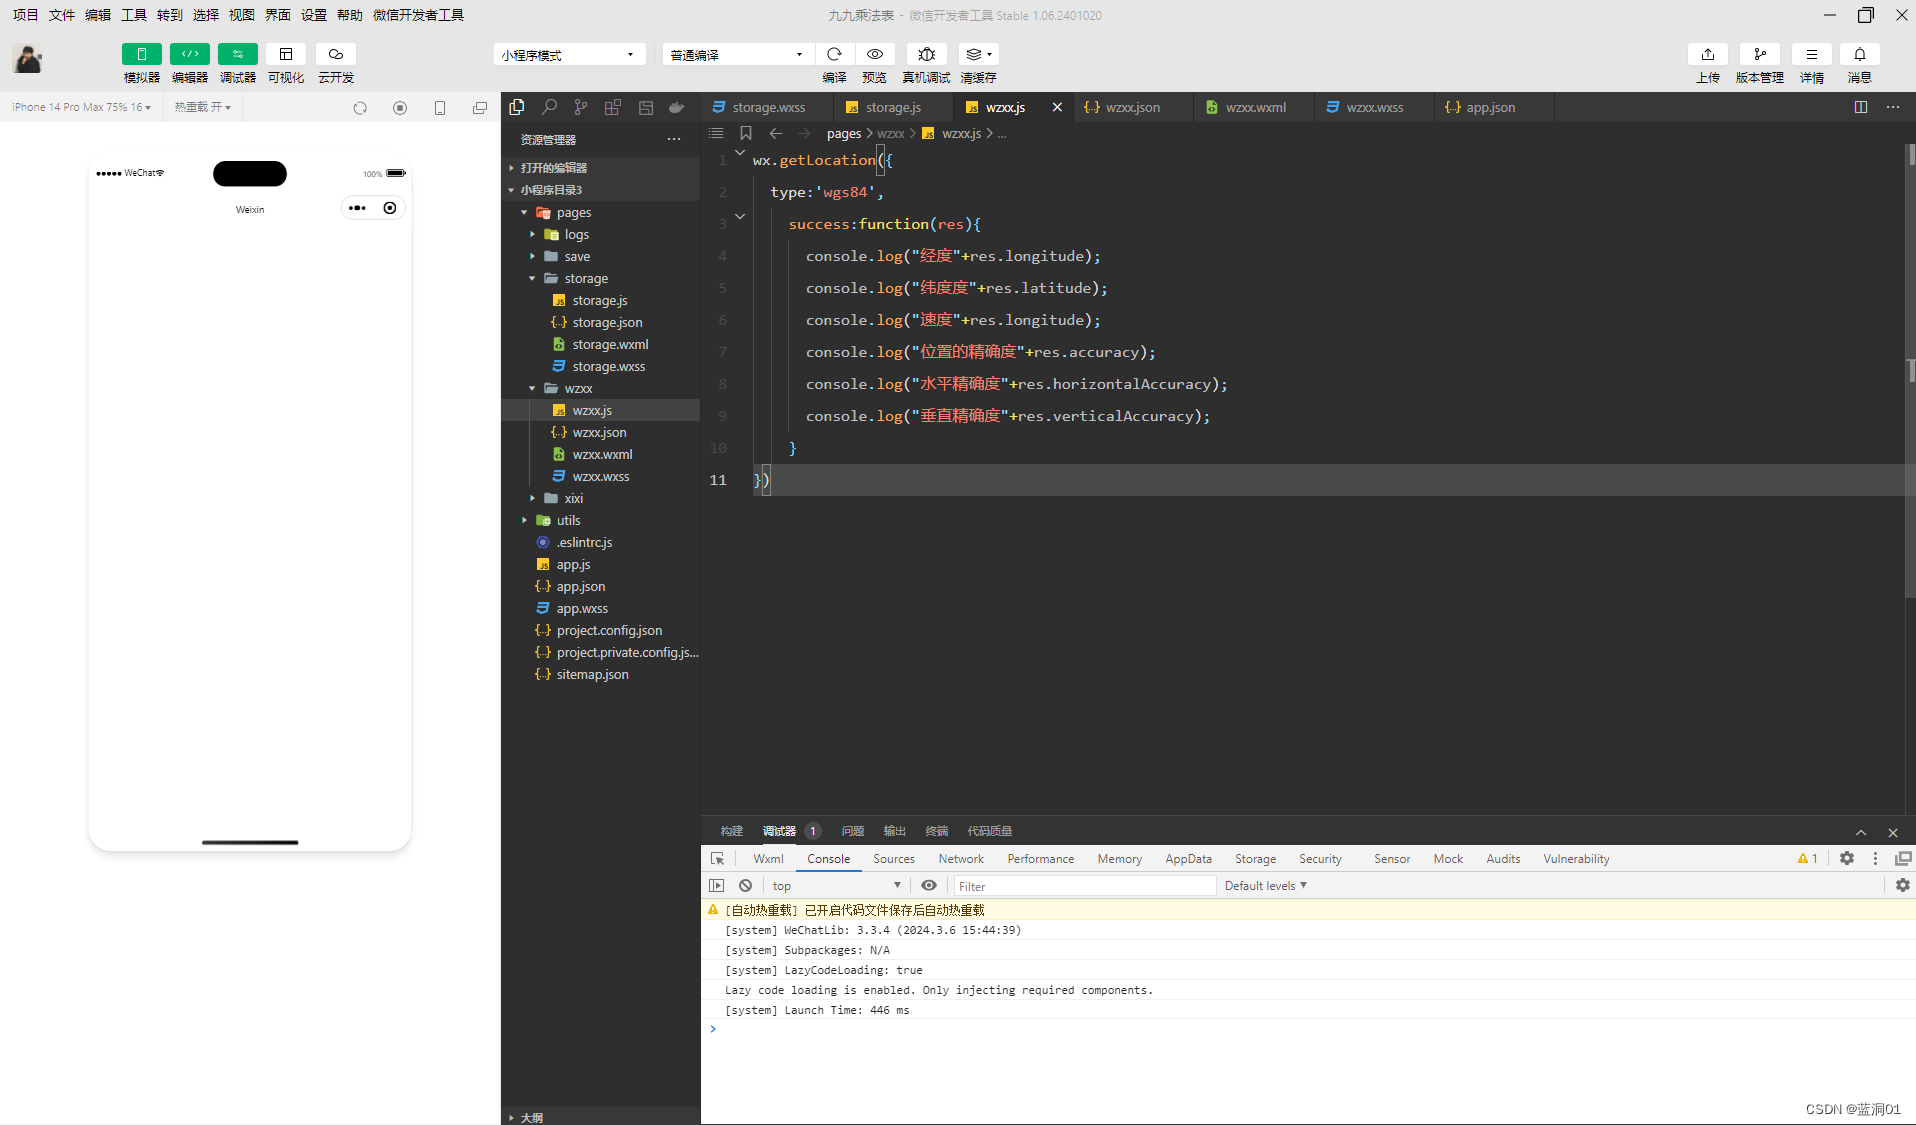
wx.getLocation(object)接口,获取位置信息,相关参数如下: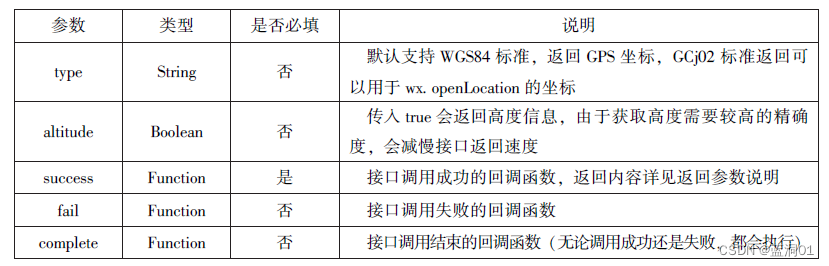
wx.getLocation(object)成功返回相关信息 :

代码:
//js

wx.getLocation({
  type:'wgs84',
    success:function(res){
      console.log("经度"+res.longitude);
      console.log("纬度度"+res.latitude);
      console.log("速度"+res.longitude);
      console.log("位置的精确度"+res.accuracy);
      console.log("水平精确度"+res.horizontalAccuracy);
      console.log("垂直精确度"+res.verticalAccuracy);
    }
})
6.5.2 选择位置信息
wx.chooseLocation(object)接口,用于选择位置信息,相关信息:

wx.chooseLocation(object)成功返回相关信息 :
代码:
//js

wx.chooseLocation({
    success:function(res){
      console.log("位置的名称"+res.longitude)
      console.log("位置的地址"+res.accuracy)
      console.log("位置的纬度"+res.horizontalAccuracy)
      console.log("位置的纬度"+res.verticalAccuracy)
    }
}) 
6.5.3 显示位置信息
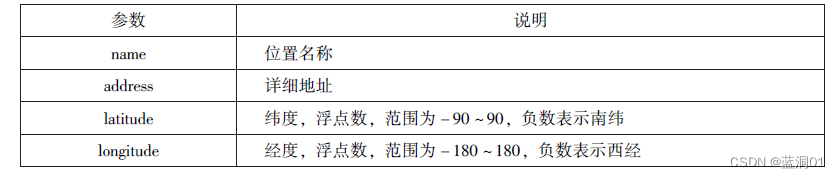
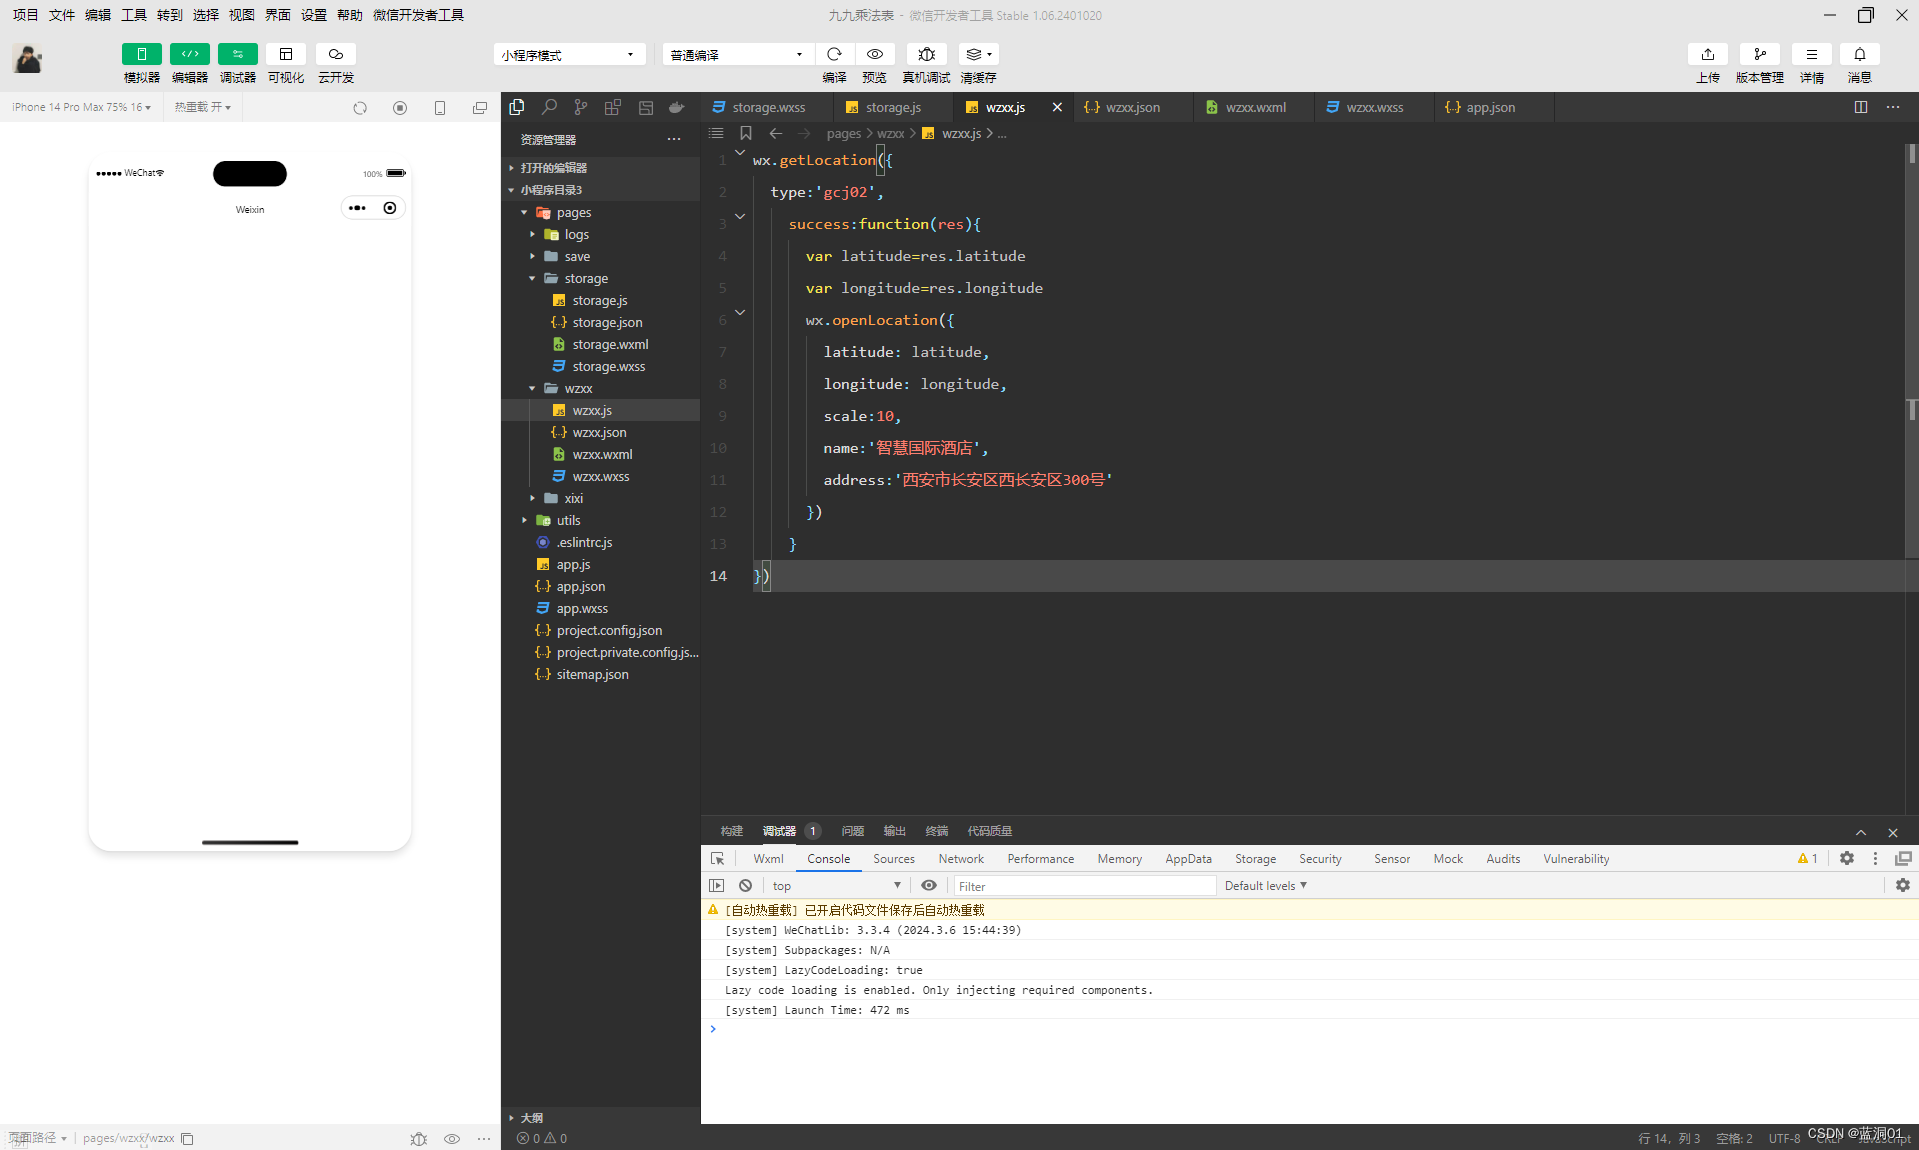
wx.openLocation(object)接口,用于显示位置信息,相关信息:
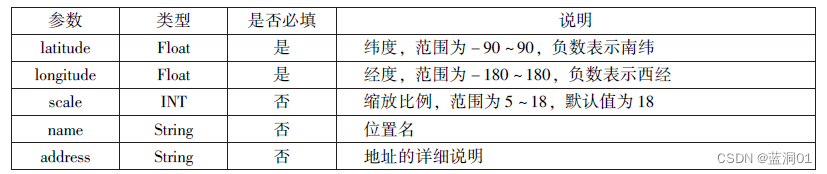

代码:
//js

wx.getLocation({
  type:'gcj02',
    success:function(res){
      var latitude=res.latitude
      var longitude=res.longitude
      wx.openLocation({
        latitude: latitude,
        longitude: longitude,
        scale:10,
        name:'智慧国际酒店',
        address:'西安市长安区西长安区300号'
      })
    }
})
6.6 设备相关API
6.6.1 获取系统信息
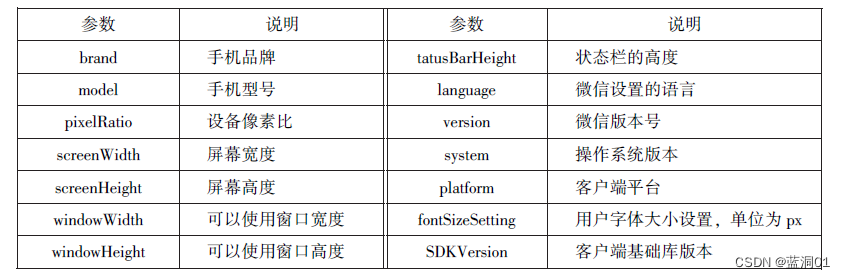
1wx.getSystemInfo()接口,wx.getSystemInfoSync()接口分别用于异步和同步获取系统信息。其相关参数:

wx.getSystemInfo()接口,wx.getSystemInfoSync()接口调用成功后,返回系统相关信息:
代码:
//js

wx.getSystemInfo({
    success:function(res){
      console.log("手机型号:"+res.model);
      console.log("设备像素比:"+res.pixelRatio);
      console.log("窗口的高度:"+res.windowHeight);
      console.log("窗口的宽度:"+res.windowWidth);
      console.log("微信的版本号:"+res.version);
      console.log("操作系统版本:"+res.system);
      console.log("客户端平台:"+res.platform);
    },
}) 
6.6.2 网络状态
wx.getNetworkType()用于获取网络类型,其参数如下:

代码:
//js

wx.getNetworkType({
  success:function(res){
    console.log(res.networkType)
  },
}) 
6.6.3 拨打电话
wx.makePhoneCall()接口实现调用手机打电话,其相关参数如下:

代码:
//js

wx.makePhoneCall({
  phoneNumber: '12339',
})
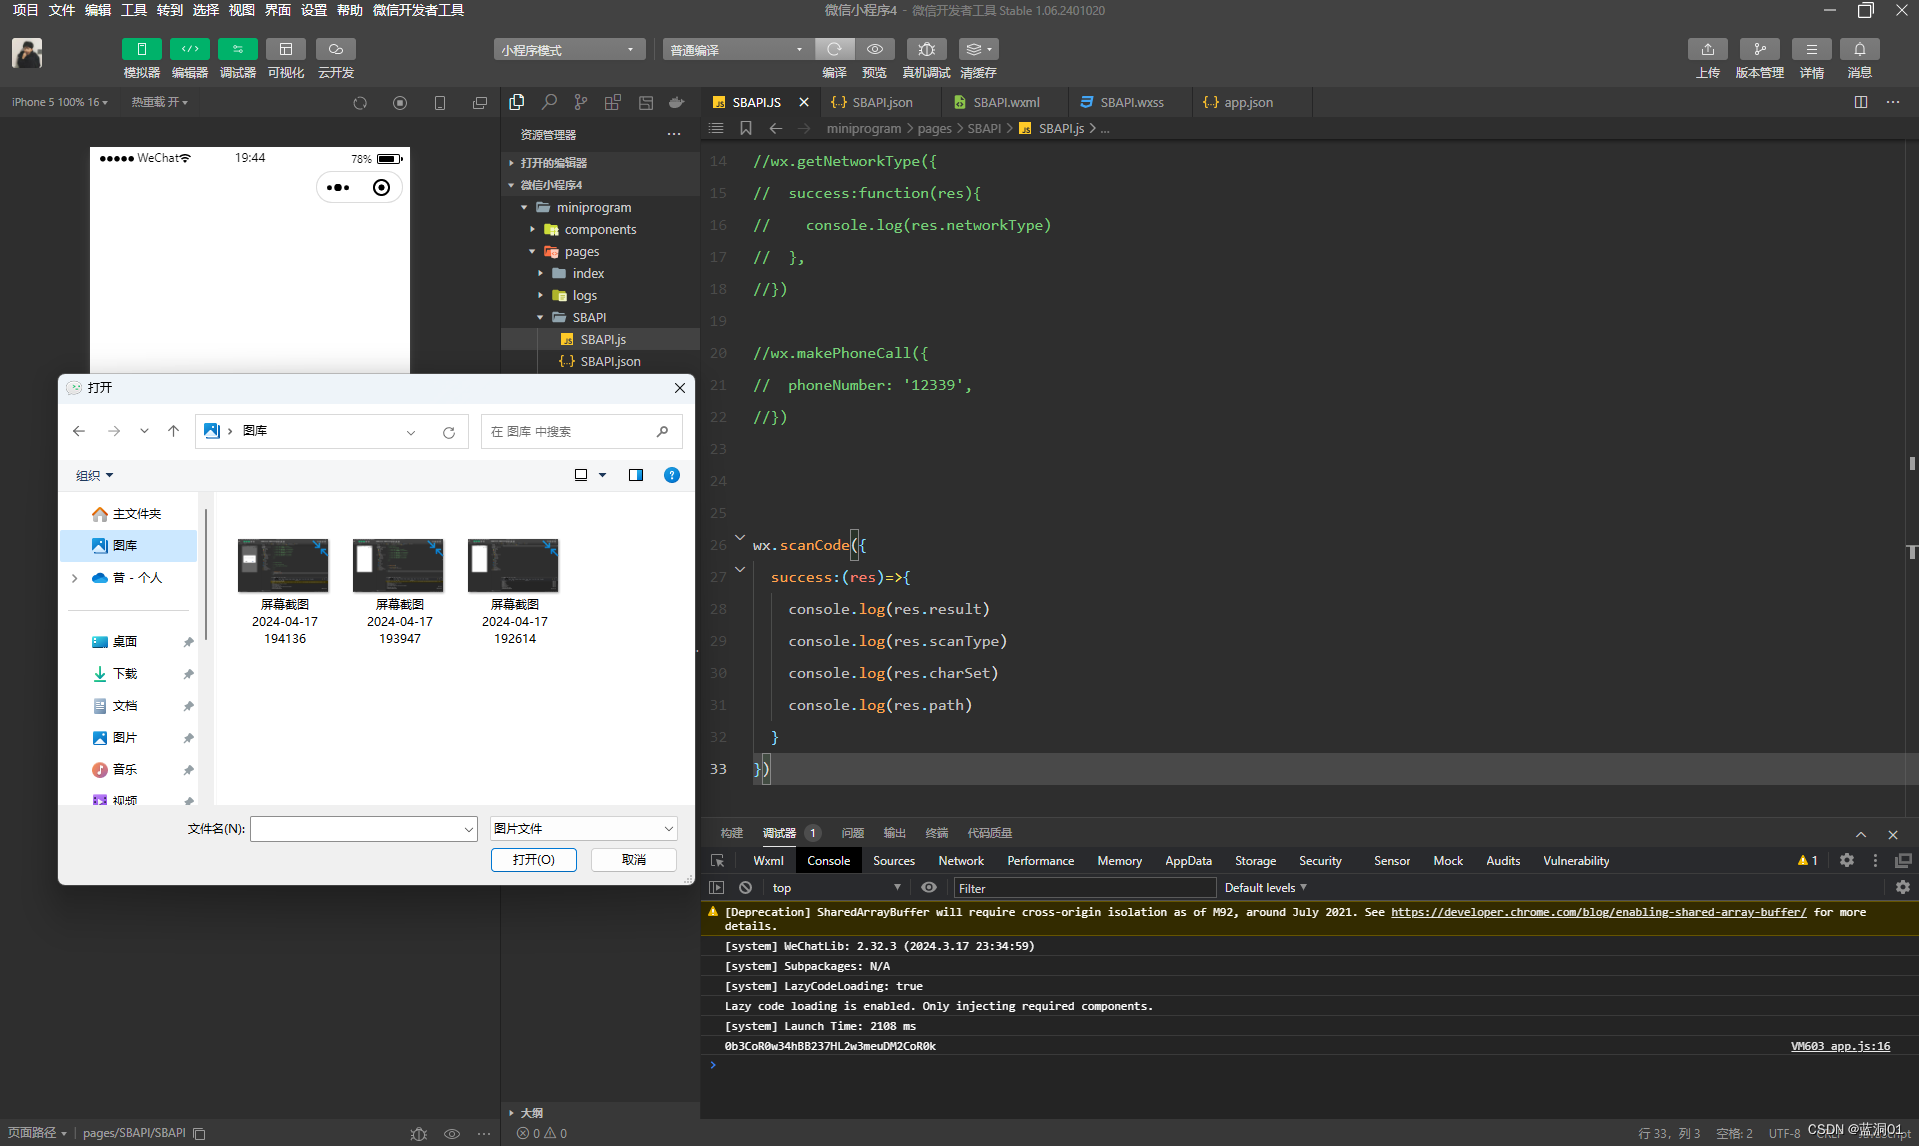
6.6.4 扫描二维码
wx.scanCode()接口用于调起客户端扫码界面,相关参数如下:

扫码成功后,返回数据

代码:
//js

wx.scanCode({
  success:(res)=>{
    console.log(res.result)
    console.log(res.scanType)
    console.log(res.charSet)
    console.log(res.path)
  }
})
效果图:


 397
397


 被折叠的 条评论
为什么被折叠?
被折叠的 条评论
为什么被折叠?
 到【灌水乐园】发言


