


介绍
随着三维技术革新的浪潮,地图应用已经从传统的二维展示跃迁至一个立体多维的视觉时代。然而,随着3D模型数量的指数级增长,如何在地图上高效加载并维持流畅的用户体验,成为了我们必须面对的挑战。本文的内容主要就是对“ 如何在高德地图上加载万级的gltf模型,仍然保持流畅的体验。”的实现方案做一个分享。
实现思路
常规做法
网上对加载gltf模型的常规的做法是直接Loader加载完模型后,使用Mesh.clone()批量复制模型。这种做法只能支持1000个以内的数量级,如果是面数复杂的模型估计上了100个都会有卡顿现象。
实例化网格做法
使用InstancedMesh 来渲染大量具有相同几何体与材质、但具有不同世界变换的物体,特别适合制作森林、砂石、大量城市路灯、大量城市垃圾桶等场景。使用 InstancedMesh 可以有效地减少 draw call 的数量,从而提升应用的整体渲染性能。
这种方法有个限制,instanceMesh(geometry, material, instanceCount)的第一个参数gemetry就要求模型是的geometry是1个单独的Mesh,没有子节点或兄弟节点。换言之如果你的gltf模型如果是3个独立的几何体组成,那么就需要实例化3个instanceMesh,且需要办法保证几何体的相对位置是固定的。
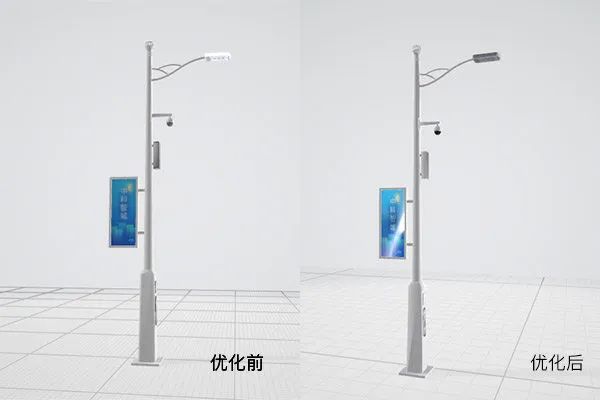
关于模型优化
无论采用哪种方案去实现最终效果的高性能,都需要渲染技术和原始模型的配合。再高效的渲染技术,如果遇到过于三角面数过于庞大的模型还是会有心无力,因此我们需要在保证模型外观过得去的情况下尽量优化模型。
对于模型的优化我们可以从以下几个方面入手,具体步骤再另外的文章分享:
1. 合并模型网格
2. 精简面数
3. 模型展UV贴图
4. 删除模型中看不见的内部面和无用边
经过这几步优化,我把原模型的三角形面数从9044个减少到1492个,文件体积从1060KB缩减到159KB。且保证了外观上没有太大的变化。
实现代码
three.js的版权声明及许可证:
The MIT LicenseCopyright © 2010-2024 three.js authorsPermission is hereby granted, free of charge, to any person obtaining a copyof this software and associated documentation files (the "Software"), to dealin the Software without restriction, including without limitation the rightsto use, copy, modify, merge, publish, distribute, sublicense, and/or sellcopies of the Software, and to permit persons to whom the Software isfurnished to do so, subject to the following conditions:The above copyright notice and this permission notice shall be included inall copies or substantial portions of the Software.THE SOFTWARE IS PROVIDED "AS IS", WITHOUT WARRANTY OF ANY KIND, EXPRESS ORIMPLIED, INCLUDING BUT NOT LIMITED TO THE WARRANTIES OF MERCHANTABILITY,FITNESS FOR A PARTICULAR PURPOSE AND NONINFRINGEMENT. IN NO EVENT SHALL THEAUTHORS OR COPYRIGHT HOLDERS BE LIABLE FOR ANY CLAIM, DAMAGES OR OTHERLIABILITY, WHETHER IN AN ACTION OF CONTRACT, TORT OR OTHERWISE, ARISING FROM,OUT OF OR IN CONNECTION WITH THE SOFTWARE OR THE USE OR OTHER DEALINGS INTHE SOFTWARE.
下面我以“在地图上加载10000个灯杆”为例,讲解编码步骤。
1.预先加载模型,创建实例化网格。
function loadModel(){this.loader = new GLTFLoader()this.loader.load(sourceUrl, function (gltf) {// 获取模型const mesh = gltf.scene.children[0]// 缓存模型_models.model = mesh_models.animations = gltf.animationsresolve()},function (xhr) {console.log((xhr.loaded / xhr.total * 100) + '% loaded')},function (error) {console.log('An error happened' + error)})}async function initMesh(){await loadModel()const { model, animations } = _modelsconst geometry = model.geometryconst material = model.material// 加载20000个模型const instanceCount = this._data.length// 3个参数分别是几何体、材质、数据量const instanceMesh = new THREE.InstancedMesh(geometry, material, instanceCount)this.scene.add(instanceMesh)}
2.遍历数据,并调整模型的实例化网络。
const dummy = new THREE.Object3D()const size = 4.0dummy.scale.set(size, size, size)const color = new THREE.Color()for (let i = 0; i < instanceCount; i++) {const { id, modelId, altitude, angle, coords, lngLat } = this._data[i]// 调整空间位置dummy.position.set(coords[0], coords[1], (altitude === undefined ? 0 : altitude) + 0)dummy.updateMatrix()// 调整朝向if (angle !== undefined) {const fn = upAxis === 'x' ? 'rotateX' : (upAxis === 'z' ? 'rotateZ' : 'rotateY')dummy[fn](-angle / 180 * Math.PI)}// 将对dummy的调整复制到具体的模型中instanceMesh.setMatrixAt(i, dummy.matrix)// 给实例添加一个空的颜色,用于实现后面的拾取后颜色控制instanceMesh.setColorAt(i, color)}
3. 处理网格的鼠标拾取事件,鼠标拾取还是用Raycaster射线去实现。
// 整个地图容器添加鼠标事件const t = thisthis._raycaster = new THREE.Raycaster()this.container.addEventListener('mousemove', _.debounce(function (event) {t.onRay(event)}, 100, true))onRay (event) {const { scene, camera } = this// 归一化坐标const pickPosition = this.setPickPosition(event)// 通过摄像机和鼠标位置更新射线this._raycaster.*setFromCamera*(pickPosition, camera)// 计算射线和场景的交集const intersects = this._raycaster.intersectObjects(scene.children, true)if (typeof this.onPicked === 'function') {this.onPicked.apply(this, [{ targets: intersects, event }])}return intersects}// 获取鼠标在three.js 中的归一化坐标setPickPosition (event) {const pickPosition = { x: 0, y: 0 }const rect = this.container.getBoundingClientRect()// // 将鼠标位置归一化为设备坐标, x 和 y 方向的取值范围是 (-1 to +1)pickPosition.x = (event.clientX / rect.width) * 2 - 1pickPosition.y = (event.clientY / rect.height) * -2 + 1return pickPosition}// 拾取到物体时,处理拾取事件onPicked ({ targets, event }) {let attrs = null// 选中状态颜色const color = new THREE.Color(0xff0000)const cMesh = this.getParentObject(targets[0], { name: this._impactName })if (cMesh?.isInstancedMesh) {const intersection = this._raycaster.intersectObject(cMesh, false)// 获取当前模型实例的编号,其实是生成序号// 通过这个编号就可以操作指定的模型了const { instanceId } = intersection[0]// 把拾取对象变成指定颜色cMesh.setColorAt(instanceId, color)// 强制颜色实时更新,必须!cMesh.instanceColor.needsUpdate = truereturn}
总结
这个方案还能继续优化吗?答案是可以的,只要将模型的可见面数合并、不可见面删除,我们还可以进一步支持更大的数据量。这里试了下将灯杆精简为一个立方体之后加载5万多数据量的效果,看看左上角的帧率,性能是完全没问题的。
相关链接
THREE实例化网格
https://threejs.org/docs/index.html?q=instance#api/zh/objects/InstancedMesh
blender如何完全合并物体
https://www.bilibili.com/video/BV1Lm4y1y7dr/?spm_id_from=333.337.search-card.all.click
Blender展UV基础
https://www.bilibili.com/video/BV1vZ4y1v71s/?spm_id_from=333.999.0.0
本文由高德开发者大本营成员—张林海提供
仅代表作者个人观点


 6717
6717

 被折叠的 条评论
为什么被折叠?
被折叠的 条评论
为什么被折叠?
 到【灌水乐园】发言


