


学习资料
博客:Touchable系列组件
TouchableHighlight、TouchableOpacity
/**
 * Sample React Native App
 * https://github.com/facebook/react-native
 * @flow
 */

import React, { Component } from 'react';
import {
  AppRegistry,
  StyleSheet,
  Text,
  View,
  TouchableOpacity
} from 'react-native';

class TouchableDemo extends Component {
  render() {
    return (
      <View style={styles.container}>
        <TouchableOpacity activeOpacity={0.5}>
          <View style={styles.innerViewStyle}>
            <Text>我是文本,但可点击</Text>
          </View>
        </TouchableOpacity>
      </View>
    );
  }
}

const styles = StyleSheet.create({
  container: {
    flex: 1,
    justifyContent: 'center',
    alignItems: 'center',
    backgroundColor: '#F5FCFF',
  },
  innerViewStyle: {
    backgroundColor: 'red',
  }
});

AppRegistry.registerComponent('TouchableDemo', () => TouchableDemo);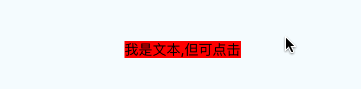
不透明触摸 TouchableOpacity
该组件封装了响应触摸事件;当点击按下的时候,该组件的透明度会降低。
常用属性:activeOpacity 设置当用户触摸的时候,组件的透明度
/**
 * Sample React Native App
 * https://github.com/facebook/react-native
 * @flow
 */

import React, { Component } from 'react';
import {
  AppRegistry,
  StyleSheet,
  Text,
  View,
  TouchableOpacity,
  AlertIOS
} from 'react-native';

// ES5新建组件的写法
var TouchableDemo = React.createClass({
  getInitialState(){
    return {
      title:'不透明触摸'
    }
  },

  render() {
    return (
        <View style={styles.container}>
          <TouchableOpacity
              activeOpacity={0.5}
              onPress={()=>this.activeEvent('点击')}
              onPressIn={()=>this.activeEvent('按下')}
              onPressOut={()=>this.activeEvent('抬起')}
              onLongPress={()=>this.activeEvent('长按')}
          >
            <View style={styles.innerViewStyle}>
              <Text>点击事件</Text>
            </View>
          </TouchableOpacity>
          <View style={{marginTop:20}}>
            <Text>状态: {this.state.title}</Text>
          </View>
        </View>
    );
  },

  // 鼠标触发这个函数
  activeEvent(event){
    // 修改title
    this.setState({
      title:event
    })
  }
});

// ES6的写法
// class TouchableDemo extends Component {
//
// }

const styles = StyleSheet.create({
  container: {
    flex: 1,
    justifyContent: 'center',
    alignItems: 'center',
    backgroundColor: '#F5FCFF',
  },
  innerViewStyle: {
    backgroundColor: 'red',
  }
});

AppRegistry.registerComponent('TouchableDemo', () => TouchableDemo);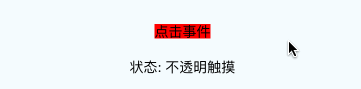
补充:
上面我们用的是ES5的写法,下面我们来用ES6的写法实现:
// ES6的写法
class TouchableDemo extends Component {
  // 构造
  constructor(props) {
    super(props);
    // 初始状态
    this.state = {title:'不透明触摸'};
  }

  render() {
    return (
        <View style={styles.container}>
          <TouchableOpacity
              activeOpacity={0.5}
              onPress={()=>this.activeEvent('点击')}
              onPressIn={()=>this.activeEvent('按下')}
              onPressOut={()=>this.activeEvent('抬起')}
              onLongPress={()=>this.activeEvent('长按')}
          >
            <View style={styles.innerViewStyle}>
              <Text>点击事件</Text>
            </View>
          </TouchableOpacity>
          <View style={{marginTop:20}}>
            <Text>状态: {this.state.title}</Text>
          </View>
        </View>
    );
  }

  // 鼠标触发这个函数
  activeEvent(event){
    // 修改title
    this.setState({
      title:event
    })
  }
}
对比2种写法的区别。
这里边还需要学习 React Native组件生命周期


 3173
3173


 被折叠的 条评论
为什么被折叠?
被折叠的 条评论
为什么被折叠?
 到【灌水乐园】发言


