


点击上方“芋道源码”,选择“设为星标”
管她前浪,还是后浪?
能浪的浪,才是好浪!
每天 10:33 更新文章,每天掉亿点点头发...
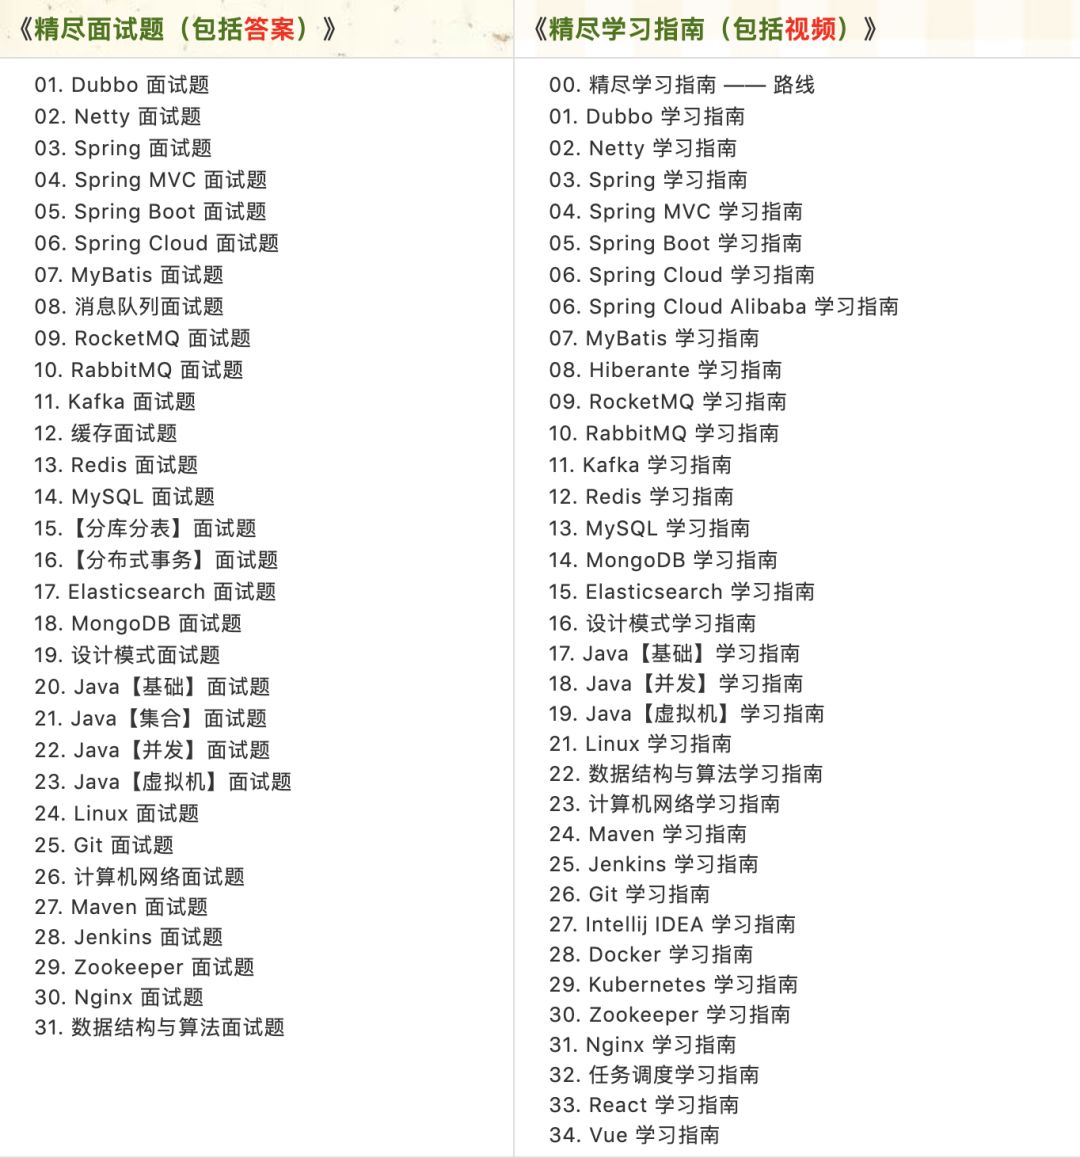
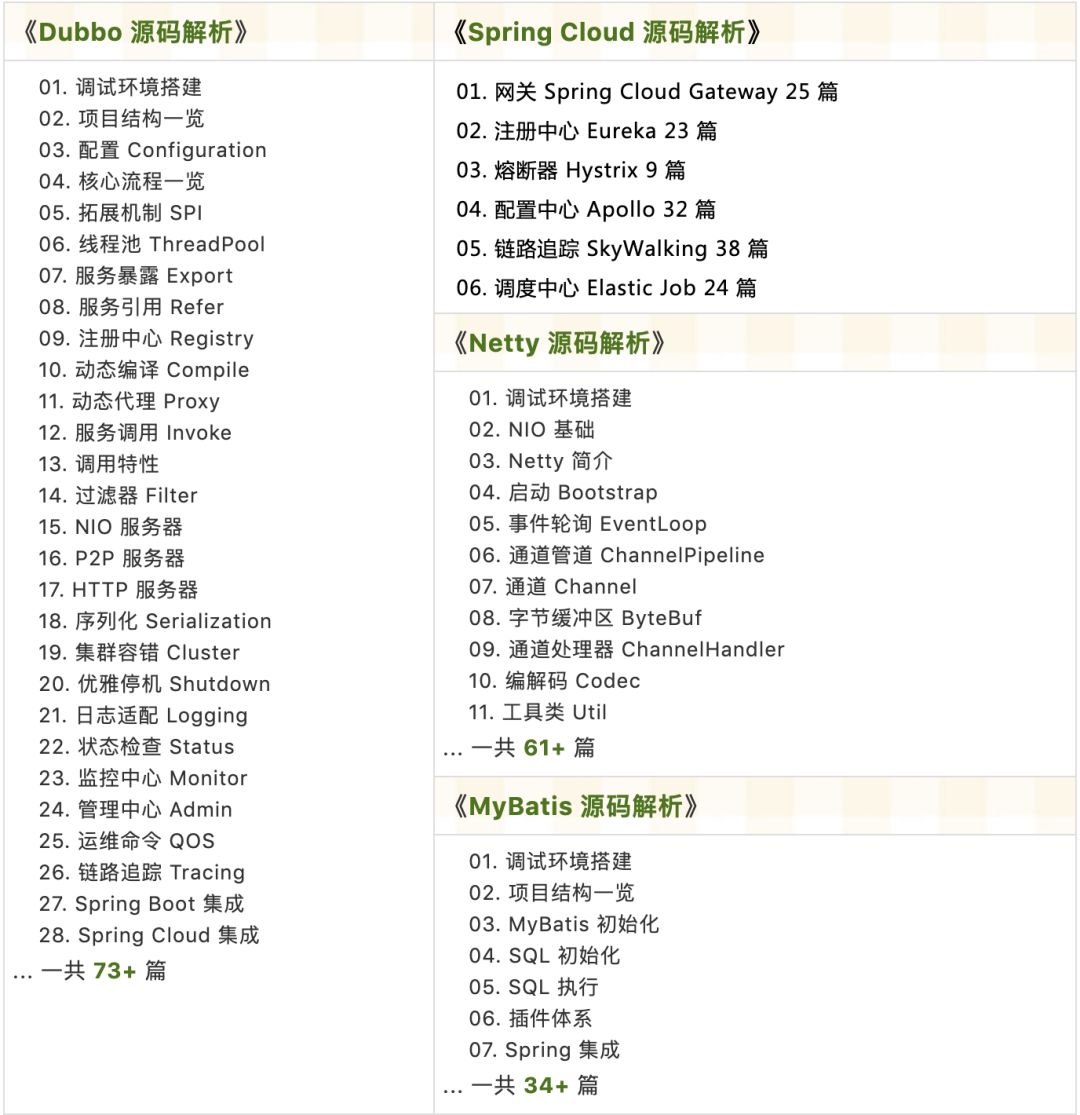
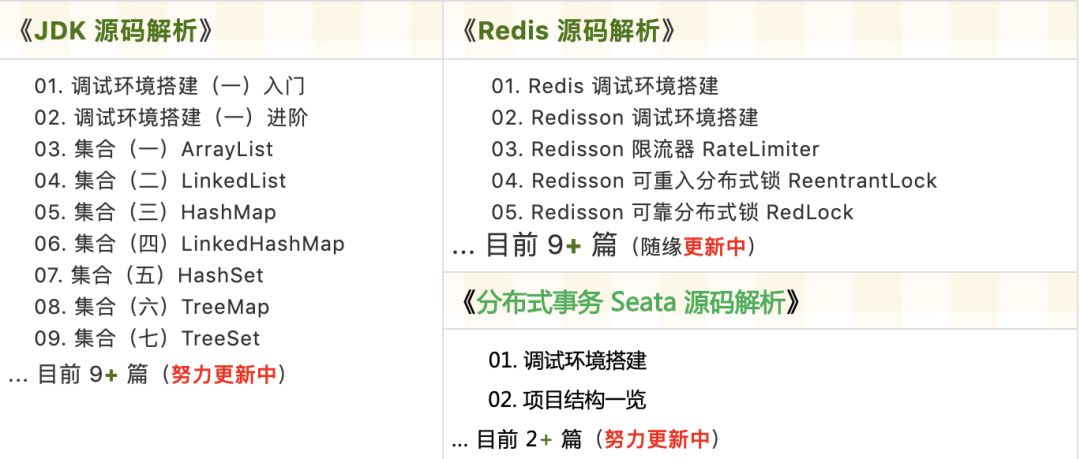
源码精品专栏
来源:wangbinguang.blog.csdn.net/
环境搭建
Nacos搭建
最新版本快速搭建 使用Mysql模式
Nacos直接启动即可。控制台默认账号密码是nacos/nacos,Mysql账户密码有两个 root/root 和 nacos/nacos。
Seata搭建
Seata版本1.5.0 快速搭建
Seata1.5.0版本直接是一个SpringBoot项目,下载后修改application.yml 文件中注册中心、配置中心、存储模式配置。参考resources/application.example.yml 文件 ,修改后如下
server:
  port: 7091

spring:
  application:
    name: seata-server

logging:
  config: classpath:logback-spring.xml
  file:
    path: ${user.home}/logs/seata
  extend:
    logstash-appender:
      destination: 127.0.0.1:4560
    kafka-appender:
      bootstrap-servers: 127.0.0.1:9092
      topic: logback_to_logstash

console:
  user:
    username: seata
    password: seata

seata:
  config:
    # support: nacos, consul, apollo, zk, etcd3
    type: file
  registry:
    # support: nacos, eureka, redis, zk, consul, etcd3, sofa
    type: nacos
    nacos:
      application: seata-server
      server-addr: 127.0.0.1:8848
      namespace:
      group: SEATA_GROUP
      cluster: default
      username: nacos
      password: nacos
      ##if use MSE Nacos with auth, mutex with username/password attribute
      #access-key: ""
      #secret-key: ""
  store:
    # support: file 、 db 、 redis
    mode: db
    db:
      datasource: druid
      db-type: mysql
      driver-class-name: com.mysql.jdbc.Driver
      url: jdbc:mysql://127.0.0.1:3306/seata?rewriteBatchedStatements=true
      user: root
      password: root
      min-conn: 5
      max-conn: 100
      global-table: global_table
      branch-table: branch_table
      lock-table: lock_table
      distributed-lock-table: distributed_lock
      query-limit: 100
      max-wait: 5000

> 基于 Spring Boot + MyBatis Plus + Vue & Element 实现的后台管理系统 + 用户小程序,支持 RBAC 动态权限、多租户、数据权限、工作流、三方登录、支付、短信、商城等功能
>
> * 项目地址:<https://github.com/YunaiV/ruoyi-vue-pro>
> * 视频教程:<https://doc.iocoder.cn/video/>

#  server:

> 基于 Spring Cloud Alibaba + Gateway + Nacos + RocketMQ + Vue & Element 实现的后台管理系统 + 用户小程序,支持 RBAC 动态权限、多租户、数据权限、工作流、三方登录、支付、短信、商城等功能
>
> * 项目地址:<https://github.com/YunaiV/yudao-cloud>
> * 视频教程:<https://doc.iocoder.cn/video/>

#    service-port: 8091 #If not configured, the default is '${server.port} + 1000'
  security:
    secretKey: SeataSecretKey0c382ef121d778043159209298fd40bf3850a017
    tokenValidityInMilliseconds: 1800000
    ignore:
      urls: /,/**/*.css,/**/*.js,/**/*.html,/**/*.map,/**/*.svg,/**/*.png,/**/*.ico,/console-fe/public/**,/api/v1/auth/login
创建seata数据库,执行脚本建表
-- -------------------------------- The script used when storeMode is 'db' --------------------------------
-- the table to store GlobalSession data
CREATE TABLE IF NOT EXISTS `global_table`
(
    `xid`                       VARCHAR(128) NOT NULL,
    `transaction_id`            BIGINT,
    `status`                    TINYINT      NOT NULL,
    `application_id`            VARCHAR(32),
    `transaction_service_group` VARCHAR(32),
    `transaction_name`          VARCHAR(128),
    `timeout`                   INT,
    `begin_time`                BIGINT,
    `application_data`          VARCHAR(2000),
    `gmt_create`                DATETIME,
    `gmt_modified`              DATETIME,
    PRIMARY KEY (`xid`),
    KEY `idx_status_gmt_modified` (`status` , `gmt_modified`),
    KEY `idx_transaction_id` (`transaction_id`)
) ENGINE = InnoDB
  DEFAULT CHARSET = utf8mb4;

-- the table to store BranchSession data
CREATE TABLE IF NOT EXISTS `branch_table`
(
    `branch_id`         BIGINT       NOT NULL,
    `xid`               VARCHAR(128) NOT NULL,
    `transaction_id`    BIGINT,
    `resource_group_id` VARCHAR(32),
    `resource_id`       VARCHAR(256),
    `branch_type`       VARCHAR(8),
    `status`            TINYINT,
    `client_id`         VARCHAR(64),
    `application_data`  VARCHAR(2000),
    `gmt_create`        DATETIME(6),
    `gmt_modified`      DATETIME(6),
    PRIMARY KEY (`branch_id`),
    KEY `idx_xid` (`xid`)
) ENGINE = InnoDB
  DEFAULT CHARSET = utf8mb4;

-- the table to store lock data
CREATE TABLE IF NOT EXISTS `lock_table`
(
    `row_key`        VARCHAR(128) NOT NULL,
    `xid`            VARCHAR(128),
    `transaction_id` BIGINT,
    `branch_id`      BIGINT       NOT NULL,
    `resource_id`    VARCHAR(256),
    `table_name`     VARCHAR(32),
    `pk`             VARCHAR(36),
    `status`         TINYINT      NOT NULL DEFAULT '0' COMMENT '0:locked ,1:rollbacking',
    `gmt_create`     DATETIME,
    `gmt_modified`   DATETIME,
    PRIMARY KEY (`row_key`),
    KEY `idx_status` (`status`),
    KEY `idx_branch_id` (`branch_id`),
    KEY `idx_xid` (`xid`)
) ENGINE = InnoDB
  DEFAULT CHARSET = utf8mb4;

CREATE TABLE IF NOT EXISTS `distributed_lock`
(
    `lock_key`       CHAR(20) NOT NULL,
    `lock_value`     VARCHAR(20) NOT NULL,
    `expire`         BIGINT,
    primary key (`lock_key`)
) ENGINE = InnoDB
  DEFAULT CHARSET = utf8mb4;

INSERT INTO `distributed_lock` (lock_key, lock_value, expire) VALUES ('AsyncCommitting', ' ', 0);
INSERT INTO `distributed_lock` (lock_key, lock_value, expire) VALUES ('RetryCommitting', ' ', 0);
INSERT INTO `distributed_lock` (lock_key, lock_value, expire) VALUES ('RetryRollbacking', ' ', 0);
INSERT INTO `distributed_lock` (lock_key, lock_value, expire) VALUES ('TxTimeoutCheck', ' ', 0);启动seata-server,控制台登录页面如下,账号密码为seata/seata。
项目搭建
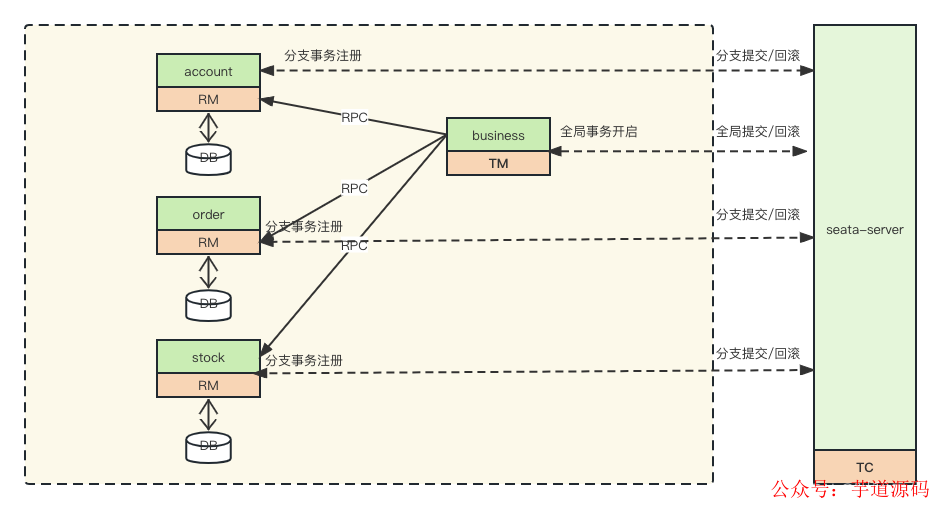
业务背景
用户购买商品的业务逻辑。整个业务逻辑由3个微服务提供支持:
仓储服务: 对给定的商品扣除仓储数量。
订单服务: 根据采购需求创建订单。
帐户服务: 从用户帐户中扣除余额。
架构
业务表创建
-- ----------------------------
-- Table structure for t_account
-- ----------------------------
DROP TABLE IF EXISTS `t_account`;
CREATE TABLE `t_account`
(
    `id`      int(11) NOT NULL AUTO_INCREMENT,
    `user_id` varchar(255) DEFAULT NULL,
    `amount`  double(14, 2
) DEFAULT '0.00',
  PRIMARY KEY (`id`)
) ENGINE=InnoDB AUTO_INCREMENT=2 DEFAULT CHARSET=utf8;

-- ----------------------------
-- Records of t_account
-- ----------------------------
INSERT INTO `t_account`
VALUES ('1', '1', '4000.00');

-- ----------------------------
-- Table structure for t_order
-- ----------------------------
DROP TABLE IF EXISTS `t_order`;
CREATE TABLE `t_order`
(
    `id`             int(11) NOT NULL AUTO_INCREMENT,
    `order_no`       varchar(255) DEFAULT NULL,
    `user_id`        varchar(255) DEFAULT NULL,
    `commodity_code` varchar(255) DEFAULT NULL,
    `count`          int(11) DEFAULT '0',
    `amount`         double(14, 2
) DEFAULT '0.00',
  PRIMARY KEY (`id`)
) ENGINE=InnoDB AUTO_INCREMENT=64 DEFAULT CHARSET=utf8;

-- ----------------------------
-- Records of t_order
-- ----------------------------

-- ----------------------------
-- Table structure for t_stock
-- ----------------------------
DROP TABLE IF EXISTS `t_stock`;
CREATE TABLE `t_stock`
(
    `id`             int(11) NOT NULL AUTO_INCREMENT,
    `commodity_code` varchar(255) DEFAULT NULL,
    `name`           varchar(255) DEFAULT NULL,
    `count`          int(11) DEFAULT '0',
    PRIMARY KEY (`id`),
    UNIQUE KEY `commodity_code` (`commodity_code`)
) ENGINE=InnoDB AUTO_INCREMENT=2 DEFAULT CHARSET=utf8;

-- ----------------------------
-- Records of t_stock
-- ----------------------------
INSERT INTO `t_stock`
VALUES ('1', 'C201901140001', '水杯', '1000');

-- ----------------------------
-- Table structure for undo_log
-- 注意此处0.3.0+ 增加唯一索引 ux_undo_log
-- ----------------------------
DROP TABLE IF EXISTS `undo_log`;
CREATE TABLE `undo_log`
(
    `id`            bigint(20) NOT NULL AUTO_INCREMENT,
    `branch_id`     bigint(20) NOT NULL,
    `xid`           varchar(100) NOT NULL,
    `context`       varchar(128) NOT NULL,
    `rollback_info` longblob     NOT NULL,
    `log_status`    int(11) NOT NULL,
    `log_created`   datetime     NOT NULL,
    `log_modified`  datetime     NOT NULL,
    PRIMARY KEY (`id`),
    UNIQUE KEY `ux_undo_log` (`xid`,`branch_id`)
) ENGINE=InnoDB AUTO_INCREMENT=1 DEFAULT CHARSET=utf8;

-- ----------------------------
-- Records of undo_log
-- ----------------------------
SET
FOREIGN_KEY_CHECKS=1;
服务创建
业务服务
以order服务为例,引入依赖、配置参数、提供创建订单接口。
pom.xml文件中引入依赖
<dependencies>
    <dependency>
        <groupId>org.springframework.boot</groupId>
        <artifactId>spring-boot-starter-web</artifactId>
    </dependency>
    <dependency>
        <groupId>com.alibaba.cloud</groupId>
        <artifactId>spring-cloud-starter-alibaba-nacos-discovery</artifactId>
    </dependency>
    <dependency>
        <groupId>com.alibaba.cloud</groupId>
        <artifactId>spring-cloud-starter-alibaba-seata</artifactId>
    </dependency>
    <dependency>
        <groupId>com.alibaba</groupId>
        <artifactId>druid</artifactId>
    </dependency>
    <dependency>
        <groupId>com.baomidou</groupId>
        <artifactId>mybatis-plus-boot-starter</artifactId>
    </dependency>
    <dependency>
        <groupId>mysql</groupId>
        <artifactId>mysql-connector-java</artifactId>
    </dependency>
</dependencies>
application.properties配置参数
server.port=81
spring.application.name=order
spring.cloud.nacos.discovery.server-addr=127.0.0.1:8848
spring.cloud.nacos.username=nacos
spring.cloud.nacos.password=nacos
spring.datasource.type=com.alibaba.druid.pool.DruidDataSource
spring.datasource.driver-class-name=com.mysql.cj.jdbc.Driver
spring.datasource.url=jdbc:mysql://127.0.0.1:3306/seata_samples?allowPublicKeyRetrieval=true&useSSL=false&useUnicode=true&characterEncoding=utf-8&allowMultiQueries=true
spring.datasource.username=root
spring.datasource.password=root
mybatis-plus.mapper-locations=classpath:mapper/*.xml
mybatis-plus.configuration.log-impl=org.apache.ibatis.logging.stdout.StdOutImpl
提供创建订单接口
@RequestMapping("/add")
 public void add(String userId, String commodityCode, Integer count, BigDecimal amount) {
     Order order = new Order();
     order.setOrderNo(UUID.randomUUID().toString());
     order.setUserId(userId);
     order.setAmount(amount);
     order.setCommodityCode(commodityCode);
     order.setCount(count);
     orderService.save(order);
 }
聚合服务
business服务远程调用仓储、订单、帐户服务,完成下单流程。
1.pom.xml文件中引入依赖
<dependencies>
    <dependency>
        <groupId>org.springframework.boot</groupId>
        <artifactId>spring-boot-starter-web</artifactId>
    </dependency>
    <dependency>
        <groupId>com.alibaba.cloud</groupId>
        <artifactId>spring-cloud-starter-alibaba-nacos-discovery</artifactId>
    </dependency>
    <dependency>
        <groupId>com.alibaba.cloud</groupId>
        <artifactId>spring-cloud-starter-alibaba-seata</artifactId>
    </dependency>
    <dependency>
        <groupId>com.alibaba</groupId>
        <artifactId>druid</artifactId>
    </dependency>
    <dependency>
        <groupId>org.springframework.cloud</groupId>
        <artifactId>spring-cloud-starter-openfeign</artifactId>
    </dependency>
</dependencies>
2.application.properties配置参数
server.port=80
spring.application.name=business
spring.cloud.nacos.discovery.server-addr=127.0.0.1:8848
spring.cloud.nacos.username=nacos
spring.cloud.nacos.password=nacos
spring.datasource.type=com.alibaba.druid.pool.DruidDataSource
spring.datasource.driver-class-name=com.mysql.cj.jdbc.Driver
spring.datasource.url=jdbc:mysql://127.0.0.1:3306/seata_samples?allowPublicKeyRetrieval=true&useSSL=false&useUnicode=true&characterEncoding=utf-8&allowMultiQueries=true
spring.datasource.username=root
spring.datasource.password=root
service.disableGlobalTransaction=false
# 连接超时时间
ribbon.ConnectTimeout=3000
# 响应超时时间
ribbon.ReadTimeout=5000
3.声明account、stock、order的feign接口。
@FeignClient(value = "account")
public interface AccountFeign {
    @RequestMapping("/account/reduce")
    public void reduce(@RequestParam("userId") String userId, @RequestParam("amount") BigDecimal amount);

}
@FeignClient(value = "order")
public interface OrderFeign {
    @RequestMapping("/order/add")
    public void add(@RequestParam("userId") String userId, @RequestParam("commodityCode") String commodityCode, @RequestParam("count") Integer count, @RequestParam("amount") BigDecimal amount);

}
@FeignClient(value = "stock")
public interface StockFeign {
    @RequestMapping("/stock/deduct")
    public void deduct(@RequestParam("commodityCode") String commodityCode, @RequestParam("count") Integer count);

}
4.全局事务开启,调用feign接口
@Autowired
private OrderFeign orderFeign;

@Autowired
private StockFeign stockFeign;

@Autowired
private AccountFeign accountFeign;

@GlobalTransactional
@RequestMapping("/toOrder")
public void toOrder(String userId, String commodityCode, Integer count, BigDecimal amount) {
    accountFeign.reduce(userId, amount);
    stockFeign.deduct(commodityCode, count);
    orderFeign.add(userId, commodityCode, count, amount);
}
测试验证
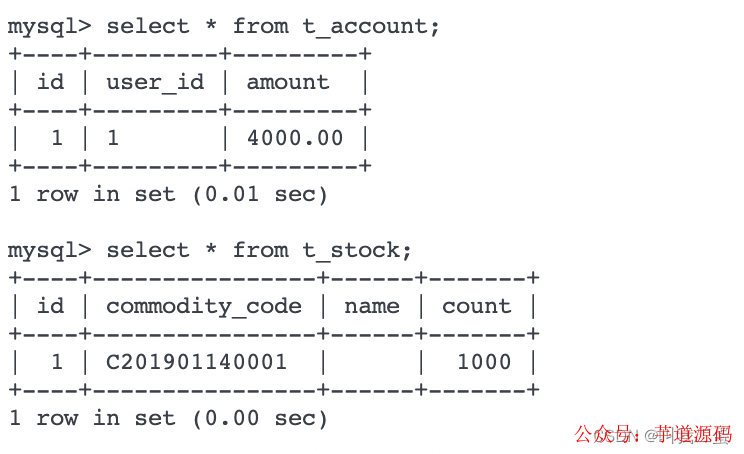
当前资金账户4000,库存1000,模拟用户购买商品2000个,消费4000,业务调用后,数据库数据状态应该如下:
用户资金满足4000,数据库更新用户资金为0。
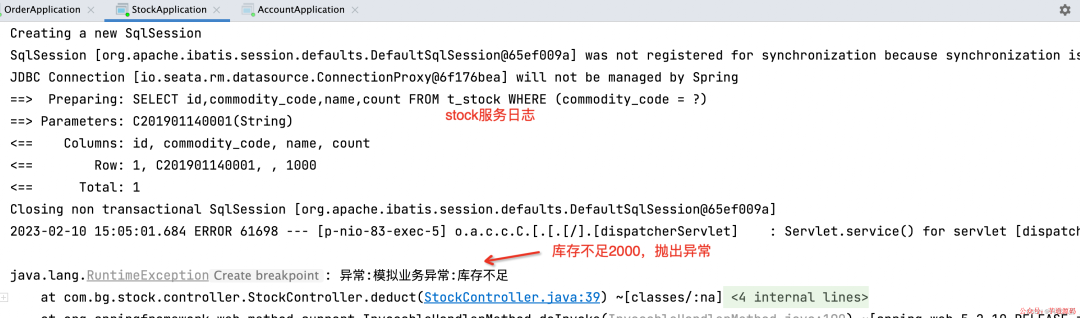
商品库存不满足2000个,异常。
business服务提交全局回滚。
资金服务回滚操作,更新资金为4000。
验证:
1.浏览器输入地址请求访问
http://127.0.0.1/business/toOrder?userId=1&commodityCode=C201901140001&count=2000&amount=4000
2.account、stock服务日志观察。
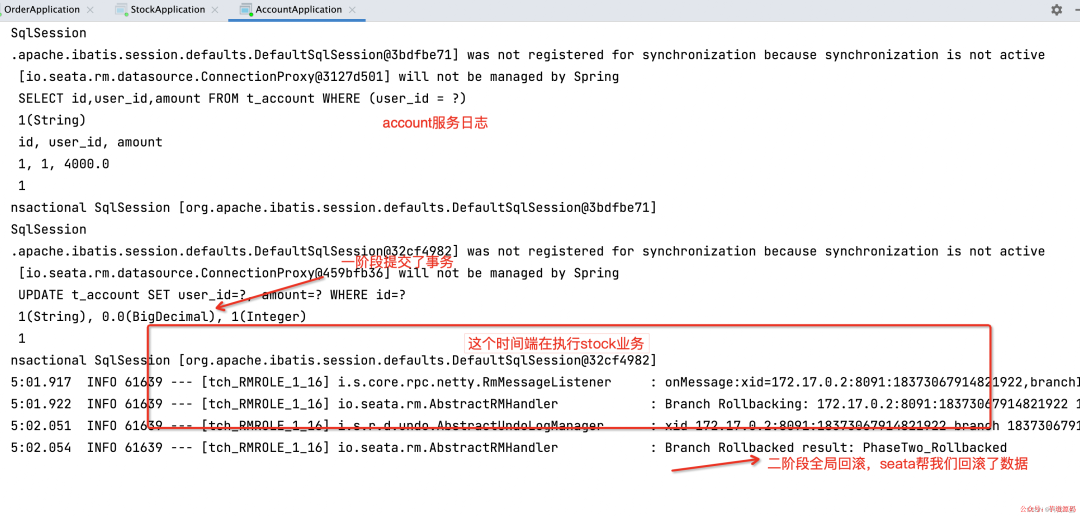
3.数据库数据依然为原始状态。
注意事项
1.Seata1.5版本的mysql驱动是5.7,需要为8,在libs文件夹删除mysql-connector-java-5.xx.jar,替换mysql-connector-java-8.xx.jar即可
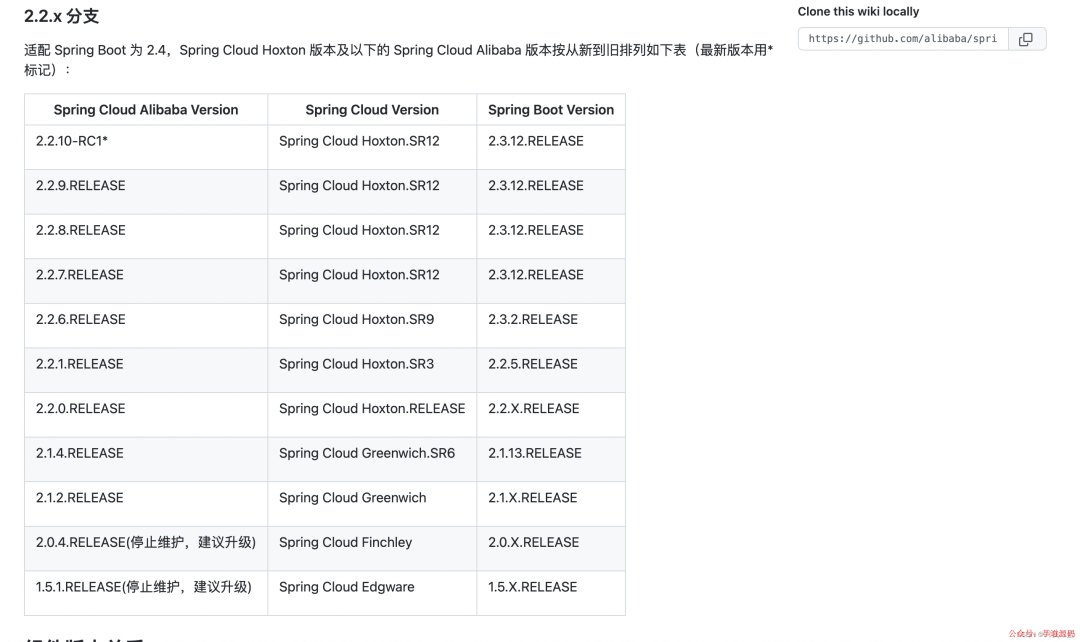
2.Spring Boot &Spring Cloud&Spring Cloud Alibaba版本兼容问题
Spring Cloud Alibaba版本说明
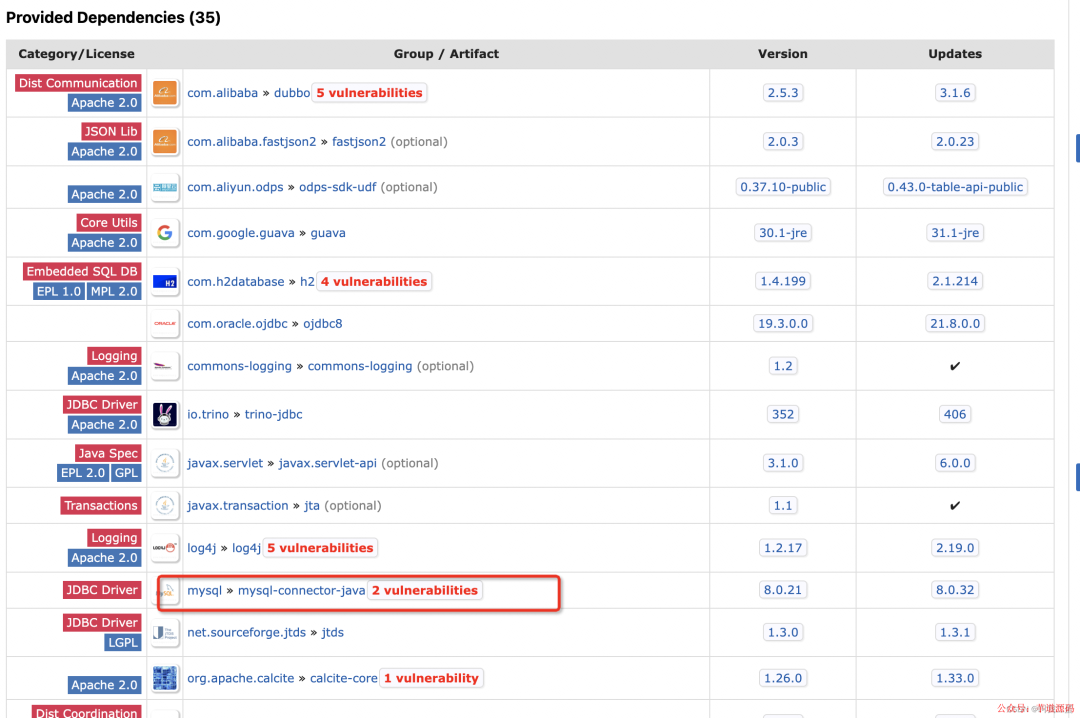
3.druid和数据驱动版本兼容
通过druid仓库版本查看各依赖版本说明
代码仓库
https://gitee.com/codeWBG/springcloud_alibaba
欢迎加入我的知识星球,一起探讨架构,交流源码。加入方式,长按下方二维码噢:

已在知识星球更新源码解析如下:

最近更新《芋道 SpringBoot 2.X 入门》系列,已经 101 余篇,覆盖了 MyBatis、Redis、MongoDB、ES、分库分表、读写分离、SpringMVC、Webflux、权限、WebSocket、Dubbo、RabbitMQ、RocketMQ、Kafka、性能测试等等内容。
提供近 3W 行代码的 SpringBoot 示例,以及超 4W 行代码的电商微服务项目。
获取方式:点“在看”,关注公众号并回复 666 领取,更多内容陆续奉上。
文章有帮助的话,在看,转发吧。
谢谢支持哟 (*^__^*)


 1181
1181

 被折叠的 条评论
为什么被折叠?
被折叠的 条评论
为什么被折叠?
 到【灌水乐园】发言


