Things We Need
Before we starts with our first Hello World Spring MVC Example, we will need few tools.
- JDK 1.5 above
- Tomcat 5.x above or any other container (Glassfish, JBoss, Websphere, Weblogic etc)
- Eclipse 3.2.x above
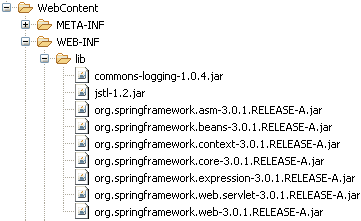
- Spring 3.0 MVC JAR files:. Following are the list of JAR files required for this application.
- commons-logging-1.0.4.jar
- jstl-1.2.jar
- org.springframework.asm-3.0.1.RELEASE-A.jar
- org.springframework.beans-3.0.1.RELEASE-A.jar
- org.springframework.context-3.0.1.RELEASE-A.jar
- org.springframework.core-3.0.1.RELEASE-A.jar
- org.springframework.expression-3.0.1.RELEASE-A.jar
- org.springframework.web.servlet-3.0.1.RELEASE-A.jar
- org.springframework.web-3.0.1.RELEASE-A.jar
Note that depending on the current version of Spring MVC, the version number of above jar files may change.
Our Goal
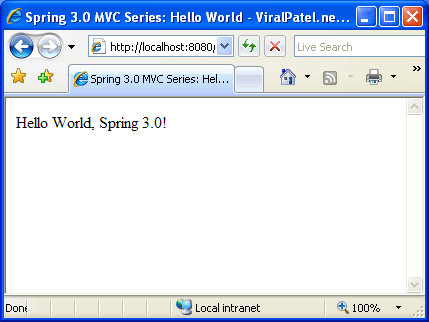
Our goal is to create a basic Spring MVC application using latest 3.0 version. There will be an index page which will display a link “Say Hello” to user. On clicking this link, user will be redirected to another page hello which will display a message “Hello World, Spring 3.0!”.
Getting Started
Let us start with our first Spring 3.0 MVC based application.
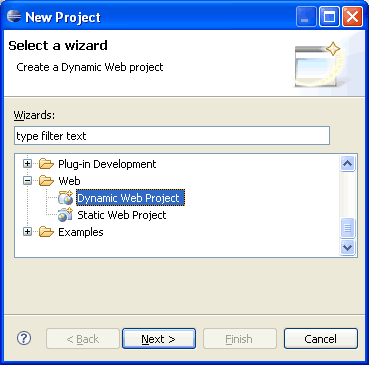
Open Eclipse and goto File -> New -> Project and select Dynamic Web Project in the New Project wizard screen.
After selecting Dynamic Web Project, press Next.
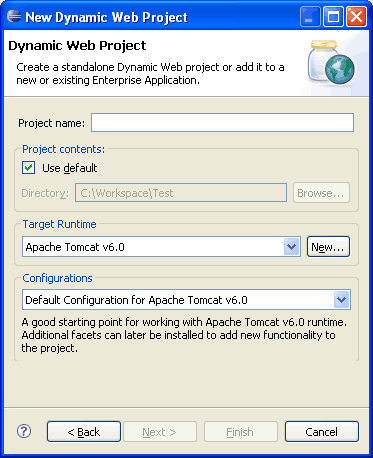
Write the name of the project. For example Spring3MVC. Once this is done, select the target runtime environment (e.g. Apache Tomcat v6.0). This is to run the project inside Eclipse environment. After this press Finish.
Once the project is created, you can see its structure in Project Explorer.
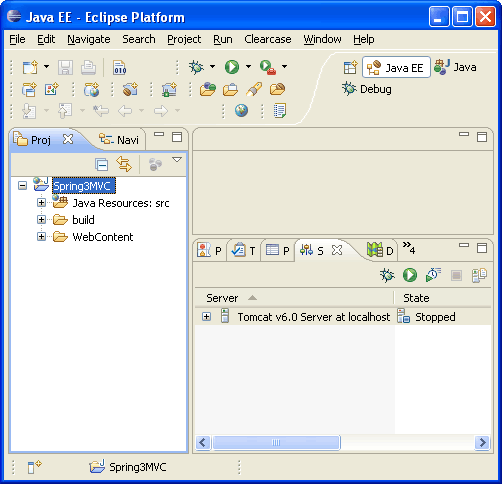
Now copy all the required JAR files in WebContent > WEB-INF > lib folder. Create this folder if it does not exists.
The Spring Controller Class
We will need a spring mvc controller class that will process the request and display a “Hello World” message. For this we will create a package net.viralpatel.spring3.controller in the source folder. This package will contain the Controller file.
Create a class called HelloWorldController in net.viralpatel.spring3.controller package and copy following content into it.
File: net.viralpatel.spring3.controller.HelloWorldController
package net.viralpatel.spring3.controller;

import org.springframework.stereotype.Controller;
import org.springframework.web.bind.annotation.RequestMapping;
import org.springframework.web.servlet.ModelAndView;

@Controller
public class HelloWorldController {

    @RequestMapping("/hello")
    public ModelAndView helloWorld() {

        String message = "Hello World, Spring 3.0!";
        return new ModelAndView("hello", "message", message);
    }
}
Note that we have annotated the HelloWorldController class with @Controller and @RequestMapping("/hello") on line 7 and 10. When Spring scans our package, it will recognize this bean as being a Controller bean for processing requests. The @RequestMapping annotation tells Spring that this Controller should process all requests beginning with /hello in the URL path. That includes /hello/* and /hello.html.
The helloWorld() method returns ModelAndView object. The ModelAndView object tries to resolve to a view named “hello” and the data model is being passed back to the browser so we can access the data within the JSP. The logical view name will resolve to “/WEB-INF/jsp/hello.jsp“. We will discuss this shortly how the logical name “hello” which is return in ModelAndView object is mapped to path /WEB-INF/jsp/hello.jsp.
The ModelAndView object also contains a message with key “message” and value “Hello World, Spring 3.0!”. This is the data that we are passing to our view. Normally this will be a value object in form of java bean that will contain the data to be displayed on our view. Here we are simply passing a string.
The View: Create JSP
To display the hello world message we will create a JSP. Note that this JSP is created in folder /WEB-INF/jsp. Create hello.jsp under WEB-INF/jsp directory and copy following content into it.
File: WEB-INF/jsp/hello.jsp
““
Spring 3.0 MVC Series: Hello World - ViralPatel.net
${message}
The above JSP simply display a message using expression `${message}`. Note that the name “`message`” is the one which we have set in `ModelAndView` object with the `message` string.

Also we will need an `index.jsp` file which will be the entry point of our application. Create a file `index.jsp` under `WebContent` folder in your project and copy following content into it.

###File: WebContent/index.jsp
Spring 3.0 MVC Series: Index - ViralPatel.net
Say Hello
###Mapping Spring MVC in WEB.xml

As discussed in the previous article (Introduction to Spring 3.0 MVC), the entry point of Spring MVC application will be the Servlet define in deployment descriptor (`web.xml`). Hence we will define an entry of `org.springframework.web.servlet.DispatcherServlet` class in `web.xml`.
Open `web.xml` file which is under `WEB-INF` folder and copy paste following code.

####File: WEB-INF/web.xml
The above code in `web.xml` will map `DispatcherServlet` with url pattern `*.html`. Also note that we have define `index.jsp` as welcome file.
One thing to note here is the name of servlet in `<servlet-name>` tag in `web.xml`. Once the `DispatcherServlet` is initialized, it will looks for a file name `[servlet-name]-servlet.xml` in `WEB-INF` folder of web application. In this example, the framework will look for file called `spring-servlet.xml`.
####Spring configuration file
Create a file `spring-servlet.xml` in `WEB-INF` folder and copy following content into it.
####File: WEB-INF/spring-servlet.xml




 1647
1647

 被折叠的 条评论
为什么被折叠?


