


概览: Linux环境使用docker 安装elasticsearch, 并使用elasticsearch-head来查看数据插入情况
步骤1. docker 镜像搭建与启动
docker run -p 9200:9200 -p 9300:9300 --name elasticsearch -e "discovery.type=single-node" -e "TAKE_FILE_OWNERSHIP=true" -v /1/logs:/usr/share/elasticsearch/logs -v /1/data:/usr/share/elasticsearch/data -d elasticsearch:7.17.9指定es版本为7.17.9,启动命令如上
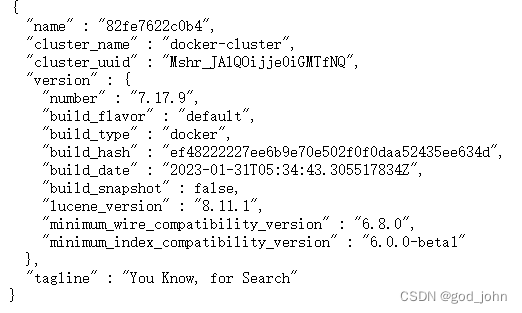
测试是否安装成功,通过浏览器访问 你的ip:9200, 出现以下信息即es服务启动成功
步骤2:安装elasticsearch-head (用来查看ES数据库详情)
docker create --name elasticsearch-head -p 9302:9302 mobz/elasticsearch-head:5
elasticsearch-head 镜像已被创建,通过docker start启动镜像
步骤3:修改配置文件
- 进入mobz/elasticsearch-head:5 镜像
docker exec -it 镜像id bash, 修改Gruntfile.js 可在宿主机上修改后放回去替换,这里不再赘述
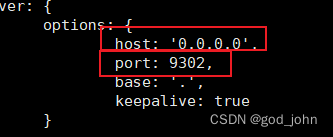
添加广播地址 host: '0.0.0.0' , port 指定一个没有被占用的端口即可没有强求
- 进入elasticsearch镜像修改 /config/elasticsearch.yml文件
http.cors.enabled: true
http.cors.allow-origin: "*"
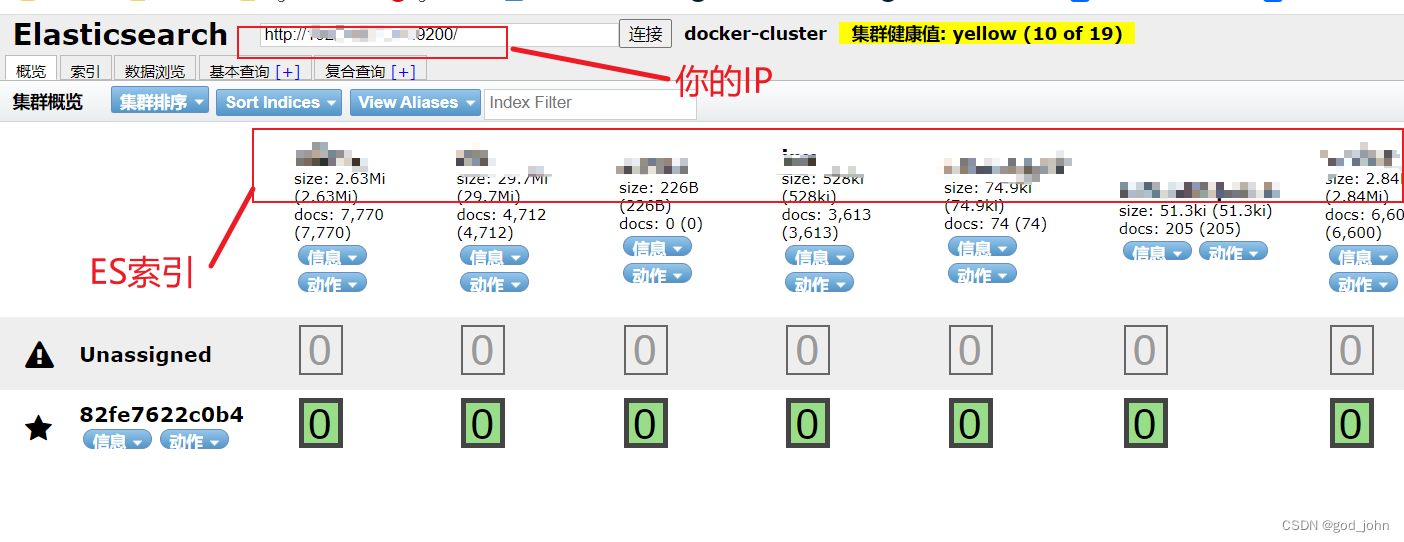
允许跨域访问,方便通过浏览器访问到 es的数据 效果如下所示
题外话:也可以简单的通过接口访问 你的IP:9200/_cat/indices?v&pretty

步骤4: 数据迁移(从其他的机器上去拉去索引和data)
机器1(有原始数据的机器): 旧IP
机器2(刚搭好的ES,没有ES数据):新IP
具体步骤抽象的来说就是:
1. 在旧IP上把索引数据保存为json文件 , 还有把data数据也保存为json数据( 索引和data必须分开为两个文件夹,不能乱)
2. 在新IP上先导入索引数据(类似于mysql的建表操作)
3. 在新IP上导入data数据(类似于mysql在建表好的基础上插入一条条的数据)
docker run --rm -ti -v /具体存索引的路径/:/tmp taskrabbit/elasticsearch-dump --input=http:/旧IP:9200/具体的index --output=/tmp/具体的index.json --type=mappingdocker run --rm -ti -v /存放data的路径/:/tmp taskrabbit/elasticsearch-dump --input=http://ni你的ip:9200/具体的index --output=/tmp/具体的index.json --type=data导入:(先索引 再数据)
docker run --rm -ti -v /新IP上存索引的路径:/tmp taskrabbit/elasticsearch-dump --input=/tmp/具体的index.json --output=http://新IP:9200/具体的index --type=mappingdocker run --rm -ti -v /data:/tmp taskrabbit/elasticsearch-dump --input=/新IP存data的路径/具体Index.json --output=http://192.168.2.110:9200/具体index --type=data


 2万+
2万+


 被折叠的 条评论
为什么被折叠?
被折叠的 条评论
为什么被折叠?
 到【灌水乐园】发言


