


(本文是LearnOpenGL的学习笔记,教程中文翻译地址https://learnopengl-cn.github.io/(备用地址https://learnopengl-cn.readthedocs.io/zh/latest/),写于 2020-1-31 ,并在 2021-8-14 进行了更新)
0.前言
上一篇笔记记录了纹理(Texture)使用:https://blog.csdn.net/gongjianbo1992/article/details/104119033,本文将学习变换(Transform)的使用。
尽管我们现在已经知道了如何创建一个物体、着色、加入纹理,给它们一些细节的表现,但因为它们都还是静态的物体,仍是不够有趣。我们可以尝试着在每一帧改变物体的顶点并且重配置缓冲区从而使它们移动,但这太繁琐了,而且会消耗很多的处理时间。我们现在有一个更好的解决方案,使用(多个)矩阵(Matrix)对象可以更好的变换(Transform)一个物体。
教程中还列出了一些常用的数学知识:https://learnopengl-cn.github.io/01%20Getting%20started/07%20Transformations/
1.如何实现
OpenGL没有自带任何的矩阵和向量知识,所以我们必须定义自己的数学类和函数。LearnOpenGL教程使用的GLM数学库,这里我们使用Qt自带的工具类(如QMatrix4x4等)。要做的,就是把算好的矩阵传递给OpenGL,我们首先查询uniform变量的地址,然后把矩阵数据发送给着色器。
本节的运算主要使用到了矩阵和矩阵相乘(多次变换操作组合),矩阵和向量相乘(计算好的矩阵乘上之前的顶点向量)。根据矩阵之间的乘法,我们可以把多个变换组合到一个矩阵中,这样我们把最终计算好的矩阵去和顶点向量相乘就行了。
单位矩阵:

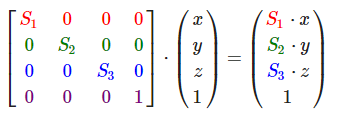
缩放:
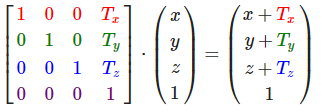
平移:
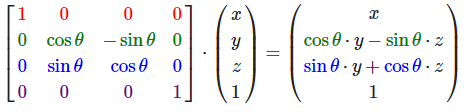
延x轴旋转:
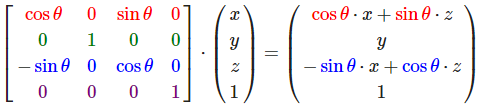
延y轴旋转:
延z轴旋转:
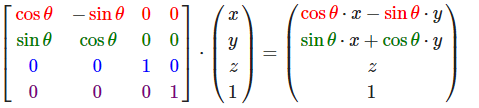
矩阵组合:

代码也很简单,就是在之前纹理的基础上计算了一个变换矩阵,传入着色器中和之前的顶点输出做运算。下面的代码表示x轴右移0.5,y轴下移0.5,延z轴旋转rotate度(Qt做了封装操作简单了不少)。
    //变换矩阵
    QMatrix4x4 transform;
    //向右下角平移
    transform.translate(QVector3D(0.5f, -0.5f, 0.0f));
    //绕z轴旋转
    transform.rotate(rotate, QVector3D(0.0f, 0.0f, 1.0f));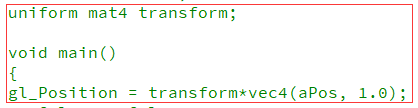
(对于教程代码移植到QtWidgets,之后我尽量使用Qt封装的类)
2.实现代码
(项目git链接:https://github.com/gongjianbo/OpenGLwithQtWidgets.git)
我的GLTransform类实现效果(平移和旋转):

GLTransform类代码:
#pragma once
#include <QOpenGLWidget>
#include <QOpenGLFunctions_3_3_Core>
#include <QOpenGLShaderProgram>
#include <QOpenGLVertexArrayObject>
#include <QOpenGLBuffer>
#include <QOpenGLTexture>
#include <QTimer>

//变换(平移-缩放-旋转)
//QOpenGLWidget窗口上下文
//QOpenGLFunctions访问OpenGL接口,可以不继承作为成员变量使用
class GLTransform
        : public QOpenGLWidget
        , protected QOpenGLFunctions_3_3_Core
{
public:
    explicit GLTransform(QWidget *parent = nullptr);
    ~GLTransform();

protected:
    //【】继承QOpenGLWidget后重写这三个虚函数
    //设置OpenGL资源和状态。在第一次调用resizeGL或paintGL之前被调用一次
    void initializeGL() override;
    //渲染OpenGL场景,每当需要更新小部件时使用
    void paintGL() override;
    //设置OpenGL视口、投影等,每当尺寸大小改变时调用
    void resizeGL(int width, int height) override;

private:
    //着色器程序
    QOpenGLShaderProgram shaderProgram;
    //顶点数组对象
    QOpenGLVertexArrayObject vao;
    //顶点缓冲
    QOpenGLBuffer vbo;
    //索引缓冲
    QOpenGLBuffer ebo;
    //纹理(因为不能赋值,所以只能声明为指针)
    QOpenGLTexture *texture1{ nullptr };
    QOpenGLTexture *texture2{ nullptr };
    //旋转
    QTimer timer;
    int rotate{ 0 };
};
#include "GLTransform.h"
#include <QMatrix4x4>
#include <QDebug>

GLTransform::GLTransform(QWidget *parent)
    : QOpenGLWidget(parent)
{
    connect(&timer,&QTimer::timeout,this,[this](){
        rotate+=2;
        if(isVisible()){
            update();
        }
    });
    timer.setInterval(50);
}

GLTransform::~GLTransform()
{
    //initializeGL在显示时才调用,释放未初始化的会异常
    if(!isValid())
        return;
    //QOpenGLWidget
    //三个虚函数不需要makeCurrent,对应的操作已由框架完成
    //但是释放时需要设置当前上下文
    makeCurrent();
    vbo.destroy();
    ebo.destroy();
    vao.destroy();
    delete texture1;
    delete texture2;
    doneCurrent();
}

void GLTransform::initializeGL()
{
    //为当前上下文初始化OpenGL函数解析
    initializeOpenGLFunctions();

    //着色器代码
    //in输入,out输出,uniform从cpu向gpu发送
    //因为OpenGL纹理颠倒过来的,所以取反vec2(aTexCoord.x, 1-aTexCoord.y);
    const char *vertex_str=R"(#version 330 core
layout (location = 0) in vec3 inPos;
layout (location = 1) in vec3 inColor;
layout (location = 2) in vec2 inTexCoord;
uniform mat4 transform;
out vec3 theColor;
out vec2 texCoord;
void main()
{
gl_Position = transform*vec4(inPos, 1.0);
theColor = inColor;
texCoord = vec2(inTexCoord.x, 1-inTexCoord.y);
})";
    const char *fragment_str=R"(#version 330 core
in vec3 theColor;
in vec2 texCoord;
uniform sampler2D texture1;
uniform sampler2D texture2;
out vec4 fragColor;
void main()
{
fragColor = mix(texture(texture1, texCoord),
texture(texture2, texCoord), 0.2) * vec4(theColor, 1.0);
})";

    //将source编译为指定类型的着色器,并添加到此着色器程序
    if(!shaderProgram.addCacheableShaderFromSourceCode(
                QOpenGLShader::Vertex,vertex_str)){
        qDebug()<<"compiler vertex error"<<shaderProgram.log();
    }
    if(!shaderProgram.addCacheableShaderFromSourceCode(
                QOpenGLShader::Fragment,fragment_str)){
        qDebug()<<"compiler fragment error"<<shaderProgram.log();
    }
    //使用addShader()将添加到该程序的着色器链接在一起。
    if(!shaderProgram.link()){
        qDebug()<<"link shaderprogram error"<<shaderProgram.log();
    }

    //顶点数据
    float vertices[] = {
        // positions          // colors           // texture coords
        0.5f,  0.5f, 0.0f,   1.0f, 0.0f, 0.0f,   1.0f, 1.0f, // top right
        0.5f, -0.5f, 0.0f,   0.0f, 1.0f, 0.0f,   1.0f, 0.0f, // bottom right
        -0.5f, -0.5f, 0.0f,   0.0f, 0.0f, 1.0f,   0.0f, 0.0f, // bottom left
        -0.5f,  0.5f, 0.0f,   1.0f, 1.0f, 0.0f,   0.0f, 1.0f  // top left
    };
    //索引
    unsigned int indices[] = {
        0, 1, 3,  // first Triangle
        1, 2, 3   // second Triangle
    };
    vao.create();
    vao.bind();
    //QOpenGLVertexArrayObject::Binder vaoBind(&vao);
    vbo=QOpenGLBuffer(QOpenGLBuffer::VertexBuffer);
    vbo.create();
    vbo.bind();
    vbo.allocate(vertices,sizeof(vertices));

    ebo=QOpenGLBuffer(QOpenGLBuffer::IndexBuffer);
    ebo.create();
    ebo.bind();
    ebo.allocate(indices,sizeof(indices));

    //参数1对应layout
    // position attribute
    shaderProgram.setAttributeBuffer(0, GL_FLOAT, 0, 3, sizeof(GLfloat) * 8);
    shaderProgram.enableAttributeArray(0);
    // color attribute
    shaderProgram.setAttributeBuffer(1, GL_FLOAT, sizeof(GLfloat) * 3, 3, sizeof(GLfloat) * 8);
    shaderProgram.enableAttributeArray(1);
    // texture coord attribute
    shaderProgram.setAttributeBuffer(2, GL_FLOAT, sizeof(GLfloat) * 6, 2, sizeof(GLfloat) * 8);
    shaderProgram.enableAttributeArray(2);

    // texture 1
    //直接生成绑定一个2d纹理, 并生成多级纹理MipMaps
    texture1 = new QOpenGLTexture(QImage(":/container.jpg"), QOpenGLTexture::GenerateMipMaps);
    if(!texture1->isCreated()){
        qDebug() << "Failed to load texture";
    }
    // set the texture wrapping parameters
    // 等于glTexParameteri(GLtexture_2D, GLtexture_WRAP_S, GL_REPEAT);
    texture1->setWrapMode(QOpenGLTexture::DirectionS, QOpenGLTexture::Repeat);
    texture1->setWrapMode(QOpenGLTexture::DirectionT, QOpenGLTexture::Repeat);
    // set texture filtering parameters
    //等价于glTexParameteri(GLtexture_2D, GLtexture_MIN_FILTER, GL_LINEAR);
    texture1->setMinificationFilter(QOpenGLTexture::Linear);
    texture1->setMagnificationFilter(QOpenGLTexture::Linear);

    // texture 2
    //直接生成绑定一个2d纹理, 并生成多级纹理MipMaps
    texture2 = new QOpenGLTexture(QImage(":/awesomeface.png"), QOpenGLTexture::GenerateMipMaps);
    if(!texture2->isCreated()){
        qDebug() << "Failed to load texture";
    }
    // set the texture wrapping parameters
    // 等于glTexParameteri(GLtexture_2D, GLtexture_WRAP_S, GL_REPEAT);
    texture2->setWrapMode(QOpenGLTexture::DirectionS, QOpenGLTexture::Repeat);
    texture2->setWrapMode(QOpenGLTexture::DirectionT, QOpenGLTexture::Repeat);//
    // set texture filtering parameters
    //等价于glTexParameteri(GLtexture_2D, GLtexture_MIN_FILTER, GL_LINEAR);
    texture2->setMinificationFilter(QOpenGLTexture::Linear);
    texture2->setMagnificationFilter(QOpenGLTexture::Linear);

    shaderProgram.bind();
    shaderProgram.setUniformValue("texture1", 0);
    shaderProgram.setUniformValue("texture2", 1);
    shaderProgram.release();

    timer.start();
}

void GLTransform::paintGL()
{
    glClearColor(0.2f, 0.3f, 0.3f, 1.0f);
    glClear(GL_COLOR_BUFFER_BIT);

    //纹理
    glActiveTexture(GL_TEXTURE0);
    texture1->bind();
    glActiveTexture(GL_TEXTURE1);
    texture2->bind();

    //变换矩阵
    QMatrix4x4 transform;
    //向右下角平移
    transform.translate(QVector3D(0.5f, -0.5f, 0.0f));
    //绕z轴旋转
    transform.rotate(rotate, QVector3D(0.0f, 0.0f, 1.0f));

    shaderProgram.bind();
    shaderProgram.setUniformValue("transform", transform);
    vao.bind();
    //根据索引绘制
    glDrawElements(GL_TRIANGLES, 6, GL_UNSIGNED_INT, 0);
}

void GLTransform::resizeGL(int width, int height)
{
    glViewport(0, 0, width, height);
}
3.参考
LearnOpenGL:https://learnopengl-cn.github.io/01%20Getting%20started/07%20Transformations/


 4553
4553


 被折叠的 条评论
为什么被折叠?
被折叠的 条评论
为什么被折叠?
 到【灌水乐园】发言


