


文章目录
- 个人感受
- 安装
- 工具
- 代码生成器
- page.pause()
- Trace Viewer(跟踪视图)
- 录制
- 查看录制
- Call
- Debug工具
- PDB交互
- Pytest插件
- 启动参数
- Fixtures
- Function scope
- Session scope
- 用户定义fixture选项
- 动作
- 元素定位
- get_by_role
- 文本匹配选项
- locator(XPath与CSS-Selector定位)
- Shalldow DOM定位
- 筛选定位结果
- 列表处理
- React定位器 与 Vue定位器
- 填入信息
- locator.type()
- 选择单、多选项框
- 选择下拉框
- 鼠标活动
- 事件操作
- 键盘活动
- 上传文件
- 聚焦元素
- 拖动元素
- 会话框操作
- 下载
- 执行JS
- 事件操作
- 事件种类
- 事件监听
- 事件等待
- expect_xxx
- wait_for_event()
- iframe操作
- 暂停
- 重要功能
- 异步编程
- 简述异步编程
- playwright中使用异步编程
- 自动等待
- 导航等待
- 导航生命周期
- 异步navigation
- 同时发生多个navigation
- 弹出框加载
- 高级等待
- 认证、鉴权
- 调试
- 模拟接口处理
- 模拟请求
- 修改响应
- 终止请求
- 其它功能
- 网络设置
- 代理
- 监控请求
- 录制、路由回放请求
- 录制
- 路由回放
- API测试
- 断言
- 环境模拟
- Chrome插件加载
- Handles句柄
- Locator VS Handles
- Selenium Grid
- 自定义元素定位引擎
- Tips
- 使用本地浏览器
- 使用多个context
- 寻找父元素
- 一些功能性操作(与Selenium对比)
- 连接已打开的浏览器
- Selenium
- Playwright
- 录屏
- Selenium
- Playwright
- 截屏
- Selenium
- Playwright
- 拦截网络请求
- Selenium
- Selenium4
- Selenium3
- Playwright
- 获取所有请求信息
- Selenium
- Playwright
Selenium是通过webdriver协议与浏览器交互;Playwright则通过API。
个人感受
1,playwright提供了许多有用的工具,解决了使用selenium期间的很多问题,尤其是在找问题原因上。
2,playwright操作更简单,如不需要切换页面和iframe、不需要根据版本换driver。
3,playwright更像是事件驱动,selenium更接近实际操作。
安装
1,安装Pytest插件:
pip install pytest-playwright
2,安装所需浏览器: playwright install,建议添加--with-deps参数可同时安装系统依赖(也可以添加参数只安装指定浏览器)。
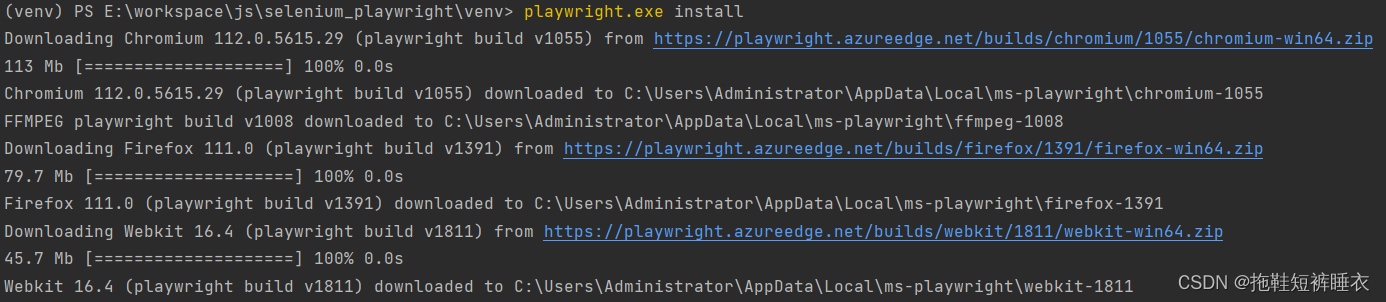
需要注意的是,因为每个版本的playwright都有其对应的浏览器版本,所以当playwright更新之后,应该重新运行
playwright install命令安装对应版本浏览器。
3,运行时默认会使用其依赖的浏览器。并且会运行新建context及page。
from playwright.sync_api import Page, expect

def test_homepage_has_Playwright_in_title_and_get_started_link_linking_to_the_intro_page(page: Page):
    page.goto("https://playwright.dev/")

    # Expect a title "to contain" a substring.
    expect(page).to_have_title(re.compile("Playwright"))
工具
代码生成器
可以生成不同形式(python、pytest、java等)的代码。使用起来比较直观方便,特别是当你不熟悉API,或想生成一些简单的初始代码时。还可以用来捕捉一些难以获取的元素。添加参数,同样支持各种模拟、登录功能。
Selenium通过其IDE好像也可以,但听说不好用,没用过。
playwright codegen baidu.com
page.pause()
通过pause()方法可以使代码运行到一半时,启动代码生成器。
from playwright.sync_api import sync_playwright

with sync_playwright() as p:
    # Make sure to run headed.
    browser = p.chromium.launch(headless=False)

    # Setup context however you like.
    context = browser.new_context() # Pass any options
    context.route('**/*', lambda route: route.continue_())

    # Pause the page, and start recording manually.
    page = context.new_page()
    page.pause()
Trace Viewer(跟踪视图)
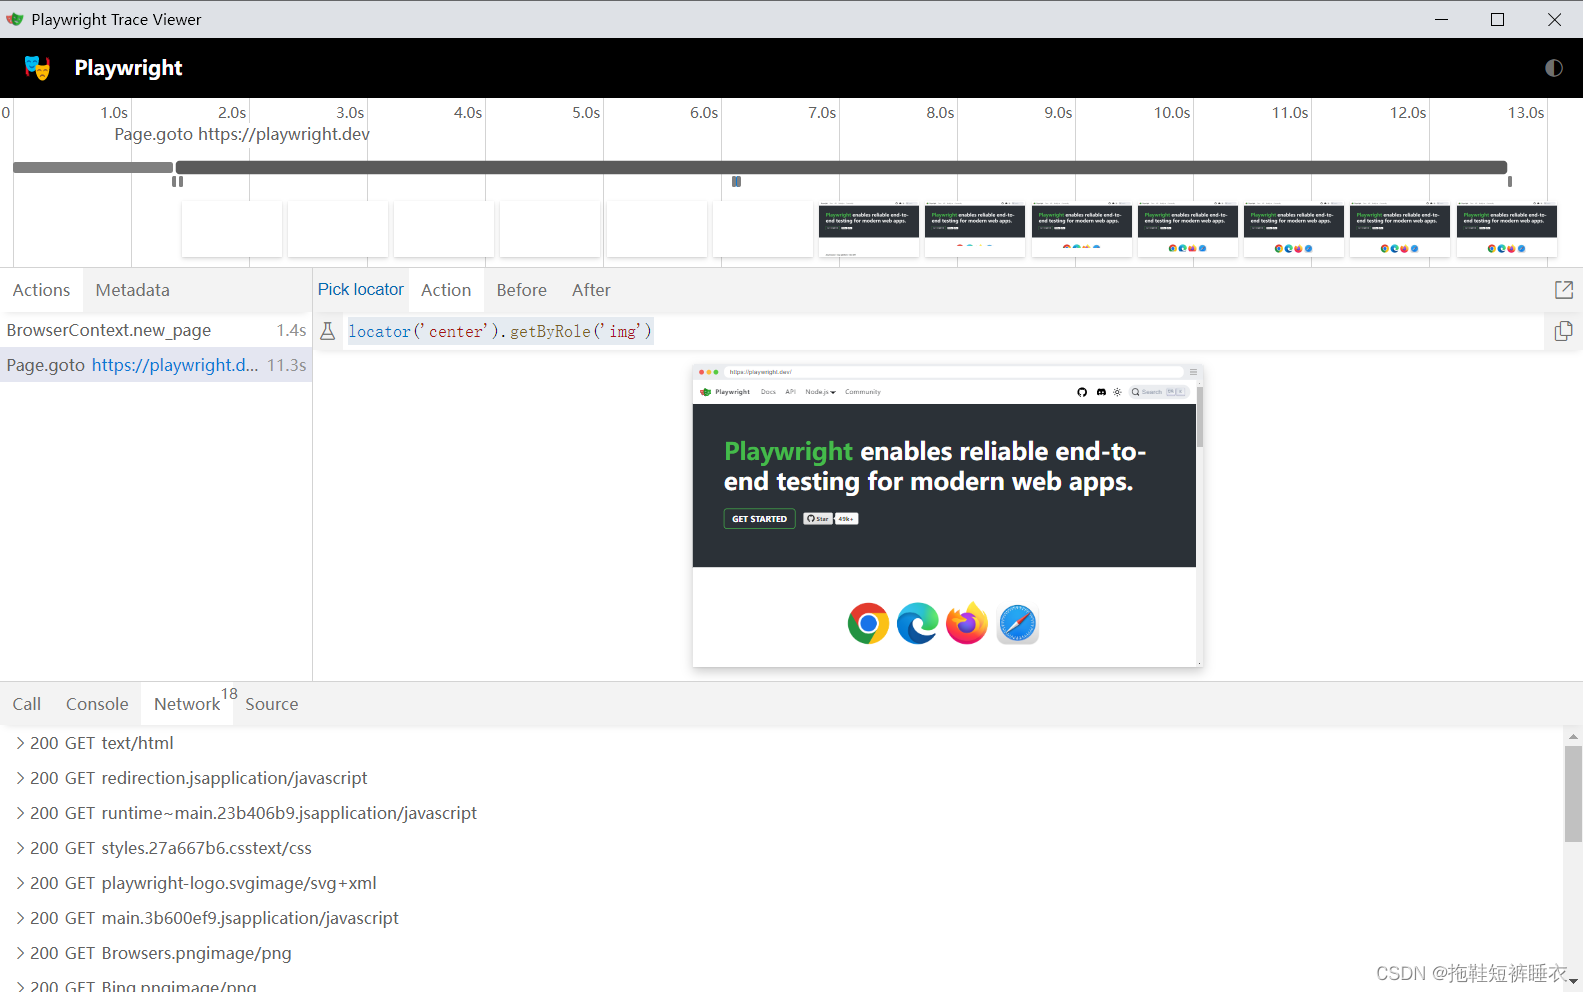
完全是一个逆天的存在!解决了多年自动化出错时难以定位错误的问题。因为通过它,几乎可以完全还原自动化运行时的情景,包括每个时间段浏览器的情况、每行代码运行的前后情况、网络请求、console输出;不仅如此,特么还可以按F12打开开发者工具;特么中间的不是截图,是可以交互的界面,可以点击输入。。。仅因为它,我决定从selenium转向playwright。
录制
通过context.tracing.start()开始,context.tracing.stop()结束
from playwright.sync_api import sync_playwright
with sync_playwright() as p:
    browser = p.chromium.launch()
    context = browser.new_context()

    # Start tracing before creating / navigating a page.
    context.tracing.start(screenshots=True, snapshots=True, sources=True)

    page = context.new_page()
    page.goto("https://playwright.dev")

    # Stop tracing and export it into a zip archive.
    context.tracing.stop(path="trace.zip")
查看录制
查看可以使用本地playwright或者在线工具:https://trace.playwright.dev/(直接把文件丢上去就可以)。
# 1) 本地工具
playwright show-trace trace.zip
# 2) 还可以指向远程
playwright show-trace https://example.com/trace.zip
# 3) 把文件放到公网使用在线工具查看
https://trace.playwright.dev/?trace=https://demo.playwright.dev/reports/todomvc/data/cb0fa77ebd9487a5c899f3ae65a7ffdbac681182.zip
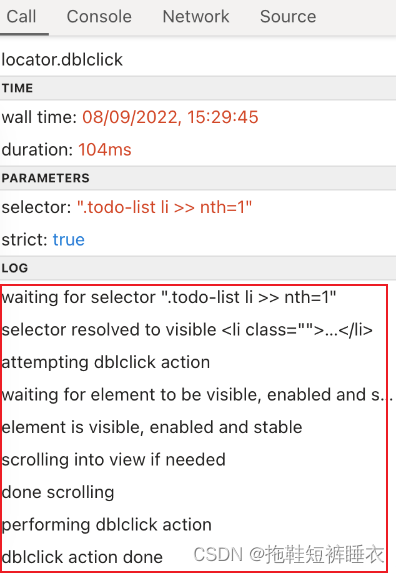
Call
这是一个比较容易被忽略的功能,它显示了playwright在一行代码中所做的动作。通过它可以让我们更好地理解playwright,写出更可靠的自动化程序。
Debug工具
PDB交互
通过breakpoint()方法可以打开Python Debug Bridge进行实时交互调试。
def test_bing_is_working(page):
    page.goto("https://bing.com")
    breakpoint()

想继续运行,可运行continue命令;
使用interact命令,可以运行代码调试;ctl+d退出代码调试。
Pytest插件
仅介绍playwright带来的重要的特定功能。
启动参数
--tracing,默认记录每一个测试的trace,有on、off(默认)、retain-on-failure选项。--video,默认记录每一个测试的录像,有on、off(默认)、retain-on-failure选项。--screenshot,默认记录每一个测试的结束时(不是每个动作)的截屏,有on、off(默认)、only-on-failure选项。
Fixtures
Function scope
context: New browser context for a test.page: New browser page for a test.
Session scope
playwright: Playwright instance.browser_type: BrowserType instance of the current browser.browser: Browser instance launched by Playwright.browser_name: Browser name as string.browser_channel: Browser channel as string.is_chromium, is_webkit, is_firefox: Booleans for the respective browser types.
用户定义fixture选项
用户通过重定义下面的fixture,来改变browser和context启动选项。
browser_type_launch_args:字典,用于browser_type.launch()。browser_context_args:字典,用于browser.new_context()。
import pytest
from playwright.sync_api import Playwright, BrowserType

@pytest.fixture(scope='session')
def browser_type_launch_args() -> dict:
    # 设置浏览器启动参数
    launch_args = {
        "headless": False,
        "args": ["--no-sandbox", "--disable-setuid-sandbox"]
    }
    return launch_args

@pytest.fixture(scope='session')
def browser_type(playwright: Playwright) -> BrowserType:
    # 创建 Playwright 的 BrowserType 对象
    browser_type = playwright.chromium
    return browser_type
def test_example(browser_type, browser_type_launch_args):
    with browser_type.launch(**browser_type_launch_args) as browser:
        with browser.new_context() as context:
            page = context.new_page()
            page.goto('https://www.example.com')
            assert page.title() == 'Example Domain'
动作
元素定位
对定位不熟悉的时候,用Inspector来做一笔业务记录元素会更方便。
推荐使用的内建定位器:
- page.get_by_role();
- page.get_by_text(),通过元素的内部文本定位;
- page.get_by_label(),通过元素相关的label定位;
- page.get_by_placeholder();
- page.get_by_alt_text(),使用如图片的alt(说明)属性定位;
- page.get_by_title(),根据title属性定位;
- page.get_by_test_id(),多余。
可以用链式locator来逐步精确到想要的元素。(Selenium不支持)
locator = page.frame_locator("my-frame").get_by_role("button", name="Sign in")
get_by_role
官方说法:get_by_role是playwright推荐的定位方式,因为其最接近用户对页面的感知,并且变化不会像xpath那样频繁(突然多出一层元素或细微变化不会影响用户感知)。
但能使用户有相同感知的技术有很多,h3元素和加粗的大字体并无两样,那get_by_role能否识别?其后面的技术是怎样的?不清楚原理的情况下还是不放心使用。
另外,都作为一个能写自动化的技术人员了,简单的html都懂,为什么直接准确的XPATH、ID、CSS-SELECTOR不用,反而要重新学习一套复杂的role体系?
例如下面,checkbox就是复选框而不会是input元素;heading就是标题而不是h3元素。
<h3>Sign up</h3>
<label>
  <input type="checkbox" /> Subscribe
</label>
<br/>
<button>Submit</button>
定位元素:
expect(page.get_by_role("heading", name=re.compile("sign up", re.IGNORECASE)).to_be_visible()

page.get_by_role("checkbox", name="Subscribe").check()
文本匹配选项
page.get_by_text()、page.get_by_label()等通过文本来匹配的定位器,默认都是大小写不敏感的部分匹配,有pattern(正则)和exact(准确匹配)两个参数。当遇到“空白”时,playwright会把换行转成空格、把多个空白合成一个、去掉前后“空白”后再进行匹配,即使exact=True。
expect(page.get_by_text("Welcome, John", exact=True)).to_be_visible()

expect(page
    .get_by_text(re.compile("welcome, john", re.IGNORECASE)))
    .to_be_visible()
locator(XPath与CSS-Selector定位)
page.locator() 支持xpath和css-selector定位,并且当不指定css=或xpath=时能自动识别定位类型。
page.locator("css=button").click()
page.locator("xpath=//button").click()

page.locator("button").click()
page.locator("//button").click()

# 当返回多个时:用all()方法然后遍历
btn_list = page.locator("button").all()
for btn in btn_list:
	btn.click()
Shalldow DOM定位
除了locator()外,其它定位器默认支持Shalldow DOM:
<x-details role=button aria-expanded=true aria-controls=inner-details>
  <div>Title</div>
  #shadow-root
    <div id=inner-details>Details</div>
</x-details>
定位:
page.get_by_text("Details").click()
筛选定位结果
xpath自带层级和筛选功能,而playwright的定位器可以通过链式调用和元素筛选的方式来实现。(下面例子也同样演示了链式调用)
示例:
<ul>
  <li>
    <h3>Product 1</h3>
    <button>Add to cart</button>
  </li>
  <li>
    <h3>Product 2</h3>
    <button>Add to cart</button>
  </li>
</ul>
- 根据文本筛选
支持文本、正则、has_text、has_no_text等。
page.get_by_role("listitem").filter(has_text=re.compile("Product 2"))
    .get_by_role("button", name="Add to cart")
    .click()
- 根据层级过滤
page.get_by_role("listitem")
    .filter(has=page.get_by_role("heading", name="Product 2"))
    .get_by_role("button", name="Add to cart").click()
列表处理
- 断言数量
expect(page.get_by_role("listitem")).to_have_count(3)
- 断言文本内容
expect(page.get_by_role("listitem")).to_have_text(["apple", "banana", "orange"])
- 获取某个元素
banana = page.get_by_role("listitem").nth(1)
banana = page.get_by_role("listitem").first()
banana = page.get_by_role("listitem").last()
- 遍历元素
for row in page.get_by_role("listitem").all():
    print(row.text_content())

rows = page.get_by_role("listitem")
count = rows.count()
for i in range(count):
    print(rows.nth(i).text_content())
React定位器 与 Vue定位器
实验中:https://playwright.dev/python/docs/other-locators#react-locator
填入信息
locator.fill()触发input事件实现输入信息。
page.get_by_role("textbox").fill("Peter")

# 只要控件支持,还能输入日期等其它信息
page.get_by_label("Local time").fill("2020-03-02T05:15")
locator.type()
模拟键盘输入,会触发所有键盘相关的事件,如keydown、keyup、keypress。如果不关心这些事件,用fill()方法就够了。
page.locator('#area').type('Hello World!')
选择单、多选项框
locator.set_checked()可以用在input[type=checkbox]、input[type=radio]、[role=checkbox]元素。
# Check the checkbox
page.get_by_label('I agree to the terms above').check()

# Assert the checked state
assert page.get_by_label('Subscribe to newsletter').is_checked() is True
选择下拉框
locator.select_option()用于<select>元素,但目前许多选择组件都不使用该元素。
# 根据值选择
page.get_by_label('Choose a color').select_option('blue')

# 根据标签label选择
page.get_by_label('Choose a color').select_option(label='Blue')

# 多选
page.get_by_label('Choose multiple colors').select_option(['red', 'green', 'blue'])
鼠标活动
# 左击
page.get_by_role("button").click()

# 双击
page.get_by_text("Item").dblclick()

# 右击
page.get_by_text("Item").click(button="right")

# Shift + click
page.get_by_text("Item").click(modifiers=["Shift"])

# Hover over element
page.get_by_text("Item").hover()

# Click the top left corner
page.get_by_text("Item").click(position={ "x": 0, "y": 0})
在操作前会进行检查其“可操作”,包括移动滚动条使该元素到页面中。也可以忽略限制强制执行:
page.get_by_role("button").click(force=True)
事件操作
模拟手动操作的话需要满足各种条件,如果不考虑现实条件,可以通过locator.dispatch_event()发送元素事件进行操作。
page.get_by_role("button").dispatch_event('click')
键盘活动
通过locator.press()可以模拟所有键盘组合,完全模拟键盘活动的同时触发键盘事件。
# Hit Enter
page.get_by_text("Submit").press("Enter")

# Dispatch Control+Right
page.get_by_role("textbox").press("Control+ArrowRight")
上传文件
# Select one file
page.get_by_label("Upload file").set_input_files('myfile.pdf')

# Select multiple files
page.get_by_label("Upload files").set_input_files(['file1.txt', 'file2.txt'])
如果无法获取上传元素,还可以通过处理page.on("filechooser")事件实现上传。
with page.expect_file_chooser() as fc_info:
    page.get_by_label("Upload file").click()
file_chooser = fc_info.value
file_chooser.set_files("myfile.pdf")
聚焦元素
page.get_by_label('password').focus()
拖动元素
page.locator("#item-to-be-dragged").drag_to(page.locator("#item-to-drop-at"))
亦可通过其实际操作来实现:
page.locator("#item-to-be-dragged").hover()
page.mouse.down()
page.locator("#item-to-drop-at").hover()
page.mouse.up()
会话框操作
playwright能操作的会话框包括alert、confirm、prompt还有beforeunload。默认情况下会对其进行取消关闭,但可以进行改写:
page.on("dialog", lambda dialog: dialog.accept())
beforeunload对话框:
    addEventListener('beforeunload', (event) => {
      // 显示确认对话框
      event.preventDefault();
      // Google Chrome 需要设置 returnValue.
      event.returnValue = '';
    });
退出时提示:
当传入参数run_before_unload=True时,page.close()不会等待页面关闭,而是转由代码定义的方法去处理。
def handle_dialog(dialog):
    assert dialog.type == 'beforeunload'
    dialog.dismiss()

page.on('dialog', lambda: handle_dialog)
page.close(run_before_unload=True)
下载
每次下载都会触发page.on("download")事件,可以获取Download对象来获取信息和改变它。Playwright默认会把文件下载到临时目录(context关闭时会自动删除),也可以通过传入browser_type.launch(downloads_path='xxx')来修改。
# Start waiting for the download
with page.expect_download() as download_info:
    # Perform the action that initiates download
    page.get_by_text("Download file").click()
# Wait for the download to start
download = download_info.value
# Wait for the download process to complete
print(download.path())
# Save downloaded file somewhere
download.save_as("/path/to/save/download/at.txt")
也可以监控download事件:
page.on("download", lambda download: print(download.path()))
执行JS
通过page.evaluate()可以执行JS脚本并获取其返回值。如果脚本是异步或返回一个Promise,还会等等其完成。
status = page.evaluate("""async () => {
  response = await fetch(location.href)
  return response.status
}""")
它可以接收一个参数,类型可以是很多类型,例如元素引用page.query_selector("a")、JS引用page.evaluate_handle("window"):
# 一般值
page.evaluate('num => num', 42)

# 数组
page.evaluate('array => array.length', [1, 2, 3])

# 对象
page.evaluate('object => object.foo', { 'foo': 'bar' })

# 元素引用
button = page.evaluate('window.button')
page.evaluate('button => button.textContent', button)

# 具体对象调用,默认作为传入参数
button.evaluate('(button, from) => button.textContent.substring(from)', 5)

# 类型组合成对象、数组
button1 = page.evaluate('window.button1')
button2 = page.evaluate('.button2')
page.evaluate("""o => o.button1.textContent + o.button2.textContent""",
    { 'button1': button1, 'button2': button2 })
事件操作
事件种类
事件分为:
- 浏览器、导航事件,参考“导航生命周期”
- 网络事件、页面事件
不同的对象可以响应不同的事件,例如Page.Events、BrowserContext.Events
事件监听
def print_request_sent(request):
  print("Request sent: " + request.url)

def print_request_finished(request):
  print("Request finished: " + request.response().text)

page.on("request", print_request_sent)
page.on("requestfinished", print_request_finished)
page.on("response", lambda response: print(response.status, response.url))

# 移除监听
page.remove_listener("requestfinished", print_request_finished)

# 一次性监听
page.once("dialog", lambda dialog: dialog.accept("2021"))
事件等待
常用方法有三种,第一种就是通过上面的page.on()方式监听,其余两种都是基于第一种方式的。
- expect_xxx方式是playwright推荐,也是最直观简单。
- wait_for_event()方式是比较万能的,通过一个接收event参数,监控所有类型事件。
expect_xxx
expect_console_message
expect_download
expect_event
expect_file_chooser
expect_popup
expect_request – 当请求发出
expect_request_finished – 请求完成请求体接收,请求完成
expect_response – 当请求状态码或请求头返回
expect_websocket
expect_worker
上面的方法其实都是基于page.on()的事件监听机制。而它们的返回各不一样,例如上面三个请求相关的等待,返回的是Request对象。
expect_request_finished,就是等待requestfinished事件。
404、503、302(重定向)这种仍会当成请求成功,仅请求没任何返回时才会被当成失败,触发requestfailed事件。
with page.expect_request_finished("**/*user_info/*") as request:
  # url可以是完整的,也可以是模糊,或者是正则的
  response = request.response()
  print(response.header_value())
  print(response.status)
  print(response.text())

with page.expect_popup() as popup:
  page.get_by_text("open the popup").click()
popup.value.goto("https://wikipedia.org")
wait_for_event()
page.wait_for_event('requestfinished', timeout=1000, predicate=lambda response: response.url == '**/*user_info/*')
iframe操作
直接定位(获取)iframe里面元素进行操作。
# Locate element inside frame
# Get frame using any other selector
username = page.frame_locator('.frame-class').get_by_label('User Name')
username.fill('John')
通过Frame对象,定位内部元素操作。
# Get frame using the frame's name attribute
frame = page.frame('frame-login')

# Get frame using frame's URL
frame = page.frame(url=r'.*domain.*')

# Interact with the frame
frame.fill('#username-input', 'John')
相比selenium来讲便利很多,不用来回切iframe。
暂停
如果我们想在脚本中暂停执行几秒,例如使用selenium时,通常time.sleep(5)就可以实现。这是Python标准库中的方法,用于在给定的秒数内暂停当前线程的执行。
然而,使用time.sleep()方法存在一些潜在的问题:
阻塞线程:time.sleep()方法是阻塞式的,意味着在暂停期间,当前线程将完全停止执行,无法处理其他任务。这可能在需要同时处理多个任务或并发执行async的情况下不是理想的。
不精确的等待时间:time.sleep()方法不保证在指定的时间后立即恢复执行。它会暂停当前线程,并允许其他线程或进程运行,所以恢复执行的时间可能会有所延迟。这可能导致等待时间不精确。
为了避免这些问题,特别是在自动化测试中,推荐使用与Playwright一起提供的非阻塞式延迟方法,如page.wait_for_timeout()。
# 异步延迟 5 秒
page.wait_for_timeout(5000)
page.wait_for_timeout()方法是Playwright中的异步方法,它会暂停执行指定的毫秒数,但不会阻止其他代码的执行。这可以帮助你更好地控制并发任务和精确的等待时间。
重要功能
异步编程
简述异步编程
async def func():
      await api
      await api
同步:发送一个请求,等待返回,然后再发送下一个请求
异步:发送一个请求,不等待返回,随时可以再发送下一个请求
python在3.5以后引入async和await来强化自身的异步编程,提升效率。async就是异步,而await就是async wait异步等待。
async 用于申明一个 function 是异步的。异步函数的特点是能在函数执行过程中挂起,去执行其他异步函数,等到挂起条件结束后再回来继续执行。
而 await 用于等待一个异步方法执行完成。其实就是碰到await时,就开始多线程的并行运行。
await只可以对异步函数使用,普通函数使用会报错。
试运行下面的代码:
import time
import asyncio

async def wait1():
    print(f'wait1 start {time.time()}')
    await asyncio.sleep(1)
    print(f'wait1 end {time.time()}')

async def wait3():
    print(f'wait3 start {time.time()}')
    await asyncio.sleep(3)
    print(f'wait3 end {time.time()}')

# async def wait3():
#     print(f'wait3 start {time.time()}')
#     time.sleep(3)
#     print(f'wait3 end {time.time()}')

async def wait5():
    print(f'wait5 start {time.time()}')
    await asyncio.sleep(5)
    print(f'wait5 end {time.time()}')

# 2. 将异步函数加入事件队列
tasks = [
    wait1(),
    wait5(),
    wait3(),
]

if __name__ == '__main__':
    # 创建一个事件循环
    loop = asyncio.get_event_loop()
    startTime = time.time()
    # 执行队列实践,直到最晚的一个事件被处理完毕后结束
    loop.run_until_complete(asyncio.wait(tasks))
    # 如果不再使用loop,建议使用关闭,类似操作文件的close()函数
    loop.close()
    endTime = time.time()
    print("sum time: ", endTime - startTime)
此时不管哪个函数先执行,它们都只根据自己的时间运行不会受其它函数影响(并行运行)。
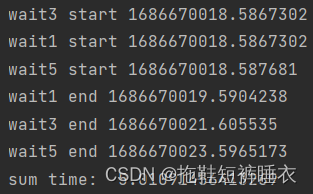
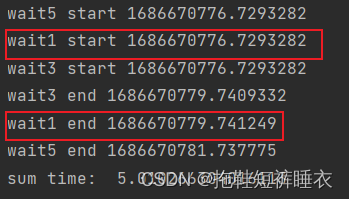
但异步函数碰到同步函数时,只能等待同步方法运行完成,才能回到异步方法中去。
把wait3换成注释里面的非await(非异步)形式时,无论是谁先执行,都要等待wait3方法执行完才能继续执行。
playwright中使用异步编程
async def playwright_async_demo():
  async with async_playwright() as p:
     browser = await p.chromium.launch(channel="chrome")
     page = await browser.new_page()
     await page.goto("http://www.baidu.com")
asyncio.run(playwright_async_demo())
总的来说,步骤就是通过async with async_playwright()生成一个异步的playwright实例,然后通过await关键字控制需要同步运行的操作(这里如果缺少await,就会报错,因为browser、page的实例是有顺序依赖的)。
自动等待
Playwright通过对页面的一系列状态来判断元素是否符合操作条件。如果所需运行所需条件在等待一定时间后仍然不具备,则抛出TimeoutError。
每个动作所检查的条件不一样,具体可参考:https://playwright.dev/python/docs/actionability
添加force参数可以突破这些限制,强制执行。
page.get_by_role("button").click(force=True)
导航等待
导航生命周期
Playwright把展示页面的过程分成了navigation和loading两个步骤。
navigation:从发生请求,到接收到请求头。
loading:浏览器解释加载、渲染,事件包括:
- page.url 更新为新的url;
- document 内容解释加载;
- page.on(“domcontentloaded”) 事件触发;
- 页面渲染:执行脚本、加载资源、css、图像等;
- page.on(“load”) 事件触发;
- 执行动态加载脚本(js触发的请求);
- 500 ms没有新请求,触发networkidle事件。
无论是修改URL跳转,还是点击页面按钮跳转,playwright都会自动等待导航完成再进行下一步动作:
# Click will auto-wait for navigation to complete
page.get_by_text("Login").click()

# 当然也可以显式等待navigation完成事件触发
page.wait_for_load_state("networkidle")

# Fill will auto-wait for element on navigated page
page.get_by_label("User Name").fill("John Doe")
异步navigation
当点击页面按钮时,页面采用了setTimeout之类的异步技术时,应该使用expect_navigation()来等待navigation的发生并完成后再进行操作。
with page.expect_navigation():
    # Triggers a navigation after a timeout
    page.get_by_text("Navigate after timeout").click()
同时发生多个navigation
跟异步navigation一样,但我们要做的是等待某一个navigation:
with page.expect_navigation(url="**/login"):
    # Triggers a navigation with a script redirect
    page.get_by_text("Click me").click()
弹出框加载
当一个有请求的动态弹窗时,page.wait_for_load_state()可以确保弹窗已加载到需要的状态。
with page.expect_popup() as page_info:
    page.get_by_role("button").click() # click triggers a popup.
popup = page_info.value
# Wait for the "DOMContentLoaded" event.
popup.wait_for_load_state("domcontentloaded")
print(popup.title()) # popup is ready to use.
高级等待
wait_for_function()可以通过函数来检查页面,等待其具备所需状态。
page.goto("http://example.com")
page.wait_for_function("() => window.amILoadedYet()")
# Ready to take a screenshot, according to the page itself.
page.screenshot()
认证、鉴权
网站通常在cookie或者local storage中保存认证信息,而Playwright的browserContext.storageState([options])方法可以用来把已认证的context中保存这些信息,然后用在创建新的context中。这样就可以实现登录一次,多次使用。
# Save storage state into the file.
storage = context.storage_state(path="state.json")

# Create a new context with the saved storage state.
context = browser.new_context(storage_state="state.json")
根少数使用session storage来存储认证信息,而且由于其关闭网页就清除的机制原因,playwright也不提供api支持。
问题,playwright怎么区分哪些是认证信息?是保存所有cookie和localstorage吗?
调试
除了之前介绍的方法之外,PWDEBUG(PlayWright Debug)环境变量也是调试的一大利器。
当PWDEBUG=1时,浏览器自动以headed启动,默认timeout=0(没有超时时间)。
PWDEBUG=1 pytest -s
当PWDEBUG=console时,浏览器的开发者模式会在page.pause()时启动,并且可以在其console里面使用playwright对象:
- playwright.$(selector)
根据selector获取元素对象。
playwright.$('.auth-form >> text=Log in');

// 返回:<button>Log in</button>
- playwright.$$(selector)
和playwright.$一样,但返回所有匹配的元素对象。
playwright.$$('li >> text=John')

// [<li>, <li>, <li>, <li>]
- playwright.inspect(selector)
在Elements标签页(tab)中高亮显示该属性元素。
playwright.inspect('text=Log in')
- playwright.locator(selector)
Create a locator and query matching elements, for example:
playwright.locator('.auth-form', { hasText: 'Log in' });

// Locator ()
//  - element: button
//  - elements: [button]
- playwright.highlight(selector)
高亮第一个元素。
playwright.highlight('.auth-form');
- playwright.clear()
清除高亮。
- playwright.selector(element)
根据给定的元素产生一个selector对象,例如传入$0(代表Element tab中选中的元素)
playwright.selector($0)

// "div[id="glow-ingress-block"] >> text=/.*Hello.*/"
模拟接口处理
模拟请求
没有请求到目标,直接由playwright模拟返回请求的响应。
async def handle(route):
    json = { message: { "test_breed": [] } }
    route.fulfill(json=json)

page.route("https://dog.ceo/api/breeds/list/all", handle)
修改响应
有请求到目标,由playwright修改后响应。
def handle(route):
    response = route.fulfill()
    json = response.json()
    json["message"]["big_red_dog"] = []
    # Fulfill using the original response, while patching the response body
    # with the given JSON object.
    route.fulfill(response=response, json=json)

page.route("https://dog.ceo/api/breeds/list/all", handle)
终止请求
page.route("**/*.{png,jpg,jpeg}", lambda route: route.abort())
其它功能
网络设置
代理
可以在browser级别和context级别设置代理。在windows chrome环境为context级别设置时,需要先在browser级别做特别设置:
browser = chromium.launch(proxy={
  "server": "http://myproxy.com:3128",
  "username": "usr",
  "password": "pwd"
})

# Browser proxy option is required for Chromium on Windows.
browser = chromium.launch(proxy={"server": "per-context"})
context = browser.new_context(proxy={"server": "http://myproxy.com:3128"})
监控请求
# Subscribe to "request" and "response" events.
page.on("request", lambda request: print(">>", request.method, request.url))
page.on("response", lambda response: print("<<", response.status, response.url))

# 等待响应
with page.expect_response("**/api/fetch_data") as response_info:
    page.get_by_text("Update").click()
response = response_info.value
录制、路由回放请求
Playwright可以实现把请求录制成HTTP Archive file (HAR),并且用在接口模拟中。
录制
- 通过命令方式。
-- save-har-glob设置只录制某些请求。
# Save API requests from example.com as "example.har" archive.
playwright open --save-har=example.har --save-har-glob="**/api/**" https://example.coms
- 程序方式录制。
context = browser.new_context(record_har_path="example.har", record_har_url_filter="**/api/**")

# ... Perform actions ...

# Close context to ensure HAR is saved to disk.
context.close()
如果文件以.zip结尾,每个请求都会记录一个文件再打包成zip,可以解压编辑它。
路由回放
page.route_from_har("example.har")
Playwright需要完全匹配url及请求内容,如果多个请求有相同的url和内容,会取header最接近的一个。
API测试
Playwright提供了一套用于API测试的库APIRequestContext,但看例子感觉和用Requests库差不多。
断言
除了使用pytest的断言之外,Playwright也提供了一套expect断言。用法:
expect(page.get_by_text("Name"), "Name should be visible after logged in").to_be_visible()
环境模拟
playwright可以模拟不同的设备类型、屏幕大小、网络离线、JS禁用、主题颜色、地理位置、时间、语言。但和appium连接真实设备并能操作应用的所有控件不一样,playwright只能模拟操作webview。
模拟设备:(其实就是设置了几个参数)
playwright.devices # 可以查看所有支持的设备
'iPhone 13': {
        'user_agent': 'Mozilla/5.0 (iPhone; CPU iPhone OS 15_0 like Mac OS X) AppleWebKit/605.1.15 (KHTML, like Gecko) Version/16.4 Mobile/15E148 Safari/604.1',
        'viewport': {'width': 390, 'height': 664}, 'device_scale_factor': 3, 'is_mobile': True, 'has_touch': True,
        'default_browser_type': 'webkit'}
模拟效果:
from playwright.sync_api import sync_playwright


def run(playwright):
    iphone_13 = playwright.devices['iPhone 13']
    browser = playwright.webkit.launch(headless=False)
    context = browser.new_context(
        **iphone_13,
    )
    page = context.new_page()
    page.goto('http://baidu.com')


with sync_playwright() as playwright:
    run(playwright)
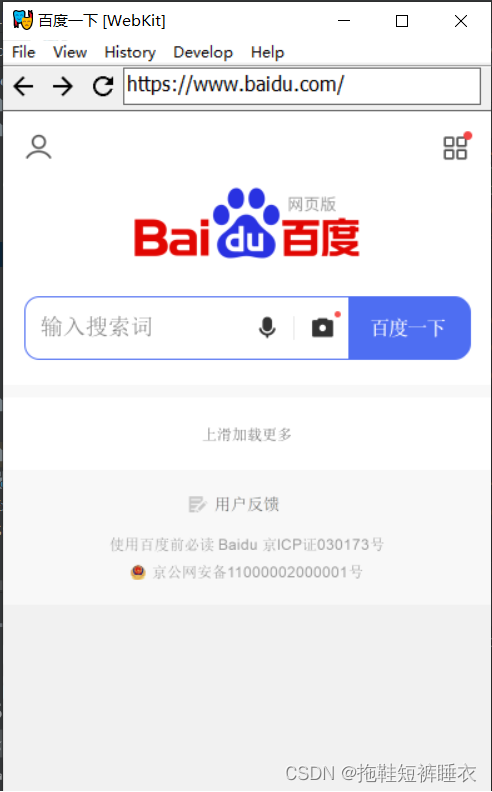
is_mobile参数在想要模拟手机设备时要注意,因为它会影响其它某些功能是否可用。
Chrome插件加载
playwright默认会以无痕模式启动浏览器,当需要加载插件时,可以通过下面方式:
from playwright.sync_api import sync_playwright

path_to_extension = "./my-extension"
user_data_dir = "/tmp/test-user-data-dir"


def run(playwright):
    context = playwright.chromium.launch_persistent_context(
        user_data_dir,
        headless=False,
        args=[
            f"--disable-extensions-except={path_to_extension}",
            f"--load-extension={path_to_extension}",
        ],
    )
    if len(context.background_pages) == 0:
        background_page = context.wait_for_event('backgroundpage')
    else:
        background_page = context.background_pages[0]

    # Test the background page as you would any other page.
    context.close()


with sync_playwright() as playwright:
    run(playwright)
用fixture的情况:
# conftest.py
from typing import Generator
from pathlib import Path
from playwright.sync_api import Playwright, BrowserContext
import pytest


@pytest.fixture()
def context(playwright: Playwright) -> Generator[BrowserContext, None, None]:
    path_to_extension = Path(__file__).parent.joinpath("my-extension")
    context = playwright.chromium.launch_persistent_context(
        "",
        headless=False,
        args=[
            f"--disable-extensions-except={path_to_extension}",
            f"--load-extension={path_to_extension}",
        ],
    )
    yield context
    context.close()


@pytest.fixture()
def extension_id(context) -> Generator[str, None, None]:
    # for manifest v2:
    # background = context.background_pages[0]
    # if not background:
    #     background = context.wait_for_event("backgroundpage")

    # for manifest v3:
    background = context.service_workers[0]
    if not background:
        background = context.wait_for_event("serviceworker")

    extension_id = background.url.split("/")[2]
    yield extension_id
Handles句柄
根据我理解,handles就是不经过playwright的机制,直接操作JS对象和页面对象。
Playwright并不推荐使用Handles,除非特定场合需要,如运行js。
playwright提供两种handles:
- JSHandle,对标页面中的js对象。
- ElementHandle,对标DOM元素;页面上的DOM其实也是一个JS对象,所以相同地,其也是JSHandle的子类,并有额外更多的方法去操作和访问属性。
获取handles:
# 最简单的方式
js_handle = page.evaluate_handle('window')
element_handle = page.query_selector("a")

# 更为推荐的方式,因为其会等待元素加载到DOM中并且满足一定状态条件,如visible(可加参数控制)
element_handle = page.wait_for_selector('window')
Locator VS Handles
两者最大的不同是,Handles是直接指向对象,而locator会在playwright的机制下运行,例如遵循其等待机制、刷新机制。
例如下面的例子,在hover之后,假如元素动态刷新变化了,handle仍然指向原本的元素,就会出错。而locator在操作第二次之前,会自动刷新获取元素,不会出错。
handle = page.query_selector("text=Submit")
handle.hover()
# 元素变化了
handle.click()  # 出错

locator = page.get_by_text("Submit")
locator.hover()
# 元素变化了
locator.click()  # 操作前会刷新,不会出错
Selenium Grid
playwright还可以整合Selenium Grid
https://playwright.dev/python/docs/next/selenium-grid
自定义元素定位引擎
其实就是用JS实现几个方法,可能可以简化一些操作,例如自动化框架时结合几个元素定位器。先用熟悉原有功能再说。
Tips
使用本地浏览器
通过executionpath可以使用电脑中原本安装好的浏览器(有一个隐患就是你安装好的浏览器未必与playwright完美兼容)。不过它自带的一些工具,如codegen就不行。
from playwright.sync_api import sync_playwright
with sync_playwright() as p:
    browser = p.chromium.launch(
        headless=False,
        executable_path="C:/Program Files/Google/Chrome/Application/chrome.exe"
    )
    context = browser.new_context()
    page = context.new_page()
    page.goto('https://www.baidu.com/')
    print(page.title())
使用多个context
适合在一次测试中模拟多用户场景,如对话:
from playwright.sync_api import sync_playwright

def run(playwright):
    # create a chromium browser instance
    chromium = playwright.chromium
    browser = chromium.launch()

    # create two isolated browser contexts
    user_context = browser.new_context()
    admin_context = browser.new_context()

    # create pages and interact with contexts independently

with sync_playwright() as playwright:
    run(playwright)
寻找父元素
# 方法1,使用filter
child = page.get_by_text("Hello")
parent = page.get_by_role("listitem").filter(has=child)

# 方法2,使用xpath
child = page.get_by_text("Hello").locator("xpath=..")
一些功能性操作(与Selenium对比)
连接已打开的浏览器
首先都要用chrome的debug模式打开浏览器:chrome.exe --remote-debugging-port=8888 --user-data-dir="D:\tmp\ChromeProfile"(两个参数都是必须的)。
Selenium
from selenium.webdriver.chrome.options import Options

chrome_options = Options()
chrome_options.add_experimental_option("debuggerAddress", "localhost:8888")
driver = webdriver.Chrome(options=chrome_options)
print(driver.title)
Playwright
from playwright.sync_api import sync_playwright
with sync_playwright() as p:
    browser = p.chromium.connect_over_cdp("http://localhost:8888")
    default_context = browser.contexts[0]
    page = default_context.pages[0]
    print(page.title())
录屏
Selenium
要在Selenium中录制视频,我们需要使用第三方库或工具,如ffmpeg或BrowserUp Proxy。在这里我们演示如何使用BrowserUp Proxy进行录制。
from selenium import webdriver
from browsermobproxy import Server

# 启动BrowserUp Proxy服务
server = Server("/path/to/browsermob-proxy/bin/browsermob-proxy")
server.start()

# 创建代理
proxy = server.create_proxy()

# 配置Chrome浏览器选项
chrome_options = webdriver.ChromeOptions()
chrome_options.add_argument("--proxy-server={0}".format(proxy.proxy))

# 创建Chrome浏览器实例
driver = webdriver.Chrome(chrome_options=chrome_options)

# 启动录屏
proxy.new_har("test", options={'captureContent': True, 'captureHeaders': True})

# 测试步骤
driver.get("https://www.google.com")
print(driver.title)

# 停止录屏
har = proxy.har

# 输出HAR文件
with open("test.har", "w") as har_file:
    har_file.write(json.dumps(har))

# 关闭浏览器
driver.quit()

# 关闭BrowserUp Proxy服务
server.stop()
在上面的代码中,我们首先启动BrowserUp Proxy服务,并创建一个代理。然后,我们配置Chrome浏览器选项,将其指向我们创建的代理。接下来,我们创建了Chrome浏览器实例,并使用BrowserUp Proxy的new_har方法启动了录屏。在测试步骤中,我们访问了谷歌搜索页面,并输出了其标题。最后,我们使用har属性获取录屏数据,并将其写入HAR文件中。最后,我们关闭了浏览器和BrowserUp Proxy服务。
Playwright
context = browser.new_context(record_video_dir="videos/")
# Make sure to close, so that videos are saved.
context.close()
截屏
Selenium
from selenium import webdriver

# 创建Chrome浏览器实例
driver = webdriver.Chrome()

# 访问测试页面
driver.get("https://www.google.com")

# 截图并保存为文件
driver.get_screenshot_as_file("screenshot.png")

# 关闭浏览器
driver.quit()
Playwright
screenshot() 有很多参数,但我觉得记住两个就行了。
# 当前页面截图
page.screenshot(path="screenshot.png")

# 截取整个页面,包括没滚动到的部分(不是真实滚动,不用担心无限加载元素)
page.screenshot(path="screenshot.png", full_page=True)
拦截网络请求
Selenium
Selenium4
Selenium 4引入了DevToolsScreenshot类,可以使用它来对Chrome浏览器进行截屏并保存为MP4文件,从而实现录屏的功能。
from selenium import webdriver

driver = webdriver.Chrome('/path/to/chromedriver')

# 开始录制
driver.execute_cdp_cmd('Page.startScreencast', {
    'format': 'png',
    'quality': 80,
})

# 进行浏览器操作,包括打开网页、输入内容、点击按钮等

# 停止录制
result = driver.execute_cdp_cmd('Page.stopScreencast')

# 保存录制视频
with open('screencast.mp4', 'wb') as f:
    f.write(result['data'])

driver.quit()
Selenium3
要在Selenium中拦截网络请求,我们可以使用第三方库或工具,如BrowserMob Proxy、MITM Proxy等。在这里我们演示如何使用BrowserMob Proxy进行拦截。
from selenium import webdriver
from browsermobproxy import Server

# 启动BrowserUp Proxy服务
server = Server("/path/to/browsermob-proxy/bin/browsermob-proxy")
server.start()

# 创建代理
proxy = server.create_proxy()

# 配置Chrome浏览器选项
chrome_options = webdriver
Playwright
page.route("**/*.{png,jpg,jpeg}", lambda route: route.abort())
获取所有请求信息
Selenium
Playwright
1,通过trace view
2,通过录制browser.new_context(record_har_path="example.har")
3,通过监控request、response事件,把它们记录到文件中。


 359
359

 被折叠的 条评论
为什么被折叠?
被折叠的 条评论
为什么被折叠?
 到【灌水乐园】发言


