


常规圆角设置方式就不说了
这里采用的是对 UIImage 进行处理,得到一个圆角的 UIImage。
关键代码
//对应于 ContentMode UIViewContentModeScaleAspectFit
- (CGSize)CGSizeAspectFit:(CGSize)aspectRatio bounding:(CGSize) boundingSize
{
float mW = boundingSize.width / aspectRatio.width;
float mH = boundingSize.height / aspectRatio.height;
if( mH < mW )
boundingSize.width = mH * aspectRatio.width;
else if( mW < mH )
boundingSize.height = mW * aspectRatio.height;
return boundingSize;
}
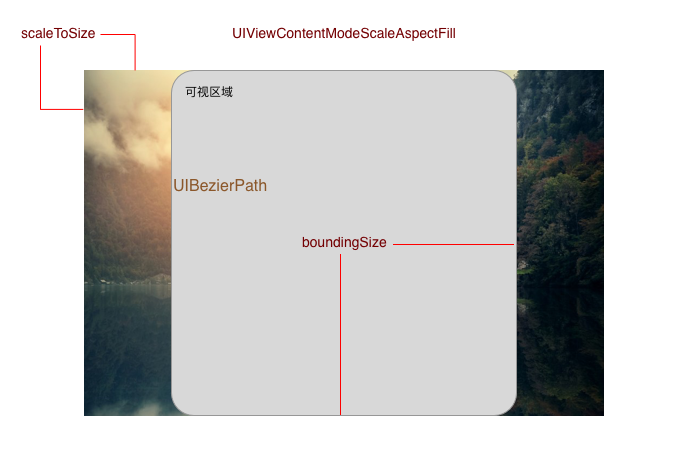
//对应于 ContentMode UIViewContentModeScaleAspectFill
- (CGSize)CGSizeAspectFill:(CGSize)aspectRatio minSize:(CGSize)minimumSize
{
float mW = minimumSize.width / aspectRatio.width;
float mH = minimumSize.height / aspectRatio.height;
if( mH > mW )
minimumSize.width = mH * aspectRatio.width;
else if( mW > mH )
minimumSize.height = mW * aspectRatio.height;
return minimumSize;
}
- (UIImage *)imageScaledToSize:(CGSize)size boundingSize:(CGSize)boundingSize cornerRadius:(CGFloat)cornerRadius borderWidth:(CGFloat)borderWidth borderColor:(UIColor *)borderColor
{
//create drawing context
UIGraphicsBeginImageContextWithOptions(size, NO, 0.0f);
//需要将可视区域画到图片的中心
CGFloat originX = (size.width-boundingSize.width)/2;
originX = originX < 0 ? 0 : originX;
CGFloat originY = (size.height-boundingSize.height)/2;
originY = originY < 0 ? 0 : originY;
[borderColor setStroke];
UIBezierPath *bezierPath = [UIBezierPath bezierPathWithRoundedRect:CGRectMake(originX, originY, boundingSize.width, boundingSize.height) cornerRadius:cornerRadius];
[bezierPath setLineWidth:borderWidth];
[bezierPath stroke];
[bezierPath addClip];
//draw
[self drawInRect:CGRectMake(0.0f, 0.0f, size.width, size.height)];
//capture resultant image
UIImage *image = UIGraphicsGetImageFromCurrentImageContext();
UIGraphicsEndImageContext();
return image;
}
参数说明
调用示例
CGSize scaleToSize = [image CGSizeAspectFill:image.size minSize:CGSizeMake(50.f, 50.f)];
image = [image imageScaledToSize:scaleToSize
                    boundingSize:CGSizeMake(50.f, 50.f)
                    cornerRadius:5.f
                     borderWidth:0.f
                     borderColor:[UIColor colorWithWhite:0 alpha:0.2]];
高级进阶–画出聊天气泡样式的图片,避免使用大量使用 mask 而导致卡顿
效果图

构建气泡外形的 UIBezierPath
- 原料:PaintCode
- 示例文档:link PaintCode示例文档
说明:利用PaintCode得到的 UIBezierPath 的坐标都是绝对值,需要自己把所有的坐标点都改成相对边框的值(修改每个 x、y,工作量有点大) - 要画什么样子的 UIBezierPath 取决于你的气泡设计(最好要熟练使用PaintCode)
关键代码
//将绝对值改成相对值后
- (UIBezierPath *)trangleRightPathInRect:(CGRect)rect {

    //画 UIBezierPath 的时候,出现了偏差,懒得重画,在这里手动修正
    CGFloat offset = 0.7f;
    CGFloat offset_y = 0.5f;

    CGPoint disPoint = CGPointMake(rect.size.width, rect.size.height);
    UIBezierPath* bezierPath = UIBezierPath.bezierPath;
    [bezierPath moveToPoint: CGPointMake(disPoint.x-2.38, 0.61+offset_y)];
    [bezierPath addCurveToPoint: CGPointMake(disPoint.x-1.02, 1.94+offset_y) controlPoint1: CGPointMake(disPoint.x-1.56, 0.82+offset_y) controlPoint2: CGPointMake(disPoint.x-1.02, 1.35+offset_y)];
    [bezierPath addCurveToPoint: CGPointMake(disPoint.x-1.08, 2.6+offset_y) controlPoint1: CGPointMake(disPoint.x - 1.02, 2.18+offset_y) controlPoint2: CGPointMake(disPoint.x-1.06, 2.51+offset_y)];
    [bezierPath addCurveToPoint: CGPointMake(disPoint.x - 1.95,  3.86+offset_y) controlPoint1: CGPointMake(disPoint.x-1.2, 2.97+offset_y) controlPoint2: CGPointMake(disPoint.x - 1.44, 3.26+offset_y)];
    [bezierPath addCurveToPoint: CGPointMake(disPoint.x - 8.5, 11.68+offset_y) controlPoint1: CGPointMake(disPoint.x - 1.95, 3.86+offset_y) controlPoint2: CGPointMake(disPoint.x-5.24, 7.79+offset_y)];
    [bezierPath addCurveToPoint: CGPointMake(disPoint.x - 8.5, disPoint.y-6.61) controlPoint1: CGPointMake(disPoint.x - 8.5, 43.68) controlPoint2: CGPointMake(disPoint.x - 8.5, disPoint.y-6.61)];
    [bezierPath addCurveToPoint: CGPointMake(disPoint.x-8.8, disPoint.y-3.03) controlPoint1: CGPointMake(disPoint.x - 8.5, disPoint.y-4.85) controlPoint2: CGPointMake(disPoint.x-8.8, disPoint.y-3.03)];
    [bezierPath addCurveToPoint: CGPointMake(disPoint.x-11.03, disPoint.y-0.8) controlPoint1: CGPointMake(disPoint.x -9.18, disPoint.y-1.99) controlPoint2: CGPointMake(disPoint.x-9.99, disPoint.y-1.18)];

    [bezierPath addCurveToPoint: CGPointMake(disPoint.x-14.61, disPoint.y-0.5) controlPoint1: CGPointMake(disPoint.x-11.97, disPoint.y-0.5) controlPoint2: CGPointMake(disPoint.x-12.85, disPoint.y-0.5)];
    [bezierPath addLineToPoint: CGPointMake( 6.61+offset, disPoint.y-0.5)];
    [bezierPath addCurveToPoint: CGPointMake(3.03+offset, disPoint.y-0.8) controlPoint1: CGPointMake(4.85+offset, disPoint.y-0.5) controlPoint2: CGPointMake(3.03+offset, disPoint.y-0.8)];
    [bezierPath addCurveToPoint: CGPointMake(0.8+offset, disPoint.y-3.03) controlPoint1: CGPointMake(1.99+offset, disPoint.y-1.18) controlPoint2: CGPointMake(1.18+offset, disPoint.y-1.99)];
    [bezierPath addCurveToPoint: CGPointMake(0.5+offset, disPoint.y-6.61) controlPoint1: CGPointMake(0.5+offset, disPoint.y-3.97) controlPoint2: CGPointMake(0.5+offset, disPoint.y-4.85)];
    [bezierPath addLineToPoint: CGPointMake(0.5+offset, 6.61+offset_y)];
    [bezierPath addCurveToPoint: CGPointMake(0.8+offset, 3.03+offset_y) controlPoint1: CGPointMake(0.5+offset, 4.85+offset_y) controlPoint2: CGPointMake(0.8+offset, 3.03+offset_y)];
    [bezierPath addCurveToPoint: CGPointMake(3.03+offset, 0.8+offset_y) controlPoint1: CGPointMake(1.18+offset, 1.99+offset_y) controlPoint2: CGPointMake(1.99+offset, 1.18+offset_y)];
    [bezierPath addCurveToPoint: CGPointMake(6.61+offset, 0.5+offset_y) controlPoint1: CGPointMake(3.97+offset, 0.5+offset_y) controlPoint2: CGPointMake(4.85+offset, 0.5+offset_y)];
    [bezierPath addLineToPoint: CGPointMake(disPoint.x-4.36+offset, 0.5+offset_y)];
    [bezierPath addCurveToPoint: CGPointMake(disPoint.x-2.38, 0.61+offset_y) controlPoint1: CGPointMake(disPoint.x-3.39, 0.5+offset_y) controlPoint2: CGPointMake(disPoint.x-2.9, 0.5+offset_y)];
    [bezierPath setLineWidth:1.f];
    [bezierPath closePath];

    return bezierPath;
}

- (UIBezierPath *)trangleLeftPathInRect:(CGRect)rect {
    CGPoint disPoint = CGPointMake(rect.size.width, rect.size.height);
    UIBezierPath* bezierPath = UIBezierPath.bezierPath;
    [bezierPath moveToPoint: CGPointMake(2.38, 0.61)];
    [bezierPath addCurveToPoint: CGPointMake(1.02, 1.94) controlPoint1: CGPointMake(1.56, 0.82) controlPoint2: CGPointMake(1.02, 1.35)];
    [bezierPath addCurveToPoint: CGPointMake(1.08, 2.6) controlPoint1: CGPointMake(1.02, 2.18) controlPoint2: CGPointMake(1.06, 2.51)];
    [bezierPath addCurveToPoint: CGPointMake(1.95, 3.86) controlPoint1: CGPointMake(1.2, 2.97) controlPoint2: CGPointMake(1.44, 3.26)];
    [bezierPath addCurveToPoint: CGPointMake(8.5, 11.68) controlPoint1: CGPointMake(1.95, 3.86) controlPoint2: CGPointMake(5.24, 7.79)];
    [bezierPath addCurveToPoint: CGPointMake(8.5, disPoint.y-6.61) controlPoint1: CGPointMake(8.5, 43.68) controlPoint2: CGPointMake(8.5, disPoint.y-6.61)];
    [bezierPath addCurveToPoint: CGPointMake(8.8, disPoint.y-3.03) controlPoint1: CGPointMake(8.5, disPoint.y-4.85) controlPoint2: CGPointMake(8.8, disPoint.y-3.03)];
    [bezierPath addCurveToPoint: CGPointMake(11.03, disPoint.y-0.8) controlPoint1: CGPointMake(9.18, disPoint.y-1.99) controlPoint2: CGPointMake(9.99, disPoint.y-1.18)];
    [bezierPath addCurveToPoint: CGPointMake(14.61, disPoint.y-0.5) controlPoint1: CGPointMake(11.97, disPoint.y-0.5) controlPoint2: CGPointMake(12.85, disPoint.y-0.5)];
    [bezierPath addLineToPoint: CGPointMake(disPoint.x-6.61, disPoint.y-0.5)];
    [bezierPath addCurveToPoint: CGPointMake(disPoint.x-3.03, disPoint.y-0.8) controlPoint1: CGPointMake(disPoint.x-4.85, disPoint.y-0.5) controlPoint2: CGPointMake(disPoint.x-3.03, disPoint.y-0.8)];
    [bezierPath addCurveToPoint: CGPointMake(disPoint.x-0.8, disPoint.y-3.03) controlPoint1: CGPointMake(disPoint.x-1.99, disPoint.y-1.18) controlPoint2: CGPointMake(disPoint.x-1.18, disPoint.y-1.99)];
    [bezierPath addCurveToPoint: CGPointMake(disPoint.x-0.5, disPoint.y-6.61) controlPoint1: CGPointMake(disPoint.x-0.5, disPoint.y-3.97) controlPoint2: CGPointMake(disPoint.x-0.5, disPoint.y-4.85)];
    [bezierPath addLineToPoint: CGPointMake(disPoint.x-0.5, 6.61)];
    [bezierPath addCurveToPoint: CGPointMake(disPoint.x-0.8, 3.03) controlPoint1: CGPointMake(disPoint.x-0.5, 4.85) controlPoint2: CGPointMake(disPoint.x-0.8, 3.03)];
    [bezierPath addCurveToPoint: CGPointMake(disPoint.x-3.03, 0.8) controlPoint1: CGPointMake(disPoint.x-1.18, 1.99) controlPoint2: CGPointMake(disPoint.x-1.99, 1.18)];
    [bezierPath addCurveToPoint: CGPointMake(disPoint.x-6.61, 0.5) controlPoint1: CGPointMake(disPoint.x-3.97, 0.5) controlPoint2: CGPointMake(disPoint.x-4.85, 0.5)];
    [bezierPath addLineToPoint: CGPointMake(4.36, 0.5)];
    [bezierPath addCurveToPoint: CGPointMake(2.38, 0.61) controlPoint1: CGPointMake(3.39, 0.5) controlPoint2: CGPointMake(2.9, 0.5)];
    [bezierPath setLineWidth:1.f];
    [bezierPath closePath];
    return bezierPath;
}

- (UIImage *)trangleImage:(UIImage *)image inRect:(CGRect)rect bezierPath:(UIBezierPath *)bezierPath {
    // Begin a new image that will be the new image with the rounded corners
    // (here with the size of an UIImageView)
    UIGraphicsBeginImageContextWithOptions(rect.size, NO, [UIScreen mainScreen].scale);

    // Add a clip before drawing anything, in the shape of an rounded rect
    [[UIColor colorWithWhite:0 alpha:0.12] setStroke];
    [bezierPath stroke];
    [bezierPath addClip];
    // Draw your image
    [image drawInRect:rect];

    // Get the image, here setting the UIImageView image
    UIImage *trangleImage = UIGraphicsGetImageFromCurrentImageContext();

    // Lets forget about that we were drawing
    UIGraphicsEndImageContext();
    return trangleImage;
}
总结
iOS的圆角开销还是比较大的,一旦滥用,必定会引起卡顿,合理的避免使用 mask layer 和 CornerRadius 属性,可以有效的提高性能。
如果可以,记得要缓存处理成圆角的image,不然频繁的绘制也会造成卡顿。


 6188
6188

 被折叠的 条评论
为什么被折叠?
被折叠的 条评论
为什么被折叠?
 到【灌水乐园】发言


