


// Create by 郭仔 2015年04月13日22:10:23
今天介绍的基础视图包括:UITextField、UIButton
一.定义UITextField:
创建UITextField与创建UILabel的步骤很相似。
1、开辟空间并初始化(如果本类有初始化⽅方法,使⽤用⾃自⼰己的;否则 使⽤用⽗父类的)。
2、设置⽂文本显⽰示、输⼊入相关的属性
3、添加到⽗父视图上,⽤用以显⽰示
4、释放
UITextField * textField = [[UITextField alloc] initWithFrame:CGRectMake(20, 50, 100, 50)];
    textField.backgroundColor = [UIColor cyanColor];
    [self.window addSubview:textField];
    [textField release];
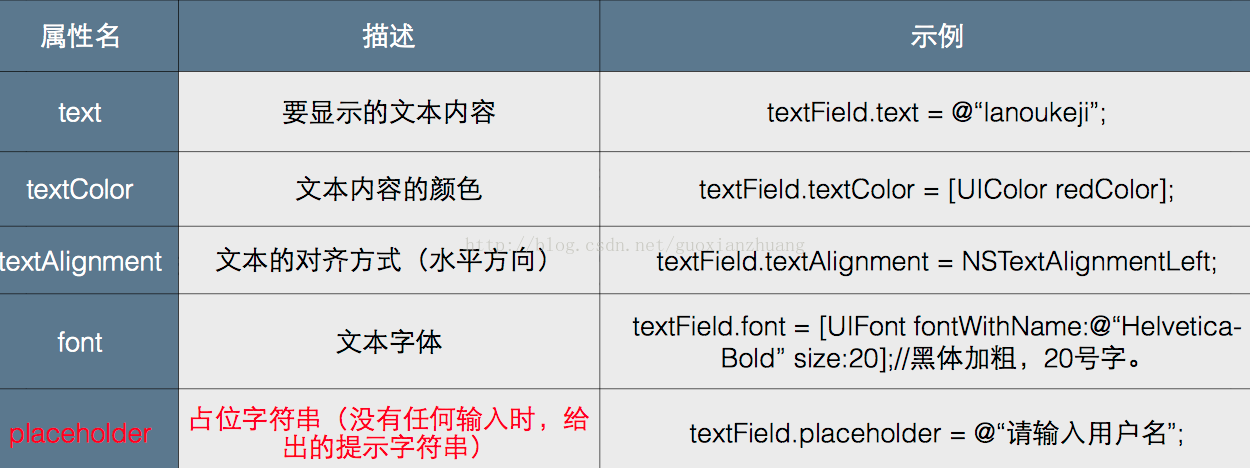
文本显示:
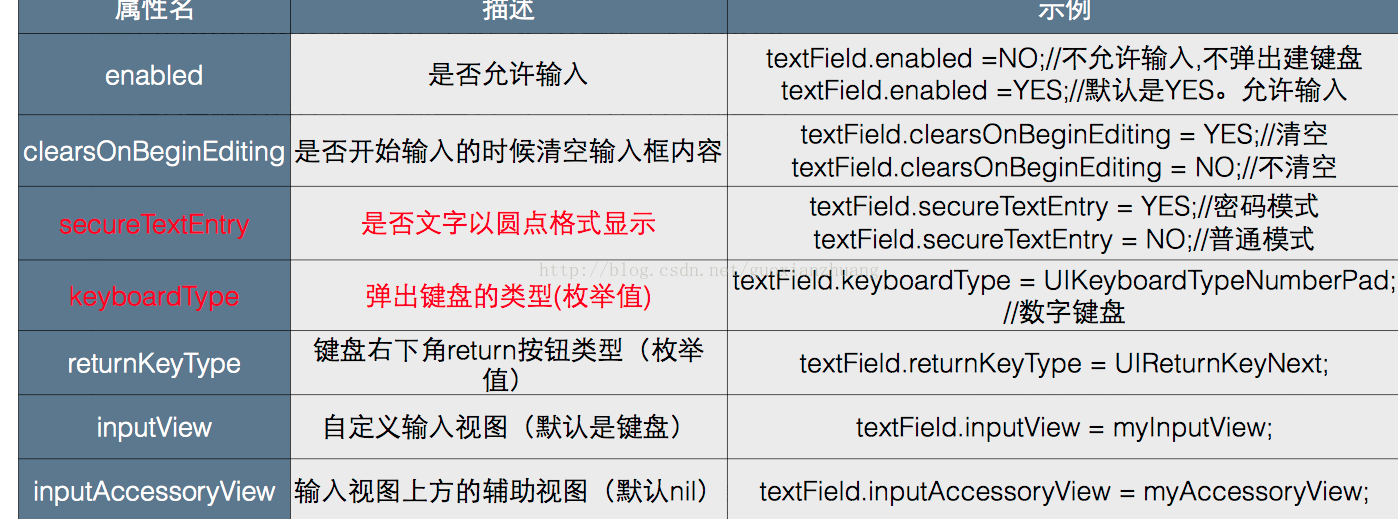
输入控制:
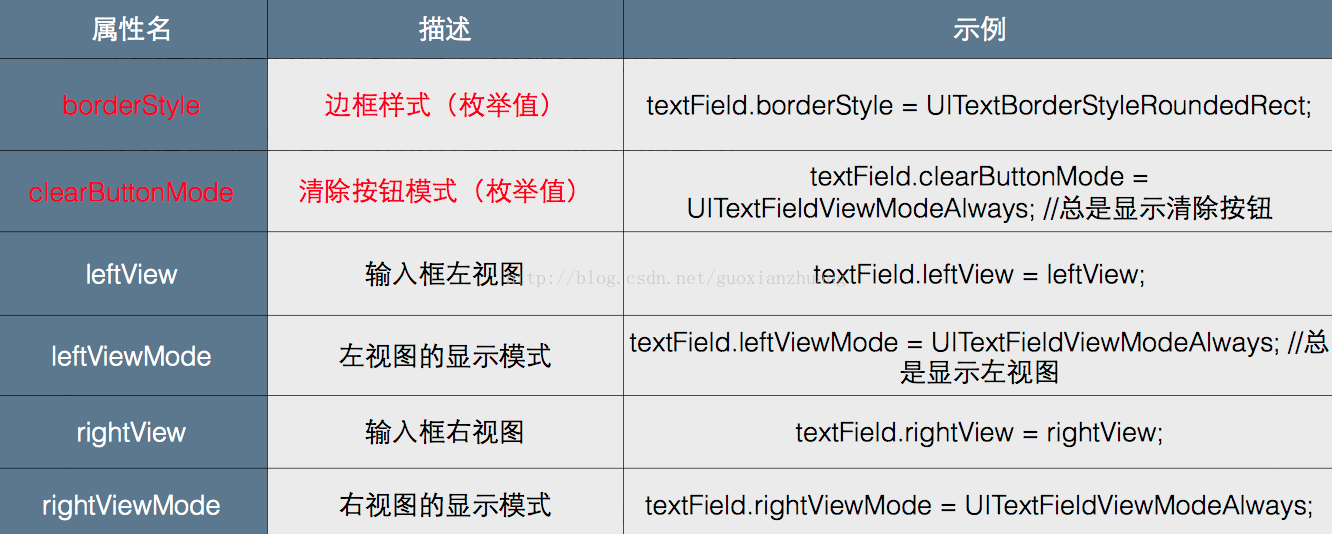
外观控制:
代码实现:
textField.text = @"Hello 郭仔";
    textField.textColor = [UIColor redColor];
    textField.textAlignment = NSTextAlignmentCenter;
    // textField.font = [UIFont systemFontOfSize:12];
    textField.font = [UIFont fontWithName:@"HelveticaBold" size:12];
    textField.placeholder = @"请输入用户名";
    // textField.enabled = NO;
    textField.clearsOnBeginEditing = YES;
    textField.secureTextEntry = YES;
    // textField.keyboardType = UIKeyboardTypeNumberPad;
    textField.returnKeyType = UIReturnKeyNext;
    // textField.inputView = self.window;
    UIView * view = [[UIView alloc] initWithFrame:CGRectMake(20, 50, 50, 30)];
    view.backgroundColor = [UIColor greenColor];


    //银行安全输入密码是变换键盘,view是自己添加的键盘
    // textField.inputView = view;
    textField.inputAccessoryView = view;
    [view release];
textField.borderStyle = UITextBorderStyleRoundedRect;
textField.clearButtonMode = UITextFieldViewModeWhileEditing;
UIView * leftView = [[UIView alloc] initWithFrame:CGRectMake(0, 0, 10, 10)];
leftView.backgroundColor = [UIColor blueColor];
textField.leftView = leftView;
textField.leftViewMode = UITextFieldViewModeAlways;
UIView * rightView = [[UIView alloc] initWithFrame:CGRectMake(0, 0, 10, 10)];
rightView.backgroundColor = [UIColor redColor];
textField.rightView = rightView;
textField.rightViewMode = UITextFieldViewModeAlways;
// =================================================
// 设置自身为代理
textField.delegate = self;
// 设置textfield为第一响应者,直接弹出键盘,光标直接定位到了textField中
[textField becomeFirstResponder];
// =================================================
[leftView release];
[rightView release];
    // 打印出系统字体
    NSArray *array = [UIFont familyNames];
    for (NSString *s in array) {
        NSLog(@"%@",s);
}UIButton:
UIButton的使用:
创建UIButton与创建UILabel、UITextField、UIView的步骤很相似。
1、创建button对象(如果本类有初始化⽅方法,使⽤用⾃自⼰己的;否则使⽤用 ⽗父类的)。
2、设置按钮显⽰示相关的属性
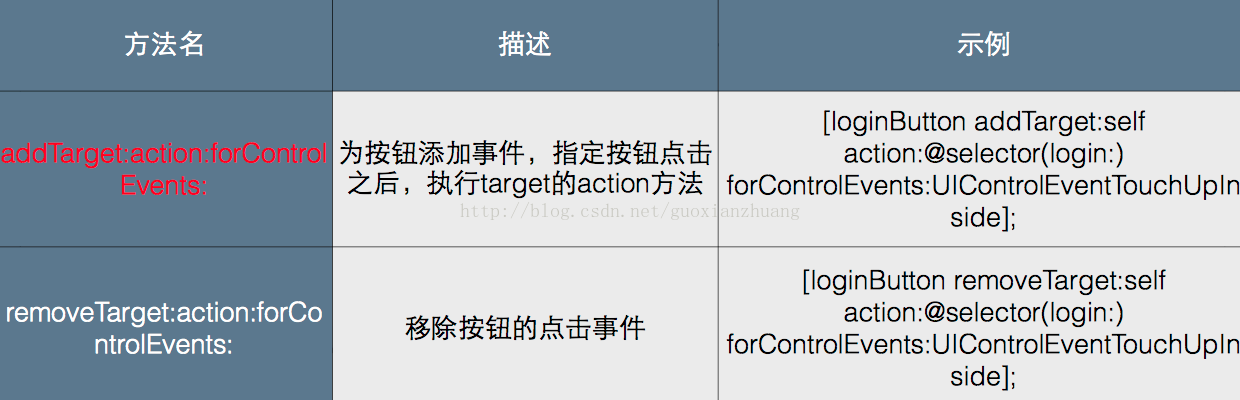
3、为按钮添加点击事件
4、添加按钮到⽗父视图上,⽤用以显⽰示
5、按钮⽆无需释放(因为使⽤用的是类⽅方法创建的button)
创建UIButton:
UIButton * btn = [UIButton buttonWithType:UIButtonTypeCustom];
btn.frame = CGRectMake(100, 150, 100, 60);
btn.backgroundColor = [UIColor greenColor];
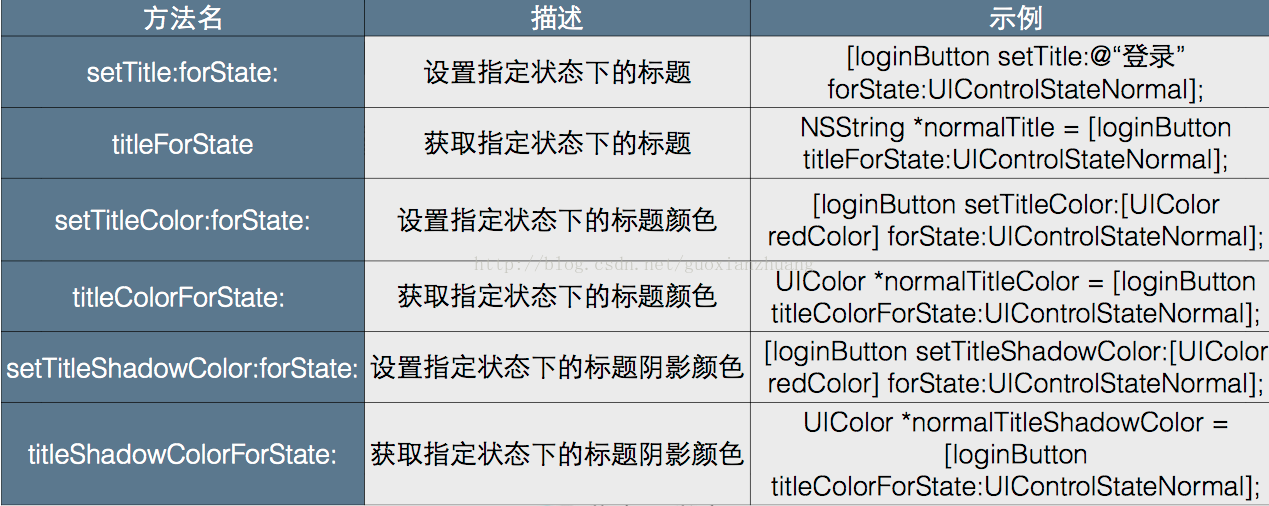
[btn setTitle:@"登陆" forState:UIControlStateNormal];
// [btn setTitle:@"登陆" forState:UIControlStateHighlighted];
// 添加button事件
[btn addTarget:self action:@selector(login:) forControlEvents:UIControlEventTouchUpInside];
[self.window addSubview:btn];件、移除事件等。
注:UIButton : UIControl : UIView
UIButton添加事件:
外观控制:
代码实现:
UIButton * btn = [UIButton buttonWithType:UIButtonTypeCustom];
btn.frame = CGRectMake(100, 150, 100, 60);
btn.backgroundColor = [UIColor greenColor];
[btn setTitle:@"登陆" forState:UIControlStateNormal];
// [btn setTitle:@"登陆" forState:UIControlStateHighlighted];
// 添加button事件
[btn addTarget:self action:@selector(login:) forControlEvents:UIControlEventTouchUpInside];
// 移除button事件
// [btn removeTarget:self action:@selector(login:) forControlEvents:UIControlEventTouchUpInside];
[btn setTitleColor:[UIColor redColor] forState:UIControlStateNormal];
[btn setTitleColor:[UIColor blackColor] forState:UIControlStateHighlighted];
[btn setTitle:@"取消" forState:UIControlStateHighlighted];
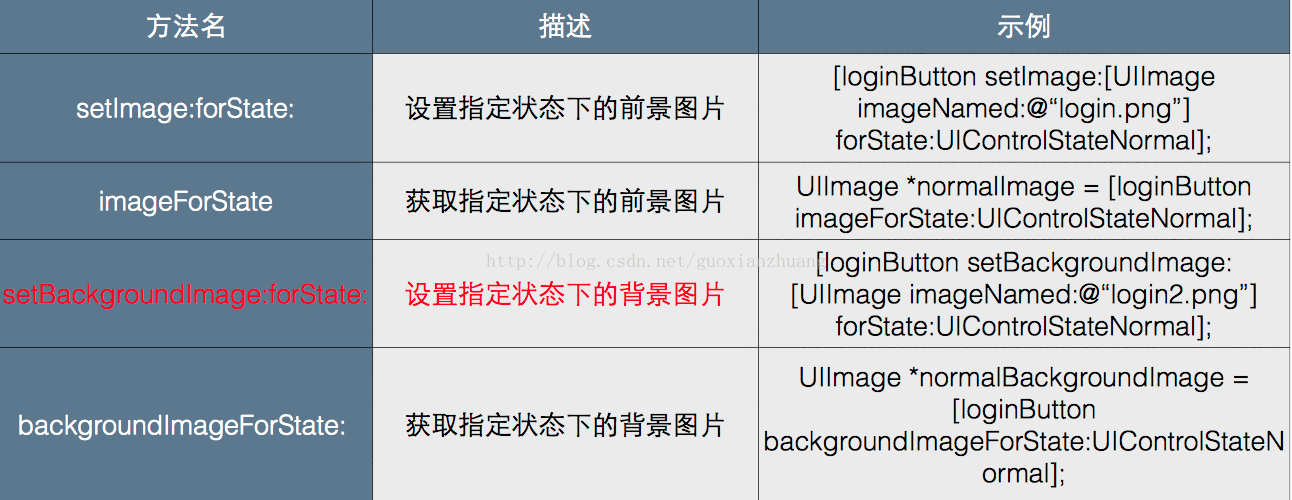
UIImage * img = [UIImage imageNamed:@"3.png"];
//[btn setImage:img forState:UIControlStateNormal];
UIImage * img2 =[UIImage imageNamed:@"4.png"];
//[btn setImage:img2 forState:UIControlStateHighlighted];
// 把图片设置成背景
[btn setBackgroundImage:img forState:UIControlStateNormal];
[btn setBackgroundImage:img2 forState:UIControlStateHighlighted];
===========================================================================
delegate:
点return回收键盘:
点击键盘return按钮实现键盘回收的步骤: 1、将AppDelete作为UITextField的delegate 2、AppDelete.h⽂文件接受UITextFieldDelegate协议 3、AppDelete.m⽂文件实现textFieldShouldReturn:⽅方法。
代码实现:
首先要遵守UITextFieldDelegate协议。
<span style="color:#333333;">    // 设置自身为代理
    textField.delegate = self;
    // 设置textfield为第一响应者,直接弹出键盘,光标直接定位到了textField中
    [textField becomeFirstResponder];</span>
- (BOOL)textFieldShouldReturn:(UITextField *)textField
{
    // 取消第一响应者
    [textField resignFirstResponder];
    NSLog(@"你点击了return按钮");
    return YES;
}
========================================================================
IOS程序启动流程:
UIApplicationMain:
UIApplicationMain在程序⼊入⼝口函数main函数中调⽤用,主要实现了3个
功能: 创建应⽤用程序(UIApplication)实例 创建应⽤用程序代理实例
建⽴立事件循环(runloop:死循环,不断检测程序运⾏行状态,是否被触 摸、晃动等)
int UIApplicationMain (!
int argc,!
char *argv[],!
NSString *principalClassName,!
NSString *delegateClassName!
);! 1、principalClassName:应⽤用程序对象的类名(UIApplication或其⼦子类)! 2、delegateClassName:应⽤用程序delegate的类名。(任何接受了 UIApplicationDelegate的类)! UIApplicationMain根据上述两个类名创建应⽤用程序实例、应⽤用程序代理实例。
然后建⽴立事件循环(runloop),检测程序的各种事件(程序开始启动,接收到触 摸等等);
==============
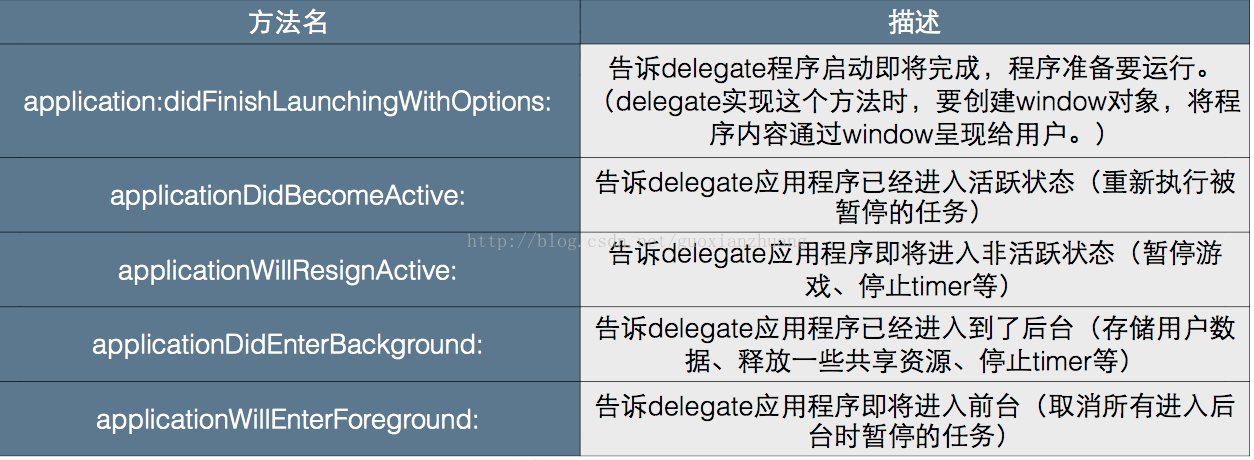
应用程序代理:
UIApplicationDelegate是⼀一个OC的协议。⾥里⾯面声明了⼀一堆⽅方法,这些⽅方
法都与应⽤用程序运⾏行状态有关,它们由应⽤用程序代理实现。UIApplication 对象负责调⽤用。
UIApplicationDelegate中的定义的部分方法:
================================================================================
UIWindow:
UIWindow作为应⽤用程序的窗⼝口,在应⽤用程序启动的时候就要加载,
各种UI界⾯面都是借助window来呈现的。 UIWindow在创建的时候,应该和屏幕⼀一样⼤大。通过[UIScreen
mainScreen].bounds可以获得屏幕⼤大⼩小。
[self.window makeKeyAndVisible];//让window变的可视,即显⽰示 window。
================================================================================


 387
387

 被折叠的 条评论
为什么被折叠?
被折叠的 条评论
为什么被折叠?
 到【灌水乐园】发言


