在iOS中,图形可分为以下层次:

越往上层,封装程度越高,动画实现越简洁,但是自由度越低;反之亦然。本文整合了Core Annimationce层的基本动画实现方案。
在iOS中,展示动画可以类比于现实生活中的“拍电影”。拍电影有三大要素:演员+剧本+开拍,概念类比如下:
演员—–>CALayer, 规定电影的主角是谁
剧本—–>CAAnimation, 规定电影改怎么演,怎么走,怎么变换
开拍——>AddAnimation, 开始执行
CALayer是什么?
CALayer是个与UIView很类似的概念,同样有layer,sublayer…,同样有backgroundColor、frame等相似的属性,我们可以将UIView看做一种特殊的CALayer,只不过可以响应事件而已。一般来说,layer可以有两种用途,二者不互相冲突:一是对view相关属性的设置,包括圆角、阴影、边框等参数,更详细的点击这里;二是实现对view的动画操控。因此对一个view进行core animation动画,本质上是对该view的.layer进行动画操作。
CAAnimation是什么呢?
CAAnimation可分为四种:
1.CABasicAnimation
通过设定起始点,终点,时间,动画会沿着你这设定点进行移动。可以看做特殊的CAKeyFrameAnimation
2.CAKeyFrameAnimation
KeyFrame顾名思义就是关键点的frame,你可以通过设定CALayer的始点、中间关键点、终点的frame,时间,动画会沿你设定的轨道进行移动
3.CAAnimationGroup
group组合的意思,就是把对这个Layer的所有动画都组合起来。
4.CATransition
这个就是苹果帮开发者封装好的一些动画
动画的具体实现及附带参数
CABasicAnimation
@interface ViewController ()
{
    CALayer *scaleLayer;
    CALayer *moveLayer;
    CALayer *rotateLayer;
    CALayer *groupLayer;
}
@end

- (void)initScaleLayer
{
    // 演员
    scaleLayer = [[CALayer alloc] init];
    // scaleLayer.backgroundColor = [UIColor redColor].CGColor;
    scaleLayer.contents = (id)[UIImage imageNamed:@"heart.png"].CGImage;
    scaleLayer.frame = CGRectMake(60, 50, 50, 50);
    scaleLayer.cornerRadius = 10;
    [self.view.layer addSublayer:scaleLayer];

    //剧本,怎么演
    CABasicAnimation *scaleAnimation = [CABasicAnimation animationWithKeyPath:@"transform.scale"];
    scaleAnimation.fromValue = [NSNumber numberWithFloat:1.0];
    scaleAnimation.toValue   = [NSNumber numberWithFloat:1.5];
    scaleAnimation.autoreverses = YES; // 反转
    scaleAnimation.repeatCount = MAXFLOAT;
    scaleAnimation.duration = 0.8;

    // 开演
    [scaleLayer addAnimation:scaleAnimation forKey:@"scaleAnimation"];
}
想要实现不同的效果,最关键的地方在于CABasicAnimation对象的初始化方式中keyPath的设定。在iOS中有以下几种不同的keyPath,代表着不同的效果:

CAAnimationGroup
利用GroupAnimation实现多种动画的组合,在GroupAnimation中的各个动画类型是同时进行的。
#pragma CAAnimationGroup
- (void)groupanimation
{
    // 组合basicanimation即可 移动,旋转, 放大
    groupLayer = [[CALayer alloc] init];
    groupLayer.backgroundColor = [UIColor redColor].CGColor;
    groupLayer.frame = CGRectMake(40, rotateLayer.position.y + 50, 50, 50);
    groupLayer.cornerRadius = 50/2.0;
    [self.view.layer addSublayer:groupLayer];

    CABasicAnimation *moveAnimation = [CABasicAnimation animationWithKeyPath:@"position"];
    moveAnimation.fromValue = [NSValue valueWithCGPoint:groupLayer.position];
    moveAnimation.toValue   =  [NSValue valueWithCGPoint:CGPointMake(320 - 40, groupLayer.position.y)];
    moveAnimation.repeatCount = MAXFLOAT;
    moveAnimation.autoreverses = YES;
    moveAnimation.fillMode = kCAFillModeForwards;
    moveAnimation.duration = 2.0;

    CABasicAnimation *rotateAnimation = [CABasicAnimation animationWithKeyPath:@"transform.rotation.y"];
    rotateAnimation.fromValue = [NSNumber numberWithFloat:0.0];
    rotateAnimation.toValue   = [NSNumber numberWithFloat:6 * M_PI];
    rotateAnimation.repeatCount = MAXFLOAT;
    rotateAnimation.autoreverses = YES;
    rotateAnimation.duration = 2.0;
    rotateAnimation.fillMode = kCAFillModeForwards;

    CABasicAnimation *scaleAnimation = [CABasicAnimation animationWithKeyPath:@"transform.scale"];
    scaleAnimation.fromValue = [NSNumber numberWithFloat:1.0];
    scaleAnimation.toValue   = [NSNumber numberWithFloat:1.5];
    scaleAnimation.repeatCount = MAXFLOAT;
    scaleAnimation.autoreverses = YES;
    scaleAnimation.duration = 1.0;
    scaleAnimation.fillMode = kCAFillModeForwards;

    // 群组动画
    CAAnimationGroup *groupAnimation = [CAAnimationGroup animation];
    groupAnimation.duration = 2.0;
    groupAnimation.autoreverses = YES;
    groupAnimation.animations = @[moveAnimation, scaleAnimation, rotateAnimation];
    groupAnimation.repeatCount = MAXFLOAT;

    // 开演
    [groupLayer addAnimation:groupAnimation forKey:@"groupAnnimation"];
}
CAKeyFrameAnimation
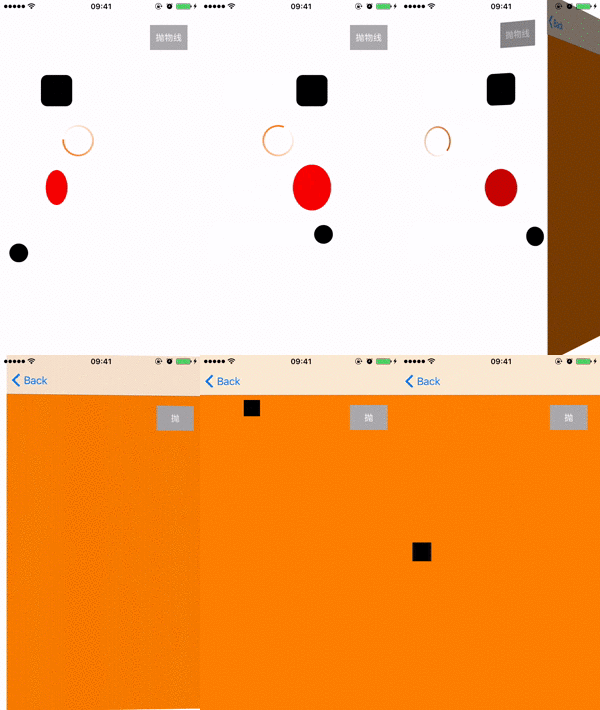
CABasicAnimation算是CAKeyFrameAnimaton的特殊情况,即不考虑中间变换过程,只考虑起始点与目标点就可以了。而CAKeyFrameAnimation则更复杂些,允许我们在起始点与终点间自定义更多内容来表达我们的实际应用需求!下面的展示的是小圆球绕循环跑到跑动的demo
#pragma CAKeyframeAnimation
- (void)keyframeanimation
{
    rectLayer = [[CALayer alloc] init];
    rectLayer.frame =  CGRectMake(15, groupLayer.position.y + 60, 30, 30);
    rectLayer.cornerRadius = 15;
    rectLayer.backgroundColor = [UIColor blackColor].CGColor;
    [self.view.layer addSublayer:rectLayer];

    /*
     (1)values属性

     values属性指明整个动画过程中的关键帧点,例如上例中的A-E就是通过values指定的。需要注意的是,起点必须作为values的第一个值。

     (2)path属性

     作用与values属性一样,同样是用于指定整个动画所经过的路径的。需要注意的是,values与path是互斥的,当values与path同时指定时,path会覆盖values,即values属性将被忽略。
     */

    CAKeyframeAnimation *rectRunAnimation = [CAKeyframeAnimation animationWithKeyPath:@"position"];

    // 设置起始和终止位子
    /*
    rectRunAnimation.values = @[[NSValue valueWithCGPoint:rectLayer.position],
                                [NSValue valueWithCGPoint:CGPointMake(320 - 20, rectLayer.position.y)],
                                [NSValue valueWithCGPoint:CGPointMake(320-20, rectLayer.position.y + 100)],
                                [NSValue valueWithCGPoint:CGPointMake(rectLayer.position.x, rectLayer.position.y + 100)],
                                [NSValue valueWithCGPoint:rectLayer.position]];
     */

    // 设置path属性 上面的values 会被忽略
    CGMutablePathRef path = CGPathCreateMutable();
    CGPathMoveToPoint(path, NULL, rectLayer.position.x, rectLayer.position.y);
    CGPathAddLineToPoint(path, NULL, 320 - 20, rectLayer.position.y );
    CGPathAddLineToPoint(path, NULL, 320 - 20, rectLayer.position.y  + 100);
    CGPathAddLineToPoint(path, NULL, rectLayer.position.x , rectLayer.position.y  + 100);
    CGPathAddLineToPoint(path, NULL, rectLayer.position.x, rectLayer.position.y);

    rectRunAnimation.path = path;
    CGPathRelease(path);

    // 设置每个关键帧的时长
    rectRunAnimation.keyTimes = @[[NSNumber numberWithFloat:0.0], [NSNumber numberWithFloat:0.6],[NSNumber numberWithFloat:0.7],[NSNumber numberWithFloat:0.8],[NSNumber numberWithFloat:1]];

    rectRunAnimation.timingFunctions = @[[CAMediaTimingFunction functionWithName:kCAMediaTimingFunctionEaseOut],[CAMediaTimingFunction functionWithName:kCAMediaTimingFunctionLinear],[CAMediaTimingFunction functionWithName:kCAMediaTimingFunctionLinear],[CAMediaTimingFunction functionWithName:kCAMediaTimingFunctionLinear]];

    rectRunAnimation.repeatCount = MAXFLOAT;
    rectRunAnimation.autoreverses = NO;
    rectRunAnimation.calculationMode = kCAMediaTimingFunctionLinear;
    rectRunAnimation.duration = 4;
    [rectLayer addAnimation:rectRunAnimation forKey:@"rectRunAnimation"];
}
CAKeyFrameAnimation的使用中有以下主要属性:
(1)values属性
values属性指明整个动画过程中的关键帧点,上面小圆球的轨迹,就是value指定的。需要注意的是,起始点必须作为values的第一个值
(2)path属性
作用与values属性一样,同样是用于指定整个动画所经过的路径的。需要注意的是,values与path是互斥的,当values与path同时指定时,path会覆盖values,即values属性将被忽略。
(3)keyTimes属性
该属性是一个数组,用以指定每个子路径的时间。如果你没有显式地对keyTimes进行设置,则系统会默认每条子路径的时间为:ti=总时间/(路径),即每条子路径的时间相等。当然,我们也可以传个数组让物体快慢结合。
(4)timeFunctions属性
用过UIKit层动画的同学应该对这个属性不陌生,这个属性用以指定时间函数,类似于运动的加速度,有以下几种类型。你有几个子路径就应该传入几个元素
kCAMediaTimingFunctionLinear//线性 kCAMediaTimingFunctionEaseIn//淡入kCAMediaTimingFunctionEaseOut//淡出
kCAMediaTimingFunctionEaseInEaseOut//淡入淡出
kCAMediaTimingFunctionDefault//默认
(5)calculationMode属性
该属性决定了物体在每个子路径下是跳着走还是匀速走,跟timeFunctions属性有点类似
const kCAAnimationLinear//线性,默认
const kCAAnimationDiscrete//离散,无中间过程,但keyTimes设置的时间依旧生效,物体跳跃地出现在各个关键帧上
const kCAAnimationPaced//平均,keyTimes跟timeFunctions失效
const kCAAnimationCubic//平均,同上
const kCAAnimationCubicPaced//平均,同上
// 动画的暂停与开始通过以下方法实现
// 暂停动画
- (void)pauseLayer:(CALayer *)layer
{
    CFTimeInterval pauseTime = [layer convertTime:CACurrentMediaTime() fromLayer:nil];
    layer.speed = 0.0;
    layer.timeOffset = pauseTime;
}

// 开始动画
- (void)resumeLayer:(CALayer *)layer
{
    CFTimeInterval pauseTime = [layer timeOffset];
    layer.speed = 1.0;
    layer.timeOffset = 0.0;
    layer.beginTime = 0.0;
    CFTimeInterval timeSincePause = [layer convertTime:CACurrentMediaTime() fromLayer:nil] - pauseTime;
    layer.beginTime = timeSincePause;
}
CATransition
实现iPhone的页面切换动画主要有两种方法,一种是UIView层面的,一种是使用CATransition进行更底层的控制。
第一种是UIView, UIView方式可能在底层也是使用了CATransition进行封装,它只能用于一些简单的,常用的效果展示,长用实例代码:
[UIView beginAnimations:@"Curl"context:nil];//动画开始

[UIView setAnimationDuration:0.75];
[UIView setAnimationDelegate:self];
[UIView setAnimationTransition:UIViewAnimationTransitionCurlUp forView:myview cache:YES];
[myview removeFromSuperview];
[UIView commitAnimations];
第二种相对复杂些,但可以更好的控制动画,下面是页面跳转的动画示例代码:
#pragma CAtransition
- (void)transitionanimation
{
    CATransition *animation = [CATransition animation];
    animation.duration = 2.0f;
    animation.timingFunction = [CAMediaTimingFunction functionWithName:kCAMediaTimingFunctionEaseOut];
    animation.fillMode = kCAFillModeForwards;
    // animation.type = kCATransitionReveal;
    animation.subtype = kCATransitionFromRight;   /* 动画方向*/
    animation.type = @"cube";
    ThrowLineTool *throwVc = [[ThrowLineTool alloc] init];
    [self.navigationController.view.layer addAnimation:animation forKey:@"animation"];
    [self.navigationController pushViewController:throwVc animated:animation];
}
这里使用了setType与setSubtype组合,这使用个比较保险,因为他的参数就是官方API里定义的。下面是参数说明:
基本的四种效果
kCATransitionPush 推入效果
kCATransitionMoveIn 移入效果
kCATransitionReveal 截开效果
kCATransitionFade 渐入渐出效果
以下API效果可以安全使用
cube 方块
suckEffect 三角
rippleEffect 水波抖动
pageCurl 上翻页
pageUnCurl 下翻页
oglFlip 上下翻转
cameraIrisHollowOpen 镜头快门开
cameraIrisHollowClose 镜头快门开
以下API效果请慎用
spewEffect 新版面在屏幕下方中间位置被释放出来覆盖旧版面.
genieEffect 旧版面在屏幕左下方或右下方被吸走, 显示出下面的新版面
unGenieEffect 新版面在屏幕左下方或右下方被释放出来覆盖旧版面.
twist 版面以水平方向像龙卷风式转出来.
tubey 版面垂直附有弹性的转出来.
swirl 旧版面360度旋转并淡出, 显示出新版面.
charminUltra 旧版面淡出并显示新版面.
zoomyIn 新版面由小放大走到前面, 旧版面放大由前面消失.
zoomyOut 新版面屏幕外面缩放出现, 旧版面缩小消失.
oglApplicationSuspend 像按”home” 按钮的效果.《完》
更多详细内容,看参考原文博客
CAKeyFrameAnimation:
这里写链接内容http://www.cnblogs.com/wengzilin/p/4256468.html
CATransition:
http://blog.sina.com.cn/s/blog_797bb4bf01018fk8.html
CABasicAnimation:
http://www.cnblogs.com/wengzilin/p/4250957.html
demo下载地址:
http://download.csdn.net/detail/gyq605949540/9262779


 1512
1512

 被折叠的 条评论
为什么被折叠?


