


开散列概念
上一篇博客中介绍了解决哈希冲突的一种方法:闭散列。但是闭散列中不管是线性探测还是二次探测,解决哈希冲突问题都不够好,一旦数据冲突过多还是会造成堆积问题。那么有什么更好一点的方法么?于是又出现了开散列这种新的方法。开散列又叫拉链法或者哈希桶。他先将数据按照哈希函数计算得到哈希地址,如果出现相同的哈希地址的数据,那么就用一个单链表把数据连起来,各链表的头节点存储在哈希表中。这样就避免了闭散列中一旦出现哈希冲突就去侵占其他位置从而造成堆积的情况。
开散列的简单实现
HashFunc
由于类似于字符串等这些不能直接使用除留余数法进行哈希函数计算哈希地址的情况,这里和闭散列里面情况类似,需要设计一些哈希方法来进行转换,从而能够进行这里的取模运算。这里还是以字符串为例,使用模板的特化来实现。
	template<class K>
	struct Hash
	{
		size_t operator()(const K& key)
		{
			return key;
		}
	};


	template<>
	struct Hash<string>
	{
		size_t operator()(const string& s)
		{
			size_t value = 0;
			for (auto ch : s)
			{
				value *= 31;
				value += ch;
			}
			return value;
		}
	};
开散列的构成
开散列的结构是由链表构成的,因此需要先定义一个节点的数据结构,哈希表仍然是使用vector数组,但是其中存放的元素是各个链表。
	template<class K, class V>
	struct HashNode
	{
		K _data;
		HashNode<K, V>* _next;
	};


	template<class K,class V, class HashFunc = Hash<K>>
	class HashTable
	{
		typedef HashNode<K, V> Node;
	private:
		vector<Node*> _tables;//数组中存放的是节点的指针
		size_t _n;
	};
插入
插入和闭散列需要注意的方法类似,插入可以分为以下几步:判断是否重复(可以使用Find函数),判断负载因子是否为1从而考虑是否需要扩容,找到哈希地址头插插入入新的节点。
下面来分别介绍这些步骤:
去重
去重这里是通过使用Find函数来判断是否能够找到该元素,Find函数实现如下:这里是通过先找到哈希地址所在的位置,然后遍历该地址上面的链表,从来进行对比判断。
		Node* Find(const K& key)
		{
			if (_tables.size() == 0)
			{
				return nullptr;
			}
			HashFunc hf;
			size_t index = hf(key) % _tables.size();
			Node* cur = _tables[index];
			while (cur)
			{
				if (cur->_data.first == key)
				{
					return cur;
				}
				else
				{
					cur = cur->_next;
				}
			}
			return nullptr;
		}
扩容
这里的扩容是先创建一个新的vector数组,给他设置为新的大小,然后通过遍历原哈希表,将哈希表每个地址的元素,以及每个链表上面所挂的数据,一一重新映射到新的vector数组中,最后进行交换即可
			if (_tables.size() == _n)//载荷因子为1的时候需要进行扩容
			{
				size_t newCapacity = _tables.size() == 0 ? 10 : _tables.size() * 2;
				vector<Node*> newTables;
				newTables.resize(newCapacity);
				for (size_t i = 0; i < _tables.size(); i++)
				{
					Node* cur = _tables[i];
					while (cur)
					{
						size_t index = hf(cur->_data.first) % newTables.size();
						Node* next = cur->_next;
						//头插
						cur->_next = newTables[index];
						newTables[index] = cur;
						cur = next;
					}
					_tables[i] = nullptr;
				}
				_tables.swap(newTables);
			}
插入
最后插入的过程比较简单,直接通过哈希函数计算出该数据的哈希地址,然后通过头插的方式,将其插入链表即可。代码实现如下:
			size_t index = hf(kv.first) % _tables.size();
			Node* newnode = new Node(kv);
			newnode->_next = _tables[index];
			_tables[index] = newnode;
			_n++;
最终一个完整的插入和查找代码就完成了,示例如下:
		Node* Find(const K& key)
		{
			if (_tables.size() == 0)
			{
				return nullptr;
			}
			HashFunc hf;
			size_t index = hf(key) % _tables.size();
			Node* cur = _tables[index];
			while (cur)
			{
				if (cur->_data.first == key)
				{
					return cur;
				}
				else
				{
					cur = cur->_next;
				}
			}
			return nullptr;
		}


		bool Insert(const pair<K, V>& kv)
		{
			Node* ret = Find(kv.first);//判断是否已经存在重复值
			if (ret)
			{
				return false;
			}
			HashFunc hf;
			if (_tables.size() == _n)//载荷因子为1的时候需要进行扩容
			{
				size_t newCapacity = _tables.size() == 0 ? 10 : _tables.size() * 2;
				vector<Node*> newTables;
				newTables.resize(newCapacity);
				for (size_t i = 0; i < _tables.size(); i++)
				{
					Node* cur = _tables[i];
					while (cur)
					{
						size_t index = hf(cur->_data.first) % newTables.size();
						Node* next = cur->_next;
						//头插
						cur->_next = newTables[index];
						newTables[index] = cur;
						cur = next;
					}
					_tables[i] = nullptr;
				}
				_tables.swap(newTables);
			}
			size_t index = hf(kv.first) % _tables.size();
			Node* newnode = new Node(kv);
			newnode->_next = _tables[index];
			_tables[index] = newnode;
			_n++;
			return true;
		}
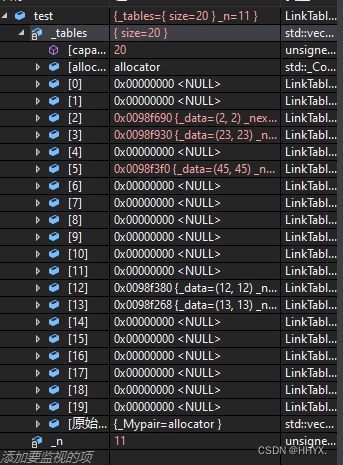
测试
最后通过一段代码来测试一下这个开散列哈希表的数据存储情况:
	void TestHash()
	{
		HashTable<int, int> test;
		int arr[] = { 2,12,22,32,42,52,62,72 ,23,13,45,55 };
		for (auto e : arr)
		{
			test.Insert(make_pair(e, e));
		}

	}


 420
420


 被折叠的 条评论
为什么被折叠?
被折叠的 条评论
为什么被折叠?
 到【灌水乐园】发言


