


3、将TextView作为子View添加到FrameLayout。
4、将FrameLayout作为RootView(根View)添加到Window里。
注意到:
wm.addView(myFrameLayout, layoutParams);
layoutParams 里重点关注宽、高字段的值,我们知道这是给Window的尺寸约束,以宽为例,设置不同的值,看看其效果:
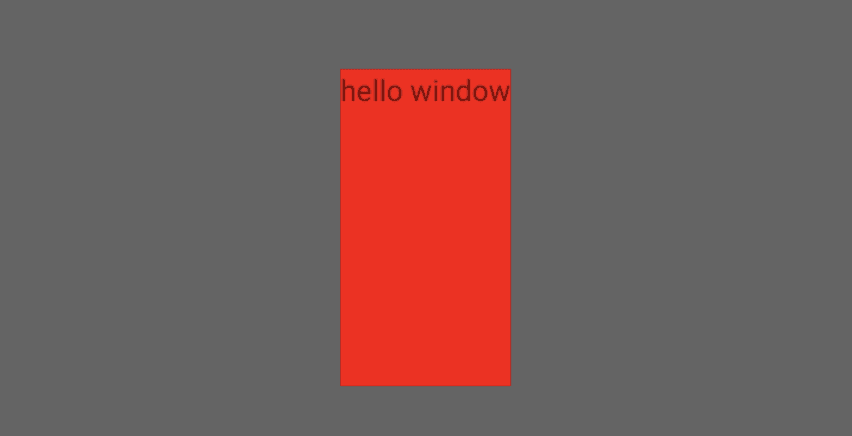
1、wrap_content
layoutParams.height = ViewGroup.LayoutParams.WRAP_CONTENT;
layoutParams.width = ViewGroup.LayoutParams.WRAP_CONTENT;
[图片上传失败…(image-f8d0f1-1616851800488)]
可以看出:RootView(FrameLayout) 包裹着TextView,两者宽度一致。
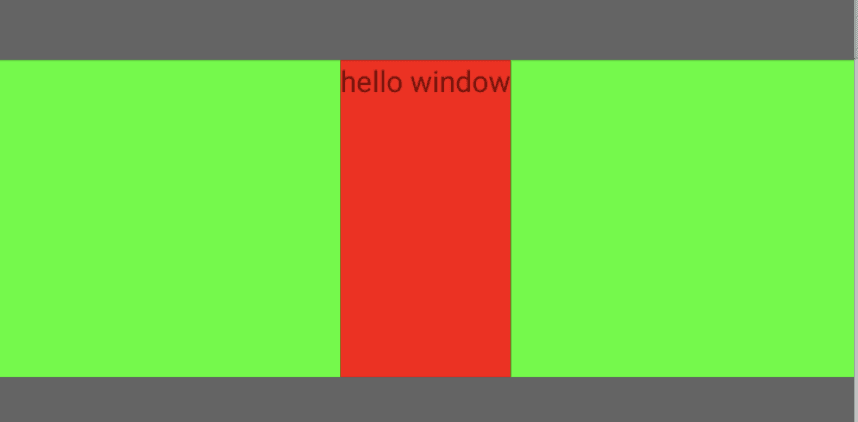
2、match_parent
layoutParams.height = ViewGroup.LayoutParams.WRAP_CONTENT;
layoutParams.width = ViewGroup.LayoutParams.MATCH_PARENT;
可以看出:RootView(FrameLayout) 宽充满屏幕。
3、设置具体的值
layoutParams.height = ViewGroup.LayoutParams.WRAP_CONTENT;
layoutParams.width = 800;
可以看出:RootView(FrameLayout) 宽没充满屏幕,屏幕宽1080px。
结合上述三张图,我们有理由相信,wm.addView(myFrameLayout, layoutParams) 里的layoutParams 是用来约束myFrameLayout(RootView),那么Window尺寸是怎么来的呢?
Window 尺寸的确定
从wm.addView(xx)开始分析,WindowManager 是个接口,其实现类是:WindowManagerImpl。
#WindowManagerImpl.java
public void addView(@NonNull View view, @NonNull ViewGroup.LayoutParams params) {
//赋值token,在启动Dialog/PopupDialog 会判断该值
applyDefaultToken(params);
//mGlobal 为单例,管理所有的ViewRootImpl、RootView
mGlobal.addView(view, params, mContext.getDisplay(), mParentWindow);
}
接着看WindowManagerGlobal 的处理:
#WindowManagerGlobal.java
public void addView(View view, ViewGroup.LayoutParams params,
Display display, Window parentWindow) {
…
final WindowManager.LayoutParams wparams = (WindowManager.LayoutParams) params;
ViewRootImpl root;
View panelParentView = null;
synchronized (mLock) {
…
//构造ViewRootImpl 对象
root = new ViewRootImpl(view.getContext(), display);
//view 作为RootView
//将传进来的wparams作为该RootView的LayoutParams
view.setLayoutParams(wparams);
//记录对象
mViews.add(view);
mRoots.add(root);
mParams.add(wparams);
try {
//ViewRootImpl 关联RootView
root.setView(view, wparams, panelParentView);
} catch (RuntimeException e) {
…
}
}
}
由上可知,在wm.addView(xx)里传递进来的LayoutParams设置给了RootView。
继续来看ViewRootImpl.setView(xx)过程。
#ViewRootImpl.java
public void setView(View view, WindowManager.LayoutParams attrs, View panelParentView) {
synchronized (this) {
if (mView == null) {
mView = view;
…
//将LayoutParams记录到成员变量 mWindowAttributes 李
//该变量用来描述Window属性
mWindowAttributes.copyFrom(attrs);
…
//开启View layout 三大流程
requestLayout();
…
try {
…
//IPC 通信,告诉WindowManagerService 要创建Window
//将mWindowAttributes 传入
//返回mTmpFrame 表示该Window可以展示的最大尺寸
res = mWindowSession.addToDisplay(mWindow, mSeq, mWindowAttributes,
getHostVisibility(), mDisplay.getDisplayId(), mTmpFrame,
mAttachInfo.mContentInsets, mAttachInfo.mStableInsets,
mAttachInfo.mOutsets, mAttachInfo.mDisplayCutout, mInputChannel,
mTempInsets);
//将返回的值记录到成员变量 mWinFrame 李
setFrame(mTmpFrame);
} catch (RemoteException e) {
…
} finally {
if (restore) {
attrs.restore();
}
}
…
}
}
}
上面这段重点关注2个方面:
1、传入的LayoutParams记录到成员变量mWindowAttributes,最后用来约束Window。
2、添加Window时返回Window的最大尺寸,最终记录在成员变量:mWinFrame里。
综上所述,我们发现:
wm.addView(myFrameLayout, layoutParams) 里的layoutParams不仅约束了RootView,也约束了Window。
=====================================================================
既然知道了RootView 的layoutParams,依据我们之前分析过的ViewTree的测量过程:Android 自定义View之Measure过程。
可知还需要为RootView生成MeasureSpec对象。
在setView(xx)过程中调用了requestLayout 注册了回调,当屏幕刷新信号到来之时执行performTraversals()开启三大流程。
#ViewRootImpl.java
private void performTraversals() {
…
//之前记录的Window LayoutParams
WindowManager.LayoutParams lp = mWindowAttributes;
//Window需要的大小
int desiredWindowWidth;
int desiredWindowHeight;
…
Rect frame = mWinFrame;
if (mFirst) {
…
if (shouldUseDisplaySize(lp)) {
…
} else {
//mWinFrame即是之前添加Window时返回的Window最大尺寸
desiredWindowWidth = mWinFrame.width();
desiredWindowHeight = mWinFrame.height();
}
…
} else {
…
}
…
if (layoutRequested) {
…
//从方法名看应该是测量ViewTree -----------(1)
windowSizeMayChange |= measureHierarchy(host, lp, res,
desiredWindowWidth, desiredWindowHeight);
}
…
if (mFirst || windowShouldResize || insetsChanged ||
viewVisibilityChanged || params != null || mForceNextWindowRelayout) {
…
try {
…
//重新确定Window尺寸 --------(2)
relayoutResult = relayoutWindow(params, viewVisibility, insetsPending);
…
} catch (RemoteException e) {
}
…
if (!mStopped || mReportNextDraw) {
…
if (focusChangedDueToTouchMode || mWidth != host.getMeasuredWidth()
|| mHeight != host.getMeasuredHeight() || contentInsetsChanged ||
updatedConfiguration) {
…
//再次测量ViewTree -------- (3)
performMeasure(childWidthMeasureSpec, childHeightMeasureSpec);
…
}
}
} else {
…
}
…
if (didLayout) {
//对ViewTree 进行Layout ---------- (4)
performLayout(lp, mWidth, mHeight);
…
}
…
if (!cancelDraw) {
…
//开始ViewTree Draw过程 ------- (5)
performDraw();
} else {
…
}
}
来看看标注的重点:
(1)measureHierarchy(xx)
#ViewRootImpl.java
private boolean measureHierarchy(final View host, final WindowManager.LayoutParams lp,
final Resources res, final int desiredWindowWidth, final int desiredWindowHeight) {
int childWidthMeasureSpec;
int childHeightMeasureSpec;
boolean windowSizeMayChange = false;
…
//标记是否测量成功
boolean goodMeasure = false;
//宽度为wrap_content时
if (lp.width == ViewGroup.LayoutParams.WRAP_CONTENT) {
final DisplayMetrics packageMetrics = res.getDisplayMetrics();
res.getValue(com.android.internal.R.dimen.config_prefDialogWidth, mTmpValue, true);
int baseSize = 0;
if (mTmpValue.type == TypedValue.TYPE_DIMENSION) {
baseSize = (int)mTmpValue.getDimension(packageMetrics);
}
//baseSize 为预置的宽度
//desiredWindowWidth 想要的宽度是否大于预置宽度
if (baseSize != 0 && desiredWindowWidth > baseSize) {
//以baseSize 作为宽度传入
childWidthMeasureSpec = getRootMeasureSpec(baseSize, lp.width);
childHeightMeasureSpec = getRootMeasureSpec(desiredWindowHeight, lp.height);
//测量----------------- 第一次
performMeasure(childWidthMeasureSpec, childHeightMeasureSpec);
//如果ViewTree的子布局需要的宽度大于父布局能给的宽度,则该标记被设置
if ((host.getMeasuredWidthAndState()&View.MEASURED_STATE_TOO_SMALL) == 0) {
//该标记没被设置,说明父布局给的尺寸够用,测量完成
goodMeasure = true;
} else {
//父布局不能满足子布局的需求,尝试扩大宽度
//desiredWindowWidth > baseSize,因此新计算的baseSize要大于原先的baseSize
baseSize = (baseSize+desiredWindowWidth)/2;
childWidthMeasureSpec = getRootMeasureSpec(baseSize, lp.width);
//拿到后继续测量----------------- 第二次
performMeasure(childWidthMeasureSpec, childHeightMeasureSpec);
//继续检测是否满足
if ((host.getMeasuredWidthAndState()&View.MEASURED_STATE_TOO_SMALL) == 0) {
goodMeasure = true;
}
}
}
}
//没测量好,继续测量
if (!goodMeasure) {
//可以看出是为RootView 生成MeasureSpec
//传入的参数:能给RootView分配的最大尺寸值以及RootView本身想要的尺寸(记录在LayoutParams里)
childWidthMeasureSpec = getRootMeasureSpec(desiredWindowWidth, lp.width);
childHeightMeasureSpec = getRootMeasureSpec(desiredWindowHeight, lp.height);
//既然MeasureSpec 有了,那么就可以测量RootView了
//该过程就是测量整个ViewTree----------------- 第三次
performMeasure(childWidthMeasureSpec, childHeightMeasureSpec);
if (mWidth != host.getMeasuredWidth() || mHeight != host.getMeasuredHeight()) {
//Window尺寸变化了,用于后续判断执行performMeasure(xx)
windowSizeMayChange = true;
}
}
…
return windowSizeMayChange;
}
private static int getRootMeasureSpec(int windowSize, int rootDimension) {
int measureSpec;
switch (rootDimension) {
case ViewGroup.LayoutParams.MATCH_PARENT:
//RootView 希望填充Window,则满足它,此时它尺寸是确切值
measureSpec = MeasureSpec.makeMeasureSpec(windowSize, MeasureSpec.EXACTLY);
break;
case ViewGroup.LayoutParams.WRAP_CONTENT:
//RootView 希望根据自身内容来确定尺寸,则设置为AT_MOST 模式
measureSpec = MeasureSpec.makeMeasureSpec(windowSize, MeasureSpec.AT_MOST);
break;
default:
//RootView 希望直接指定尺寸值,则满足它,此时它尺寸是确切值
measureSpec = MeasureSpec.makeMeasureSpec(rootDimension, MeasureSpec.EXACTLY);
break;
}
return measureSpec;
}
以上代码主要做了两件事:
1、结合Window尺寸,确定RootView 的测量模式和预估测量值(MeasureSpec)。
2、根据第一步的结果,发起对ViewTree的测量(从RootView开始)。
(2)经过对ViewTree的测量后,RootView的测量值已经确定了。
来看看relayoutWindow(xx):
#ViewRootImpl.java
private int relayoutWindow(WindowManager.LayoutParams params, int viewVisibility,
boolean insetsPending) throws RemoteException {
…
//重新设置Window大小
//传入的尺寸值为RootView的尺寸值
//返回Window尺寸值存放在 mTmpFrame里
int relayoutResult = mWindowSession.relayout(mWindow, mSeq, params,
(int) (mView.getMeasuredWidth() * appScale + 0.5f),
(int) (mView.getMeasuredHeight() * appScale + 0.5f), viewVisibility,
insetsPending ? WindowManagerGlobal.RELAYOUT_INSETS_PENDING : 0, frameNumber,
mTmpFrame, mPendingOverscanInsets, mPendingContentInsets, mPendingVisibleInsets,
mPendingStableInsets, mPendingOutsets, mPendingBackDropFrame, mPendingDisplayCutout,
mPendingMergedConfiguration, mSurfaceControl, mTempInsets);
//关联Window和surface
if (mSurfaceControl.isValid()) {
mSurface.copyFrom(mSurfaceControl);
} else {
destroySurface();
}
//记录Window 尺寸
setFrame(mTmpFrame);
return relayoutResult;
}
我们发现:
Window的尺寸是依赖于RootView的测量尺寸,并且一般来说appScale=1,也就是说Window尺寸就是RootView的尺寸。
此处也即是解释了之前的Demo现象。
而(1)步骤的测量ViewTree是为了确定RootView的尺寸从而在此步骤确定Window尺寸。
这里分析经典问题:onMeasure() 为什么会执行多次?
这三部分即是我们熟知的View 的三大过程,此外值得注意的是:
步骤(1):
在(1)步骤里的measureHierarchy(xx),我们标注了三次测量。
1、第一次:先用预置宽度测量ViewTree,得到测量结果。
最后
自我介绍一下,小编13年上海交大毕业,曾经在小公司待过,也去过华为、OPPO等大厂,18年进入阿里一直到现在。
深知大多数初中级Android工程师,想要提升技能,往往是自己摸索成长,自己不成体系的自学效果低效漫长且无助。
因此我收集整理了一份《2024年Android移动开发全套学习资料》,初衷也很简单,就是希望能够帮助到想自学提升又不知道该从何学起的朋友,同时减轻大家的负担。


既有适合小白学习的零基础资料,也有适合3年以上经验的小伙伴深入学习提升的进阶课程,基本涵盖了95%以上Android开发知识点!不论你是刚入门Android开发的新手,还是希望在技术上不断提升的资深开发者,这些资料都将为你打开新的学习之门
如果你觉得这些内容对你有帮助,需要这份全套学习资料的朋友可以戳我获取!!
由于文件比较大,这里只是将部分目录截图出来,每个节点里面都包含大厂面经、学习笔记、源码讲义、实战项目、讲解视频,并且会持续更新!
们熟知的View 的三大过程,此外值得注意的是:
步骤(1):
在(1)步骤里的measureHierarchy(xx),我们标注了三次测量。
1、第一次:先用预置宽度测量ViewTree,得到测量结果。
最后
自我介绍一下,小编13年上海交大毕业,曾经在小公司待过,也去过华为、OPPO等大厂,18年进入阿里一直到现在。
深知大多数初中级Android工程师,想要提升技能,往往是自己摸索成长,自己不成体系的自学效果低效漫长且无助。
因此我收集整理了一份《2024年Android移动开发全套学习资料》,初衷也很简单,就是希望能够帮助到想自学提升又不知道该从何学起的朋友,同时减轻大家的负担。
[外链图片转存中…(img-Ez8wmjNr-1715714010267)]
[外链图片转存中…(img-qzaPmES2-1715714010268)]
[外链图片转存中…(img-f2je7WQ3-1715714010269)]
[外链图片转存中…(img-A4IyfXPz-1715714010270)]
既有适合小白学习的零基础资料,也有适合3年以上经验的小伙伴深入学习提升的进阶课程,基本涵盖了95%以上Android开发知识点!不论你是刚入门Android开发的新手,还是希望在技术上不断提升的资深开发者,这些资料都将为你打开新的学习之门
如果你觉得这些内容对你有帮助,需要这份全套学习资料的朋友可以戳我获取!!
由于文件比较大,这里只是将部分目录截图出来,每个节点里面都包含大厂面经、学习笔记、源码讲义、实战项目、讲解视频,并且会持续更新!


 670
670


 被折叠的 条评论
为什么被折叠?
被折叠的 条评论
为什么被折叠?
 到【灌水乐园】发言


