


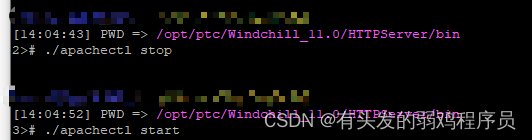
1.Windchill服务的启动
HTTPServer的停止/启动:
通过shell进入HTTPServer\bin目录,执行命令:./apachectl stop/start
WindchillDS的停止与启动:.\stop-ds/start-ds


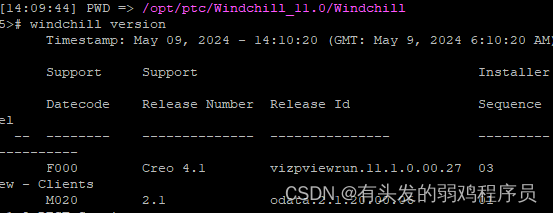
2.查看windchill版本:
windchill -version
3.properties文件新增条目:
xconfmanager -s name=value -t 目标文件 -p
用来在xconf和properties文件中增加条目,例如xconfmanager -s wt.servlet.ajp.minPort=8010 codebase/wt.properties 。
其中-s表示根据name找到value,-t表示目标文件,-p表示执行,-u表示用户名,-p表示密码。
如果要验证文件是否修改成功,可以执行命令:xconfmanager -d name,例如:xconfmanager -d wt.servlet.ajp.minPort
4.修改rbinfo文件的两种方式,这里以修改生命周期状态举例说明:
规范操作:
a 编辑WT_HOME\wtCustom\wt\lifecycle目录下的StateRB.rbInfo和StateRB_zh_CN.rbInfo文件然后保存
b 在windchill shell执行ant -f bin/tools.xmlbundle_custom -Dbundle.input=registry 或 toolsbundle_custom批量编译
c 在windchill shell执行ant -fcodebase\MakeJar.xml
d 在windchill shell 执行enumCustomize,查看是否客制化成功!
不规范操作:
a 编辑WT_HOME\src\wt\lifecycle目录下的StateRB.rbInfo和StateRB_zh_CN.rbInfo文件然后保存
b 在windchill shell执行resourcebuild wt.lifecycle.StateRB
c 在windchill shell执行ant -fcodebase\MakeJar.xml (文件是枚举类型的时候必须执行此命令,文件是不是枚举类型,可以看文件中是否存在此行:ResourceInfo.class=wt.tools.resource.EnumResourceInfo)
d 在windchill shell 执行enumCustomize,查看是否客制化成功!
5.添加客制化的xconf文件
在windchill shell中执行命令xconfmanager - i <ConfigurationRef xlink:href="codebase/config/xconf/custom.xconf" /> -p,命令执行成功后会在site.xconf和WT_HOME\declarations.xconf中增加相应条目,同时会在codebase/config/xconf目录下生成custom.properties文件。
6.Filter注册
指定文件注册:xconfmanager -i codebase/config/xconf/customize_additions.xconf -p
全局注册:xconfmanager -p
7.字段扩展
在wtCustom\wt\part\partModel.properties文件中 添加:WTPartMaster.name.UpperLimit=120 WTPartMaster.number.UpperLimit=120
windchill shell 中执行命令:ant -f bin\tools.xml custom_column -Dgen.input=wt.part.*
8.开启临时日志
windchill wt.util.jmx.SetLogLevel -ms 类名/包名 日志级别(INFO/ALL/DEBUG...)
9.开启SQL日志
windchill wt.util.jmx.SetLogLevel -ms wt.pom.sql DEBUG


 845
845


 被折叠的 条评论
为什么被折叠?
被折叠的 条评论
为什么被折叠?
 到【灌水乐园】发言


