- 使用的环境:
- Python 3.8
- Pycharm(IDE)
- Paddle和PaddleOcr(实现图像识别)
- CV2实现摄像头抓取与分割成帧,以及最后的显示效果
- PIL实现TEXT提示的覆盖显示
- Process与pickle实现数据的序列化与进程间数据传输
- 使用IP摄像头通过RTSP协议调用手机摄像头
- 环境配置与项目中出现问题参考网站
paddle与paddleOcr:PaddlePaddleOCR安装教程 - MARS_SZ - 博客园
RTSP与IP摄像头:
使用手机摄像头做网络ip摄像头 并用opencv获取rtsp视频流_xiaoqiang_007_的博客-CSDN博客
numpy和pickle对numpyArray和List的序列化与反序列化:
pickle:python使用pickle序列化和反序列化_文鑫-CSDN博客
python学习笔记之-numpy数组之数组序列化存储与读取_u014543416的博客-CSDN博客_python 数组序列化
多进程:Python多进程编程 - jihite - 博客园 (注:多进程必须再main函数里跑)
绘制矩阵:opencv-Python旋转矩形框裁减_大丈夫-CSDN博客
- 思路
利用cv2实现摄像头抓取并分割成帧
利用RTSP协议获取手机摄像头
利用Paddle自带的训练模型进行OCR识别
利用PIL将帧图片转成PIL形式再贴上文字,并转回numpyArray
利用进程进行同时抓取与信息处理
利用cv2实现框选文字
使用pickle和numpy自带方法实现序列化与反序列化并进行进程间信息共享
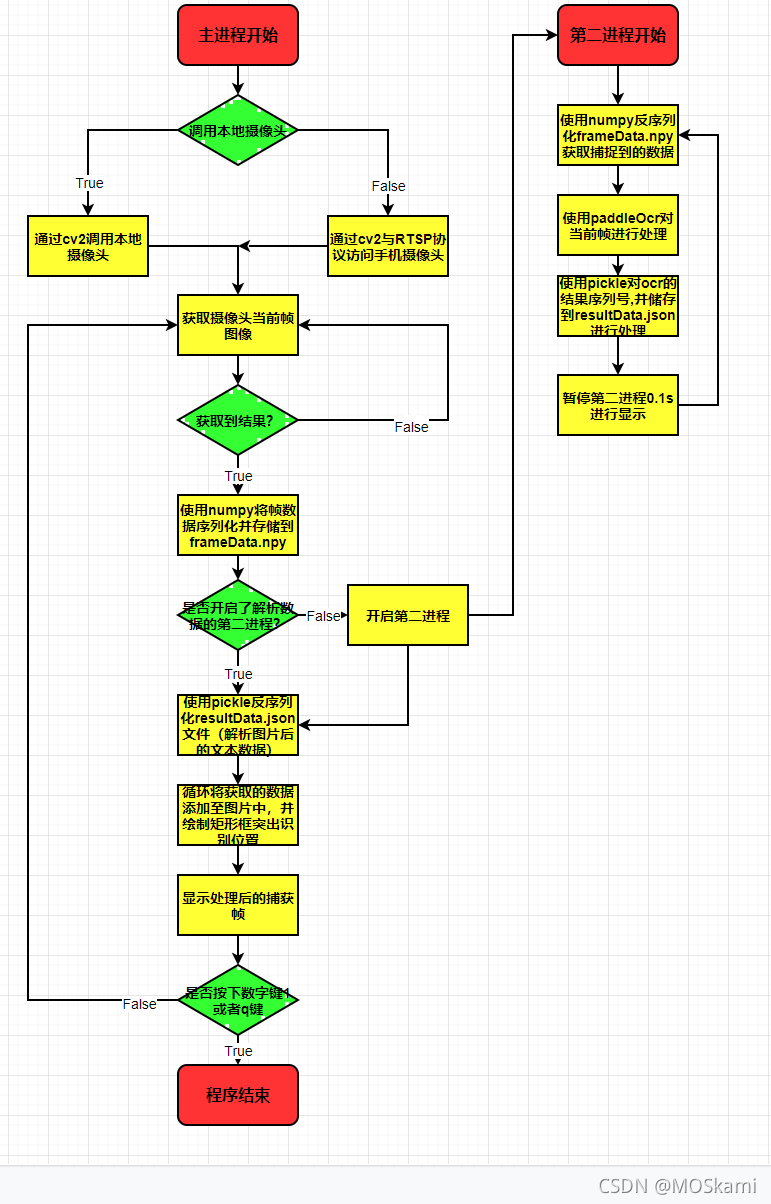
- 项目程序框图:

- 实现代码:
import time
from multiprocessing import Process,Queue
from paddleocr import PaddleOCR, draw_ocr
import cv2
import pickle
from PIL import Image, ImageDraw, ImageFont, ImageOps
# import _thread
import numpy
# import msgpack
# from threading import Timer
# 模型路径下必须含有model和params文件
ocr = PaddleOCR(use_angle_cls=True,
                use_gpu=False)  # det_model_dir='{your_det_model_dir}', rec_model_dir='{your_rec_model_dir}', rec_char_dict_path='{your_rec_char_dict_path}', cls_model_dir='{your_cls_model_dir}', use_angle_cls=True
img_path = 'result.jpg'
global result
global frame
def getImformation(name):
    # global frame,result
    while(True):
        try:
            # print("iq:",iq.empty())
            # if bool(1-iq.empty()):
            # Timer(2,getImformation,["thread1",iq,oq,]).start()
            frame = numpy.load('frameData.npy')
            # result = []
            result = ocr.ocr(frame, cls=True)
            # print(type(result))
            pickle.dump(result,open('resultData.json','wb'))
            time.sleep(0.8)
        except:
            # i = 1
            time.sleep(0.8)
    # except:
# global bS
# def stopProcess(name,pid):
#     if bS:


def showImage():
    # cam_url = 'rtsp://admin:admin@10.112.19.111:8554/live'
    # cap = cv2.VideoCapture(cam_url)
    cap = cv2.VideoCapture(0)
    # global frame,result
    # iq = Queue()
    # oq = Queue()
    result = []
    bl = True
    # bS = True
    p = Process(target=getImformation, args=("Process1",))
    p.start()
    while (True):
        # get a frame
        ret, frame = cap.read()
        # show a frame
        if ret:
            # f = open('frameData.json','wb')
            numpy.save('frameData',frame)
            # if bl:
            #     bl = False
                # t = Timer(1,showImformation, ("thread1",)).start()
                # _thread.start_new_thread(showImformation, ("thread1",))
                # t = Timer(1,stopProcess, ("Timer1",pid,)).start()
            # iq.put(frame)
            # result = []
            # print("oq:",oq.empty())
            # if bool(1-oq.empty()):
            #     result = oq.get()
            with open('resultData.json', 'rb') as f:
                try:
                    result = pickle.load(f)
                except:
                    result = []
            for line in result:
                draw_rectangle(frame,line)
                # cv2.rectangle(frame, (int(line[0][0][0]-2), int(line[0][0][1]-2)), (int(line[0][2][0]+2), int(line[0][2][1]+2)),
                #               (0, 255, 0), 3)
                frame = cv2ImgAddText(frame, line[1][0], int(line[0][0][0]+2), int(line[0][0][1]+2), (255, 0 , 0), 20)
            cv2.imshow("capture", frame)
            if cv2.waitKey(1) & 0xFF == ord('q'):
                break

def draw_rectangle(frame,pos):
    cv2.line(frame, (int(pos[0][0][0]), int(pos[0][0][1])), (int(pos[0][1][0]), int(pos[0][1][1])), (0, 255, 0), 1, 4)
    cv2.line(frame, (int(pos[0][1][0]), int(pos[0][1][1])), (int(pos[0][2][0]), int(pos[0][2][1])), (0, 255, 0), 1, 4)
    cv2.line(frame, (int(pos[0][2][0]), int(pos[0][2][1])), (int(pos[0][3][0]), int(pos[0][3][1])), (0, 255, 0), 1, 4)
    cv2.line(frame, (int(pos[0][3][0]), int(pos[0][3][1])), (int(pos[0][0][0]), int(pos[0][0][1])), (0, 255, 0), 1, 4)


def cv2ImgAddText(img, text, left, top,textColor, textSize):
    if (isinstance(img, numpy.ndarray)):  # 判断是否OpenCV图片类型
        img = Image.fromarray(cv2.cvtColor(img, cv2.COLOR_BGR2RGB))
    # 创建一个可以在给定图像上绘图的对象
    # fontStyle = ImageFont.truetype(
    #     "font/simsun.ttc", textSize, encoding="utf-8")
    # txt = Image.new('L', (100, 100))
    # d = ImageDraw.Draw(txt)
    # d.text((0, 0), text, font=fontStyle, fill=255)
    # w = txt.rotate(17.5, expand=1)
    # img.paste(ImageOps.colorize(w, (0,0,0), (255,255,255)), (left, top),  w)
    draw = ImageDraw.Draw(img)
    # 字体的格式
    fontStyle = ImageFont.truetype(
        "font/simsun.ttc", textSize, encoding="utf-8")
    # 绘制文本
    draw.text((left, top), text, textColor, font=fontStyle)
    # 转换回OpenCV格式
    return cv2.cvtColor(numpy.asarray(img), cv2.COLOR_RGB2BGR)
if __name__ == "__main__":
    showImage()
# 显示结果
# from PIL import Image
#
# image = Image.open(img_path).convert('RGB')
# boxes = [line[0] for line in result]
# txts = [line[1][0] for line in result]
# scores = [line[1][1] for line in result]
# im_show = draw_ocr(image, boxes, txts, scores, font_path='D:/paddle_pp/PaddleOCR/doc/simfang.ttf')
# im_show = Image.fromarray(im_show)
# im_show.save('result.jpg')  # 结果图片保存在代码同级文件夹中。
- 实现结果:


 1419
1419


 被折叠的 条评论
为什么被折叠?


