


idea搭建ssm框架(spring+springmvc+mybatis):
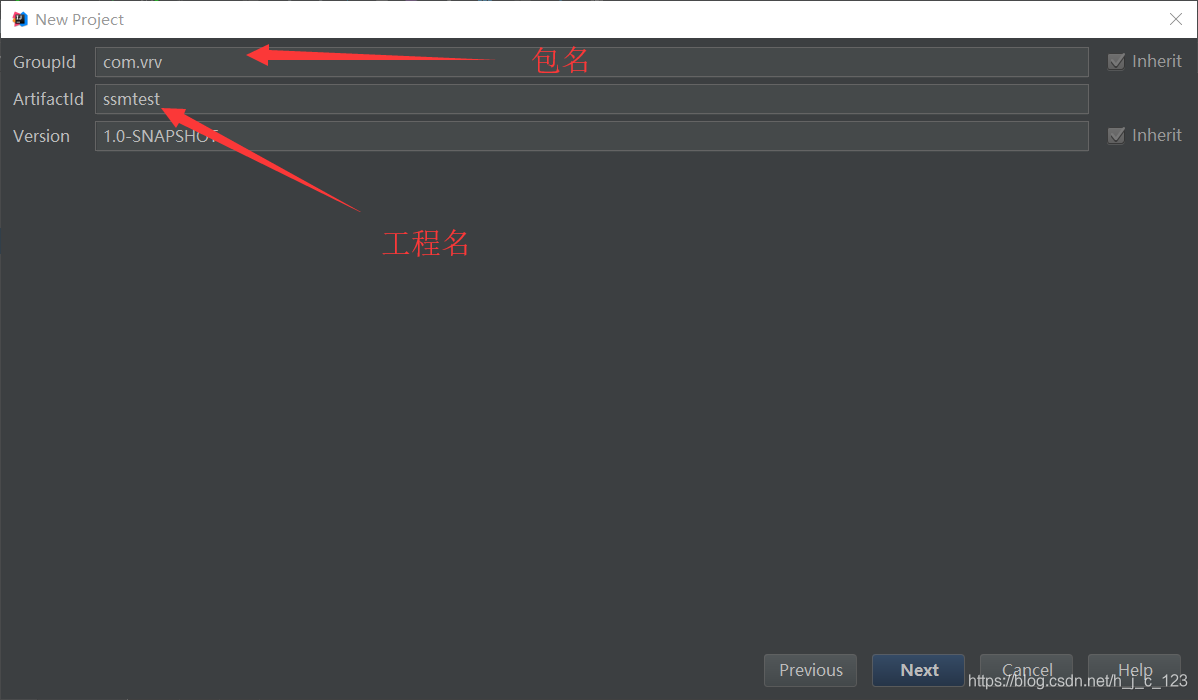
先创建一个maven工程:

next
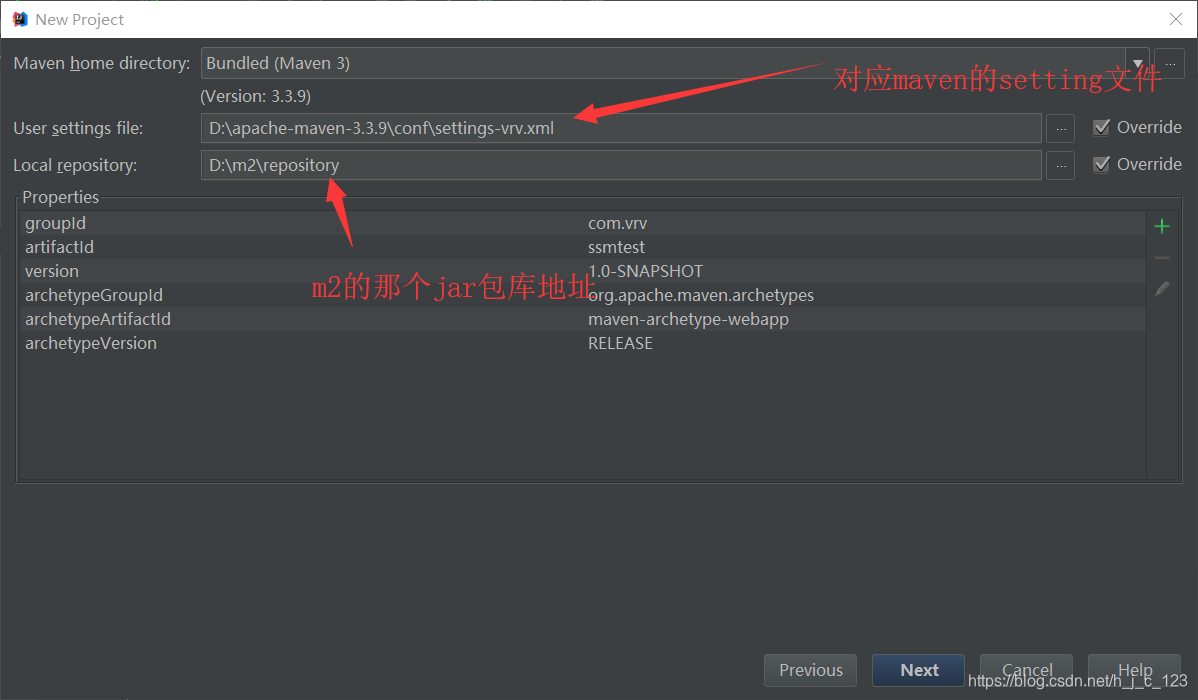
next
next
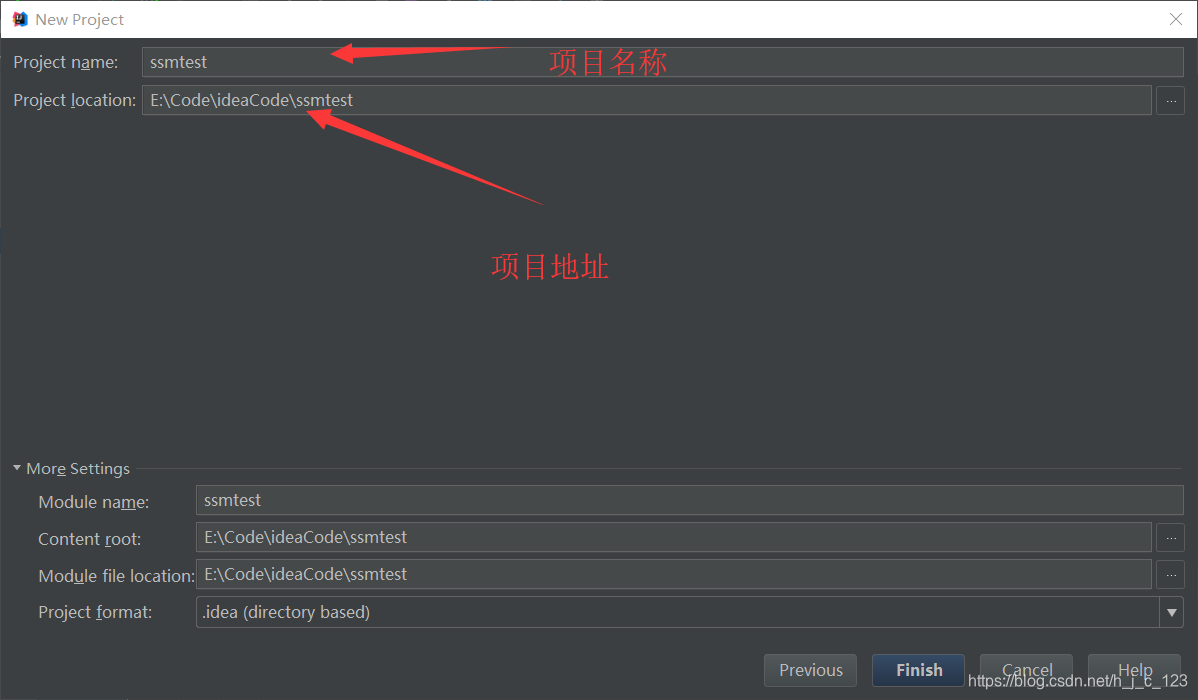
到这里项目创建完成。
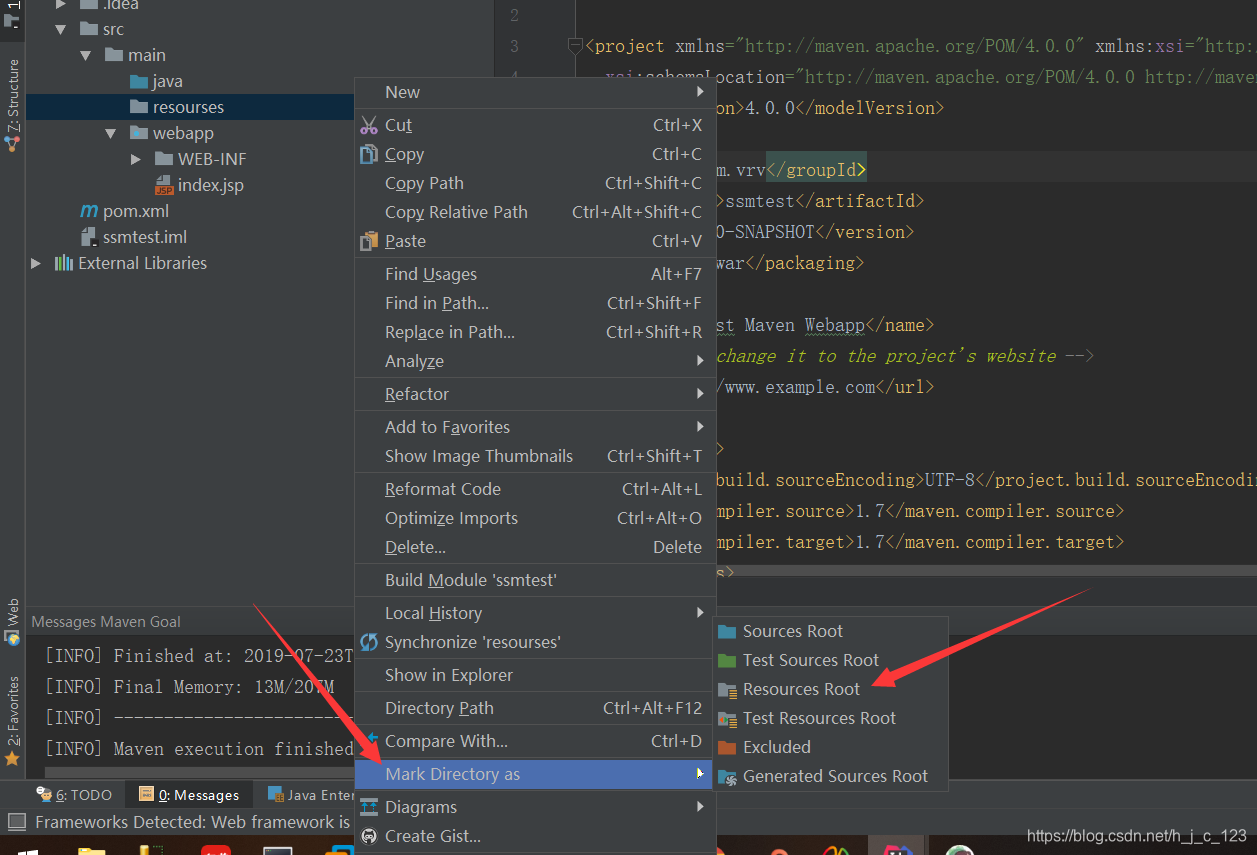
下面我们来创建文件夹:
在main下new 一个directory名为java和resourses
选择java点击右键

选择resourses单击右键
创建具体的包,在java下:
包建好之后就来集成spring的一些基础的包
<!--spring相关-->
<!-- https://mvnrepository.com/artifact/org.springframework/spring-context -->
<dependency>
    <groupId>org.springframework</groupId>
    <artifactId>spring-context</artifactId>
    <version>4.3.18.RELEASE</version>
</dependency>

<!-- https://mvnrepository.com/artifact/org.springframework/spring-core -->
<dependency>
    <groupId>org.springframework</groupId>
    <artifactId>spring-core</artifactId>
    <version>4.3.18.RELEASE</version>
</dependency>

<!-- https://mvnrepository.com/artifact/org.springframework/spring-beans -->
<dependency>
    <groupId>org.springframework</groupId>
    <artifactId>spring-beans</artifactId>
    <version>4.3.18.RELEASE</version>
</dependency>

<!-- https://mvnrepository.com/artifact/org.springframework/spring-web -->
<dependency>
    <groupId>org.springframework</groupId>
    <artifactId>spring-web</artifactId>
    <version>4.3.18.RELEASE</version>
</dependency>

<!-- https://mvnrepository.com/artifact/org.springframework/spring-webmvc -->
<dependency>
    <groupId>org.springframework</groupId>
    <artifactId>spring-webmvc</artifactId>
    <version>4.3.18.RELEASE</version>
</dependency>
然后需要用到数据库就需要有mysql和mybatis的jar包:
<!--mybatis-->
<!-- https://mvnrepository.com/artifact/org.mybatis/mybatis -->
<dependency>
    <groupId>org.mybatis</groupId>
    <artifactId>mybatis</artifactId>
    <version>3.4.6</version>
</dependency>

<!-- https://mvnrepository.com/artifact/mysql/mysql-connector-java -->
<dependency>
<groupId>mysql</groupId>
<artifactId>mysql-connector-java</artifactId>
<version>5.1.38</version>
</dependency>
<!--数据库事务管理-->
<!-- https://mvnrepository.com/artifact/org.springframework/spring-jdbc -->
<dependency>
    <groupId>org.springframework</groupId>
    <artifactId>spring-jdbc</artifactId>
    <version>4.3.18.RELEASE</version>
</dependency>

<!-- https://mvnrepository.com/artifact/org.springframework/spring-tx -->
<dependency>
    <groupId>org.springframework</groupId>
    <artifactId>spring-tx</artifactId>
    <version>4.3.18.RELEASE</version>
</dependency>
mybatis需要和spring整合,所以我们需要一个整合的包
<!-- https://mvnrepository.com/artifact/org.mybatis/mybatis-spring -->
<dependency>
    <groupId>org.mybatis</groupId>
    <artifactId>mybatis-spring</artifactId>
    <version>1.3.2</version>
</dependency>
然后这里我们采用的是传统的jsp视图,然后我们在家几个包:
<!--jsp-->
<!-- https://mvnrepository.com/artifact/javax.servlet/jstl -->
<dependency>
    <groupId>javax.servlet</groupId>
    <artifactId>jstl</artifactId>
    <version>1.2</version>
</dependency>

<!-- https://mvnrepository.com/artifact/javax.servlet/javax.servlet-api -->
<dependency>
    <groupId>javax.servlet</groupId>
    <artifactId>javax.servlet-api</artifactId>
    <version>3.1.0</version>
    <scope>provided</scope>
</dependency>
在使用数据库中我们会使用数据库连接池再加一个包:
<!-- 导入dbcp的jar包,用来在applicationContext.xml中配置数据库 -->
<!-- https://mvnrepository.com/artifact/org.apache.commons/commons-dbcp2 -->
<!-- https://mvnrepository.com/artifact/commons-dbcp/commons-dbcp -->
<dependency>
    <groupId>commons-dbcp</groupId>
    <artifactId>commons-dbcp</artifactId>
    <version>1.4</version>
</dependency>
因为需要解析json数据我们需要阿里巴巴的json包
<!-- https://mvnrepository.com/artifact/com.alibaba/fastjson -->
<dependency>
<groupId>com.alibaba</groupId>
<artifactId>fastjson</artifactId>
<version>1.2.47</version>
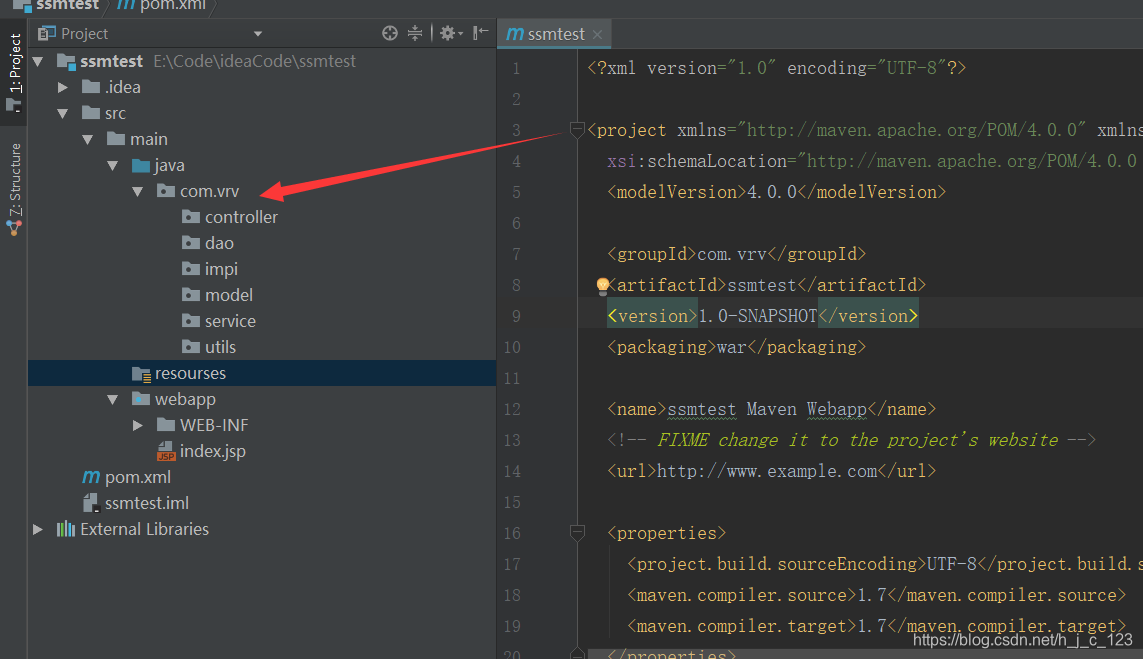
</dependency>到这里我们基本的包已经引进完毕了,然后我们来写springmvc的配置在resources下新建一个包叫spring,然后新建springmvc的配置文件,叫spring-mvc.xml

内容如下:
<?xml version="1.0" encoding="UTF-8"?>
<beans xmlns="http://www.springframework.org/schema/beans"
       xmlns:xsi="http://www.w3.org/2001/XMLSchema-instance"
       xmlns:aop="http://www.springframework.org/schema/aop"
       xmlns:c="http://www.springframework.org/schema/c"
       xmlns:cache="http://www.springframework.org/schema/cache"
       xmlns:context="http://www.springframework.org/schema/context"
       xmlns:jee="http://www.springframework.org/schema/jee"
       xmlns:lang="http://www.springframework.org/schema/lang"
       xmlns:mvc="http://www.springframework.org/schema/mvc"
       xmlns:p="http://www.springframework.org/schema/p"
       xmlns:task="http://www.springframework.org/schema/task"
       xmlns:util="http://www.springframework.org/schema/util"
       xsi:schemaLocation="http://www.springframework.org/schema/beans http://www.springframework.org/schema/beans/spring-beans.xsd
      http://www.springframework.org/schema/aop http://www.springframework.org/schema/aop/spring-aop-4.3.xsd
      http://www.springframework.org/schema/cache http://www.springframework.org/schema/cache/spring-cache-4.3.xsd
      http://www.springframework.org/schema/context http://www.springframework.org/schema/context/spring-context-4.3.xsd
      http://www.springframework.org/schema/jee http://www.springframework.org/schema/jee/spring-jee-4.3.xsd
      http://www.springframework.org/schema/lang http://www.springframework.org/schema/lang/spring-lang-4.3.xsd
      http://www.springframework.org/schema/mvc http://www.springframework.org/schema/mvc/spring-mvc-4.3.xsd
      http://www.springframework.org/schema/task http://www.springframework.org/schema/task/spring-task-4.3.xsd
      http://www.springframework.org/schema/util http://www.springframework.org/schema/util/spring-util-4.3.xsd">

    <!--使用注解驱动-->
    <mvc:annotation-driven/>

    <!--配置视图解析器-->
    <bean class="org.springframework.web.servlet.view.InternalResourceViewResolver">
        <!--重定向时,是否加上上下文路径-->
        <property name="redirectContextRelative" value="true"/>
        <!--配置解析前后缀-->
        <property name="prefix" value="/WEB-INF/views/"/>
        <property name="suffix" value=".jsp"/>
    </bean>

    <!--扫描所有handler(控制器)-->
    <context:component-scan base-package="com.hjc.handler"/>
</beans>

在web-inf目录下创建view文件夹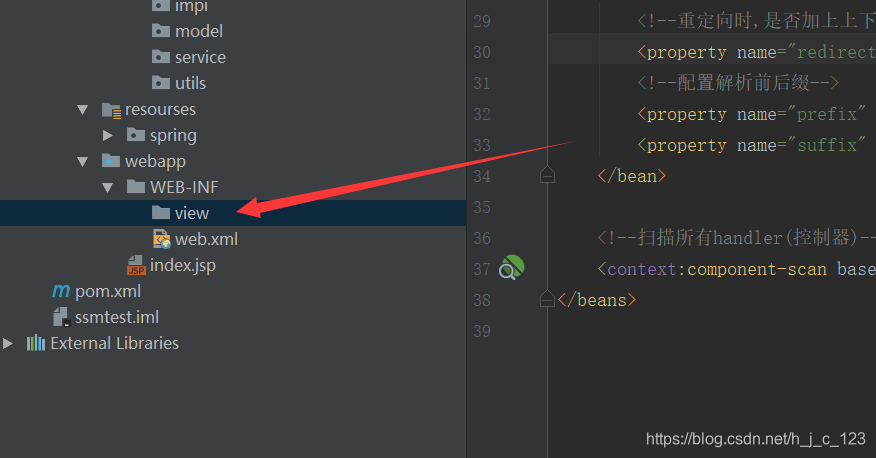
在下面创建一个login.jsp

然后需要在新建一个spring-maybis整合的配置文件spring-maybis.xml,还在spring目录下
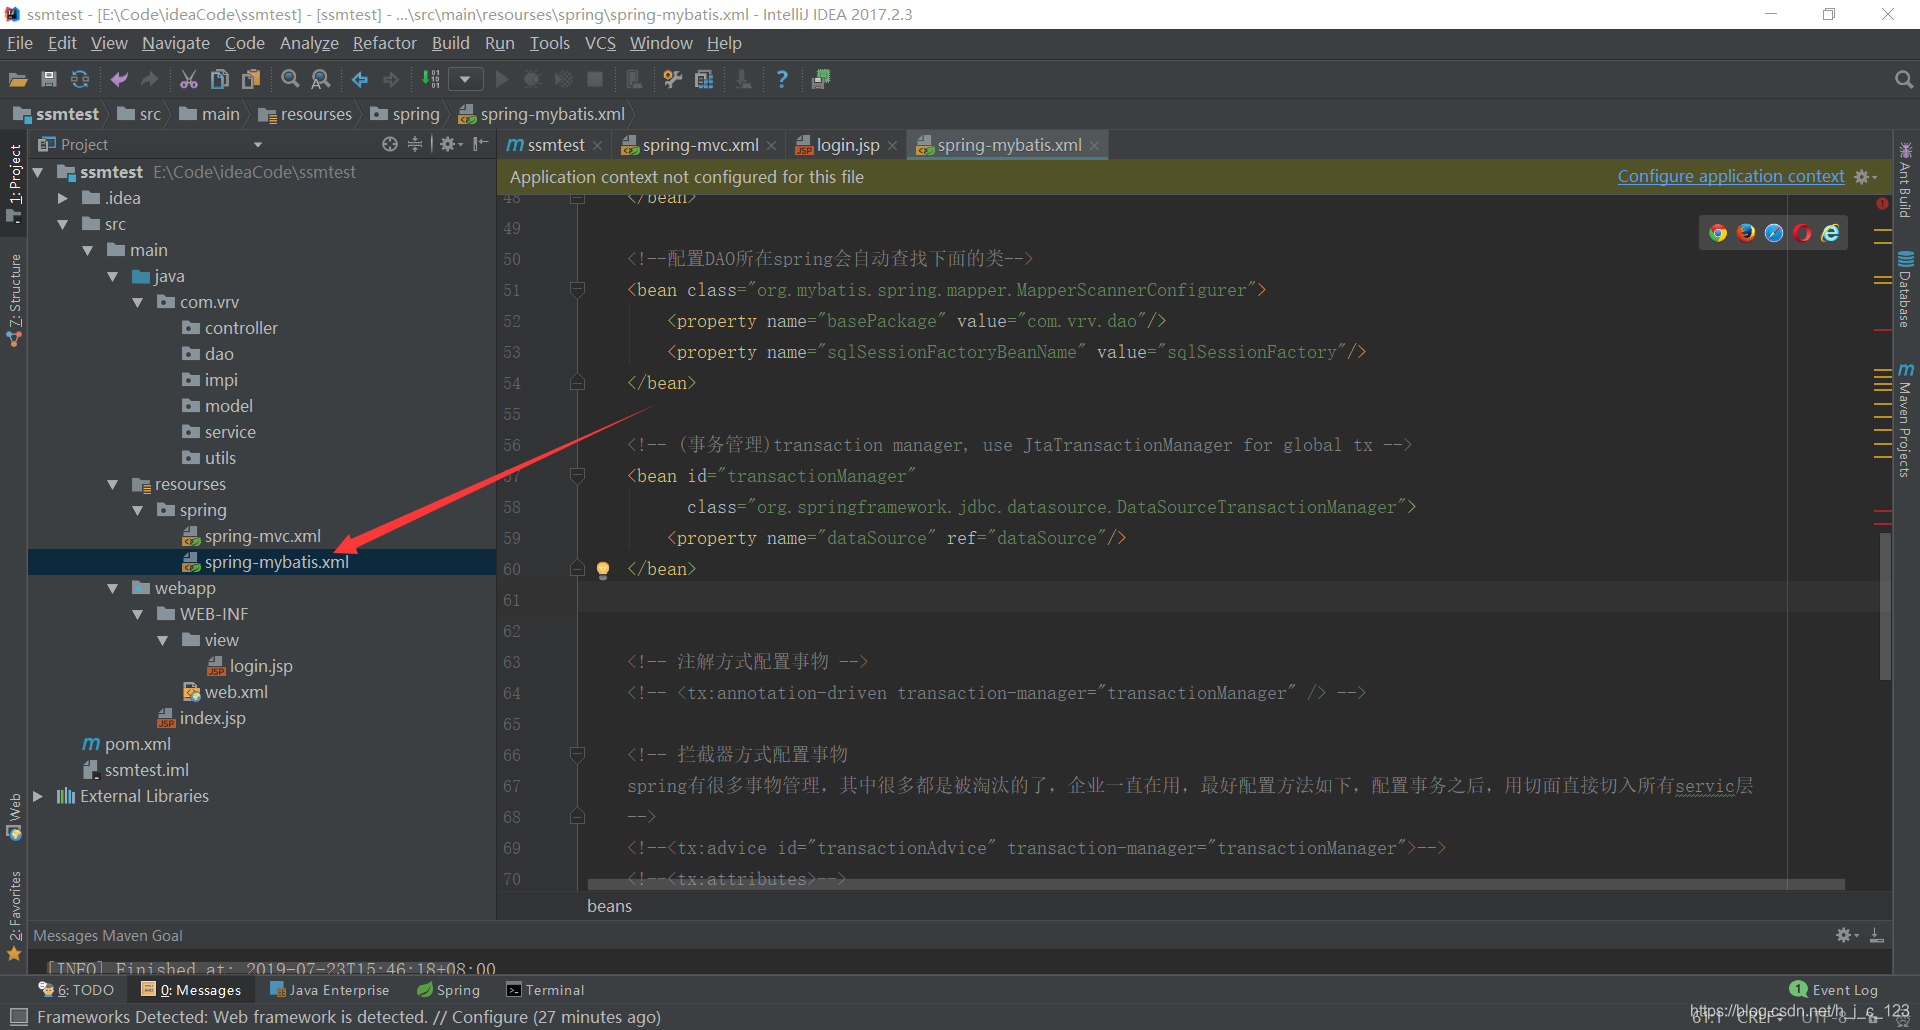
文件内容如下:
<?xml version="1.0" encoding="UTF-8"?>
<beans xmlns="http://www.springframework.org/schema/beans"
       xmlns:xsi="http://www.w3.org/2001/XMLSchema-instance" xmlns:p="http://www.springframework.org/schema/p"
       xmlns:context="http://www.springframework.org/schema/context"
       xmlns:mvc="http://www.springframework.org/schema/mvc"
       xsi:schemaLocation="http://www.springframework.org/schema/beans
                        http://www.springframework.org/schema/beans/spring-beans-4.0.xsd
                        http://www.springframework.org/schema/context
                        http://www.springframework.org/schema/context/spring-context-4.0.xsd
                        http://www.springframework.org/schema/mvc
                        http://www.springframework.org/schema/mvc/spring-mvc-4.0.xsd">

    <!--自动扫描-->
    <context:component-scan base-package="com.vrv"/>

    <!--引入properties文件-->
    <bean id="placeholderConfigurer" class="org.springframework.beans.factory.config.PropertyPlaceholderConfigurer">
        <property name="location" value="classpath:jdbc.properties"></property>
    </bean>

    <!--配置数据源-->
    <bean id="dataSource" class="org.apache.commons.dbcp.BasicDataSource">
        <!--数据库连接池-->
        <property name="driverClassName" value="${driver}"/>
        <property name="url" value="${url}"/>
        <property name="username" value="${username}"/>
        <property name="password" value="${password}"/>
        <!-- 初始化连接大小 -->
        <property name="initialSize" value="${initialSize}"></property>
        <!-- 连接池最大数量 -->
        <property name="maxActive" value="${maxActive}"></property>
        <!-- 连接池最大空闲 -->
        <property name="maxIdle" value="${maxIdle}"></property>
        <!-- 连接池最小空闲 -->
        <property name="minIdle" value="${minIdle}"></property>
        <!-- 获取连接最大等待时间 -->
        <property name="maxWait" value="${maxWait}"></property>
    </bean>

    <!--配置sqlsession工厂-->
    <!-- spring和MyBatis完美整合,不需要mybatis的配置映射文件 -->
    <bean id="sqlSessionFactory" class="org.mybatis.spring.SqlSessionFactoryBean">
        <property name="dataSource" ref="dataSource"/>
        <!-- 自动扫描mapping.xml文件 -->
        <property name="mapperLocations" value="classpath:mapper/*.xml"/>
    </bean>

    <!--配置DAO所在spring会自动查找下面的类-->
    <bean class="org.mybatis.spring.mapper.MapperScannerConfigurer">
        <property name="basePackage" value="com.vrv.dao"/>
        <property name="sqlSessionFactoryBeanName" value="sqlSessionFactory"/>
    </bean>

    <!-- (事务管理)transaction manager, use JtaTransactionManager for global tx -->
    <bean id="transactionManager"
          class="org.springframework.jdbc.datasource.DataSourceTransactionManager">
        <property name="dataSource" ref="dataSource"/>
    </bean>


    <!-- 注解方式配置事物 -->
    <!-- <tx:annotation-driven transaction-manager="transactionManager" /> -->

    <!-- 拦截器方式配置事物
    spring有很多事物管理,其中很多都是被淘汰的了,企业一直在用,最好配置方法如下,配置事务之后,用切面直接切入所有servic层
    -->
    <!--<tx:advice id="transactionAdvice" transaction-manager="transactionManager">-->
    <!--<tx:attributes>-->
    <!--<tx:method name="add*" propagation="REQUIRED" />-->
    <!--<tx:method name="append*" propagation="REQUIRED" />-->
    <!--<tx:method name="insert*" propagation="REQUIRED" />-->
    <!--<tx:method name="save*" propagation="REQUIRED" />-->
    <!--<tx:method name="update*" propagation="REQUIRED" />-->
    <!--<tx:method name="modify*" propagation="REQUIRED" />-->
    <!--<tx:method name="edit*" propagation="REQUIRED" />-->
    <!--<tx:method name="delete*" propagation="REQUIRED" />-->
    <!--<tx:method name="remove*" propagation="REQUIRED" />-->
    <!--<tx:method name="repair" propagation="REQUIRED" />-->
    <!--<tx:method name="delAndRepair" propagation="REQUIRED" />-->

    <!--<tx:method name="get*" propagation="SUPPORTS" />-->
    <!--<tx:method name="find*" propagation="SUPPORTS" />-->
    <!--<tx:method name="load*" propagation="SUPPORTS" />-->
    <!--<tx:method name="search*" propagation="SUPPORTS" />-->
    <!--<tx:method name="datagrid*" propagation="SUPPORTS" />-->

    <!--<tx:method name="*" propagation="SUPPORTS" />-->
    <!--</tx:attributes>-->
    <!--</tx:advice>-->
    <!--<aop:config>-->
    <!--<aop:pointcut id="transactionPointcut" expression="execution(* com.jsx.service..*Impl.*(..))" />-->
    <!--<aop:advisor pointcut-ref="transactionPointcut" advice-ref="transactionAdvice" />-->
    <!--</aop:config>-->
</beans>
为了更加容易的更换数据库配置我们新建一个jdbc.properties文件,在resources目录下,里面填写数据库配置:
driver=com.mysql.jdbc.Driver
#driver=com.mysql.cj.jdbc.Driver
#mytest为我本地的数据库名
url=jdbc:mysql://localhost:3306/teaching_manage
#url=jdbc:mysql://192.168.220.139:3306/teaching_manage
username=root
#下面输入自己数据库的密码
password=123456
#定义初始连接数
initialSize=1
#定义最大连接数
maxActive=20
#定义最大空闲
maxIdle=20
#定义最小空闲
minIdle=1
#定义最长等待时间
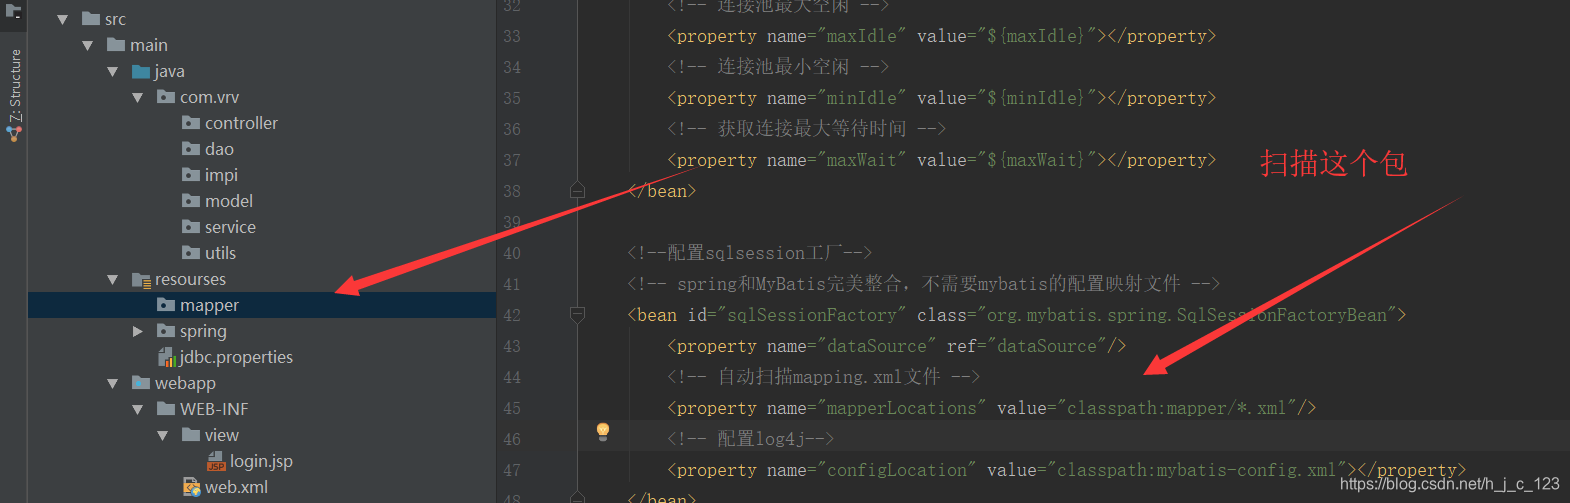
maxWait=60000因为mybatis是半自动化的orm(以对象的方式操作数据库),所以我们需要自己写mybatis的映射文件,现在在resourses目录下新建一个mapper文件夹:
mybatis扫描这个目录下的所有文件
最后我们需要在web.xml文件里面加载这两个配置文件,同时配置字符集监听,和前端控制器
内容如下:
<!DOCTYPE web-app PUBLIC
"-//Sun Microsystems, Inc.//DTD Web Application 2.3//EN"
"http://java.sun.com/dtd/web-app_2_3.dtd" >
<web-app
xmlns="http://java.sun.com/xml/ns/javaee"
xmlns:xsi="http://www.w3.org/2001/XMLSchema-instance"
xsi:schemaLocation="http://java.sun.com/xml/ns/javaee http://java.sun.com/xml/ns/javaee/web-app_3_0.xsd"
version="3.0"
metadata-complete="true">
<display-name>Archetype Created Web Application</display-name>
<!--请求和应答字符编码过滤器-->
<filter>
<filter-name>encoding-filter</filter-name>
<filter-class>org.springframework.web.filter.CharacterEncodingFilter</filter-class>
<init-param>
<param-name>encoding</param-name>
<param-value>UTF-8</param-value>
</init-param>
</filter>
<filter-mapping>
<filter-name>encoding-filter</filter-name>
<!--<url-pattern>/*</url-pattern>-->
<servlet-name>springDispatcherServlet</servlet-name>
</filter-mapping>
<!--启动spring容器-->
<listener>
<listener-class>org.springframework.web.context.ContextLoaderListener</listener-class>
</listener>
<context-param>
<param-name>contextConfigLocation</param-name>
<param-value>classpath:spring/spring-mybatis.xml</param-value>
</context-param>
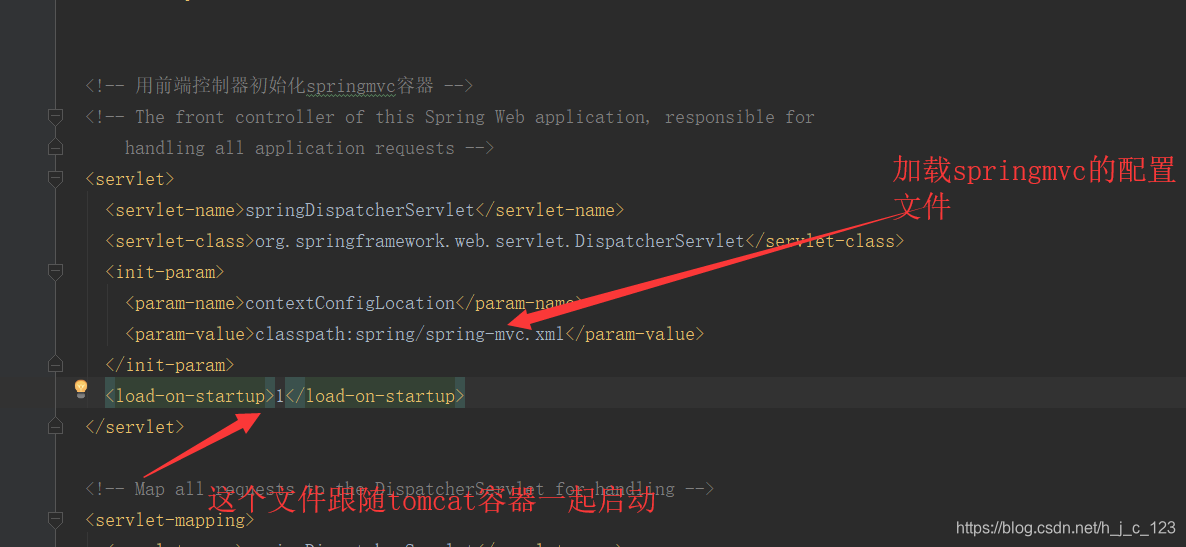
<!-- 用前端控制器初始化springmvc容器 -->
<!-- The front controller of this Spring Web application, responsible for
handling all application requests -->
<servlet>
<servlet-name>springDispatcherServlet</servlet-name>
<servlet-class>org.springframework.web.servlet.DispatcherServlet</servlet-class>
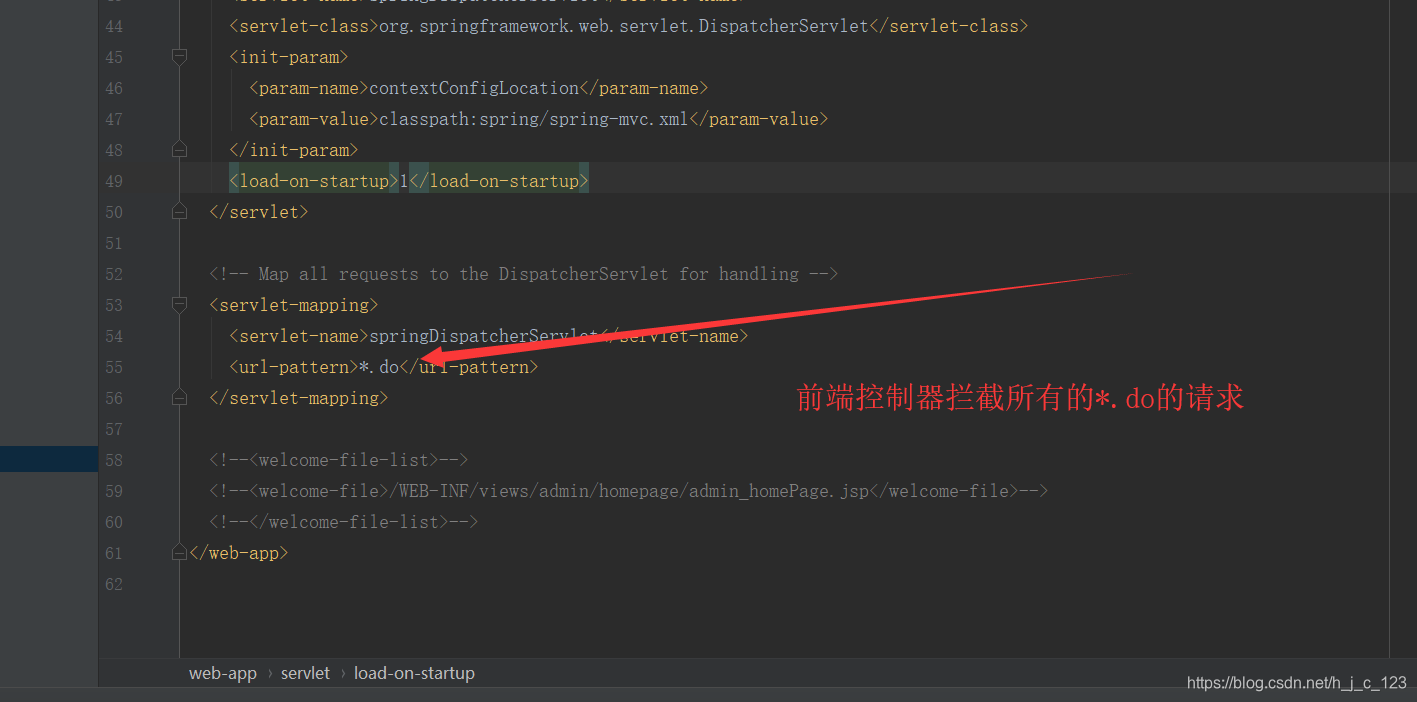
<init-param>
<param-name>contextConfigLocation</param-name>
<param-value>classpath:spring/spring-mvc.xml</param-value>
</init-param>
<load-on-startup>1</load-on-startup>
</servlet>
<!-- Map all requests to the DispatcherServlet for handling -->
<servlet-mapping>
<servlet-name>springDispatcherServlet</servlet-name>
<url-pattern>*.do</url-pattern>
</servlet-mapping>
<!--<welcome-file-list>-->
<!--<welcome-file>/WEB-INF/views/admin/homepage/admin_homePage.jsp</welcome-file>-->
<!--</welcome-file-list>-->
</web-app>
下面对基本的包概念进行说明:
字符集监听器:org.springframework.web.filter.CharacterEncodingFilter
主要用来限制整个工程的字符集的。
前端控制器:org.springframework.web.servlet.DispatcherServlet
是spring用来接收用户请求的同时分配用户请求给控制器(controller)来控制请求处理
到这里我们的环境集成算是完成了,下一篇我们来写一个用ssm框架来实现的简单的登陆的例子
健康管理系统1.0:
https://blog.csdn.net/h_j_c_123/article/details/105984527
健康管理系统2.0:
https://blog.csdn.net/h_j_c_123/article/details/112853754
欢迎关注我的微信公众号,更多内容将在微信公众号中发布:


 1826
1826


 被折叠的 条评论
为什么被折叠?
被折叠的 条评论
为什么被折叠?
 到【灌水乐园】发言


