


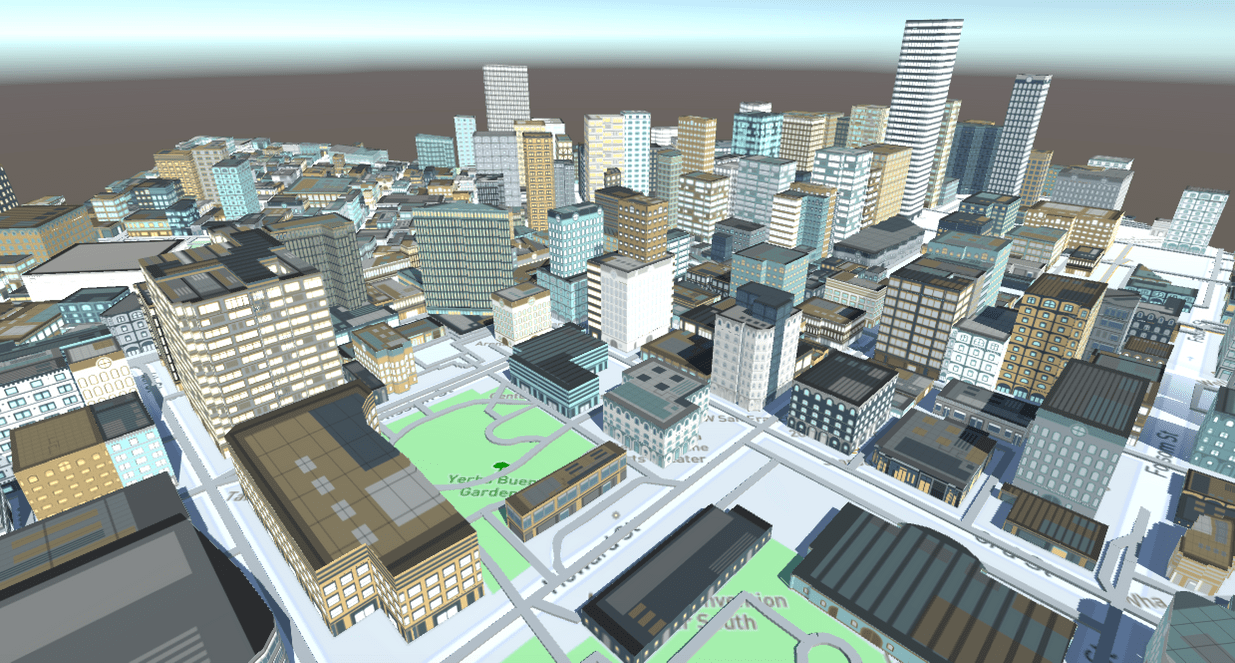
Mapbox’s Maps SDK allows developers to create custom styling for buildings in their Unity projects.
Mapbox 的 Maps SDK 允许开发人员在他们的 Unity 项目中为建筑物创建自定义样式。
Custom styles
Mapbox’s Maps SDK allows developers to create custom styling for buildings in their Unity projects. Custom styles can include user-defined architectural feature proportions, textures, and colors. Custom styles are comprised of three different building blocks:
Mapbox 的 Maps SDK 允许开发人员在他们的 Unity 项目中为建筑物创建自定义样式。 自定义样式可以包括用户定义的建筑特征比例、纹理和颜色。 自定义样式由三个不同的构建块组成:
- AtlasInfo files(AtlasInfo文件)
- MapboxStyles materials(MapboxStyles 材料)
- Scriptable Palettes(可编写脚本的调色板)
AtlasInfo
Create an AtlasInfo file
AtlasInfo files contain user-defined data that tells the Maps SDK how to organize, partition and assign sections of a texture atlas to procedurally generated buildings. They inherit from Unity’s scriptable object class, which means they can be saved in a Unity project and used in multiple scenes.
AtlasInfo 文件包含用户定义的数据,这些数据告诉 Maps SDK 如何组织、划分纹理图集的各个部分并将其分配给程序生成的建筑物。 它们继承自 Unity 的脚本对象类,这意味着它们可以保存在一个 Unity 项目中并在多个场景中使用。
The AtlasInfo class inherits from Unity’s scriptable object class. Users can use the default Atlas Info file, or create their own by doing the following:
AtlasInfo 类继承自 Unity 的脚本对象类。 用户可以使用默认的 Atlas Info 文件,或通过执行以下操作创建自己的文件:
- Right click or go to the Assets menu and navigate to
Create > Mapbox > AtlasInfoto create an Atlasinfo file.(右键单击或转到“资产”菜单并导航到“创建”>“Mapbox”>“AtlasInfo”以创建一个 Atlasinfo 文件。) - Click Textures.(单击纹理。)
- Change the Size to 1.(将大小更改为 1。)
- Click Element 0 to view the parameters.(单击元素 0 查看参数。)
- Repeat steps 1-4 for Roofs.(对屋顶重复步骤 1-4。)

Textures: Contains a public list of texture sections for building facades.
Textures:包含用于建筑立面的纹理部分的公共列表。
Roofs: Contains a public list of texture sections for building roofs.
屋顶:包含用于建筑屋顶的纹理部分的公共列表。
Note that textures and roofs can have sections that overlap in UV space. This is useful, as facade and roof textures can be packed either in one Atlas texture or multiple, as roof and facade geometry can use different materials.
请注意,纹理和屋顶可以有在 UV 空间中重叠的部分。 这很有用,因为立面和屋顶纹理可以打包在一个或多个 Atlas 纹理中,因为屋顶和立面几何体可以使用不同的材料。
Texture Rect: Position and size of texture section in UV space
Texture Rect:纹理部分在UV空间中的位置和大小
- X: Position of the bottom left corner of the texture section in UV space.(X:纹理部分左下角在 UV 空间中的位置。)
- Y: Position of the bottom left corner of the texture section in UV space.(Y:纹理部分左下角在 UV 空间中的位置。)
- W: Width of the texture section in UV space.(W:UV 空间中纹理部分的宽度。)
- H: Height of the texture section in UV space.(H:纹理部分在 UV 空间中的高度。)
Mid floor count: Number of mid floors to define in texture space. Mid floors will repeat as required to fill a given building’s height. If you set the mid floor count to 1, a single floor will be redrawn repeatedly. Mid floor counts of greater than 1 will result in a series of floors being redrawn in a repeated sequence.
中间楼层数:要在纹理空间中定义的中间楼层数。 中层将根据需要重复,以填充给定建筑物的高度。 如果将中间楼层数设置为 1,则会重复重绘单个楼层。 中间楼层数大于 1 将导致一系列楼层按重复顺序重新绘制。
Column count: Number of columns to define in texture space. Columns will be repeated as necessary.
列数:要在纹理空间中定义的列数。 列将根据需要重复。
Top Section ratio: Height ratio of the top floor in the section. So if a section has 8 floors (including ground and top floors) and they are all equal height, this should be 1/8.
Top Section ratio:剖面中顶层的高度比。 因此,如果一个部分有 8 层(包括底层和顶层)并且它们的高度都相等,则这应该是 1/8。
Bottom Section ratio: Height ratio of the ground floor in the section. So if the section has 8 floor (including ground and top floors) and they are all equal height, this should be 1/8.
Bottom Section ratio:剖面中底层的高度比。 因此,如果该部分有 8 层(包括底层和顶层)并且它们的高度都相等,则这应该是 1/8。
Preferred Edge Section Length: Ideal wall length. The mesh generation setting will cut down long wall segments to smaller chunks of this length and chosen texture section will be applied to each separately. This setting doesn’t effect uv mapping directly.
首选边缘部分长度:理想的壁长。 网格生成设置会将长墙段切割成此长度的较小块,并且所选纹理部分将分别应用于每个。 此设置不会直接影响 uv 贴图。
Floor Height: Single mid floor height. Even if the texture has a big mid segment that consists of multiple floors, this value is a single one of them. This is a mesh generation setting, and doesn’t effect uv mapping directly.
层高:单层中间层高。 即使纹理有一个由多个楼层组成的大中间段,这个值也是其中一个。 这是一个网格生成设置,不会直接影响 uv 贴图。
First Floor Height: Ground floor height. This is a mesh generation setting, and doesn’t effect uv mapping directly.
一楼高度:一楼的高度。 这是一个网格生成设置,不会直接影响 uv 贴图。
Top Floor Height: This is a mesh generation setting, and doesn’t effect uv mapping directly.
Top Floor Height:这是一个网格生成设置,不会直接影响 uv 贴图。
Export an AtlasInfo file as a savable template texture
将 AtlasInfo 文件导出为可保存的模板纹理
Data defined in an AtlasInfo file can be exported as a savable template texture. This texture can then be opened in an image editing program such as Adobe Photoshop or Illustrator, and used as a reference layer for constructing a texture atlas that conforms to the structure defined in the AtlasInfo.
AtlasInfo 文件中定义的数据可以导出为可保存的模板纹理。 然后可以在图像编辑程序(如 Adobe Photoshop 或 Illustrator)中打开此纹理,并用作构建符合 AtlasInfo 中定义的结构的纹理图集的参考层。
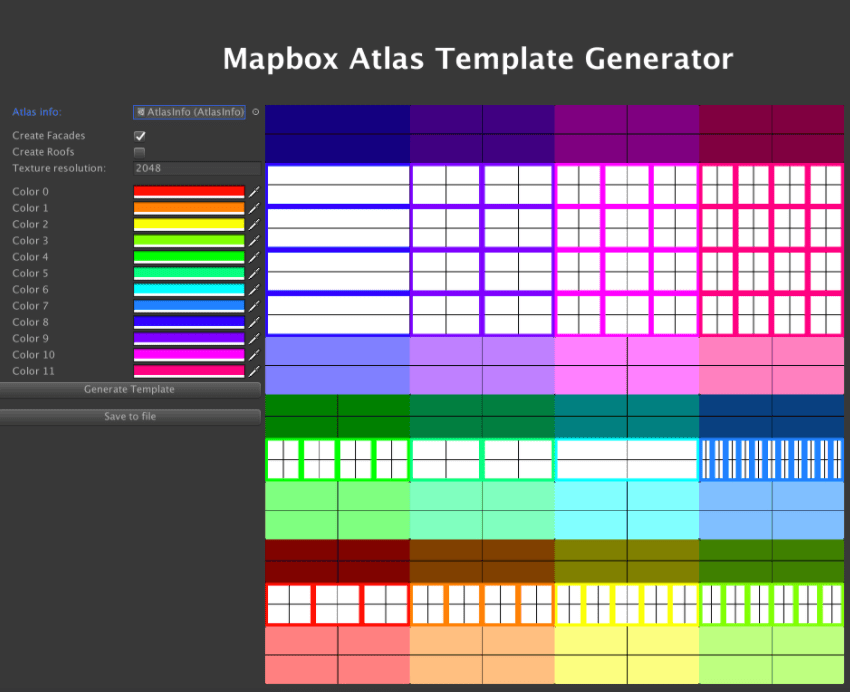
- From the top menu, go to
Mapbox > Atlas Template Generator.(从顶部菜单转到 Mapbox > Atlas 模板生成器。) - In the Mapbox Atlas Template Generator window, drag an AtlasInfo file into the Atlas info field, shown below.(在 Mapbox Atlas Template Generator 窗口中,将 AtlasInfo 文件拖到 Atlas 信息字段中,如下所示。)
- Select what AtlasInfo data to render to the texture by checking Create Facades and/or Create Roofs(通过选中 Create Facades 和/或 Create Roofs 选择要渲染到纹理的 AtlasInfo 数据)
- Specify a Texture resolution. The default is 2048 x 2048.(指定纹理分辨率。 默认值为 2048 x 2048。)
- Unity sets colors programmatically and are for template reference only. Change the colors by clicking in their respective Color fields.(Unity 以编程方式设置颜色,仅供模板参考。 通过单击各自的颜色字段来更改颜色。)
- Click Generate Template. The tools will draw the key subsections of each texture section, such as ground/mid/top floors, columns, etc. The tools will also draw black lines to show subsection centers.(单击生成模板。 这些工具将绘制每个纹理部分的关键部分,例如地面/中层/顶层、柱子等。这些工具还将绘制黑线以显示部分中心。)
- Click Save to File to save the generated texture out to a PNG, which can then be used in an image editing software of your choice.(单击“保存到文件”将生成的纹理保存为 PNG,然后可以在您选择的图像编辑软件中使用。)
MapboxStyles materials
MapboxStyles 材料
Any type of material can be used to render buildings. To take full advantage of the Maps SDK styling features, use of the MapboxStyles materials, which provide support for three colorization layers.
任何类型的材料都可用于渲染建筑物。 要充分利用 Maps SDK 样式功能,请使用 MapboxStyles 材料,它提供对三个着色层的支持。
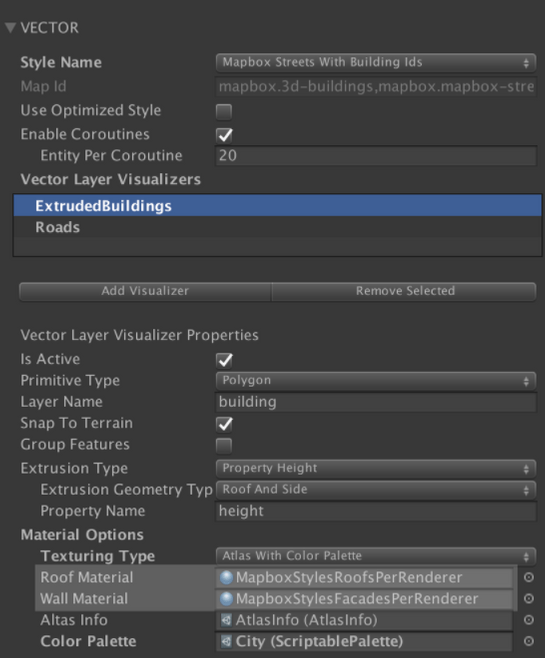
To specify the materials used for building visualization, go to the gameObject that contains the AbstractMap component. Next, navigate to the VECTOR settings. Under Vector Layer Visualizers, click on a visualizer. ExtrudedBuildings is selected in this example. Next, add a material for Roof Material and Wall Material. To add a new visualizer instead of using an existing one, click Add Visualizer. Roofs and facades can use the same material or separate ones.
要指定用于构建可视化的材料,请转到包含 AbstractMap 组件的游戏对象。 接下来,导航到 VECTOR 设置。 在矢量图层可视化器下,单击一个可视化器。 本例中选择了 ExtrudedBuildings。 接下来,为 Roof Material 和 Wall Material 添加材料。 要添加新的可视化工具而不是使用现有的可视化工具,请单击添加可视化工具。 屋顶和立面可以使用相同的材料或单独的材料。
These layers are defined by assigning transparent mask textures to the Detail_1 and Detail_2 texture slots.
这些层是通过将透明遮罩纹理分配给 Detail_1 和 Detail_2 纹理槽来定义的。
Coloring these layers can be done in one of two ways, depending on the material type used:
根据使用的材料类型,可以通过以下两种方式之一为这些层着色:
- MapboxStyles - allow you to set colors for feature layers directly in the material inspector, which works for when you want all buildings to have the same base, detail_1, and detail_2 colors. Change the colors by selecting the material and using the color picker. Specify the textures by clicking Select and adding a texture of your choice. The materials can be found by in the
Mapbox > Resources > MapboxStyles > Materialsdirectory.(MapboxStyles - 允许您直接在材质检查器中设置要素图层的颜色,这适用于您希望所有建筑物具有相同的基础、detail_1 和 detail_2 颜色的情况。 通过选择材料并使用颜色选择器来更改颜色。 通过单击“选择”并添加您选择的纹理来指定纹理。 这些材料可以在 Mapbox > Resources > MapboxStyles > Materials 目录中找到。)

- MapboxStylesPerRenderer - you cannot set colors for feature layers in the inspector. Instead, Unity sets them programmatically using colors defined in a scriptable palette file. This shader uses Unity’s
[PerRendererData]tag on color properties to allow for different renderers to modify those properties at runtime without creating material instances and incurring additional draw calls. To use this material, you must define a ScriptablePalette in the Material Options section of the Vector Layer Visualizer. Use it if you want buildings to have their base, detail_1, and detail_2 colors randomly assigned from a palette.(MapboxStylesPerRenderer - 您不能在检查器中设置要素图层的颜色。 相反,Unity 使用可编写脚本的调色板文件中定义的颜色以编程方式设置它们。 此着色器在颜色属性上使用 Unity 的 [PerRendererData] 标签,以允许不同的渲染器在运行时修改这些属性,而无需创建材质实例和引发额外的绘制调用。 要使用此材质,您必须在矢量图层可视化器的材质选项部分定义一个 ScriptablePalette。 如果您希望建筑物的基础颜色、detail_1 和 detail_2 颜色从调色板中随机分配,请使用它。)
Scriptable Palettes
可编写脚本的调色板
Scriptable Palettes are containers that can generate and hold a palette of colors. They inherit from Unity’s scriptable object class, which means they can be saved in a Unity project and used in multiple scenes.
Scriptable Palettes 是可以生成和保存颜色调色板的容器。 它们继承自 Unity 的脚本对象类,这意味着它们可以保存在一个 Unity 项目中并在多个场景中使用。
Scriptable Palettes require the use of MapboxStylesPerRenderer materials.
Scriptable Palettes 需要使用 MapboxStylesPerRenderer 材质。

Assign/Change the scriptable palette in use
分配/更改正在使用的可编写脚本的调色板
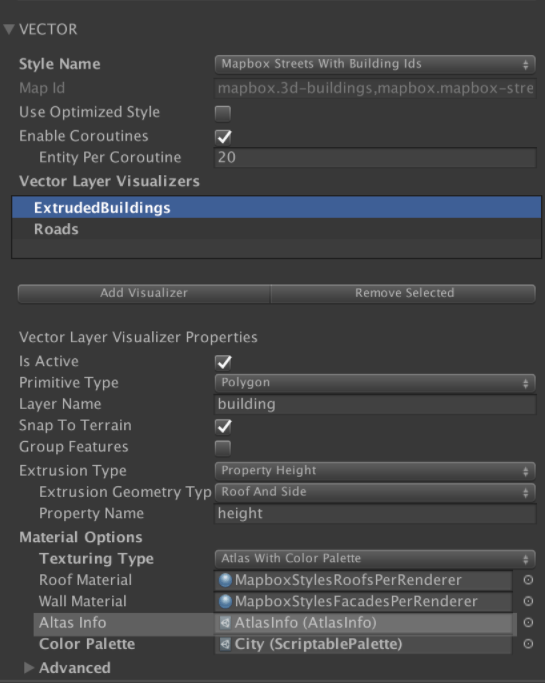
Select the gameObject containing the AbstractMap component, and navigate to the VECTOR settings. Navigate to Vector Layer Visualizers > ExtrudedBuildings > Material Options > Atlas Info.
选择包含 AbstractMap 组件的游戏对象,然后导航到 VECTOR 设置。 导航到矢量图层可视化器 > ExtrudedBuildings > 材料选项 > 地图集信息。
Create a new Scriptable Palette
创建一个新的脚本调色板
Right click or go to the Assets menu and navigate to Create > Mapbox > ScriptablePalette to create an ScriptablePalette file.
右键单击或转到 Assets 菜单并导航到 Create > Mapbox > ScriptablePalette 以创建 ScriptablePalette 文件。
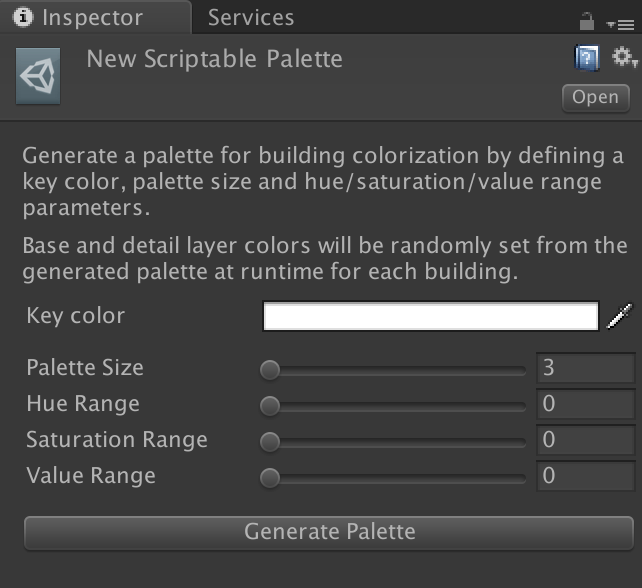
Generate a palette of colors(生成调色板)
- Define a Key Color. This will be used as a ‘seed’, from which other colors will be procedurally derived.(定义键颜色。 这将用作“种子”,其他颜色将从中按程序派生。)
- Set a Palette Size. Choose how many colors will be in the palette.(设置调色板大小。 选择调色板中的颜色数量。)
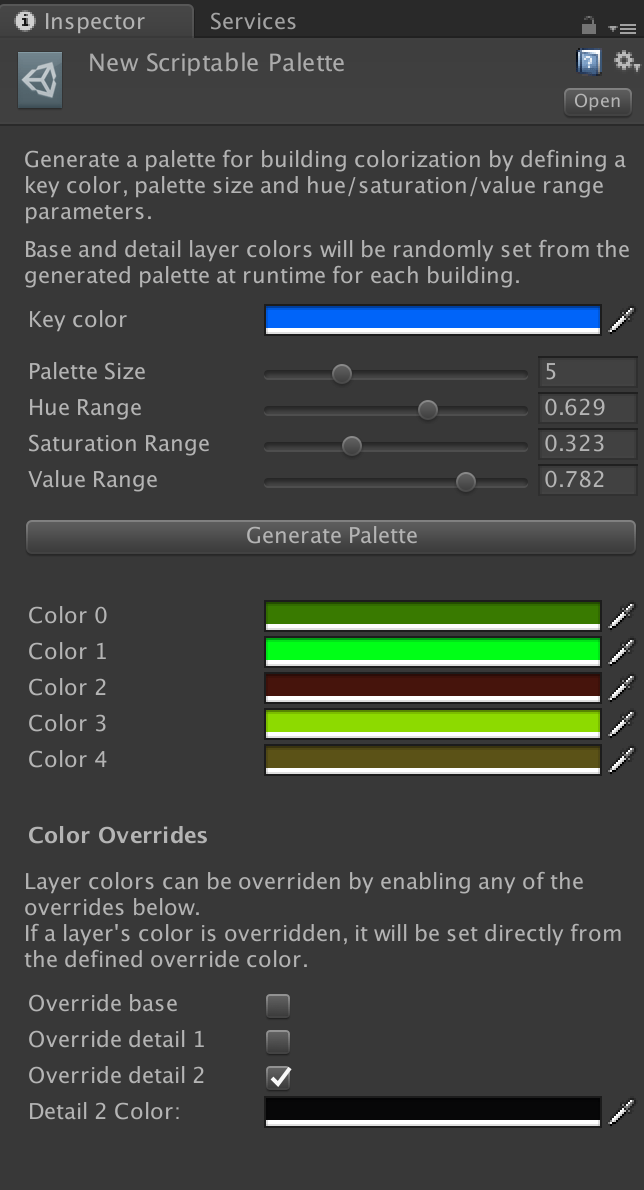
- Define Hue, Saturation and Value ranges.(定义色调、饱和度和值范围。)
- Hue Range. Hue Range is used to define how far colors in the palette can deviate from the key color's hue.(色调范围。 色调范围用于定义调色板中的颜色可以偏离主色色调的程度。)
- Saturation Range. Saturation Range is used to define how far colors in the palette can deviate from the key color's saturation.(饱和度范围。 饱和度范围用于定义调色板中的颜色可以偏离主色饱和度的程度。)
- Value Range. Value Range is used to define how far colors in the palette can deviate from the key color's value.(值范围。 值范围用于定义调色板中的颜色可以偏离键颜色值的程度。)
- Click Generate Palette.(单击生成调色板。)
- To make any changes to your palette, repeat steps 1-4 until you are satisfied with it.(要对您的调色板进行任何更改,请重复步骤 1-4,直到您满意为止。)
- You can edit the final colors in the inspector.(您可以在检查器中编辑最终颜色。)
- If desired, set Color Overrides. This provides a method for directly setting colors for feature layers. For instance, you can enable Override Detail 2 to directly assign a chosen color to all windows. In this case, Override Detail 2 sets all windows to black to give buildings a night aesthetic.(如果需要,设置颜色覆盖。 这提供了一种直接为要素图层设置颜色的方法。 例如,您可以启用 Override Detail 2 直接将选定的颜色分配给所有窗口。 在这种情况下,Override Detail 2 将所有窗户设置为黑色,以赋予建筑物夜间美感。)


 291
291


 被折叠的 条评论
为什么被折叠?
被折叠的 条评论
为什么被折叠?
 到【灌水乐园】发言


