


Android 事件分发 系列文章目录
【Android 事件分发】事件分发源码分析 ( 驱动层通过中断传递事件 | WindowManagerService 向 View 层传递事件 )
一、事件分发脉络
事件分发分析流程 :
① 驱动层 -> Framework 层 : 用户触摸 , 或按键 后 , 事件在硬件中产生 , 从 硬件驱动层 , 传递到 Framework 层 ;
② WMS -> View 层 : WindowManagerService ( 简称 WMS ) 将事件传递到 View 层 ;
③ View 层内部 : 事件在 View 的容器及下层容器 / 组件 之间传递 ;
二、驱动层通过中断传递事件
硬件产生事件后 , 驱动层通过中断传递事件 ;
中断在嵌入式 Linux 中经常使用 , 分为 外部中断 和 内部中断 ;
- 外部中断 : 由外部事件产生的中断 , 如这里的由硬件触摸 / 按键 产生的事件产生的中断 ;
- 内部中断 : 程序运行出现崩溃 , 异常 等情况 ;
中断是指在 CPU 正常执行指令时 , 内部或外部事件 / 事先设置好的中断操作 , 会引起 CPU 中断当前正在执行的指令 , 转而运行当前中断对应的相关指令 , 中断程序执行完毕后 , 继续执行后续中断前未执行完毕的代码 ;
中断有两种方式 : 一种是轮询的 , CPU 不断读取硬件的状态 ; 另一种是硬件产生事件会后 , 发送信息给 CPU , 让 CPU 暂停当前工作 , 执行中断任务 ;
三、WindowManagerService 向 View 传递事件
在 【Android 应用开发】UI绘制流程 ( 生命周期机制 | 布局加载机制 | UI 绘制流程 | 布局测量 | 布局摆放 | 组件绘制 | 瀑布流布局案例 ) 博客中 , 分析了 UI 布局绘制流程 , 从 ActivityThread 开始 , 逐步调用 , 绘制 UI 界面 , 调用链如下 :
ActivityThread | handleResumeActivity -> WindowManager | addView -> ViewRootImpl | setView ;
最后在 ViewRootImpl 的 performTraversals 方法中 , 完成 测量 , 布局 , 绘画 操作 ;
在 WindowManagerGlobal 中的 addView 方法的主要作用是添加 DecorView ;
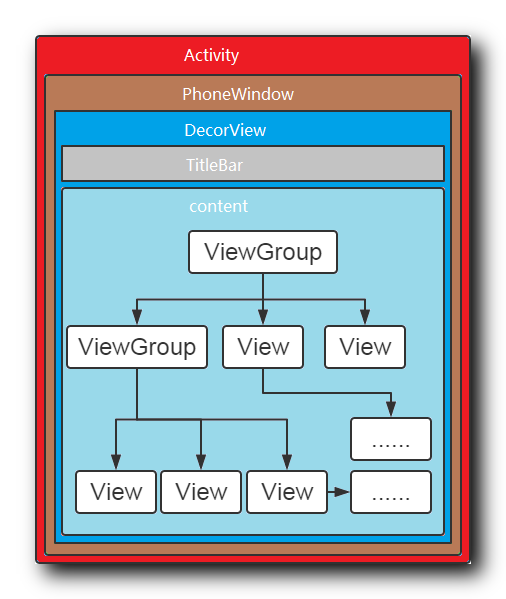
各个窗口的层级如下 : 事件传递从 Activity 逐层向下传递的 View 组件上 ;
这里开始从 ViewRootImpl 的 setView 方法进行分析 ;
通过 new InputChannel() 直接创建输入通道 ;
还调用了 WindowSession 的 addToDisplay 方法 , mWindowSession 成员是 IWindowSession 类型 , 通过 mWindowSession = WindowManagerGlobal.getWindowSession() 获得 ;
WindowManagerGlobal 的 getWindowSession 方法中 , 最终 WindowSession 又调用回了 WMS 的 openSession , 创建了一个 WindowSession 对象 ;
在 ViewRootImpl 的 setView 方法中 , 注册了 mInputEventReceiver , 传入 InputChannel 和 Looper 参数 , InputChannel 就是事件传入的通道 , Looper 用于轮询事件是否发生 ;
ViewRootImpl 参考源码 :
public final class ViewRootImpl implements ViewParent,
        View.AttachInfo.Callbacks, ThreadedRenderer.DrawCallbacks {
    public void setView(View view, WindowManager.LayoutParams attrs, View panelParentView) {
                requestLayout();
                if ((mWindowAttributes.inputFeatures
                        & WindowManager.LayoutParams.INPUT_FEATURE_NO_INPUT_CHANNEL) == 0) {
                    mInputChannel = new InputChannel();
                }

               	...

                    res = mWindowSession.addToDisplay(mWindow, mSeq, mWindowAttributes,
                            getHostVisibility(), mDisplay.getDisplayId(), mWinFrame,
                            mAttachInfo.mContentInsets, mAttachInfo.mStableInsets,
                            mAttachInfo.mOutsets, mAttachInfo.mDisplayCutout, mInputChannel);

				...

                if (mInputChannel != null) {
                    if (mInputQueueCallback != null) {
                        mInputQueue = new InputQueue();
                        mInputQueueCallback.onInputQueueCreated(mInputQueue);
                    }
                    mInputEventReceiver = new WindowInputEventReceiver(mInputChannel,
                            Looper.myLooper());
                }
    }
}
/frameworks/base/core/java/android/view/ViewRootImpl.java
WindowManagerService 获取 WindowSession 方法 : 通过调用 WindowManagerGlobal 的 getWindowSession 获取 , 最终还是调用了 WindowManagerService 的 openSession 方法 ;
WindowManagerGlobal 参考源码 :
public final class WindowManagerGlobal {
    public static IWindowSession getWindowSession() {
        synchronized (WindowManagerGlobal.class) {
            if (sWindowSession == null) {
                try {
                    InputMethodManager imm = InputMethodManager.getInstance();
                    IWindowManager windowManager = getWindowManagerService();
                    sWindowSession = windowManager.openSession(
                            new IWindowSessionCallback.Stub() {
                                @Override
                                public void onAnimatorScaleChanged(float scale) {
                                    ValueAnimator.setDurationScale(scale);
                                }
                            },
                            imm.getClient(), imm.getInputContext());
                } catch (RemoteException e) {
                    throw e.rethrowFromSystemServer();
                }
            }
            return sWindowSession;
        }
    }
}
/frameworks/base/core/java/android/view/WindowManagerGlobal.java
在 WindowManagerService 的 addWindow 方法中 ,
- 初始化了 窗口的状态 WindowState ,
- 通过调用 WindowState 的 openInputChannel 方法 , 设置了 InputChannel , 就是将 ViewRootImpl 中 setView 方法中 new InputChannel() 创建的 InputChannel 传递进来 ;
WindowManagerService 参考源码 :
/** {@hide} */
public class WindowManagerService extends IWindowManager.Stub
        implements Watchdog.Monitor, WindowManagerPolicy.WindowManagerFuncs {
    public int addWindow(Session session, IWindow client, int seq,
            LayoutParams attrs, int viewVisibility, int displayId, Rect outFrame,
            Rect outContentInsets, Rect outStableInsets, Rect outOutsets,
            DisplayCutout.ParcelableWrapper outDisplayCutout, InputChannel outInputChannel) {
			// 初始化窗口状态
            final WindowState win = new WindowState(this, session, client, token, parentWindow,
                    appOp[0], seq, attrs, viewVisibility, session.mUid,
                    session.mCanAddInternalSystemWindow);

            if  (openInputChannels) {
                win.openInputChannel(outInputChannel);
            }
	}

    @Override
    public IWindowSession openSession(IWindowSessionCallback callback, IInputMethodClient client,
            IInputContext inputContext) {
        if (client == null) throw new IllegalArgumentException("null client");
        if (inputContext == null) throw new IllegalArgumentException("null inputContext");
        Session session = new Session(this, callback, client, inputContext);
        return session;
    }
}
/frameworks/base/services/core/java/com/android/server/wm/WindowManagerService.java
WindowState 的 openInputChannel 方法 , 其中调用了 InputChannel.openInputChannelPair(name) 静态方法 , 这是开启了 2 2 2 个 InputChannel , inputChannels[0] 放在服务端 , inputChannels[1] 放在了客户端 ;
服务端 与 客户端 需要进行通信 , 二者通过 Looper 进行通信 , 通信前需要进行注册 , 在 InputDispatcher.cpp 中进行的注册 ;
WindowState 参考源码 :
/** A window in the window manager. */
class WindowState extends WindowContainer<WindowState> implements WindowManagerPolicy.WindowState {
    void openInputChannel(InputChannel outInputChannel) {
        if (mInputChannel != null) {
            throw new IllegalStateException("Window already has an input channel.");
        }
        String name = getName();
        InputChannel[] inputChannels = InputChannel.openInputChannelPair(name);
        // 服务端
        mInputChannel = inputChannels[0];
        // 客户端
        mClientChannel = inputChannels[1];
        mInputWindowHandle.inputChannel = inputChannels[0];
        if (outInputChannel != null) {
            mClientChannel.transferTo(outInputChannel);
            mClientChannel.dispose();
            mClientChannel = null;
        } else {
            // If the window died visible, we setup a dummy input channel, so that taps
            // can still detected by input monitor channel, and we can relaunch the app.
            // Create dummy event receiver that simply reports all events as handled.
            mDeadWindowEventReceiver = new DeadWindowEventReceiver(mClientChannel);
        }
        mService.mInputManager.registerInputChannel(mInputChannel, mInputWindowHandle);
    }
}
/frameworks/base/services/core/java/com/android/server/wm/WindowState.java
下面分析在 InputDispatcher 中 , 注册 服务端 与 客户端 InputChannel 的过程 ;
在 registerInputChannel 方法中 , 创建了 Connection 连接 , 这就是两个 服务端 与 客户端 InputChannel 沟通的通道 , 每个 InputChannel 都有一个 fd , 通过 int fd = inputChannel->getFd() 获取 fd , 调用 mConnectionsByFd.add(fd, connection) 将 fd 与 Connection 对应起来 ;
最后将 fd 注册在 Looper 中 , mLooper->addFd ;
只要有任何事件输入 , 该 Looper 就会被唤醒 , 通过 InputChannel 传递到 Activity , 进而传递给各个层级的 View 组件 ;
status_t InputDispatcher::registerInputChannel(const sp<InputChannel>& inputChannel,
        const sp<InputWindowHandle>& inputWindowHandle, bool monitor) {
#if DEBUG_REGISTRATION
    ALOGD("channel '%s' ~ registerInputChannel - monitor=%s", inputChannel->getName().c_str(),
            toString(monitor));
#endif

    { // acquire lock
        AutoMutex _l(mLock);

        if (getConnectionIndexLocked(inputChannel) >= 0) {
            ALOGW("Attempted to register already registered input channel '%s'",
                    inputChannel->getName().c_str());
            return BAD_VALUE;
        }

        sp<Connection> connection = new Connection(inputChannel, inputWindowHandle, monitor);

        int fd = inputChannel->getFd();
        mConnectionsByFd.add(fd, connection);

        if (monitor) {
            mMonitoringChannels.push(inputChannel);
        }

        mLooper->addFd(fd, 0, ALOOPER_EVENT_INPUT, handleReceiveCallback, this);
    } // release lock

    // Wake the looper because some connections have changed.
    mLooper->wake();
    return OK;
}
/frameworks/native/services/inputflinger/InputDispatcher.cpp


 2860
2860


 被折叠的 条评论
为什么被折叠?
被折叠的 条评论
为什么被折叠?
 到【灌水乐园】发言


