


1.项目结构截图:
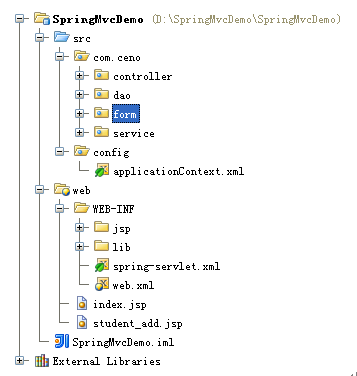
整个项目的项目结构就如图上所示,文档后面的代码demo里面的类就可以对应放入路径即可,项目的成败还有一个很重要的因素就是包的问题,调试包是个很痛苦的过程,这里我也将我这个项目lib里面的包上传到百度云里面供大家下载,希望大家能成功把自己的Demo项目搭建起来。
百度云分享下载链接:
http://pan.baidu.com/s/1c0xOCNY
2.web.xml配置
<?xml version="1.0" encoding="UTF-8"?>

<web-app xmlns="http://java.sun.com/xml/ns/javaee"

           xmlns:xsi="http://www.w3.org/2001/XMLSchema-instance"

           xsi:schemaLocation="http://java.sun.com/xml/ns/javaee

                     http://java.sun.com/xml/ns/javaee/web-app_2_5.xsd"

           version="2.5">

        <display-name>SpringMvcDemo</display-name>

        <welcome-file-list>

            <welcome-file>index.jsp</welcome-file>

        </welcome-file-list>

       <!-- 通过过滤器配置utf-8编码 -->

       <filter>

        <filter-name>Spring character encoding filter</filter-name>

          <filter-class>

            org.springframework.web.filter.CharacterEncodingFilter

          </filter-class>

          <init-param>

             <param-name>encoding</param-name>

             <param-value>utf-8</param-value>

          </init-param>

        </filter>


        <filter-mapping>

           <filter-name>Spring character encoding filter</filter-name>

           <url-pattern>/*</url-pattern>

        </filter-mapping>

      <!--  Spring 服务层的配置文件 -->

       <context-param>

            <param-name>contextConfigLocation</param-name>

            <param-value>classpath:config/applicationContext.xml</param-value>

       </context-param>

      <!--  Spring 容器启动监听器 -->

       <listener>

<listener-class>org.springframework.web.context.ContextLoaderListener</listener-class>

       </listener>

 <!--Spring MVC 的Servlet它将加载WEB-INF/spring-servlet.xml 的

配置文件,以启动Spring MVC模块-->

        <servlet>

        <servlet-name>spring</servlet-name>

           <servlet-class>

             org.springframework.web.servlet.DispatcherServlet

           </servlet-class>

           <load-on-startup>1</load-on-startup>

         </servlet>

        <servlet-mapping>

           <servlet-name>spring</servlet-name>

           <url-pattern>*.do</url-pattern>

        </servlet-mapping>

</web-app>
3.applicationContext.xml
<?xml version="1.0" encoding="UTF-8"?>

<beans xmlns="http://www.springframework.org/schema/beans"

 xmlns:aop="http://www.springframework.org/schema/aop"

 xmlns:context="http://www.springframework.org/schema/context"

 xmlns:mvc="http://www.springframework.org/schema/mvc"

 xmlns:p="http://www.springframework.org/schema/p"

 xmlns:tx="http://www.springframework.org/schema/tx"

 xmlns:xsi="http://www.w3.org/2001/XMLSchema-instance"

 xsi:schemaLocation="

   http://www.springframework.org/schema/beans http://www.springframework.org/schema/beans/spring-beans-3.0.xsd

   http://www.springframework.org/schema/context http://www.springframework.org/schema/context/spring-context-3.0.xsd

   http://www.springframework.org/schema/aop http://www.springframework.org/schema/aop/spring-aop-3.0.xsd

   http://www.springframework.org/schema/mvc http://www.springframework.org/schema/mvc/spring-mvc-3.0.xsd

   http://www.springframework.org/schema/tx http://www.springframework.org/schema/tx/spring-tx-3.0.xsd">

 <context:annotation-config />

 <context:component-scan base-package="com.ceno" />  <!-- 自动扫描所有注解该路径 -->

 <mvc:annotation-driven></mvc:annotation-driven>

 <aop:aspectj-autoproxy/>

 <bean

 id="sessionFactory" class="org.springframework.orm.hibernate4.LocalSessionFactoryBean">

  <property name="dataSource" ref="dataSource" />

           <property name="hibernateProperties">

                      <props>

                                <prop key="hibernate.dialect">org.hibernate.dialect.MySQL5InnoDBDialect</prop>

                                <prop key="hibernate.hbm2ddl.auto">update</prop>

                                <prop key="show_sql">true</prop>

                                <prop key="format_sql">true</prop>

                      </props>

           </property>

  <property name="packagesToScan">

            <list>

             <value>com.ceno.form</value><!-- 扫描实体类-->

            </list>

   </property>

 </bean>

 <bean

 id="transactionManager" class="org.springframework.orm.hibernate4.HibernateTransactionManager">

  <property name="sessionFactory" ref="sessionFactory" />

 </bean>


 <bean

 id="dataSource" class="org.springframework.jdbc.datasource.DriverManagerDataSource">

           <property name="driverClassName" value="com.mysql.jdbc.Driver" />

           <property name="url" value="jdbc:mysql://localhost:3306/springmvcdemo" />

           <property name="username" value="root" />

           <property name="password" value="123" />

 </bean>

 <tx:annotation-driven transaction-manager="transactionManager" />

</beans>
4.spring-servlet.xml
<?xml version="1.0" encoding="UTF-8"?>

<beans xmlns="http://www.springframework.org/schema/beans"

xmlns:xsi="http://www.w3.org/2001/XMLSchema-instance"

xmlns:p="http://www.springframework.org/schema/p"

xmlns:context="http://www.springframework.org/schema/context"

xsi:schemaLocation="http://www.springframework.org/schema/beans

http://www.springframework.org/schema/beans/spring-beans-3.0.xsd

http://www.springframework.org/schema/context

http://www.springframework.org/schema/context/spring-context-3.0.xsd">

    <!-- 扫描控制器包-->

<context:component-scan base-package="com.ceno.controller" />

    <bean class="org.springframework.web.servlet.mvc.annotation.

 AnnotationMethodHandlerAdapter"/>

<bean

 id="viewResolver" class="org.springframework.web.servlet.view.UrlBasedViewResolver">

      <property name="viewClass"  value="org.springframework.web.servlet.view.JstlView" />

      <property name="prefix" value="/WEB-INF/jsp/" />

      <property name="suffix" value=".jsp" />

    </bean>

</beans>5.@Repository、@Service、@Controller和 @Component等
- @Component 是一个泛化的概念,仅仅表示一个组件 (Bean) ,可以作用在任何层次。
- @Service 通常作用在业务层,但是目前该功能与 @Component 相同。
- @Constroller 通常作用在控制层,但是目前该功能与 @Component 相同。
- @Repository它用于将数据访问层 (DAO 层 ) 的类标识为 Spring Bean
默认情况下,对于包含 name 属性的 @Component、@Repository、 @Service 和 @Controller,会把 name 取值作为 Bean 的名字。如果这个注解不包含 name 值或是其他被自定义过滤器发现的组件,默认 Bean 名称会是小写开头的非限定类名。
@Qualifier
我们使用@AutoWired按照类型自动绑定,当容器中有多个匹配的bean时,将绑定那一个呢?我们可以通过在需要绑定的字段或参数上使用@Qualifier(value=“bar1”)来指定要绑定的bean。
| public class Foo { @Autowired @Qualifier(value="bar1") private Bar bar; } |
@Resource和@Autowired
作用相当于@Autowired,只不过@Autowired按byType自动注入,而@Resource默认按 byName自 动注入罢了。@Resource有两个属性是比较重要的,分是name和type,Spring将@Resource注解的name属性解析为bean的 名字,而type属性则解析为bean的类型。所以如果使用name属性,则使用byName的自动注入策略,而使用type属性时则使用byType自 动注入策略。如果既不指定name也不指定type属性,这时将通过反射机制使用byName自动注入策略。
@Resource装配顺序
1. 如果同时指定了name和type,则从Spring上下文中找到唯一匹配的bean进行装配,找不到则抛出异常
2. 如果指定了name,则从上下文中查找名称(id)匹配的bean进行装配,找不到则抛出异常
3. 如果指定了type,则从上下文中找到类型匹配的唯一bean进行装配,找不到或者找到多个,都会抛出异常
4. 如果既没有指定name,又没有指定type,则自动按照byName方式进行装配;如果没有匹配,则回退为一个原始类型进行匹配,如果匹配则自动装配;
与通过 XML 配置的 Spring Bean 一样,通过上述注解标识的 Bean,其默认作用域是"singleton",为了配合这四个注解,在标注 Bean 的同时能够指定 Bean 的作用域,Spring 2.5 引入了 @Scope 注解。使用该注解时只需提供作用域的名称就行了,如下所示:
| @Scope("prototype") @Repository public class Demo { … } |
6.sessionFactory的CRUD
Session session = sessionFactory.getCurrentSession(); // 获得Session
Session session = sessionFactory.openSession(); // 打开Session
对于上述的两个方法,有以下区别:
1. openSession 从字面上可以看得出来,是打开一个新的session对象,而且每次使用都是打开一个新的session,假如连续使用多次,则获得的session不是同一个对象,并且使用完需要调用close方法关闭session。
2. getCurrentSession ,从字面上可以看得出来,是获取当前上下文一个session对象,当第一次使用此方法时,会自动产生一个session对象,并且连续使用多次时,得到的session都是同一个对象,这就是与openSession的区别之一,简单而言,getCurrentSession 就是:如果有已经使用的,用旧的,如果没有,建新的。
在实际开发中,往往使用getCurrentSession多,因为一般是处理同一个事务(即是使用一个数据库的情况),所以在一般情况下比较少使用openSession或者说openSession是比较老旧的一套接口了;
Create
public void save(Student s){

       sessionFactory.getCurrentSession().save(s);

    }
Read
读取列表:
public List<Student> findAll(){

           return sessionFactory.getCurrentSession().createQuery("from Student").list();

       }
读取列表(分页读取):
public List<Student> listStudentByPage(int page,int size){

            Query query=sessionFactory.getCurrentSession().createQuery("from Student");

            query.setFirstResult((page-1)*size);

            query.setMaxResults(size);

            List<Student> list=query.list();

            return list;

}
读取列表(根据Criteria):
public List<Student> queryByCriteria(String name,String passWord){

            Criteria criteria=sessionFactory.getCurrentSession().createCriteria(Student.class);

     criteria.add(Restrictions.eq("name",name));

     //criteria.setFirstResult();

     //criteria.setMaxResults();criteria同样可以实现分页

     criteria.add(Restrictions.eq("passWord",passWord));

     List<Student> list=criteria.list();

     return list;

 }
读取单个结果(根据条件):
public Student getStudent(String name,String passWord){

     Session session=sessionFactory.getCurrentSession();

     Query query=session.createQuery("from Student where name=? and passWord=:passWord");

     query.setParameter(0,name);

     query.setParameter("passWord",passWord);

     //query.executeUpdate();用来执行一些更新操作的sql语句

     //query.list();返回的就是一个集合

     Student student=(Student)query.uniqueResult();

     return student;

}
读取单个结果(根据id):
public Student getStudent(int id){

            Student student=(Student)sessionFactory.getCurrentSession().get(Student.class,id);

            return student;

}
Update
public void update(Student model) {

            sessionFactory.getCurrentSession().update(model);

        }
Delete
public void delete(Student model) {

            sessionFactory.getCurrentSession().delete(model);

        }
NativeSql
也可以使用数据库的 Native SQL 语言来查询数据。这对你在要使用数据库的某些特性的时候(比如说在查询提示或者 Oracle 中的 CONNECT 关键字),这是非常有用的。这就能够扫清你把原来直接使用 SQL/JDBC 的程序迁移到基于 Hibernate 应用的道路上的障碍。
public List<Student> getByNativeSql(){

           Query query=sessionFactory.getCurrentSession().createSQLQuery("select from student");

           List<Student> list=query.list();

           return list;

}
7.代码Demo:
Student实体类:
package com.ceno.form;

import java.io.Serializable;

import javax.persistence.Basic;

import javax.persistence.Column;

import javax.persistence.Entity;

import javax.persistence.GeneratedValue;

import javax.persistence.GenerationType;

import javax.persistence.Id;

import javax.persistence.Table;

@Entity

@Table(name="student")

public class Student implements Serializable{

    private static final long serialVersionUID = 1L;

    private Integer id;

    private String name;

    private String passWord;

    @Id

    @Basic(optional=false)

    @Column(name="id")

    @GeneratedValue(strategy=GenerationType.IDENTITY)

    public Integer getId() {

       return id;

    }

    public void setId(Integer id) {

       this.id = id;

    }

    @Column(name="name")

    public String getName() {

       return name;

    }

    public void setName(String name) {

       this.name = name;

    }

    @Column(name="password")

    public String getPassWord() {

       return passWord;

    }

    public void setPassWord(String psw) {

       this.passWord = psw;

    }

}
Student的dao操作类:
package com.ceno.dao;

import java.util.List;

import org.hibernate.Criteria;

import org.hibernate.Query;

import org.hibernate.Session;

import org.hibernate.SessionFactory;

import org.hibernate.criterion.Criterion;

import org.hibernate.criterion.Restrictions;

import org.springframework.beans.factory.annotation.Autowired;

import org.springframework.stereotype.Repository;

import com.ceno.form.Student;


@Repository("entityDao")

public class EntityDao {


       @Autowired

       private SessionFactory sessionFactory;


       public void save(Student s){

           sessionFactory.getCurrentSession().save(s);

       }


        public Student getStudent(String name,String passWord){

            Session session=sessionFactory.getCurrentSession();

            Query query=session.createQuery("from Student where name=? and passWord=:passWord");

            query.setParameter(0,name);

            query.setParameter("passWord",passWord);

            Student student=(Student)query.uniqueResult();

            return student;

        }


        public Student getStudent(int id){

            Student student=(Student)sessionFactory.getCurrentSession().get(Student.class,id);

            return student;

        }


       public List<Student> getByNativeSql(){

           Query query=sessionFactory.getCurrentSession().createSQLQuery("select from student");

           List<Student> list=query.list();

           return list;

       }


        public List<Student> listStudentByPage(int page,int size){

            Query query=sessionFactory.getCurrentSession().createQuery("from Student");

            query.setFirstResult((page-1)*size);

            query.setMaxResults(size);

            List<Student> list=query.list();

            return list;

        }


        public List<Student> queryByCriteria(String name,String passWord){

            Criteria criteria=sessionFactory.getCurrentSession().createCriteria(Student.class);

            criteria.add(Restrictions.eq("name",name));

            //criteria.setFirstResult();

            //criteria.setMaxResults();

            criteria.add(Restrictions.eq("passWord",passWord));

            List<Student> list=criteria.list();

            return list;

        }


       @SuppressWarnings("unchecked")

       public List<Student> findAll(){

           return sessionFactory.getCurrentSession().createQuery("from Student").list();

       }


        public void update(Student model) {

            sessionFactory.getCurrentSession().update(model);

        }


        public void delete(Student model) {

            sessionFactory.getCurrentSession().delete(model);

        }

}
Student的service类:
package com.ceno.service;

import java.util.List;

import org.springframework.beans.factory.annotation.Autowired;

import org.springframework.stereotype.Service;

import org.springframework.transaction.annotation.Transactional;

import com.ceno.dao.EntityDao;

import com.ceno.form.Student;

@Service("studentService")

@Transactional

public class StudentService {

 @Autowired

 public EntityDao entityDao;

     public void save(Student st){

        entityDao.save(st);

     }

     public void delete(Student obj){

        entityDao.delete(obj);

     }

    public List<Student> findAll() {

           return entityDao.findAll();

      }

    public void update(Student model){

       entityDao.update(model);

    }

}
Student的controller类:
package com.ceno.controller;


/**

 * Created by IntelliJ IDEA.

 * User: Administrator

 * Date: 14-4-27

 * Time: 下午7:09

 * To change this template use File | Settings | File Templates.

 */

import java.util.List;

import javax.servlet.http.HttpServletRequest;

import javax.servlet.http.HttpServletResponse;

import org.apache.commons.logging.Log;

import org.apache.commons.logging.LogFactory;

import org.springframework.beans.factory.annotation.Autowired;

import org.springframework.beans.factory.annotation.Qualifier;

import org.springframework.stereotype.Controller;

import org.springframework.ui.ModelMap;

import org.springframework.web.bind.annotation.RequestMapping;

import org.springframework.web.bind.annotation.RequestParam;

import com.ceno.form.Student;

import com.ceno.service.StudentService;

@Controller

@RequestMapping("/student.do")

public class StudentController{

    protected final transient Log log

 = LogFactory.getLog(StudentController.class);

    @Autowired()

    public StudentService studentService;

    public StudentController(){}

    @RequestMapping

    public String load(ModelMap modelMap){

       List<Student> list = studentService.findAll();

       modelMap.put("list", list);

       return "student";

    }


    @RequestMapping(params = "method=add")

    public String add(HttpServletRequest request, ModelMap modelMap) throws Exception{

       return "student_add";

    }

    @RequestMapping(params = "method=save")

    public String save(HttpServletRequest request, ModelMap modelMap){

       Student st = new Student();

       String name = request.getParameter("name");

       String passWord = request.getParameter("passWord");

       st.setName(name);

       st.setPassWord(passWord);

       try{

           studentService.save(st);

           modelMap.put("addstate", "添加成功");

       }

       catch(Exception e){

           e.printStackTrace();

           log.error(e.getMessage());

           modelMap.put("addstate", "添加失败b");

       }

       return load(modelMap);

    }


    @RequestMapping(params = "method=del")

    public void del(@RequestParam("id") String id, HttpServletResponse response){

       try{

           Student st = new Student();

           st.setId(Integer.valueOf(id));

           studentService.delete(st);

           response.getWriter().print("{\"del\":\"true\"}");

       }

        catch(Exception e){

           log.error(e.getMessage());

           e.printStackTrace();

       }

    }

}
前台代码:
添加Student页面:
<%@ page language="java" contentType="text/html; charset=utf-8" pageEncoding="utf-8"%>

<%@ taglib prefix="c" uri="http://java.sun.com/jsp/jstl/core" %>

<!DOCTYPE html PUBLIC "-//W3C//DTD HTML 4.01 Transitional//EN" "http://www.w3.org/TR/html4/loose.dtd">

<html>

<head>

<meta http-equiv="Content-Type" content="text/html; charset=utf-8">

<title>添加</title>

<script type="text/javascript"></script>

</head>

<body>

<form method="post" action="student.do?method=save">

       <table>

           <tr><td>姓名</td><td><input id="name" name="name" type="text" /></td></tr>

           <tr><td>密码</td><td><input id="passWord" name="passWord"  type="text" /></td></tr>

           <tr><td colSpan="2" align="center"><input type="submit" value="提交"/>

           <input type="button" οnclick="turnback()" value="返回" /> </td></tr>

       </table>

</form>

</body>

</html>EL表达<%@page isELIgnored="false"%>问题
Web.xml的头配置信息
<web-app xmlns="http://java.sun.com/xml/ns/javaee"

           xmlns:xsi="http://www.w3.org/2001/XMLSchema-instance"

           xsi:schemaLocation="http://java.sun.com/xml/ns/javaee

                     http://java.sun.com/xml/ns/javaee/web-app_2_5.xsd"

           version="2.5">
注意里面的web-app_2_5.xsd,就是这个引起的,在web-app_2_4.xsd中就不会出现这种问题(这个版本的isELIgnored默认设置为false)。
在不改变web.xml2.5版本的情况下解决办法是:在jsp页面头加:<%@page isELIgnored="false"%> 问题得以解决。
还有就是:<%@page isELIgnored="false"%>的优先级要高于web.xml中的设置,所以在JSP中的设置会盖掉web.xml中的设置.
拦截器
Xml文件配置
<!-- 拦截器 -->

 <mvc:interceptors>

        <!-- 使用bean定义一个Interceptor,直接定义在mvc:interceptors根下面的Interceptor将拦截所有的请求 -->

        <bean class="com.ceno.interceptor.AllInterceptor"/>

        <mvc:interceptor>

            <!--

            设置拦截的路径

             <mvc:mapping path="/entryOrJsonController/*" />如果不配置或/*,将拦截所有的Controller

            -->

            <mvc:mapping path="/student.do?method=save"/>

            <bean class="com.ceno.interceptor.TimeInterceptor">

                <!-- property为拦截器注入属性 -->

                <!--openingTime 属性指定上班时间-->

                <property name="openingTime">

                    <value>12</value>

                </property>

                <!--closingTime属性指定下班时间-->

                <property name="closingTime">

                    <value>18</value>

                </property>

                <!--outsideOfficeHoursPage属性指定提示页面的URL-->

                <property name="outsideOfficeHoursPage">

                    <value>jsp/return.jsp</value>

                </property>

            </bean>

        </mvc:interceptor>

    </mvc:interceptors>


 247
247

 被折叠的 条评论
为什么被折叠?
被折叠的 条评论
为什么被折叠?
 到【灌水乐园】发言


