很难为你的应用程序得到正确的图像缩放吗?是你的图片过大,造成内存问题?还是图片不正确缩放造成不良用户体验的结果?为了寻求一个好的解决方案,我们咨询了Andreas Agvard(索尼爱立信软件部门),让他分享一些关于这方面的经验。
注意:本文没有完整显示出代码示例。你可以下载本文的PDF,来看完整的代码示例。

在索尼爱立信软件部门工作,我经常遇到需要图片缩放的应用,例如:当处理别人或者网络上提供的图片。缩放是必要的,因为通常情况下的图片不是你想要呈现的那样。
典型的例子,如果你正在为你的应用开发一个LiveView™扩展。大多数人开发应用利用LiveView™和其他第二屏幕设备,可能需要重新调整图片,重要的是要保持适当的缩放比例和图像质量。当然,在很多情况下,改变图片尺寸是一个有点困难,但是很有效的途径。
ImageView解决了许多的图片缩放问题,首先,至少你在设置完一个图片源后,不用去解码或缩放图片。但有时需要你自己去解码控制,这是本教程的用武之地。随着本教程,我写了一个代码示例,下载图片缩放代码示例。在文本中呈现的效果,可以通过编译和运行该项目来看到。
孤立的问题
我做这个教程,是因为我已经有一些实用方法来实现图片的缩放,为了避免最常见的图片缩放问题。如下面的例子:
1 | Bitmap unscaledBitmap = BitmapFactory.decodeResource(getResources(), mSourceId); |
2 | Bitmap scaledBitmap = Bitmap.createScaledBitmap(unscaledBitmap, wantedWidth, wantedHeight, true); |
那么在上面的代码中,什么是正确的,什么是错的?让我们来看看在不同的代码行。
行1:整个源图像解码到一个位图。
- 这可能会导致内存不足的错误,如果图片太大的话。
- 这可能会导致在一个高分辨率上解码图像。这可能会很慢,但智能解码器可为解码提高性能。
- 缩放图片很多时候是,高分辨率位图缩放到低分辨率,会导致锯齿的问题。使用位图过滤(例如,通过传送`true`参数到Bitmap.createScaledBitmap(...))减少了锯齿,但是还是不够。
行2:解码的位图缩放到想要的大小。
- 源图像的尺寸和想要的图像尺寸在长宽比上可能是不一样的。这将导致图像的拉伸。
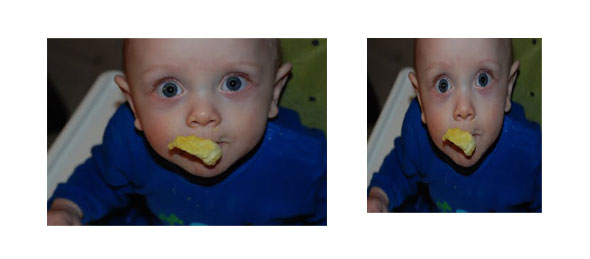
左边的图片:原始图像。右边的图片:缩放后图片。可以看出明显的失真问题,如原图的眼睛非常的鲜明,缩放后就没有了。高度出现拉伸。
创建一个解决方案
我们的解决方案,将有一个结构类似上述代码,其中的一部分将取代行1,这样为缩放做准备。另一部分将取代行2,做最后的缩放。我们将开始替换行2的部分代码,引入两个新的概念,裁剪和合适。
替换行2
在这一部分,我们将缩放位图到我们所需要的。这一步很必要,因为之前的解码能力是有限的。此外,在这一步为了避免拉伸,我们可能要重新调整图片到想要的大小。
有两种可能性可以避免拉伸。不管是那种,我们都要调整尺寸,以确保他们有相同的宽高比;即缩放图像作为源图像,直到它适合想要的尺寸,或裁剪具有相同的宽高比的源图像为想要的尺寸。
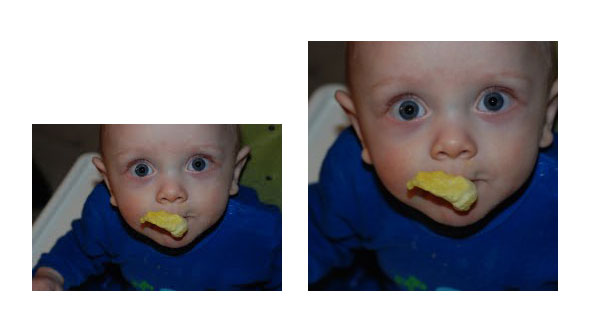
左边的图片:图像通过fit方法缩放。图片已被缩小到适合的尺寸和高度,结果是小于想要的高度。右边的图像:图像crop方法缩放。图像已被缩放到适应至少想要的尺寸。因此原图已被裁剪,切割了成左边和右边二部分。
为了缩放这样的效果,我们的实现代码如下:
1 | public static Bitmap createScaledBitmap(Bitmap unscaledBitmap, int dstWidth, intdstHeight, ScalingLogic scalingLogic) { |
2 | Rect srcRect = calculateSrcRect(unscaledBitmap.getWidth(), unscaledBitmap.getHeight(), dstWidth, dstHeight, scalingLogic); |
3 | Rect dstRect = calculateDstRect(unscaledBitmap.getWidth(), unscaledBitmap.getHeight(), dstWidth, dstHeight, scalingLogic); |
4 | Bitmap scaledBitmap = Bitmap.createBitmap(dstRect.width(), dstRect.height(), Config.ARGB_8888); |
5 | Canvas canvas = new Canvas(scaledBitmap); |
6 | canvas.drawBitmap(unscaledBitmap, srcRect, dstRect, newPaint(Paint.FILTER_BITMAP_FLAG));return scaledBitmap; |
在上面的代码,我们使用canvas.drawBitmap(...)做缩放。这种方法的裁剪区域是从源图像的规模面积定义画布的矩形为指定的目标矩形区域。为了避免拉伸,这两个矩形需要有相同的长宽比。我们还调用了两个实用的方法,一个为创建源矩形和另一个为创建目标矩形。方法如下:
01 | public static Rect calculateSrcRect(int srcWidth, int srcHeight, int dstWidth, intdstHeight, ScalingLogic scalingLogic) { |
02 | if (scalingLogic == ScalingLogic.CROP) { |
03 | final float srcAspect = (float)srcWidth / (float)srcHeight; |
04 | final float dstAspect = (float)dstWidth / (float)dstHeight; |
05 | if (srcAspect > dstAspect) { |
06 | final int srcRectWidth = (int)(srcHeight * dstAspect); |
07 | final int srcRectLeft = (srcWidth - srcRectWidth) / 2; |
08 | return new Rect(srcRectLeft, 0, srcRectLeft + srcRectWidth, srcHeight); |
10 | final int srcRectHeight = (int)(srcWidth / dstAspect); |
11 | final int scrRectTop = (int)(srcHeight - srcRectHeight) / 2; |
12 | return new Rect(0, scrRectTop, srcWidth, scrRectTop + srcRectHeight); |
15 | return new Rect(0, 0, srcWidth, srcHeight); |
18 | public static Rect calculateDstRect(int srcWidth, int srcHeight, int dstWidth, intdstHeight, ScalingLogic scalingLogic) { |
19 | if (scalingLogic == ScalingLogic.FIT) { |
20 | final float srcAspect = (float)srcWidth / (float)srcHeight; |
21 | final float dstAspect = (float)dstWidth / (float)dstHeight; |
22 | if (srcAspect > dstAspect) { |
23 | return new Rect(0, 0, dstWidth, (int)(dstWidth / srcAspect)); |
25 | return new Rect(0, 0, (int)(dstHeight * srcAspect), dstHeight); |
28 | return new Rect(0, 0, dstWidth, dstHeight); |
在刚好合适的情况下源矩形会包含整个源尺寸。在需要裁剪的情况下,它会计算好具有相同宽高比的目标图像,来裁剪源图像的宽度或高度,以达到你想要的尺寸。而刚好在合适的情况下,将有相同宽高比的源图像,调整成你想要的尺寸的宽度或高度。
替换行1
解码器很智能,特别是用于JPEG和PNG的格式。这些解码器在图片解码时可以进行缩放,并且性能也有所改善,这样锯齿问题也可以避免。此外,由于图片解码后变小了,需要的内存也会较少。
缩放解码的时候,只要简单设置上BitmapFactory.Options对象的inSampleSize参数,并把它传递给BitmapFactory。样本大小指定一个缩放图像大小的抽象因素,例如2是640×480图像在320×240图像上解码的因素。样本大小设置时,你不能保证严格按照这个数字,图像将被缩减,但至少它不会更小。例如,3倍640×480的图像可能会导致在一个320×240图像不支持值。通常情况下,至少2的一次方支持[1,2,4,8,...]。
下一步是指定一个合适的样本大小。合适的样本大小将产生最大的缩放,但仍然是大于等于你想要的图像尺寸。如下面代码:
01 | public static Bitmap decodeFile(String pathName, int dstWidth, int dstHeight, ScalingLogic scalingLogic) { |
02 | Options options = new Options(); |
03 | options.inJustDecodeBounds = true; |
04 | BitmapFactory.decodeFile(pathName, options); |
05 | options.inJustDecodeBounds = false; |
06 | options.inSampleSize = calculateSampleSize(options.outWidth, options.outHeight, dstWidth, dstHeight, scalingLogic); |
07 | Bitmap unscaledBitmap = BitmapFactory.decodeFile(pathName, options); |
08 | return unscaledBitmap; |
10 | public static int calculateSampleSize(int srcWidth, int srcHeight, int dstWidth, intdstHeight, ScalingLogic scalingLogic) { |
11 | if (scalingLogic == ScalingLogic.FIT) { |
12 | final float srcAspect = (float)srcWidth / (float)srcHeight; |
13 | final float dstAspect = (float)dstWidth / (float)dstHeight; |
14 | if (srcAspect > dstAspect) { |
15 | return srcWidth / dstWidth; |
17 | return srcHeight / dstHeight; |
20 | final float srcAspect = (float)srcWidth / (float)srcHeight; |
21 | final float dstAspect = (float)dstWidth / (float)dstHeight; |
22 | if (srcAspect > dstAspect) { |
23 | return srcHeight / dstHeight; |
25 | return srcWidth / dstWidth; |
在decodeFile(...)方法中,我们解码一个文件进行了最终缩放尺度。这是首先要通过解码源图片尺寸,然后使用calculateSampleSize(...)计算最佳样本大小,最后使用此样本的大小解码图像。如果你有兴趣的话,你可以更深入了解calculateSampleSize(...)方法,但以上方法基本可确保图片进行缩放。
全部放在一起
根据上面我们指定的方法的,现在可以执行替换最初的代码行:
1 | Bitmap unscaledBitmap = decodeFile(pathname, dstWidth, dstHeight, scalingLogic); |
2 | Bitmap scaledBitmap = createScaledBitmap(unscaledBitmap, dstWidth, dstHeight, scalingLogic); |
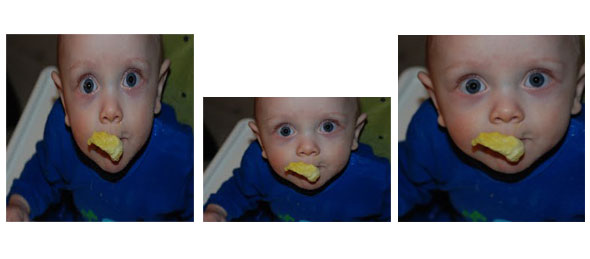
左边的图像:原始解决方案,解码消耗6693 KB的内存和1/4秒左右。结果被拉长失真。中间的图像:同比缩放解决方案,解码消耗418 KB的内存和1/10秒左右。右边的图像:裁剪解决方案,解码消耗418 KB的内存和1/10秒左右。
想要了解更多信息,请下载我们的代码示例。有了这个源码项目,你可以看到你的Android手机上运行的结果。


 1万+
1万+

 被折叠的 条评论
为什么被折叠?
被折叠的 条评论
为什么被折叠?
 到【灌水乐园】发言


