


1 服务进化概述
单体应用-> SOA ->微服务
1.1 单体应用
- 单体应用:所有功能全部打包在一起,应用大部分是一个war包或jar包
- 优点:容易开发、测试、部署,适合项目初期试错
- 缺点:都是由于所有代码在一起导致的
- 新增一个功能会对其他功能造成隐患
- 不利于维护
- 编译部署耗时长
- 可靠性差:某个小问题,比如小功能出现OOM,会导致整个应用崩溃。
- 扩展受限:只能整体扩展,无法按照需要进行扩展,每个服务器中都必须是全量代码
- 阻碍创新:单体应用是以一种技术解决所有问题,不容易引入新技术
1.2 SOA
- 面向服务架构:并不特指一种技术,而是一种分布式运算的软件设计方法。软件的部分组件(调用者),可以透过网络上的通用协议调用另一个应用软件组件运行、运作,让调用者获得服务
- 微服务其实是SOA思想的一种具体实践
1.3 微服务
- 微服务:是一种软件架构风格,它是以专注于单一责任与功能的小型功能区块为基础,利用模块化的方式组合出复杂的大型应用程序,各功能区块使用与语言无关的API(通常是HTTP API)集相互通信
- 可以通过需求和技术栈两个维度对将单体应用拆分成多个服务,这些抽象出的服务,比起原来那些服务更小,所以可以称为微服务。例如搜索服务、文件服务、http请求服务、短信服务、支付服务等
- 服务拆分太细,可能导致节点增加,同时如果从需求为度拆分,因为需求具有不确定性,可能导致之前拆分出的微服务越来越大,而随着这个微服务由不同的其他服务调用,很难重新对其再进行拆分
- 优点
- 单个服务重启速度快
- 可以将并发高的模块拆出来,单独做负载
- 缺点
- 微服务固有的复杂性:容错(某个服务宕机)、网络延时、调用关系、分布式事务
- 接口调整成本高:改一个接口,调用方都要改
- 测试难度提升:一个接口改变,所有调用方都得测,因此自动化测试就变的重要了,API文档的管理也尤为重要
- 运维要求高:需要维护几十上百个服务,监控变的复杂,并且还要关注多个集群,不像原来单体,一个应用正常运行即可
- 重复工作:比如java的工具类可以在共享common.jar中,但在多语言下行不通,C++无法直接用java的jar包
- 小项目一般不必使用spring cloud开发
2 Spring Cloud简介
- Spring Cloud是实现微服务架构的一系列框架的有机集合。是在Spring Boot基础上构建的,用于简化分布式系统构建的工具集。是拥有众多子项目的项目集合。利用Spring Boot的开发便利性,巧妙地简化了分布式系统基础设施(服务注册与发现、熔断机制、网关路由、配置中心、消息总线、负载均衡、链路追踪等)的开发
- TPS与QPS区别
- Transaction:是有状态的一些信息,比如想请求用户邮箱地址、注册时间,这些需要查数据库的东西,叫TPS
- 如果任何计算都没有,只是下载图片、文件上传,发送注册表单信息等,叫QPS
- TPS才是真正消耗系统性能的
- 版本:https://github.com/spring-cloud/spring-cloud-release/releases
- 例:vHoxton.SR4,为版本名.版本号
- 版本名:伦敦地铁字母顺序
- 版本号
- M(milestone):里程碑
- SR(Service Releases):稳定版
- RC(Release Candidate):稳定版的候选版,也就是稳定版的最后一个版本
3 第一阶段Spring Cloud技术点
- Eureka:服务注册中心,用于服务管理
- Feign: 远程服务调用,通过HTTP请求调用
- Ribbon:基于客户端的负载均衡
- Hystrix:熔断降级,防止服务雪崩
- Zuul:网关路由,提供路由转发、请求过滤、限流降级等功能
- Config:配置中心,分布式配置管理
- Sleuth:服务链路追
- Admin:健康管理
4 Eureka单节点搭建
-
创建名为eureka-test的maven项目
-
eureka-test项目下创建名为eureka-server的Module
-
Dependencies选择Spring Cloud Discovery–Eureka Server
-
application.properties
#1. 是否将自己注册到某个Eureka Server,也就是向Eureka Server的注册表中添加自身,默认为true,由于当前就是server,不必将自己注册到其他server上,故而设置成false eureka.client.register-with-eureka=false #2. 是否从注册中心获取注册表并缓存在本地,默认为true,由于单节点,不需要同步其他节点数据,故而设置成false eureka.client.fetch-registry=false #3. 使用的默认的注册中心,可以不填,因为当前服务既不向其注册,也不从其拉取注册表,不填写时,默认注册中心为http://localhost:8761/eureka/,此处可以配置多个注册中心 #eureka.client.service-url.defaultZone=http://localhost:7900/eureka/ #4. 其实我理解,以上信息都不填写,这个Eureka Server也能正常提供服务 #5. 设置当前启动的Eureka Server的端口号,默认8080 #server.port=7902 -
EurekaServerApplication
package com.mashibing.eurekaserver; import org.springframework.boot.SpringApplication; import org.springframework.boot.autoconfigure.SpringBootApplication; import org.springframework.cloud.netflix.eureka.server.EnableEurekaServer; //启动类上添加该注释即可 @EnableEurekaServer @SpringBootApplication public class EurekaServerApplication { public static void main(String[] args) { SpringApplication.run(EurekaServerApplication.class, args); } } -
查看Eureka监控后台:localhost:8080
5 Eureka高可用集群搭建
-
eureka集群,高可用,低一致性
-
如果注册列表中有错误的服务,通过客户端机制弥补,例如重试+超时
-
erueka宕机,服务仍然可用,因为客户端有服务的缓存
-
配置eureka集群,就是启动两个eureka server,他们之间互相注册,且可以互相拉取对方的注册列表,这样他们之间信息就能够保持一致
-
修改/etc/hostss,添加如下信息,因为如果都用localhost,euraka集群区分不出来,启动的两个服务是两台机器
127.0.0.1 euk1.com 127.0.0.1 euk2.com -
application.properties
spring.application.name=eureka-server #当启动第二台Eureka Server时,只需要将其改为euk2即可 spring.profiles.active=euk1 -
application-euk1.properties
#1. 自己是7001,并将自身作为客户端,注册到7002,且从7002获取注册列表 eureka.client.service-url.defaultZone=http://euk2.com:7002/eureka/ #2. hostname用来查找主机地址的,两个Eureka Server的hostname不能一样,如果只有一台电脑,可以配置不同主机名完成 #3. eureka.instance.appname用来设置Application名,作用和spring.application.name相同,Application名相同的几个服务,属于一组服务 eureka.instance.hostname=euk1.com server.port=7001 -
application-euk2.properties
eureka.client.service-url.defaultZone=http://euk1.com:7001/eureka/ eureka.instance.hostname=euk2.com server.port=7002 -
客户端配置
eureka.client.service-url.defaultZone=http://euk2.com:7002/eureka,http://euk1.com:7001/eureka -
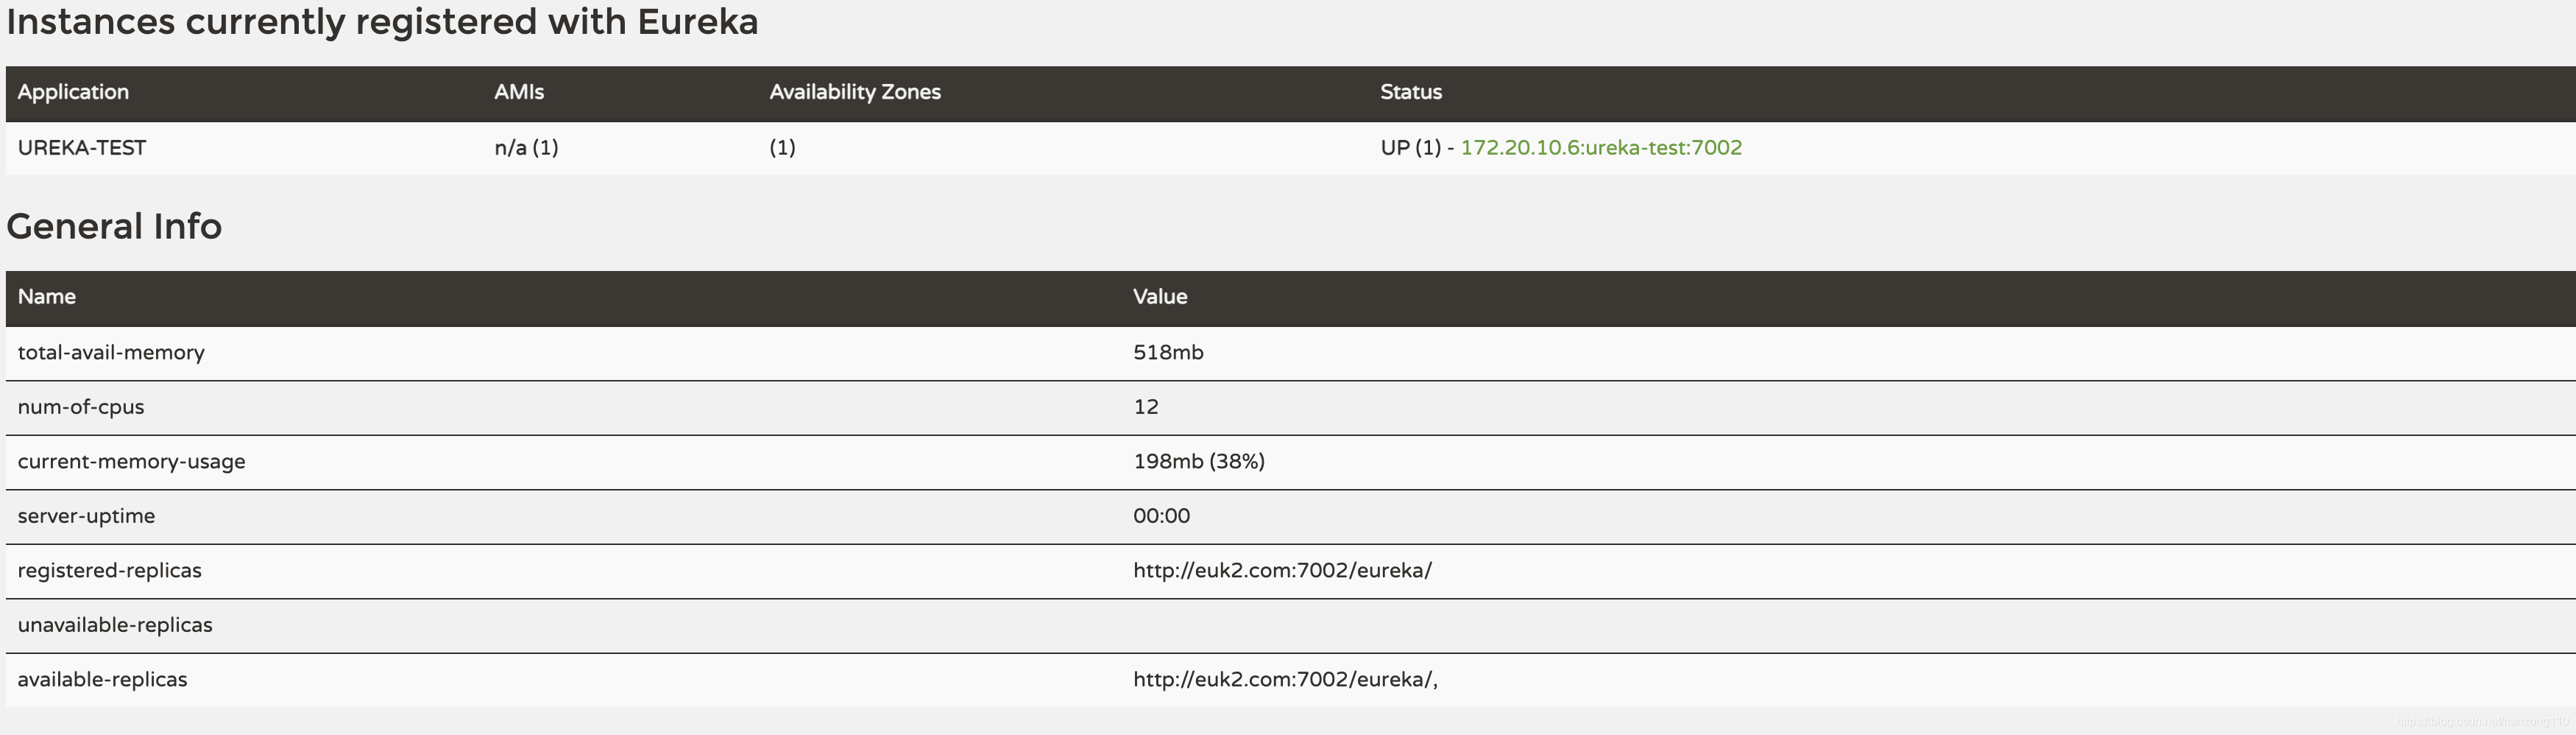
配置成功截图
- Application中显示UREKA-SERVER
- available-replicas中为其注册的Eureka Server
6 Eureka相关概念
- Eureka分为Eureka服务端和Eureka客户端两部分
- Eureka客户端按功能分为两种
- 需要将自身服务暴露给其他客户端的客户端
- 需要从注册中心获取注册列表的客户端
- Register:服务注册
- 想被其他客户端调用的服务,需要通过服务注册,将自身提供的服务信息放到注册中心(Eureka Server)的注册列表中
- 第一次心跳发生时完成注册
- Renew:续租,心跳
- 完成服务注册的服务,如果不想从注册中心的注册列表中被剔除,需要每30秒向注册中心发送一次心跳来完成续租
- 如果服务器在90秒内没有看到更新,服务端将从其注册表中删除client
- Fetch Registry:获取注册信息
- Eureka客户端从服务器获取注册表信息并将其缓存在本地,之后客户端使用这些信息来调用其他服务
- 定期(每30秒)更新上一个获取周期和当前获取周期之间的增量更新
- 获得增量之后,Eureka客户端通过比较服务器返回的实例计数来与服务器协调信息,如果由于某种原因信息不匹配,则再次获取整个注册表信息
- Cancel
- Eureka客户端在关闭时可以向Eureka服务器发送取消请求
- 从注册列表中删除实例,从而有效地将实例从通信量中取出
- 如果客户端已经关闭,但未调Cancel,那么注册列表中该服务会保留一段时间,这段时间该服务还会被人调用,但无法进行响应
- Time Lag:同步时间延迟
- 来自Eureka客户端的所有操作可能需要一段时间才能反映到Eureka服务器上,然后反映到其他Eureka客户端上
- 这是因为Eureka服务端上的有效负载缓存,它会定期(30s)刷新以反映新信息,Eureka客户端还定期(30s)地获取增量,因此更改传播到所有Eureka客户机可能需要2分钟
- Communication mechanism:通讯机制
- Eureka节点之间,通过REST风格的API进行通讯
7 服务注册
-
eureka-test项目下创建名为eureka-provider的Module
-
Spring Boot版本建议选择较低版本,否则有些jar包找不到
-
Dependencies选择Spring Cloud Discovery–Eureka Discovery Client,以及Web–Spring Web
-
MainController
package com.mashibing.eurekaprovider; import org.springframework.web.bind.annotation.GetMapping; import org.springframework.web.bind.annotation.RestController; //@Controller+@ResponseBody @RestController public class MainController { @Value("${server.port}") String port; //@RequestMapping+发送的为get请求 @GetMapping("/getHi") public String getHi() { return "Hi,my port is := "+port; } } -
application.properties
eureka.client.service-url.defaultZone=http://euk2.com:7002/eureka,http://euk1.com:7001/eureka
server.port=80
spring.application.name=eureka-provider
8 客户端配置选项
#续约发送间隔默认30秒,心跳间隔
eureka.instance.lease-renewal-interval-in-seconds=5
#表示eureka client间隔多久去拉取服务注册信息,默认为30秒,对于api-gateway,如果要迅速获取服务注册状态,可以缩小该值,比如5秒
eureka.client.registry-fetch-interval-seconds=5
#续约到期时间(默认90秒)
eureka.instance.lease-expiration-duration-in-seconds=60
9 服务器端配置选项
#关闭自我保护模式
eureka.server.enable-self-preservation=false
#失效服务间隔
eureka.server.eviction-interval-timer-in-ms=3000
10 非java应用程序使用Eureka
- 可以通过rest风格的http请求去请求Erureka
- 官方文档:https://github.com/Netflix/eureka/wiki/Eureka-REST-operations
- 相关概念说明
- appID:
EUREKA-PROVIDER,服务id,就是前面提到的服务名,也就是Application名,一个服务中有一组服务实例 - instanceID:
172.20.10.6:eureka-provider:80,服务实例id,表示一组服务中的具体某一个服务,我们启动一个provider,其实就是启动了一个服务实例
- appID:
- 举例:http://localhost:7002/eureka/status>可以用来查看服务状态,默认返回xml,如果需要返回json格式字符串,可以加个请求头
Accept:application/json,我们通常可以使用postman或yapi方便地生成http请求,并为该请求加上请求头
11 元数据
-
描述服务的一些数据,会存放在服务注册表中,客户端获取到的服务信息中,metadata节点下就是这些元数据
-
元数据分为标准元数据和自定义元数据
- 标准元数据:主机名、IP地址、端口号、状态页和健康检查等信息
- 自定义元数据:可以在Eureka服务端或Eureka客户端上,通过
eureka.instance.metadata-map.dalao参数进行配置,可后期用户个性化使用
-
自定义元数据
eureka.instance.metadata-map.dalao=mashibing -
此时通过REST风格的API访问Eureka的信息,就能看到自定义元数据信息被加到了
metadata下"metadata": { "dalao": "mashibing666", "management.port": "9001", "jmx.port": "10158" }
12 java应用程序通过EurekaClient使用Eureka
-
eureka-test项目下创建名为eureka-consumer的Module
-
Spring Boot版本建议选择较低版本,否则有些jar包找不到
-
Dependencies选择Spring Cloud Discovery–Eureka Discovery Client,以及Web–Spring Web
-
application.properties
eureka.client.service-url.defaultZone=http://euk2.com:7002/eureka,http://euk1.com:7001/eureka #不注册自身,只拉取服务 eureka.client.register-with-eureka=false server.port=8080 spring.application.name=eureka-consumer -
MainController
package com.mashibing.eurekaconsumer;

import com.netflix.appinfo.InstanceInfo;
import com.netflix.appinfo.InstanceInfo.InstanceStatus;
import com.netflix.discovery.EurekaClient;
import org.apache.commons.lang.builder.ToStringBuilder;
import org.springframework.beans.factory.annotation.Autowired;
import org.springframework.beans.factory.annotation.Qualifier;
import org.springframework.cloud.client.ServiceInstance;
import org.springframework.cloud.client.discovery.DiscoveryClient;
import org.springframework.cloud.client.loadbalancer.LoadBalancerClient;
import org.springframework.web.bind.annotation.GetMapping;
import org.springframework.web.bind.annotation.RestController;
import org.springframework.web.client.RestTemplate;

import java.util.List;

@RestController
public class MainController {
    //1. org.springframework.cloud.client.discovery
    //2. SpringCloud对注册中心client的抽象封装,提供公用功能,在Netflix Eureka和Consul中都有具体的实现类
    @Autowired
    DiscoveryClient client;

    //1. com.netflix.discovery
    //2. EurekaClient其实就是访问Eureka Server的一种java实现,功能比上面的更加丰富
    @Qualifier("eurekaClient")
    @Autowired
    EurekaClient client2;

    //1. 底层由ribbon实现
    @Autowired
    LoadBalancerClient lb;


    @GetMapping("/client3")
    public Object client3() {
        //org.springframework.cloud.client.discovery.composite.CompositeDiscoveryClient
        System.out.println(client);
        //1. 获取所有的服务的id,也就是服务名
        List<String> services = client.getServices();
        for (String str : services) {
            //eureka-server
            //eureka-provider
            System.out.println(str);
        }
        //2. 根据服务的id,获取这个服务下所有的服务实例
        List<ServiceInstance> instances = client.getInstances("eureka-provider");
        String respStr = null;
        if (instances.size() > 0) {
            //3. 取出第一个服务实例,获得其主机名、端口号
            ServiceInstance instanceInfo = instances.get(0);
            String url = "http://" + instanceInfo.getHost() + ":" + instanceInfo.getPort() + "/getHi";
            //4. RestTemplate可以发送HTTP请求
            RestTemplate restTemplate = new RestTemplate();
            respStr = restTemplate.getForObject(url, String.class);
        }
        return respStr;
    }

    @GetMapping("/client4")
    public Object client4() {
        //org.springframework.cloud.netflix.eureka.CloudEurekaClient
        System.out.println(client2);
        // 具体服务
//        List<InstanceInfo> instances = client2.getInstancesById("localhost:provider:80");
        // 根据服务id,获取所有服务实例
        List<InstanceInfo> instances = client2.getInstancesByVipAddress("eureka-provider", false);
        for (InstanceInfo ins : instances) {
            System.out.println(ToStringBuilder.reflectionToString(ins));
        }
        String respStr = null;
        if (instances.size() > 0) {
            InstanceInfo instanceInfo = instances.get(0);
            if (instanceInfo.getStatus() == InstanceStatus.UP) {
                String url = "http://" + instanceInfo.getHostName() + ":" + instanceInfo.getPort() + "/getHi";
                RestTemplate restTemplate = new RestTemplate();
                respStr = restTemplate.getForObject(url, String.class);
            }
        }
        return respStr;
    }


    @GetMapping("/client5")
    public Object client5() {
        System.out.println(lb);
        //ribbon会自动过滤掉status为down的节点
        //发现每次打印的端口号都不同
        ServiceInstance instance = lb.choose("eureka-provider");
        String url = "http://" + instance.getHost() + ":" + instance.getPort() + "/getHi";
        RestTemplate restTemplate = new RestTemplate();
        String respStr = restTemplate.getForObject(url, String.class);
        return respStr;
    }
}
13自我保护机制
-
默认情况下,Eureka Server在一定时间内(90S),没有接收到某个微服务心跳,会将某个微服务从自身注册列表中删除。但如果在Eureka Server上注册的这些客户端,到Eureka Server之间的网络大面积发生故障,那么这个删除动作就非常危险了,因为此时实际上从微服务到调用微服务的人之间是正常的,本不应该注销
-
Eureka Server通过自我保护模式来解决整个问题,当Server发现
客户端每分钟续约数<当前注册的应用实例数*2(默认情况下,注册的应用实例每半分钟续租一次,那么一分钟心跳两次,因此 x 2)*续租百分比( eureka.server.renewalPercentThreshold, 默认0.85 ),且自动保护模式开关开启(eureka.server.enable-self-preservation = true)时,Server会进入自我保护模式,保护注册表中的微服务不再被注销掉,当网络故障恢复后,退出自我保护模式 -
例如当前注册的应用实例数为10,那么期望每分钟续约数应该为10 * 2=20,因此期望阈值:20*0.85=17,当客户端每分钟续约数小于17时就会触发自我保护模式
-
出现下面这行字,就表示开启了自我保护
EMERGENCY! EUREKA MAY BE INCORRECTLY CLAIMING INSTANCES ARE UP WHEN THEY'RE NOT. RENEWALS ARE LESSER THAN THRESHOLD AND HENCE THE INSTANCES ARE NOT BEING EXPIRED JUST TO BE SAFE. -
关闭自我保护
eureka.server.enable-self-preservation=false
14 Actuator
-
Actuator可以上报服务节点状态信息
-
Eureka Server默认开启Actuator,Eureka Client默认不开启,需要人为开启
<dependency> <groupId>org.springframework.boot</groupId> <artifactId>spring-boot-starter-actuator</artifactId> </dependency> -
客户端启动后,通过http://localhost:81/actuator访问,返回如下信息
{ "_links": { "self": { "href": "http://localhost:7001/actuator", "templated": false }, "health": { "href": "http://localhost:7001/actuator/health", "templated": false }, "health-path": { "href": "http://localhost:7001/actuator/health/{*path}", "templated": true }, "info": { "href": "http://localhost:7001/actuator/info", "templated": false } } } -
默认端点
- 上面返回的信息中,我们将health、info称为端点,我们可以通过端点中的href访问该端点的状态,例如访问health端点状态:http://localhost:81/actuator/health
- Spring Boot 2.X的Actuator只暴露了health和info端点,提供的监控信息无法满足我们的需求
-
开启所有端点
#开启所有端点
management.endpoints.web.exposure.include=*
14.1 端点介绍
-
health:表示服务状态
-
shutdown:用来远程关闭服务
-
即使开启所有端点,该端点也不会出现,必须人工进行如下配置
management.endpoint.shutdown.enabled=true -
此时通过postman,发送post请求http://localhost:81/actuator/shutdown就可以关闭该服务节点
-
-
beans:获取应用上下文中创建的所有Bean
-
configprops:获取应用中配置的属性信息报告
-
env:获取应用所有可用的环境属性报告
-
mappings:获取应用所有Spring Web的控制器映射关系报告
-
info:获取应用自定义的信息
-
metrics:返回应用的各类重要度量指标信息,该节点并没有返回全量信息,我们可以通过不同的key去加载我们想要的值,例如http://localhost:81/actuator/metrics/jvm.memory.max
-
threaddump:返回程序运行中的线程信息 ,springboot 1.x中,名为dump
14.2 Eureka的健康检查
-
ribbon这种客户端,只会调用UP状态的服务,只有90s不发送心跳包的服务才会被注册列表删除,DOWN状态的服务不会被注册列表删除
-
某些场景,例如短信被限制每日200000笔,200000笔后调用该服务会报错,此时实际上该服务端口还在,且到注册中心网没问题,那么实际上心跳包还能一直发送,而默认情况下,只要心跳包能发送,Eureka Server就认为服务实例的状态为UP,因此该服务还是会被调用,因此当服务在,但想表示该服务不可用时,应该修改Actuator监控的该服务的heath端点状态改为DOWN,并启动Eureka的健康检查,告知Eureka Server使用Actuator监控的该服务的heath端点状态作为该服务实例真正的状态
-
启动eureka的健康检查
eureka.client.healthcheck.enabled=true -
修改health状态Service
package com.mashibing.eurekaprovider; import org.springframework.boot.actuate.health.Health; import org.springframework.boot.actuate.health.HealthIndicator; import org.springframework.stereotype.Service; @Service public class HealthStatusService implements HealthIndicator { private Boolean status = true; public void setStatus(Boolean status) { this.status = status; } @Override public Health health() { // TODO Auto-generated method stub if(status) return new Health.Builder().up().build(); return new Health.Builder().down().build(); } public String getStatus() { // TODO Auto-generated method stub return this.status.toString(); } } -
修改健康状态的controller
@Autowired HealthStatusService healthStatusSrv; @GetMapping("/health") public String health(@RequestParam("status") Boolean status) { healthStatusSrv.setStatus(status); return healthStatusSrv.getStatus(); } -
发送请求http://localhost:81/health?status=false将heath端点状态改为DOWN,过一会后发现http://localhost:7001/中检测到的该服务状态也变为DOWN
-
再启动一个新的正常的provider,会发现Eureka Server中监控到该服务下有两个服务实例,一个状态为UP,一个状态为DOWN,通过http://localhost:8080/client5远程调用服务实例,发现每次调用的都是状态为UP的服务实例,DOWN的无法被调起
15 Security
-
eureka-server中新增依赖
<dependency> <groupId>org.springframework.boot</groupId> <artifactId>spring-boot-starter-security</artifactId> </dependency> -
如果为新增Module时可以在Dependencies中选择Security–Spring Security
-
此时启动eureka-server后登陆,会提示需要输入用户名和密码
-
必须配置登陆的账号密码,否则无法登陆
#配置账号密码,不配置进不去 spring.security.user.name=yiming spring.security.user.password=123 -
配置完后,Eureka Client注册这个注册中心时会报错,需要将用户名和密码在配置文件中写明
eureka.client.service-url.defaultZone=http://yiming:123@euk1.com:7001/eureka/ -
启动Eureka集群后后抛如下异常,是因为Eureka默认开启防止跨域攻击
2020-11-25 09:35:24.653 INFO 2286 --- [tbeatExecutor-0] c.n.d.s.t.d.RedirectingEurekaHttpClient : Request execution error. endpoint=DefaultEndpoint{ serviceUrl='http://yiming:123@euk2.com:7002/eureka/}, exception=com.fasterxml.jackson.databind.exc.MismatchedInputException: Root name 'timestamp' does not match expected ('instance') for type [simple type, class com.netflix.appinfo.InstanceInfo] -
在服务端增加配置类来关闭防止跨域攻击
package com.mashibing.eurekaserver;

import org.springframework.context.annotation.Configuration;
import org.springframework.security.config.annotation.web.builders.HttpSecurity;
import org.springframework.security.config.annotation.web.configuration.EnableWebSecurity;
import org.springframework.security.config.annotation.web.configuration.WebSecurityConfigurerAdapter;

@Configuration
@EnableWebSecurity
public class WebSecurityConfig extends WebSecurityConfigurerAdapter {
    @Override
    protected void configure(HttpSecurity http) throws Exception {
        // TODO Auto-generated method stub
        http.csrf().disable();
        super.configure(http);
    }
}
16 Ribbon
16.1 负载均衡简介
-
软件负载均衡,按服务端地址列表、负载均衡算法的存储位置不同,分为两类
- 服务端负载均衡:客户端只知道单一服务代理(nginx)的地址,服务代理(nginx)知道客户端要访问的服务端地址列表,其实如果换个角度,将nginx服务器看作一个客户端,那么服务端负载均衡就变成了客户端为nginx的客户端负载均衡
- 客户端负载均衡:所有客户端都有一份自己要访问的服务端地址列表,这些列表都从服务注册中心获取
-
Ribbon是Netflix开发的客户端负载均衡器,为Ribbon配置服务提供者地址列表后,Ribbon就可以基于某种负载均衡策略算法,自动地帮助服务消费者去选择一个服务提供者
-
Ribbon可以单独使用,作为一个独立的负载均衡组件,只是需要我们手动配置服务地址列表
ribbon.eureka.enabled=false #1. 为所有服务设置服务器列表 ribbon.listOfServers=localhost:80,localhost:81 #2. 为指定服务设置服务器列表 #eureka-provider.ribbon.listOfServers=localhost:80,localhost:81 -
Ribbon与Eureka配合使用时,Ribbon可自动从Eureka Server获取服务提供者地址列表
-
Ribbon可以与OpenFeign和RestTemplate进行无缝对接,让二者具有负载均衡的能力
-
16.2 负载均衡策略
- ZoneAvoidanceRule(区域权衡策略):默认算法,复合判断Server所在区域的性能和Server的可用性选择服务实例,在没有区域的环境下,类似于轮询(RandomRule)
- BestAvailableRule(最低并发策略):会先过滤掉由于多次访问故障而处于断路器跳闸状态的服务,然后选择一个并发量最小的服务。逐个找服务,如果断路器打开,则忽略
- RoundRobinRule(轮询策略):以简单轮询选择一个服务器。按顺序循环选择一个server
- RandomRule(随机策略):随机选择一个服务器
- AvailabilityFilteringRule(可用过滤策略):会先过滤掉多次访问故障而处于断路器跳闸状态的服务和过滤并发的连接数量超过阀值的服务,然后对剩余的服务列表安装轮询策略进行访问
- WeightedResponseTimeRule(响应时间加权策略):据平均响应时间计算所有的服务的权重,响应时间越快服务权重越大,容易被选中的概率就越高。刚启动时,如果统计信息不中,则使用RoundRobinRule(轮询)策略,等统计的信息足够了会自动的切换到WeightedResponseTimeRule。响应时间长,权重低,被选择的概率低。反之,同样道理。此策略综合了各种因素(网络,磁盘,IO等),这些因素直接影响响应时间
- RetryRule(重试策略):先按照RoundRobinRule(轮询)的策略获取服务,如果获取的服务失败则在指定的时间会进行重试,进行获取可用的服务。如多次获取某个服务失败,就不会再次获取该服务。主要是在一个时间段内,如果选择一个服务不成功,就继续找可用的服务,直到超时
16.3 切换负载均衡策略
- 通过注解切换
- 通过配置文件切换
- 配置文件优先级高于注解
16.3.1 注解
@Bean
public IRule myRule(){
  //return new RoundRobinRule();
  //return new RandomRule();
  return new RetryRule();
}
16.3.2 配置文件
#1. 为所有服务修改Ribbon策略
ribbon.NFLoadBalancerRuleClassName=com.netflix.loadbalancer.RandomRule
#2. 为指定服务修改Ribbon策略
eureka-provider.ribbon.NFLoadBalancerRuleClassName=com.netflix.loadbalancer.RandomRule
16.4 Ribbon使用
-
eureka-consumer/EurekaConsumerApplication
//1. RestTemplate无状态,不必每次都新建一个,因此通过Bean的方式注入spring,默认是单例 @Bean //2. 为RestTemplate开启负载均衡功能,发现不开启就无法让RestTemplate通过url中的服务名找到对应服务,所以一般都开启 @LoadBalanced RestTemplate restTemplate() { return new RestTemplate(); } -
eureka-consumer/MainController
@Autowired
RestTemplate restTemplate;

@GetMapping("/client9")
public Object client9() {
  //1. Ribbon会查找服务列表中,服务id为eureka-provider的所有服务实例,按自身默认的负载均衡策略,选取其中一个服务实例,将其ip、端口等信息拼接到url中
  //2. 然后由RestTemplate发送http请求
  //3. 如果不开启负载均衡,也就不会由Ribbon来查找服务列表
  String url ="http://eureka-provider/getHi";
  String respStr = restTemplate.getForObject(url, String.class);
  return respStr;
}
17 服务调用
- Spring Cloud提供两种方式,RestTemplate和Feign
- 他们只能调用RESTful API,本质上就是发送HTTP请求
- HTTP请求完成服务调用,比RPC效率低,但更简洁
18 RestTemplate
18.1 REST简介
- REST(Representational State Transfer):表现层状态转换,也称为RESTful,是Roy Thomas Fielding博士于2000年在他的博士论文提出的一种万维网上的软件的一种架构风格,目的是便于不同应用程序在网络中互相传递信息,可以理解为是在HTTP协议基础上预先定义一组约束和属性。按REST风格设计的应用程序,允许他人通过预先约定好的URI,来访问和操作自身
- 目前在三种主流的Web服务实现方案中,REST模式比SOAP和XML-RPC更加简洁
- HTTP请求方法在RESTful API(符合REST设计风格的Web API)中的典型应用
| 资源 | GET | PUT | POST | DELETE |
|---|---|---|---|---|
一组资源的URI,比如https://example.com/resources | 列出URI,以及该资源组中每个资源的详细信息(后者可选)。 | 使用给定的一组资源替换当前整组资源。 | 在本组资源中创建/追加一个新的资源。该操作往往返回新资源的URL。 | 删除整组资源。 |
单个资源的URI,比如https://example.com/resources/142 | 获取指定的资源的详细信息,格式可以自选一个合适的网络媒体类型(比如:XML、JSON等) | 替换/创建指定的资源。并将其追加到相应的资源组中。 | 把指定的资源当做一个资源组,并在其下创建/追加一个新的元素,使其隶属于当前资源。 | 删除指定的元素。 |
18.2 RestTemplate简介
- 用于访问REST风格的应用程序的客户端,底层使用jdk内置的HttpURLConnection实现,而HttpURLConnection不支持连接池,如果想使用连接池,需要使用第三方的HttpClient替换HttpURLConnection来作为底层实现
- swagger:一个文档在线自动生成+功能测试功能软件,项目引入swagger的依赖后,就可以在业务代码上使用swagger提供的注释,服务启动后,swagger也会启动一个服务,同时根据业务代码上的注释,来生成接口文档,客户可以通过RESTful API来访问swagger生成的接口文档,也可以完成简单的接口调用
- 服务提供者编写号接口后,通常通过swagger生成接口文档,供服务消费者查看
18.3 RestTemplate使用
-
eureka-consumer/MainController
@GetMapping("/client10") public Object client10() { String url = "http://eureka-provider/getHi"; //发送GET请求 //1. 返回一个String对象 String respStr = restTemplate.getForObject(url, String.class); //2. 返回一个ResponseEntity,ResponseEntity是Spring对HTTP请求响应的封装,包括了几个重要的元素,如响应码、contentType、contentLength、响应消息体等 ResponseEntity<String> entity = restTemplate.getForEntity(url, String.class); System.out.println("entity:" + entity); System.out.println(respStr); return respStr; } @GetMapping("/client11") public Object client11() { String url = "http://eureka-provider/getMap"; //返回一个Map对象 Map<String, String> map = restTemplate.getForObject(url, Map.class); return map; } @GetMapping("/client13") public Object client13() { //使用占位符完成参数传递 String url = "http://eureka-provider/getHi?name={1}"; String respStr = restTemplate.getForObject(url, String.class, "didiao"); return respStr; } @GetMapping("/client14") public Object client14() { //使用Map完成参数传递 String url = "http://eureka-provider/getHi?name={name}"; Map<String, String> map = Collections.singletonMap("name", "xiao66"); String respStr = restTemplate.getForObject(url, String.class, map); return respStr; } @GetMapping("/client16") public Object client16() { String url = "http://eureka-provider/postParam?name={1}&sex={2}"; //POST请求传递表单数据 Map<String, String> map = Collections.singletonMap("aaa", "bbb"); //发送POST请求 //参数一:请求的url //参数二:请求体中数据 //参数三:请求返回的数据类型 //参数四..:为uri中占位符传递值 String name = restTemplate.postForObject(url, map, String.class, "handidiao", "man"); return name; } @GetMapping("/client15") public Object client15(HttpServletResponse response) throws Exception { // 自动处理URL String url = "http://eureka-provider/postLocation"; URI location = restTemplate.postForLocation(url, "handidiao"); System.out.println(location); //将请求重定向收到的url中 response.sendRedirect(location.toURL().toString()); return location; } -
eureka-provider/MainController
@GetMapping("/getMap")
public Map<String, String> getMap() {
  return Collections.singletonMap("id", "100");
}

//@RequestBody:用于接收请求体里的数据,post请求的表单数据在这里
//@RequestParam:用于接受请求行里的数据,get请求的url中的数据在这里,之前一直有误区,实际上post请求的url中,也可以拼接?name=111&sex=man来传递参数
//没有任何修饰,默认从请求行里获取数据
//因此name和sex接收url中的数据,str接收整个请求体,将请求体转为String类型,实际上通过postForObject(url, map, String.class,"handidiao","man"),传递的请求体,是一个Map类型,整个map会被强制转为String类型,并放在str中
@PostMapping("/postParam")
public String postParam(@RequestBody String str, String name, String sex) {
  return "str:=" + str + ",name:=" + name + ",sex:=" + sex;
}

@PostMapping("/postLocation")
public URI postLocation(@RequestBody String name, HttpServletResponse response) throws Exception {
  URI uri = new URI("https://www.baidu.com/s?wd=" + name);
  //如果不加这句话,那么返回给consumer的uri就是null
  response.addHeader("Location", uri.toString());
  return uri;
}
18.4 RestTemplate拦截器
-
RestTemplate每次发送请求都会被拦截
-
LoggingClientHttpRequestInterceptor:自定义拦截器
package com.mashibing.eurekaconsumer; import org.springframework.http.HttpRequest; import org.springframework.http.client.ClientHttpRequestExecution; import org.springframework.http.client.ClientHttpRequestInterceptor; import org.springframework.http.client.ClientHttpResponse; import java.io.IOException; public class LoggingClientHttpRequestInterceptor implements ClientHttpRequestInterceptor { @Override public ClientHttpResponse intercept(HttpRequest request, byte[] body, ClientHttpRequestExecution execution) throws IOException { System.out.println("拦截啦!!!"); System.out.println(request.getURI()); //RestTemplate发送请求 ClientHttpResponse response = execution.execute(request, body); System.out.println(response.getHeaders()); return response; } } -
EurekaConsumerApplication:添加拦截器
@Bean
// 开启负载均衡
@LoadBalanced
RestTemplate restTemplate() {
  RestTemplate restTemplate = new RestTemplate();
  restTemplate.getInterceptors().add(new LoggingClientHttpRequestInterceptor());
  return restTemplate;
}
19 Feign
19.1 Feign、OpenFeign简介
- Feign:声明式服务调用,使我们可以仅在接口上加注释就能完成web客户端的编写,从而调用web服务
- Open Feign:Netflix公司提供的Feign的开源项目
- Spring Cloud OpenFeign:Spring Cloud对OpenFeign进行了集成,增加了OpenFeign对Spring MVC注释的支持
- Spring Cloud OpenFeign内部集成Ribbon、Hystrix、RestTemplate来提供负载均衡、断路器、远程调用等功能
19.2 Spring Cloud OpenFeign使用
19.2.1 user-provider
-
eureka-test项目下创建名为user-provider的Module
-
Dependencies选择Spring Cloud Discovery–Eureka Discovery Client和Web–Spring Web
-
application.properties
eureka.client.service-url.defaultZone=http://euk2.com:7002/eureka,http://euk1.com:7001/eureka server.port=82 spring.application.name=user-provider -
UserController
package com.mashibing.userprovider;

import org.springframework.web.bind.annotation.GetMapping;
import org.springframework.web.bind.annotation.RestController;

@RestController
public class UserController {
    //正常user-provider应该写一个文档,给所有客户端看,告诉他们怎么调用自己的服务,但如果只有java编写的客户端,没有php客户端,就没必要写文档了,因为不如给客户端user-consumer一套接口,直接调用就行了
    @GetMapping("/provideralive")
    public String provideralive() {
        return "ok";
    }
}
19.2.2 user-consumer
-
eureka-test项目下创建名为user-consumer的Module
-
Dependencies选择Spring Cloud Discovery–Eureka Discovery Client、Web–Spring Web、Spring Cloud Routing–Open Feign
-
application.properties
eureka.client.service-url.defaultZone=http://euk2.com:7002/eureka,http://euk1.com:7001/eureka #不注册自身,只拉取服务 eureka.client.register-with-eureka=false server.port=8081 spring.application.name=user-consumer -
UserConsumerApplication
package com.mashibing.userconsumer; import org.springframework.boot.SpringApplication; import org.springframework.boot.autoconfigure.SpringBootApplication; import org.springframework.cloud.openfeign.EnableFeignClients; @SpringBootApplication //加载Feign,之前Eureka Client也需要使用类似注释开启,但新版本简化了 @EnableFeignClients public class UserConsumerApplication { public static void main(String[] args) { SpringApplication.run(UserConsumerApplication.class, args); } } -
MainController
package com.mashibing.userconsumer; import org.springframework.beans.factory.annotation.Autowired; import org.springframework.web.bind.annotation.GetMapping; import org.springframework.web.bind.annotation.RestController; @RestController public class MainController { @Autowired UserApi api; @GetMapping("/consumeralive") public String consumeralive() { return api.provideralive(); } } -
UserApi
package com.mashibing.userconsumer;

import org.springframework.cloud.openfeign.FeignClient;
import org.springframework.web.bind.annotation.GetMapping;

//1. 调用该接口中的方法时,如果发现接口有@FeignClient注释,会拦截方法调用,不会真正执行该方法,而是改为由Feign来发送HTTP请求到指定的服务实例
//2. 查找服务名为xxoo的服务实例,如果不存在,使用url中设置的值作为服务实例地址
@FeignClient(name = "xxoo", url = "http://localhost:82")
public interface UserApi {
    //1. 相当于发送请求到http://localhost:82/provideralive
    //2. 注意这个/provideralive,这是看服务提供方给的API文档写出来的
    //3. 想调用远程的服务,必须声明一个方法,所以叫声明式服务调用
    @GetMapping("/provideralive")
    public String provideralive();
}
19.2.3 user-consumer使用eureka提供注册列表
-
user-consumer/UserApi
package com.mashibing.userconsumer;

import org.springframework.cloud.openfeign.FeignClient;
import org.springframework.web.bind.annotation.GetMapping;

//user-provider为服务名
@FeignClient(name = "user-provider")
public interface UserApi {
    @GetMapping("/provideralive")
    public String provideralive();
}
19.2.4 将访问user-provider的方法单独提取成一个jar包
-
到此为止,Feign和RestTemplate调用服务没有本质上区别
-
可以将访问user-provider的方法,单独放在一个接口中,并将这个接口打成jar包,这样,user-consumer就能直接使用这个jar包来调用服务
-
eureka-test项目下创建名为user-api的Module
-
Dependencies选择Web–Spring Web
-
UserApi
package com.mashibing.userapi; import org.springframework.web.bind.annotation.GetMapping; public interface UserApi { @GetMapping("/provideralive") public String provideralive(); } -
使用maven-install对user-api打包
-
在user-consumer中引入user-api项目
<dependency> <groupId>com.mashibing</groupId> <artifactId>user-api</artifactId> <version>0.0.1-SNAPSHOT</version> </dependency> -
将user-consumer中UserApi删除
-
user-consumer中创建ConsumerApi
package com.mashibing.userconsumer; import com.mashibing.userapi.UserApi; import org.springframework.cloud.openfeign.FeignClient; //使用FeignClient拦截方法调用,改为发送http请求到user-provider @FeignClient(name="user-provider") public interface ConsumerApi extends UserApi { } -
修改MainController
package com.mashibing.userconsumer; import org.springframework.beans.factory.annotation.Autowired; import org.springframework.web.bind.annotation.GetMapping; import org.springframework.web.bind.annotation.RestController; @RestController public class MainController { @Autowired ConsumerApi api; //其实也可以写UserApi //UserApi api; @GetMapping("/consumeralive") public String consumeralive() { return api.provideralive(); } } -
此时user-consumer已经可以完成远程调用
-
在user-provider中引入user-api项目
-
修改user-provider/UserController
package com.mashibing.userprovider; import com.mashibing.userapi.UserApi; import org.springframework.web.bind.annotation.RestController; @RestController public class UserController implements UserApi { //正常user-provider应该写一个文档,给所有客户端看,告诉他们怎么调用自己的服务,但如果只有java编写的客户端,没有php客户端,就没必要写文档了,因为不如给客户端user-consumer一套接口,直接调用就行了 // @GetMapping("/provideralive") // public String provideralive() { // return "ok"; // } @Override public String provideralive() { return "ok"; } } -
此时user-provider也能正确提供服务了
-
实际上真正生产上,UserApi是user-provider提供的,表示自身有哪些接口,user-consumer将UserApi引入后,由ConsumerApi接口实现UserApi接口,并在该接口上加入注释
@FeignClient(name="user-provider"),这样当调用该接口的方法时,就会由Feign自动调用远程服务上实现了UserApi接口的UserController中的同名方法,user-api只能提供给java实现的客户端,无法跨语言
19.3 Spring Cloud OpenFeign参数传递
-
user-api/UserApi
//1. 参数优先接收请求体中的值,其次接收请求行中的值 //2. 无论对于GET还是POST请求,有bug,必须加@RequestParam或@RequestBody注释,否则传递到user-provider的参数值为null @GetMapping("/getMap") Map<Integer, String> getMap(@RequestParam("id") Integer id); //3. 对每个参数需要逐个设置 @GetMapping("/getMap2") Map<Integer, String> getMap2(@RequestParam("id") Integer id, @RequestParam("name") String name); @GetMapping("/getMap3") Map<Integer, String> getMap3(@RequestParam Map<String, Object> map); @PostMapping("/postMap") Map<Integer, String> postMap(@RequestParam Map<String, Object> map); -
user-provider/UserController
//1. 此处不需要再使用@GetMapping("/getMap"),因为UserApi中已经写了,参数列表中也无需写@RequestParam public Map<Integer, String> getMap(Integer id) { System.out.println(id); //2. 此处id如果为空,会导致整个请求失败 return Collections.singletonMap(id, "mmeme"); } public Map<Integer, String> getMap2(Integer id, String name) { System.out.println(id); return Collections.singletonMap(id, name); } public Map<Integer, String> getMap3(Map<String, Object> map) { System.out.println(map); return Collections.singletonMap(Integer.parseInt(map.get("id").toString()), map.get("name").toString()); } public Map<Integer, String> postMap(Map<String, Object> map) { System.out.println(map); return Collections.singletonMap(Integer.parseInt(map.get("id").toString()), map.get("name").toString()); } -
user-consumer/MainController
@GetMapping("/map")
public Map<Integer, String> map(Integer id) {
  System.out.println(id);
  return api.getMap(id);
}

@GetMapping("/map2")
public Map<Integer, String> map2(Integer id,String name) {
  System.out.println(id);
  return api.getMap2(id,name);
}


@GetMapping("/map3")
public Map<Integer, String> map3(@RequestParam Map<String, Object> map) {
  //		System.out.println(id);
  //		HashMap<String, Object> map = new HashMap<>(2);
  //
  //		map.put("id", id);
  //		map.put("name", name);
  //		syso
  System.out.println(map);
  return api.getMap3(map);
}


@GetMapping("/map4")
public Map<Integer, String> map4(@RequestParam Map<String, Object> map) {
  //		System.out.println(id);
  //		HashMap<String, Object> map = new HashMap<>(2);
  //
  //		map.put("id", id);
  //		map.put("name", name);
  //		syso
  System.out.println(map);
  return api.postMap(map);
}
19.4 Spring Cloud OpenFeign超时与重试
-
OpenFeign默认支持Ribbon,而Ribbon的重试机制和OpenFeign的重试机制有冲突,所以源码中默认关闭OpenFeign的重试机制,使用Ribbon的重试机制
-
user-consumer/application.properties
#1. 连接超时时间(ms) ribbon.ConnectTimeout=1000 #2. 业务逻辑超时时间(ms),设置好后,当发送请求到user-provider超时后,就会返回超时 ribbon.ReadTimeout=1000 #3. 也可以针对某个服务设置超时时间 #user-provider.ribbon.ReadTimeout=6000 #4. 默认为false,表示POST请求不重试,只有GET请求重试 ribbon.OkToRetryOnAllOperations=true #5. 同一台实例最大重试次数,不包括首次调用 ribbon.MaxAutoRetries=1 #6. 重试负载均衡其他的实例最大重试次数,不包括首次调用 ribbon.MaxAutoRetriesNextServer=1 -
实验:当启动两台user-provider,一个超时一个不超时,且user-consumer配置为
ribbon.MaxAutoRetries=1,user-consumer发送请求,如果第一次到达超时的user-provider,由于调用超时,进行重试,第二次仍然发送到这个超时的user-provider,仍然超时,再次进行重试,第三次发送到不超时的user-provider,之后正确返回结果。此后一段时间内如果再次发送请求,请求只会发送到不超时的user-provider,直到过了这段时间再次发送请求,才会重新向发向超时的user-provider
20 Hystrix
20.1 Hystrix简介
- Hystrix是Netflix开源的一个延迟和错误容忍库,旨在隔离自身与远程系统、服务和第三方库,防止在依赖的服务出现高延迟或失败时,导致级联失败,并使复杂的分布式系统在不可避免的故障中具有弹性,主要功能包括隔离、降级、熔断
- 可以简单地理解为,就是通过AOP实现了在调用远程服务前后加入异常处理机制,保证远程服务调用报错或延迟时,不影响当前服务
- 隔离:Hystrix为每种请求user-consumer的uri或远程服务调用,建立一个线程池,也就是将不同的uri或不同的远程服务调用进行隔离,当线程池中线程数满,会使用降级方法处理,可以防止user-consumer因为user-provider的堵塞导致自身被拖死
- 降级:服务降级指当我们的服务器压力剧增,为了保证核心功能的可用性,而选择性地降低一些功能的可用性,或者直接关闭该功能。对于Hystrix就是指当调用远程服务超时或失败时,提供一个默认方法,使用默认方法中功能替代原有远程服务的功能
- 熔断:指依赖的外部接口出现故障时,断绝和外部接口的关系,同时在外部接口恢复后,自动重新建立与外部接口的关系,从而防止应用程序不断地尝试可能超时和失败的服务,而导致整个链路的请求时间,和加重超时/失败服务的压力。可以创建一个计数器,记录调用远程服务错误次数,成功清零,不成功累加,如果达到一定阈值,就不再调用该远程服务,同时在随机次数后,重新尝试调用远程服务,如果成功,解除熔断,如果失败继续熔断
20.2 脱离Spring Cloud独立使用Hystrix
package com.mashibing.userconsumer;

import com.netflix.hystrix.HystrixCommand;
import com.netflix.hystrix.HystrixCommandGroupKey;

import java.util.concurrent.ExecutionException;
import java.util.concurrent.Future;

public class HystrixTest extends HystrixCommand {

    protected HystrixTest(HystrixCommandGroupKey group) {
        super(group);
    }

    public static void main(String[] args) throws ExecutionException, InterruptedException {
        //1. 对于线程池隔离,每个key产生一个线程池
        HystrixTest hystrixTest = new HystrixTest(HystrixCommandGroupKey.Factory.asKey("ext"));
        //2. queue:异步非阻塞执行run,execute:同步阻塞执行run
        Future<String> futureResult = hystrixTest.queue();
        String result = "";
        //3. 对于queue方法,在此处阻塞
        result = futureResult.get();
        //4. 该结果正常应该是run方法的结果,但Hystrix会拦截业务逻辑中的异常,进入getFallback方法,最终将getFallback方法返回值返回到这,其实就是代理实现的
        System.out.println("程序结果:" + result);
    }

    @Override
    protected Object run() throws Exception {
        System.out.println("执行逻辑");
        int i = 1 / 0;
        return "ok";
    }

    //降级方法
    @Override
    protected Object getFallback() {
        return "降级";
    }
}
20.3 RestTemplate整合Hystrix
-
user-consumer/UserConsumerApplication
//RestTemplate没有内置Hystrix,所以需要手动开启 @EnableCircuitBreaker public class UserConsumerApplication -
user-consumer引入Hystrix的pom依赖
<dependency> <groupId>org.springframework.cloud</groupId> <artifactId>spring-cloud-starter-netflix-hystrix</artifactId> </dependency> -
user-consumer/MainController
@HystrixCommand(fallbackMethod = "back")
@GetMapping("/consumeralive1")
public String alive() {
  //当alive中内容超时或报错,就自动转为调用back方法并返回
  String url = "http://user-provider/provideralive";
  String object = restTemplate.getForObject(url, String.class);
  return object;
}

public String back() {
  return "降级页面";
}
20.4 Feign整合Hystrix
-
user-consumer引入Hystrix的pom依赖
-
user-consumer/application.properties
feign.hystrix.enabled=true -
user-consumer/ConsumerApi
//fallback:应变计划,fallback会将下面所有的错误,都回掉到AliveBack类中 //spring会从容器中,找AliveBack类型的bean,所以其实现,需要交由spring管理 @FeignClient(name="user-provider",fallback = AliveBack.class) public interface ConsumerApi extends UserApi -
user-consumer/AliveBack
//需要对每个接口,指定报错时如何处理,所以应该继承ConsumerApi //注意UserApi类上面如果有@RequestMapping,且配置了Hystrix,那么启动时,会报错,这个是Hystrix的一个bug,只能去掉@RequestMapping解决 @Component public class AliveBack implements ConsumerApi { //方法是对远程方法调用失败时的降级处理 @Override public String provideralive() { return "降级"; } } -
MainController
//此时ConsumerApi在spring容器中,存在了两个实例,AliveBack和ConsumerApi的,因此此处会报错,需要将变量名改为AliveBack首字母小写,表示使用AliveBack的实例对该变量进行注入,或者在变量上使用@Qualifier("aliveBack")注释指定要注入的Bean的id @Autowired ConsumerApi aliveBack; -
经过测试发现,user-consumer/MainController/consumeralive方法中如果出错,是不会进入降级方法的,只有调用的远程服务出错,才会进入降级方法,这和RestTemplate整合Hystrix时效果不同
20.5 使用fallbackFactory检查具体错误
-
通常在user-provider做异常处理,比如抛一个自定义异常,并返回特定响应码,然后user-consumer就可以通过fallbackFactory指定的工厂类的create方法,将异常对象传递给具体的降级方法,这样降级方法中就可以根据不同的异常进行不同地处理
-
user-consumer/ConsumerApi
@FeignClient(name="user-provider",fallbackFactory = UserProviderBackFactory.class) public interface ConsumerApi extends UserApi { } -
user-consumer/UserProviderBackFactory
package com.mashibing.userconsumer;

import feign.hystrix.FallbackFactory;
import org.springframework.stereotype.Component;

import java.util.Map;

@Component
public class UserProviderBackFactory implements FallbackFactory<ConsumerApi> {
    @Override
    public ConsumerApi create(Throwable cause) {
        return new ConsumerApi() {

            @Override
            public String provideralive() {
                cause.printStackTrace();
                return "降级";
            }

            @Override
            public Map<Integer, String> getMap(Integer id) {
                return null;
            }

            @Override
            public Map<Integer, String> getMap2(Integer id, String name) {
                return null;
            }

            @Override
            public Map<Integer, String> getMap3(Map<String, Object> map) {
                return null;
            }

            @Override
            public Map<Integer, String> postMap(Map<String, Object> map) {
                return null;
            }
        };
    }

}
20.6 信号量隔离与线程隔离
-
线程池隔离:使用Hystrix自身建立线程池中的线程去调用远程服务,有一定的延迟,一般用于网络调用
-
信号量隔离:使用Tomcat线程去调用远程服务,不需要开启内部线程池,更加轻量级,速度更快,适用于无网络的高并发请求
-
当请求数超过线程或信号量限定的数量,会直接调用降级方法不再调用远程服务
-
相关配置
#1. 命令执行超时时间,默认为1000ms
hystrix.command.default.execution.isolation.thread.timeoutInMilliseconds=1000
#2. 是否启用超时机制,默认为true
hystrix.command.default.execution.timeout.enabled=false
#3. 发生超时是是否中断,默认true
hystrix.command.default.execution.isolation.thread.interruptOnTimeout
#4. 最大并发请求数,默认10,当隔离策略为SEMAPHORE时才生效,如果达到最大并发请求数,请求会直接返回降级方法,通常该值应该占整个容器(tomcat)的线程池的一小部分
hystrix.command.default.execution.isolation.semaphore.maxConcurrentRequests
#5. 隔离策略,默认值为Thread, 可选Semaphore,default表示对所有方法进行配置,也可以针对某个方法配置
hystrix.command.default.execution.isolation.strategy=SEMAPHORE
20.7 Hystrix Dashboard
-
actuator可以将hystrix的相关信息进行上报,而Hystrix Dashboard可以收集actuator上报的hystrix的相关信息,并以可视化的页面进行展示
-
user-consumer/pom.xml
<dependency> <groupId>org.springframework.boot</groupId> <artifactId>spring-boot-starter-actuator</artifactId> </dependency> <dependency> <groupId>org.springframework.cloud</groupId> <artifactId>spring-cloud-starter-netflix-hystrix-dashboard</artifactId> </dependency> -
user-consumer/application.properties
#开启actuator所有端点 management.endpoints.web.exposure.include=* #新版本需要将dashboard监控的主机名,添加到此处,否则dashboard无法正常显示 hystrix.dashboard.proxy-stream-allow-list=localhost -
user-consumer/UserConsumerApplication
@EnableHystrixDashboard -
查看actuator上报信息:http://localhost:8081/actuator/hystrix.stream
-
Hystrix Dashboard监控页面:http://localhost:8081/hystrix
21 Zuul
21.1 Zuul简介
- 在idea中使用Spring Initializr的启动器创建项目时,默认使用提供启动器服务的地址为https://start.spring.io/,如果有时网络不通,可以使用阿里提供的启动器服务https://start.aliyun.com/
- Zuul是Netflix开源的微服务网关,默认集成了Ribbon和Hystrix
- 使用网关注册eureka-server,然后我们就能通过访问网关来访问eureka-server中注册的其他服务,无需输入具体服务对应的url,只需输入网关的url即可,网关会帮我们转发
- 网关可以用于对user-consumer做负载均衡,其实原理和user-consumer对user-provider的负载均衡相同,也是使用Ribbon完成的
- Zuul叫做业务网关,和Nginx做的工作完全相同,与lvs区别在于,Zuul是7层的,所以效率没有lvs高,也没有lvs抗压能力强,通常可以使用lvs为Zuul做负载均衡,网关根据发送自身的url信息,自动将请求转给对应的服务,这个动作叫做路由
21.2 搭建网关
-
eureka-test项目下创建名为zuul-test的Module
-
Dependencies选择Spring Cloud Discovery–Eureka Discovery Client、Spring Cloud Routing–Zuul、Web–Spring Web
-
application.properties
eureka.client.service-url.defaultZone=http://euk2.com:7002/eureka,http://euk1.com:7001/eureka server.port=8082 spring.application.name=zuul-test -
ZuulTestApplication
@EnableZuulProxy -
启动eureka-server、user-provider、user-consumer、zuul-test
-
测试访问
- 未配置zuul-test前,需要通过http://localhost:8081/consumeralive访问user-consumer
- 配置zuul-test后,可以通过http://localhost:8082/user-consumer/consumeralive访问user-consumer
- 也就是说网关会将客户的请求转发给url中服务名对应的具体服务
21.3 修改网关负载均衡策略
-
zuul-test/application.properties
#和之前修改一摸一样,在网关服务zuul-test上设置
user-consumer.ribbon.NFLoadBalancerRuleClassName=com.netflix.loadbalancer.RandomRule
21.4 开启actuator端点
-
routes端点可以查看访问网关的url和转发到的服务的映射关系
#启动一些端点
management.endpoints.web.exposure.include=*
management.endpoint.health.show-details=always
management.endpoint.health.enabled=true
management.endpoint.routes.enabled=true
21.5 配置指定微服务的访问路径
-
通过服务名配置:zuul-test/application.properties
#1. 配置后,相当于添加了url为/xxoo/**到user-consumer服务的映射 #2. 因此同时可以通过http://localhost:8082/xxoo/consumeralive或http://localhost:8082/user-consumer/consumeralive访问user-consumer的服务 zuul.routes.user-consumer=/xxoo/** #3. 下面两行配置和上面一行的含义相同 zuul.routes.handidiao.path=/xxoo/** zuul.routes.handidiao.serviceId=user-consumer -
自定义映射:zuul-test/application.properties
#1. 添加一个路由条目,路由名叫handidiao,url为/xxoo/**时,使用这条路有 zuul.routes.handidiao.path=/xxoo/** #2. handidiao这条路由,转发给http://mashibing.com zuul.routes.handidiao.url=http://mashibing.com #3. 发送到网关的/handidiao/**的请求,都被转发给http://mashibing.com -
不使用eureka提供负载均衡列表
zuul.routes.handidiao.path=/xx/**
zuul.routes.handidiao.serviceId=handidiao
handidiao.ribbon.listOfServers=localhost:82,localhost:83
ribbon.eureka.enabled=false
21.6 忽略指定微服务
-
zuul-test/application.properties
#配置后就无法通过网关,将请求转发给user-provider这个微服务
zuul.ignored-services=user-provider
21.7 前缀
-
zuul-test/application.properties
#1. 配置前缀后,访问网关的url中,必须带前缀才能被正确路由,例如http://localhost:8082/api/v1/user-provider/provideralive
zuul.prefix=/api/v1
#2. 是否去除前缀,默认值为true,user-provider服务收到的url为http://localhost:83/provideralive,如果配置为false,user-provider服务收到的url实际上为http://localhost:83/api/v1/provideralive,我们当前user-provider中没有对该url的处理,因此当前配置为false会报错
zuul.strip-prefix=false
22 Sleuth
22.1 Sleuth简介
- 链路追踪用于追踪每个请求,中间经过哪些微服务、请求耗时、网络延迟、业务逻辑耗时等,通过追踪到的信息,我们能更好地分析系统瓶颈,从而解决系统问题
- 链路追踪通常要考虑如下几个问题
- 尽量不影响服务本尊
- 开发可以很快接入,别浪费太多精力
- 可以实时收集数据,且维度足够,便于分析
- Sleuth是Spring cloud的分布式链路追踪解决方案
22.2 Sleuth中相关概念介绍
- 一个外部请求所经过的链路中,包含多个Span,他们的Span ID不同,但Trace ID相同,其中Span ID和Trace ID都是64位的唯一标识
- Span:代表一个基础的工作单元,一个HTTP请求对应一个Span,Span中存放了Span ID、Trace ID、描述信息、时间戳、Annotation键值对属性、上级工作单元的Span ID,链路中第一个Span叫做Root Span,其Span ID和Trace ID相同
- Trace:由一系列具有相同Trace ID的Span串联形成的一个树状结构,在复杂的分布式系统中,每一个外部请求通常都会产生一个复杂的树状结构的Trace
- Annotation:用来及时地记录一个事件的存在,可以把Annotation理解为一个包含有时间戳的事件标签,对于一个HTTP请求,sleuth中定义了下面四个核心Annotation来标识一个事件的开始与结束
- cs(Client Send):客户端发起请求,Span开始
- sr(Server Received):服务端接到请求,sr - cs = 网络延迟
- ss(Server Send):服务器端处理完成,并将结果发送给客户端表示服务器完成请求处理,ss - sr =服务器处理请求的时间
- cr(Client Received ): 客户端接受服务端信息,Span结束,cr - cs = 客户端发出请求到服务器响应的总时间
22.3 Sleuth使用
-
在链路中每个需要被进行链路追踪的的微服务上进行配置,例如此处在user-consumer和user-provider上配置
-
pom
<!-- 引入sleuth依赖 --> <dependency> <groupId>org.springframework.cloud</groupId> <artifactId>spring-cloud-starter-sleuth</artifactId> </dependency> -
加入后发现打印日志也发生了变化
#加入Sleuth前
2020-12-04 07:30:21.098  INFO 2743 --- [user-provider-1] c.netflix.config.ChainedDynamicProperty  : Flipping property: user-provider.ribbon.ActiveConnectionsLimit to use NEXT property: niws.loadbalancer.availabilityFilteringRule.activeConnectionsLimit = 2147483647

#加入Sleuth后
2020-12-04 07:28:43.734  INFO [user-consumer,d0d8a964b1ea6529,7cd547faad869a1d,true] 2719 --- [user-provider-1] c.netflix.config.ChainedDynamicProperty  : Flipping property: user-provider.ribbon.ActiveConnectionsLimit to use NEXT property: niws.loadbalancer.availabilityFilteringRule.activeConnectionsLimit = 2147483647

#[服务名,Trace ID,Span ID,是否允许zipkin收集和展示此信息]
[user-consumer,d0d8a964b1ea6529,7cd547faad869a1d,true]
22.4 Zipkin使用
-
Zipkin是twitter开源的分布式跟踪系统,Sleuth可以将收集到的跟踪信息通过Zipkin提供的RESTful API,发送给Zipkin的服务端,Zipkin服务端提供了一个友好的界面展示这些信息
-
Zipkin服务端默认内存存储,可以用mysql,ES等存储
-
所有配置了Sleuth的地方配置Zipkin客户端
-
pom
<!-- zipkin --> <dependency> <groupId>org.springframework.cloud</groupId> <artifactId>spring-cloud-starter-zipkin</artifactId> </dependency> -
application.properties
#配置zipkin服务端地址 spring.zipkin.baseUrl=http://localhost:9411/ spring.sleuth.sampler.rate=1 -
启动zipkin服务端
docker run -d -p 9411:9411 openzipkin/zipkin -
此时发送请求http://localhost:8081/consumeralive,然后登陆zipkin可视化界面,就能查看各链路调用情况
23 SpringCloud Admin
23.1 Admin简介
- 微服务上可以配置Admin的客户端,Admin客户端通过actuator将微服务的相关健康信息上报给Admin的服务端,然后就可以通过Admin的服务端可视化界面监控这些服务的健康状态
23.2 Admin使用
-
Admin服务端搭建
-
eureka-test项目下创建名为admin-test的Module
-
pom
<dependency> <groupId>de.codecentric</groupId> <artifactId>spring-boot-admin-starter-server</artifactId> </dependency> <!-- Admin 界面 --> <dependency> <groupId>de.codecentric</groupId> <artifactId>spring-boot-admin-server-ui</artifactId> </dependency> -
AdminTestApplication
@EnableAdminServer
-
-
Admin客户端搭建:在user-consumer、user-provider、eureka-server等所有要监控的微服务上进行配置
-
pom
<dependency> <groupId>de.codecentric</groupId> <artifactId>spring-boot-admin-starter-client</artifactId> <version>2.2.1</version> </dependency> <!-- 注意必须开启actuator --> <dependency> <groupId>org.springframework.boot</groupId> <artifactId>spring-boot-starter-actuator</artifactId> </dependency> -
application.properties
management.endpoints.web.exposure.include=*
management.endpoint.health.show-details=always
spring.boot.admin.client.url=http://localhost:8080
-
-
启动后,就可以通过http://localhost:8080/applications访问Admin提供的可视化界面,从而监控集群中的微服务的健康状态
23.3 Admin发送邮件
-
Spring Cloud Admin可以在发现某个微服务下线时,给指定邮箱发送邮件通知
-
admin-test/pom.xml
<dependency> <groupId>org.springframework.boot</groupId> <artifactId>spring-boot-starter-mail</artifactId> </dependency> -
application.properties
spring.mail.host=smtp.qq.com
spring.mail.username=770686421
#此密码不是qq密码,是在qq邮箱中生成的,第三方登录qq邮箱的授权码
spring.mail.password=xxxxxxxxxxxxxxxx
spring.mail.properties.mail.smpt.auth=true
spring.mail.properties.mail.smpt.starttls.enable=true
spring.mail.properties.mail.smpt.starttls.required=true

spring.boot.admin.notify.mail.to=770686421@qq.com
spring.boot.admin.notify.mail.from=770686421@qq.com
23.4 钉钉群通知
-
启动类
package com.mashibing.admin; import org.springframework.boot.SpringApplication; import org.springframework.boot.autoconfigure.SpringBootApplication; import org.springframework.context.annotation.Bean; import de.codecentric.boot.admin.server.config.EnableAdminServer; import de.codecentric.boot.admin.server.domain.entities.InstanceRepository; @SpringBootApplication @EnableAdminServer public class AdminApplication { public static void main(String[] args) { SpringApplication.run(AdminApplication.class, args); } @Bean public DingDingNotifier dingDingNotifier(InstanceRepository repository) { return new DingDingNotifier(repository); } } -
通知类
package com.mashibing.admin; import java.util.Map; import com.alibaba.fastjson.JSONObject; import de.codecentric.boot.admin.server.domain.entities.Instance; import de.codecentric.boot.admin.server.domain.entities.InstanceRepository; import de.codecentric.boot.admin.server.domain.events.InstanceEvent; import de.codecentric.boot.admin.server.notify.AbstractStatusChangeNotifier; import reactor.core.publisher.Mono; public class DingDingNotifier extends AbstractStatusChangeNotifier { public DingDingNotifier(InstanceRepository repository) { super(repository); } @Override protected Mono<Void> doNotify(InstanceEvent event, Instance instance) { String serviceName = instance.getRegistration().getName(); String serviceUrl = instance.getRegistration().getServiceUrl(); String status = instance.getStatusInfo().getStatus(); Map<String, Object> details = instance.getStatusInfo().getDetails(); StringBuilder str = new StringBuilder(); //此处必须和机器人上设置的关键字完全相同,否则无法发送到叮叮群 str.append("服务预警 : 【" + serviceName + "】"); str.append("【服务地址】" + serviceUrl); str.append("【状态】" + status); str.append("【详情】" + JSONObject.toJSONString(details)); return Mono.fromRunnable(() -> { DingDingMessageUtil.sendTextMessage(str.toString()); }); } } -
发送工具类
package com.mashibing.admin; import java.io.InputStream; import java.io.OutputStream; import java.net.HttpURLConnection; import java.net.URL; import com.alibaba.fastjson.JSONObject; public class DingDingMessageUtil { //从叮叮群获取,点进群设置--智能群助手--添加机器人--自定义--自定义关键词勾选--起名叫系统预警--添加后,记录webhook地址,这个地址,替换到当前Token字符串位置 public static String access_token = "Token"; public static void sendTextMessage(String msg) { try { Message message = new Message(); message.setMsgtype("text"); message.setText(new MessageInfo(msg)); URL url = new URL("https://oapi.dingtalk.com/robot/send?access_token=" + access_token); // 建立 http 连接 HttpURLConnection conn = (HttpURLConnection) url.openConnection(); conn.setDoOutput(true); conn.setDoInput(true); conn.setUseCaches(false); conn.setRequestMethod("POST"); conn.setRequestProperty("Charset", "UTF-8"); conn.setRequestProperty("Content-Type", "application/Json; charset=UTF-8"); conn.connect(); OutputStream out = conn.getOutputStream(); String textMessage = JSONObject.toJSONString(message); byte[] data = textMessage.getBytes(); out.write(data); out.flush(); out.close(); InputStream in = conn.getInputStream(); byte[] data1 = new byte[in.available()]; in.read(data1); System.out.println(new String(data1)); } catch (Exception e) { e.printStackTrace(); } } } -
消息类
package com.mashibing.admin;

public class Message {
	private String msgtype;
    private MessageInfo text;
    public String getMsgtype() {
        return msgtype;
    }
    public void setMsgtype(String msgtype) {
        this.msgtype = msgtype;
    }
    public MessageInfo getText() {
        return text;
    }
    public void setText(MessageInfo text) {
        this.text = text;
    }
}
package com.mashibing.admin; public class MessageInfo { private String content; public MessageInfo(String content) { this.content = content; } public String getContent() { return content; } public void setContent(String content) { this.content = content; } }
24 配置中心
24.1 配置中心简介
- 微服务中服务非常多,如果某项配置信息想要对所有服务修改,必须在所有服务上都进行修改,比较麻烦,且必须重启服务,配置中心可以,将配置文件集中管理,只需修改一次,且可以自动重启服务重新加载被修改的配置信息
- 分布式配置中心包括3个部分
- 存放配置的地方:本地git仓库、github等
- Config Server:从本地git仓库上读取配置文件
- Config Client:从Config Server中读取配置信息
24.2 gitee
- 创建gitee仓库:https://gitee.com/handidiao/configuration-center.git
- 创建本地仓库,并与gitee上远程仓库关联
- 创建文件consumer-dev.properties并上传
24.3 Config Server搭建
-
eureka-test项目下创建名为config-center的Module
-
pom
<dependency> <groupId>org.springframework.cloud</groupId> <artifactId>spring-cloud-config-server</artifactId> </dependency> <!--可以将自身注册到注册中心,其实也可以不必,因为Config Client可以直接通过URL指定配置中心--> <dependency> <groupId>org.springframework.cloud</groupId> <artifactId>spring-cloud-starter-netflix-eureka-client</artifactId> </dependency> -
ConfigCenterApplication
@EnableConfigServer -
application.properties
eureka.client.service-url.defaultZone=http://euk2.com:7002/eureka/ #git地址 spring.cloud.config.server.git.uri=https://gitee.com/handidiao/configuration-center.git #项目分支 spring.cloud.config.label=master spring.application.name=config-center server.port=9999 -
启动config-server,此时就可以通过http://localhost:9999/consumer-dev.properties访问git上的配置文件,该url表示读取master分支下的consumer-dev.properties文件,也可以使用http://localhost:9999/test/consumer-dev.properties,访问test分支下的文件
24.4 Config Client搭建
-
想从config-server中读取配置文件的所有微服务的pom中引入Config Client的依赖,此处以user-consumer服务读取配置中心中数据为例
-
user-consumer/pom
<dependency> <groupId>org.springframework.cloud</groupId> <artifactId>spring-cloud-config-client</artifactId> </dependency> -
user-consumer/MainController
@Value("${config.info}") String info; @GetMapping("/configCenterTest") public String configCenterTest() { return info; } -
user-consumer/application.properties,必须改名为bootstrap.properties,否则启动报错
#1. 通过URL方式查找配置中心 spring.cloud.config.uri=http://localhost:9999/ #2. 通过eureka注册中心查找配置中心,这样可以多弄几个配置中心放到注册中心,就能实现配置中心的高可用 #spring.cloud.config.discovery.enabled=true #3. 告诉注册中心,配置中心的服务名是什么 #spring.cloud.config.discovery.service-id=config-center #4. Config Client相当于会通过http://localhost:9999/{label}/{服务名}-{profile}.properties访问Config Server中的配置信息,label相当于分支名,profile相当于环境名称(dev:开发、qa:测试、prd:生产) #5. 因此如果按如下配置,user-consumer想正确读取文件,我们应该上传一个名user-consumer-dev.properties文件为到gitee仓库的test分支中 spring.cloud.config.profile=dev spring.cloud.config.label=test -
访问http://localhost:8081/config-center-test,显示user-consumer-dev.properties文件中config.info的值,说明客户端配置成功
24.5 刷新配置
24.5.1 单节点刷新配置
-
user-consumer/bootstrap.properties
#必须开启actuator上的refresh端点 management.endpoints.web.exposure.include=* -
user-consumer/MainController
//需要重新读配置文件的地方才加,不需要的不用加 @RefreshScope public class MainController -
向user-consumer发送POST请求http://localhost:8081/actuator/refresh来更新配置信息,从新读取配置过程中服务不可用
-
此时访问http://localhost:8081/config-center-test发现返回内容已经改变
24.5.2 批量刷新配置
-
Spring Cloud Bus:消息总线,其中一个功能就是给所有微服务发送消息,我们可以让所有想更新配置文件的微服务都接入Bus,然后当配置文件更新时,通过POST请求http://localhost:8081/actuator/bus-refresh向其中一个微服务发送更新请求,之后Bus会自动将更新请求转发给所有服务
-
配置中心是没有推送消息的功能的,所以无法通知所有连接其的微服务更新自身配置信息,也因此我们需要使用Bus完成这个动作
-
支持amqp协议的消息中间件可以接入Bus,Bus通过这些消息中间件完成各个微服务上的消息传递。rabbitmq和kafka默认支持amqp协议,因此此处选择rabbitmq接入Bus
-
启动rabbitmq
#1. management为带管理控制台版本的rabbitmq,其中15672为管理界面端口,5672为rabbitmq收发消息的端口 #2. 可以通过http://localhost:15672/访问管理控制台,默认用户名密码为guest docker run -d -p 5672:5672 -p 15672:15672 -p 25672:25672 rabbitmq:management -
user-consumer接入Bus
<!--bus依赖--> <dependency> <groupId>org.springframework.cloud</groupId> <artifactId>spring-cloud-starter-bus-amqp</artifactId> </dependency> -
user-consumer中配置Bus使用的rabbitmq地址、端口、用户名、密码等信息
#rabbitmq地址,端口,用户名,密码 spring.rabbitmq.host=localhost spring.rabbitmq.port=5672 spring.rabbitmq.username=guest spring.rabbitmq.password=guest -
通知所有接入Bus的微服务更新配置:http://localhost:8081/actuator/bus-refresh
-
通知其中一个微服务更新配置:http://localhost:8081/actuator/refresh


 被折叠的 条评论
为什么被折叠?
被折叠的 条评论
为什么被折叠?
 到【灌水乐园】发言


