


上一篇我们说到了三种方式储存数据信息,已经讲到了第一种SharedPreferences,那么这一篇就讲一下第二种文件File的方式。
同样还是以一个例子来讲一下。直接上技术,理论的东西自己去研究。。。
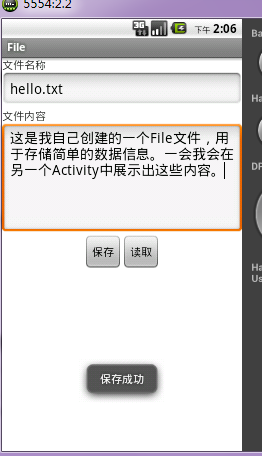
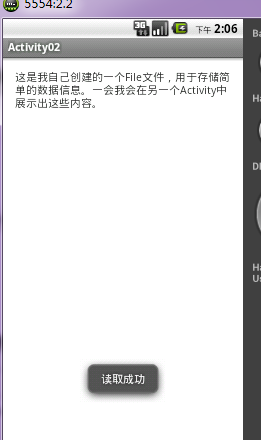
先上图,看效果:
布局文件antivity_main.xml,这个对于我们来说不难弄:
<LinearLayout xmlns:android="http://schemas.android.com/apk/res/android"
    xmlns:tools="http://schemas.android.com/tools"
    android:layout_width="match_parent"
    android:layout_height="match_parent"
    android:orientation="vertical" >

    <TextView
        android:layout_width="wrap_content"
        android:layout_height="wrap_content"
        android:text="@string/titleName" />

    <EditText
        android:id="@+id/titleName"
        android:layout_width="fill_parent"
        android:layout_height="wrap_content" />

    <TextView
        android:layout_width="wrap_content"
        android:layout_height="wrap_content"
        android:text="@string/page" />

    <!-- 输入时光标左上角 -->
    <!-- 可以显示多行 -->
    <!-- 最小显示6行 -->

    <EditText
        android:id="@+id/page"
        android:layout_width="fill_parent"
        android:layout_height="wrap_content"
        android:gravity="left|top"
        android:inputType="textMultiLine"
        android:minLines="6" />

    <LinearLayout
        android:layout_width="wrap_content"
        android:layout_height="wrap_content"
        android:orientation="horizontal"
        android:layout_gravity="center_horizontal">


	    <Button
	        android:id="@+id/save"
	        android:layout_width="wrap_content"
	        android:layout_height="wrap_content"
	        android:text="@string/save" />

	    <Button
	        android:id="@+id/read"
	        android:layout_width="wrap_content"
	        android:layout_height="wrap_content"
	        android:text="@string/read" />
    </LinearLayout>
</LinearLayout>
注意EditText设置的多行问题。上边已经标注出来了。仔细研究研究即可。
这里也可以抽取出一个Model层的通用类FileService,以后用到储存文本信息时就直接调用即可。File存储要用到一个类FileOutputStream,这个类是关键,首先new一下,然后调用方法write()。
FileOutputStream outputStream = context.openFileOutput(fileName,context.MODE_WORLD_READABLE+context.MODE_WORLD_WRITEABLE);
outputStream.write(page.getBytes());
通用类FileService.java
public class FileService {

	private Context context;

	public FileService(Context context){
		this.context = context;
	}

	/* 存储信息 */
	public void save(String fileName,String page) throws IOException{
		FileOutputStream outputStream = context.openFileOutput(fileName, context.MODE_WORLD_READABLE+context.MODE_WORLD_WRITEABLE);
		outputStream.write(page.getBytes());
		outputStream.flush();
		outputStream.close();
	}

	/* 读取信息 */
	public String read(String fileName) throws IOException{
		FileInputStream inputStream = context.openFileInput(fileName);
		int len = 0;
		byte [] buffer = new byte[1024];

		ByteArrayOutputStream bao = new ByteArrayOutputStream(); //往内存中输出数据
		while((len=inputStream.read(buffer)) != -1){ //如果数据量很大,第2次读取的数据有可能会把第1次读取的数据给覆盖掉
			bao.write(buffer, 0, len);
		}

		byte[] data = bao.toByteArray();
		bao.close();
		inputStream.close();
		return new String(data);
	}
}
MainActivity.java里边就是主要的是按钮的监听方法:
public class MainActivity extends Activity {

    static EditText titleName,page;
	private Button save,read;
	FileService service;
    @Override
    protected void onCreate(Bundle savedInstanceState) {
        super.onCreate(savedInstanceState);
        setContentView(R.layout.activity_main);

        titleName = (EditText)this.findViewById(R.id.titleName);
        page = (EditText) this.findViewById(R.id.page);
        save = (Button) this.findViewById(R.id.save);
        read = (Button) this.findViewById(R.id.read);

        save.setOnClickListener(new OnClickListener() {

			@Override
			public void onClick(View v) {
				// TODO Auto-generated method stub
				service = new FileService(MainActivity.this);
				try {
					service.save(titleName.getText().toString(), page.getText().toString());
					Toast.makeText(MainActivity.this, "保存成功", Toast.LENGTH_LONG).show();
				} catch (IOException e) {
					// TODO Auto-generated catch block
					e.printStackTrace();
					Toast.makeText(MainActivity.this, "保存失败", Toast.LENGTH_LONG).show();
				}
			}
        });

        read.setOnClickListener(new OnClickListener() {

			@Override
			public void onClick(View v) {
				// TODO Auto-generated method stub
				Intent intent = new Intent();
				intent.setClass(MainActivity.this, Activity02.class);
				startActivity(intent);
			}
		});
    }

    @Override
    public boolean onCreateOptionsMenu(Menu menu) {
        // Inflate the menu; this adds items to the action bar if it is present.
        getMenuInflater().inflate(R.menu.main, menu);
        return true;
    }

}
Activity02.java中是读取按钮的监听方法:
public class Activity02 extends Activity {

	private TextView text;
	FileService service;
	@Override
	protected void onCreate(Bundle savedInstanceState) {
		super.onCreate(savedInstanceState);
		setContentView(R.layout.activity_activity02);

		text = (TextView)this.findViewById(R.id.text);

		service = new FileService(Activity02.this);
		String str = null;
		try {
			str = service.read(MainActivity.titleName.getText().toString());
			Toast.makeText(Activity02.this, "读取成功", Toast.LENGTH_LONG).show();
		} catch (IOException e) {
			// TODO Auto-generated catch block
			e.printStackTrace();
			Toast.makeText(Activity02.this, "读取失败", Toast.LENGTH_LONG).show();
		}
		text.setText(str);
	}

	@Override
	public boolean onCreateOptionsMenu(Menu menu) {
		// Inflate the menu; this adds items to the action bar if it is present.
		getMenuInflater().inflate(R.menu.activity02, menu);
		return true;
	}

}
到现在为止,文件File存储你就已经掌握了。下面你就把源码贴进去,然后自己研究研究吧。虽然里边有的方法我没有讲解,但是,这些方法都是通用的,以后你要用的时候就直接用就可以,当然,你非要弄明白,那么就给我留言,我可以给你说一下。


 369
369


 被折叠的 条评论
为什么被折叠?
被折叠的 条评论
为什么被折叠?
 到【灌水乐园】发言


