


1安装MySQL
我们平时安装MySQL都是源码包安装的,但是由于它的编译需要很长的时间,所以,阿铭建议你安装二进制免编译包。你可以到MySQL官方网站去下载 http://dev.mysql.com/downloads/ 具体版本根据你的平台和需求而定,目前比较常用的为mysql-5.0/mysql-5.1, 5.5版本虽然已经发布有段日子了,但是貌似用在线上跑服务的还是少数。所以,阿铭建议你下载一个5.1的版本。可以使用阿铭提供的地址下载。下面是安装步骤(注意,下面的安装步骤是基于32位操作系统的,如果你的系统为64位,则需要下载一个64位的包):1
- 下载mysql到/usr/local/src/
#cd /usr/local/src/    (文件存放地址)
wget http://mirrors.sohu.com/mysql/MySQL-5.1/mysql-5.1.73-linux-i686-glibc23.tar.gz
- 解压
[root@localhost src]# tar -zxvf /usr/local/src/mysql-5.1.73-linux-i686-glibc23.tar.gz
建立mysql用户
-
建立mysql用户 -
[root@localhost src]# useradd -s /sbin/nologin -M mysql (建立mysql用户,并不登陆 也不创建家目录) -
#ls /home/ (查看登陆的账户)
- 把解压完的数据移动到/usr/local/mysql
[root@localhost src]# mv mysql-5.1.73-linux-i686-glibc23 /usr/local/mysql (移动并从命名)
[root@localhost src]# ls /usr/local/mysql
- 初始化数据库
[root@localhost src]# cd /usr/local/mysql
[root@localhost mysql]# mkdir -p /data/mysql
[root@localhost mysql]# chown -R mysql /data/mysql (创建文件&更改文件权限 代写 )
[root@localhost mysql]# ./scripts/mysql_install_db --user=mysql --datadir=/data/mysql (初始化mysql)
#echo $?
--user 定义数据库的所属主, --datadir 定义数据库安装到哪里,建议放到大空间的分区上,这个目录需要自行创建。这一步骤很关键,如果你看到两个 “OK” 说明执行正确,否则请仔细查看错误信息,如果你实在解决不了,请把问题发到论坛教程答疑版块(http://www.aminglinux.com/bbs/forum-40-1.html)阿铭会来帮你解决问题。
- 拷贝配置文件
[root@localhost mysql] #cd support-files/
[root@localhost support-files]# cp my-large.cnf /etc/my.cnf
  y
# vim !$
 注销 三项
#ls
#ls /etc/init.d/
[root@localhost support-files]# cp
- 拷贝启动脚本文件并修改其属性
[root@localhost support-files]# cp mysql.server  /etc/init.d/mysqld
[root@localhost support-files]# chmod 755 /etc/init.d/mysqld
8 .修改启动脚本
[root@localhost mysql]# vim /etc/init.d/mysqld (修改启动脚本
找到配置文件里面的日志记录 “basedir=/usr/local/mysql” “datadir=/data/mysql” 按:wq保存退出 )
- 把启动脚本加入系统服务项,并设定开机启动,启动mysql
[root@localhost mysql]# chkconfig --add mysqld   (加入开机启动)
[root@localhost mysql]# chkconfig mysqld on  关
[root@localhost mysql]# /etc/init.d/mysqld start  开
如果启动不了,请到 /data/mysql/ 下查看错误日志,这个日志通常是主机名.err. 检查mysql是否启动的命令为:
[root@localhost mysql]# ps aux |grep mysqld
[root@localhost mysql] # netstat -lnp |grep mysql (这俩连用命令就可以看到3306端口了)
#support -flies   mysql 的配置文件在这里面
#vim INSTALL  (查看安装方法   OK!)
2安装PHP
阿铭写这本教程时,php当前最新版本为5.5, 相信大多网站还在跑着5.2甚至更老的版本,其实5.2版本的php很经典也很稳定,因为阿铭的公司一直在使用5.2版本,但是考虑到版本太老,难免会有些漏洞,所以建议你使用5.3或者5.4版本,php官方下载地址: http://www.php.net/downloads.php
1.下载php:
[rot@localhost httpd-2.2.16]# cd /usr/local/src
[root@localhost src]# wget http://am1.php.net/distributions/php-5.3.27.tar.gz
wget http://cn2.php.net/distributions/php-5.4.37.tar.bz2
2.解压:
[root@localhost src]# tar -zxf php-5.3.27.tar.gz
- 创建相关账户
[root@localhost src]# useradd -s /sbin/nologin php-fpm
4.配置编译参数:
[root@localhost src]# cd php-5.3.27
[root@localhost php-5.3.27]# ./configure \
--prefix=/usr/local/php \
--with-config-file-path=/usr/local/php/etc \
--enable-fpm \
--with-fpm-user=php-fpm \
--with-fpm-group=php-fpm \
--with-mysql=/usr/local/mysql \
--with-mysql-sock=/tmp/mysql.sock \
--with-libxml-dir \
--with-gd \
--with-jpeg-dir \
--with-png-dir \
--with-freetype-dir \
--with-iconv-dir \
--with-zlib-dir \
--with-mcrypt \
--enable-soap \
--enable-gd-native-ttf \
--enable-ftp \
--enable-mbstring \
--enable-exif \
--disable-ipv6
在这一步,阿铭遇到如下错误:
configure: error: jpeglib.h not found. (少依赖关系)
configure: error: xml2-config not found. Please check your libxml2 installation.
解决办法是:
yum install -y libjpeg libpng freetype libjpeg-devel libpng-devel freetype-devel (依赖关系包,要同时装)
yum install -y libxml2-devel
还有错误:
configure: error: Cannot find OpenSSL's <evp.h>
解决办法是:
yum install -y openssl openssl-devel
错误:
checking for BZip2 in default path... not found
configure: error: Please reinstall the BZip2 distribution
解决办法:
yum install -y bzip2 bzip2-devel
错误:
configure: error: png.h not found.
解决办法:
yum install -y libpng libpng-devel
错误:
configure: error: freetype.h not found.
解决办法:
yum install -y freetype freetype-devel
错误:
configure: error: mcrypt.h not found. Please reinstall libmcrypt.
解决办法:
yum install -y libmcrypt-devel (yum list |grep mcrypt 搜索无此包)
出现报错!configure: error: mcrypt.h not found. Please reinstall libmcrypt.
解决方法: # rpm -ivh 'http://www.lishiming.net/data/attachment/forum/epel-release-6-8_32.noarch.rpm' (扩展源)
# wget http://www.lishiming.net/data/attachment/forum/epel-release-6-8_32.noarch.rpm
# yum install -y epel-release
因为centos6.x 默认的yum源没有libmcrypt-devel 这个包,只能借助第三方yum源。
编译:
5.[root@localhost php-5.3.27]# make
在这一步,你也许还会遇到诸多错误,没有关系,请仔细查看报错信息,解决办法很简单,就是装缺少的库。你可以把错误信息复制到google上搜一下,如果实在是解决不了,请到阿铭论坛(http://www.aminglinux.com/bbs/forum-40-1.hteml)发帖请教阿铭吧。
安装:
6.[root@localhost php-5.3.27]# make install
7.拷贝配置文件:
[root@localhost php-5.3.27]# # ls /usr/local/php 之前的老php
[root@luciLlinux php-5.3.27]# rm -rf /usr/local/php/ 删除
[root@luciLlinux php-5.3.27]# make install 重新编译安装
[root@luciLlinux php-5.3.27]# cp php.ini-production /usr/local/php/etc/php.ini 拷贝配置文件
[root@luciLlinux php-5.3.27]# cp sapi/fpm/init.d.php-fpm /etc/init.d/php-fpm 拷贝启动脚本
[root@luciLlinux php-5.3.27]# vim /etc/init.d/php-fpm 不编辑,退出
[root@luciLlinux php-5.3.27]# chmod 755 /etc/init.d/php-fpm 授予权限
[root@luciLlinux php-5.3.27]# chkconfig --add php-fpm 加入到系统服务列表
[root@luciLlinux php-5.3.27]# chkconfig php-fpm on 开机启动
[root@luciLlinux php-5.3.27]# cd /usr/local/php/etc/
[root@luciLlinux etc]# ls
[root@luciLlinux etc]# mv php-fpm.conf.default php-fpm.conf 启动配置文件,移动并重命名
[root@luciLlinux etc]# /usr/local/php/sbin/php-fpm -t 检查,语法有错误否
[root@luciLlinux php-5.3.27]# service php-fpm start 保存
[root@luciLlinux etc]# ps aux |grep php-fpm
[root@luciLlinux etc]# netstat -lnp
3安装nginx
Nginx官方网站(http://nginx.org), 从官方网站可以看到nginx更新速度很快,这也反映了一个事实,目前使用nginx跑网站的公司或者个人越来越多。当前最新版本为1.5, 但是阿铭不建议你安装这么新的,因为它还太新,难免会有一些bug或者漏洞,所以阿铭建议你安装1.4版本的nginx.
(近期nginx报出一个安全漏洞,影响版本很广 CVE-2013-4547,所以之前的老版本都需要升级一下, 1.4.4, 1.5.7以及往后版本没有问题)
- 下载nginx
cd /usr/local/src/
wget http://nginx.org/download/nginx-1.4.4.tar.gz
- 解压nginx
tar -zxvf nginx-1.4.4.tar.gz
- 配置编译参数
[root@luciLlinux src]# cd nginx-1.4.4
[root@luciLlinux nginx-1.4.4]#
./configure \
--prefix=/usr/local/nginx \
--with-http_realip_module \
--with-http_sub_module \
--with-http_gzip_static_module \
--with-http_stub_status_module  \
--with-pcre
遇到如下错误:
./configure: error: the HTTP rewrite module requires the PCRE library.
解决方法:
[root@luciLlinux nginx-1.4.4]# yum install -y pcre-devel
(因为nginx比较小,没有多少错误)
- 编译nginx
make
- 安装nginx
make install
因为nginx比较小,所以很快就会安装完,而且也不会出什么错误,如果出错了,到阿铭论坛(http://www.aminglinux.com/bbs/forum-40-1.html)发帖求助阿铭吧。
[root@luciLlinux nginx]# /usr/local/nginx/sbin/nginx 启动nginx。
[root@luciLlinux nginx]# ps aux | grep nginx
[root@luciLlinux nginx]# netstat -lnp |grep nginx
就可看到80端口是nginx ,nginx安装成功。
(有可能是Apachec占用了,把他停掉)
测试php解析。
[root@luciLlinux ~]# vim /usr/local/nginx/conf/nginx.conf 打开配置,加入/usr/local/nginx/html 根目录。
location ~ \.php$ {
root html;
fastcgi_pass 127.0.0.1:9000;
fastcgi_index index.php;
fastcgi_param SCRIPT_FILENAME /usr/local/nginx/html$fastcgi_script_name;
include fastcgi_params;
}
按:wq保存退出
[root@luciLlinux ~]# curl 192.168.1.107 -I
HTTP/1.1 200 OK
[root@luciLlinux ~]# iptables -F
[root@luciLlinux ~]# service iptables save
浏览器页面就可以看到欢迎的页面了。
[root@luciLlinux ~]# cat /usr/local/nginx/html/index.html 即页面的浏览的
[root@luciLlinux ~]# cd /usr/local/nginx/html
[root@luciLlinux html]# ls
[root@luciLlinux html]# vim info.php 编写内容:
<?php
phpinfo();
?>
保存:wq
[root@luciLlinux html]# /usr/local/nginx/sbin/nginx -t 检查
[root@luciLlinux html]# /usr/local/nginx/sbin/nginx -s reload 加载
在访问就可以正常解析了。在浏览器里面
[root@luciLlinux html]# curl localhost
[root@luciLlinux html]# curl localhost/info.php -I 其状态码HTTP/1.1 200 OK
解析成功!
4. nginx启动脚本 和 配置文件
vim /etc/init.d/nginx 写一个起动脚本
写入如下内容:
#!/bin/bash
# chkconfig: - 30 21
# description: http service.
# Source Function Library
. /etc/init.d/functions
# Nginx Settings

NGINX_SBIN="/usr/local/nginx/sbin/nginx"
NGINX_CONF="/usr/local/nginx/conf/nginx.conf"
NGINX_PID="/usr/local/nginx/logs/nginx.pid"
RETVAL=0
prog="Nginx"

start() {
        echo -n $"Starting $prog: "
        mkdir -p /dev/shm/nginx_temp
        daemon $NGINX_SBIN -c $NGINX_CONF
        RETVAL=$?
        echo
        return $RETVAL
}

stop() {
        echo -n $"Stopping $prog: "
        killproc -p $NGINX_PID $NGINX_SBIN -TERM
        rm -rf /dev/shm/nginx_temp
        RETVAL=$?
        echo
        return $RETVAL
}

reload(){
        echo -n $"Reloading $prog: "
        killproc -p $NGINX_PID $NGINX_SBIN -HUP
        RETVAL=$?
        echo
        return $RETVAL
}

restart(){
        stop
        start
}

configtest(){
    $NGINX_SBIN -c $NGINX_CONF -t
    return 0
}

case "$1" in
  start)
        start
        ;;
  stop)
        stop
        ;;
  reload)
        reload
        ;;
  restart)
        restart
        ;;
  configtest)
        configtest
        ;;
  *)
        echo $"Usage: $0 {start|stop|reload|restart|configtest}"
        RETVAL=1
esac

exit $RETVAL
保存后,更改权限:
[root@luciLlinux ~]# chmod 755 /etc/init.d/nginx
[root@luciLlinux ~]# chkconfig --add nginx
如果想开机启动,请执行:
[root@luciLlinux ~]# chkconfig nginx on
[root@luciLlinux ~]# service nginx start
重新写一个配置文件
[root@luciLlinux ~]# vim /usr/local/nginx/conf/nginx.conf
首先把原来的配置文件清空: ,之前用过(解析的时候的,打开过里面的配置的)重新载入脚本。
> /usr/local/nginx/conf/nginx.conf
“>” 这个符号之前阿铭介绍过,为重定向的意思,单独用它,可以把一个文本文档快速清空。
vim /usr/local/nginx/conf/nginx.conf
写入如下内容:
user nobody nobody;
worker_processes 2;
error_log /usr/local/nginx/logs/nginx_error.log crit;
pid /usr/local/nginx/logs/nginx.pid;
worker_rlimit_nofile 51200;

events
{
    use epoll;
    worker_connections 6000;
}

http
{
    include mime.types;
    default_type application/octet-stream;
    server_names_hash_bucket_size 3526;
    server_names_hash_max_size 4096;
    log_format combined_realip '$remote_addr $http_x_forwarded_for [$time_local]'
    '$host "$request_uri" $status'
    '"$http_referer" "$http_user_agent"';
    sendfile on;
    tcp_nopush on;
    keepalive_timeout 30;
    client_header_timeout 3m;
    client_body_timeout 3m;
    send_timeout 3m;
    connection_pool_size 256;
    client_header_buffer_size 1k;
    large_client_header_buffers 8 4k;
    request_pool_size 4k;
    output_buffers 4 32k;
    postpone_output 1460;
    client_max_body_size 10m;
    client_body_buffer_size 256k;
    client_body_temp_path /usr/local/nginx/client_body_temp;
    proxy_temp_path /usr/local/nginx/proxy_temp;
    fastcgi_temp_path /usr/local/nginx/fastcgi_temp;
    fastcgi_intercept_errors on;
    tcp_nodelay on;
    gzip on;
    gzip_min_length 1k;
    gzip_buffers 4 8k;
    gzip_comp_level 5;
    gzip_http_version 1.1;
    gzip_types text/plain application/x-javascript text/css text/htm application/xml;
    include vhosts/*.conf;
}
[root@luciLlinux ~]# cd /usr/local/nginx/conf/
[root@luciLlinux conf]# mkdir vhosts
[root@luciLlinux conf]# cd vhosts
[root@luciLlinux vhosts]# vim default.conf
插入如下内容:
server
{
    listen 80 ;
    server_name localhost;
    index index.html index.htm index.php;
    root /usr/local/nginx/html;

    location ~ \.php$ {
        include fastcgi_params;
        fastcgi_pass unix:/tmp/php-fcgi.sock;
        fastcgi_index index.php;
        fastcgi_param SCRIPT_FILENAME /usr/local/nginx/html$fastcgi_script_name;
    }

}
更改成:
server
{
listen 80 default_server;
server_name localhost;
index index.html index.htm index.php;
root /tmp/1233;
deny all;
}
保存退出。
[root@luciLlinux vhosts]# mkdir /tmp/1233
[root@luciLlinux vhosts]# /usr/local/nginx/sbin/nginx -t 检测
[root@luciLlinux vhosts]# /etc/init.d/nginx reload 加载
[root@luciLlinux vhosts]# curl -x127.0.0.1:80 jlsjflsjfldsf.dfsf.com 检测随便一个地址,其结果都403的
[root@luciLlinux vhosts]# curl -x127.0.0.1:80 ksjdfklsjdfsdf.com (随意网址都是403)
[root@Linuxhao3 vhosts]# curl localhost
<html>
<head><title>403 Forbidden</title></head>
<body bgcolor="white">
<center><h1>403 Forbidden</h1></center>
<hr><center>nginx/1.4.4</center>
</body>
</html>
[root@luciLlinux vhosts]# vim 111.conf
加入如下内容,修改带颜色部分4处
server
{
listen 80 ;
server_name www.111.com;
index index.html index.htm index.php;
root /data/www;
location ~ \.php$ {
include fastcgi_params;
#fastcgi_pass unix:/tmp/php-fcgi.sock;
fastcgi_pass 127.0.0.1:9000;
fastcgi_index index.php;
fastcgi_param SCRIPT_FILENAME /data/www$fastcgi_script_name;
}
}
保存退出。
[root@luciLlinux vhosts]# /usr/local/nginx/sbin/nginx -t
[root@luciLlinux vhosts]# /etc/init.d/nginx reload
[root@luciLlinux vhosts]# curl -x127.0.0.1:80 www.111.com
[root@Linuxhao3 www]# curl -x127.0.0.1:80 www.111.com -I
HTTP/1.1 301 Moved Permanently
Server: nginx/1.4.4
Date: Fri, 24 Feb 2017 01:21:54 GMT
Content-Type: text/html
Connection: keep-alive
X-Powered-By: PHP/5.4.37
location: forum.php
只有装了discuz才显示山面这2行。状态码会显示200 Ok。
5安装Discuz
创建目录
   # mkdir /data/www
   进入目录并且下载discuz安装包的 根目录
   # cd /data/www/
   # wget http://download.comsenz.com/DiscuzX/3.2/Discuz_X3.2_SC_GBK.zip
   解压缩安装包zip包  都会在www/下的upload下
   # unzip Discuz_X3.2_SC_GBK.zip
   # mv upload/* ./    需要把解压的移动目录文件到/data/www下
   删除不需要的文件包  多余的
   rm -rf Discuz_X3.2_SC_GBK.zip readme upload utility
[root@Linuxhao3 www]# /usr/local/nginx/sbin/nginx -t
[root@Linuxhao3 www]# /etc/init.d/nginx reload
就可以到页面浏览了,
403就加winhosts
访问前县设一哈电脑上得hostst文件
hosts.conf 文件 win更改我电脑c盘 hosts文件地址
C:\Windows\System32\drivers\etc 打开hosts文件,把
192.168.1.106 www.111.com www.aaa.com 加写在后面
这样win上就可以ping了
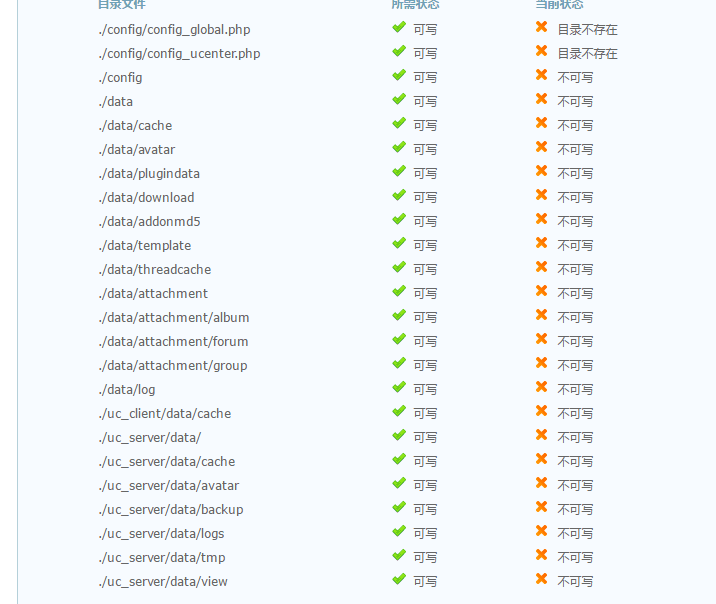
修正红X部分:
[root@yiqiang www]#ls -l[root@yiqiang www]#ps aux |grep http 查看进程的属主 是php-fpm把 drwxr-xr-x. 2 root root 4096 2月 16 19:35 config 这个文件的属主设置成php-fpm
[root@yiqiang www]# chown -R php-fpm config data uc_client/data uc_server/data 更改权限
就去论坛的红X就变成对钩了,点下一步,新安装就要创建mysql库表了。
[root@yiqiang www]#/usr/local/mysql/bin/mysql 机器上自带一个,又新装了一个,所以需要删除一个。也要做别名[root@yiqiang www]# mysqlmysql> quit Bye [root@yiqiang www]# which mysql /usr/bin/mysql[root@yiqiang www]# rpm -qf /usr/bin/mysql 查看安装包名称[root@yiqiang www]# yum remove mysql 御载[root@yiqiang www]# vim /etc/profile.d/path.sh添加内容: #!/bin/bash export PATH=$PATH:/usr/local/mysql/bin 保存退出[root@yiqiang www]# source !$ 执行脚本[root@yiqiang www]# which mysql 查看mysql的绝对路径[root@yiqiang www]#mysqlmysql>create database discuz; 创建数据库库名为discuzmysql>grant all on discuz.* to 'aming'@'localhost' identified by 'aminglinux mi密ma码'; 创建数据库账号及密码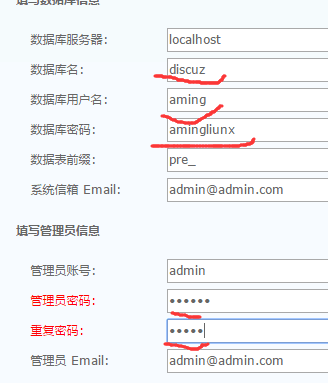
不用退出,填浏览器安装。。。。,查看页面,如果不行就重设置mysql -uroot 登录密码。直到discuz install完成。mysql>安装Discu ,成功
6.php-fpm配置文件
管理php-fpm服务的配置文件 /usr/local/php/etc/php-fpm.conf php 全局配 置 文 件:/usr/local/php/etc/php.ini
[root@luciLlinux ~]# vim /usr/local/php/etc/php-fpm.conf
加入参数,把之前的清空 > 掉:
[global]
pid = /usr/local/php/var/run/php-fpm.pid
error_log = /usr/local/php/var/log/php-fpm.log
[www]
listen = /tmp/www.sock
user = php-fpm
group = php-fpm
pm = dynamic
pm.max_children = 50
pm.start_servers = 20
pm.min_spare_servers = 5
pm.max_spare_servers = 35
pm.max_requests = 500
rlimit_files = 1024
slowlog = /tmp/www_slow.log
request_slowlog_timeout = 1
php_admin_value[open_basedir]=/data/www/:/tmp/ 性能追踪的配置,慢日志,超过1秒都记录
[www1]
listen = /tmp/www1.sock
user = php-fpm
group = php-fpm
pm = dynamic
pm.max_children = 50
pm.start_servers = 20
pm.min_spare_servers = 5
pm.max_spare_servers = 35
pm.max_requests = 500
rlimit_files = 1024
保存退出,
[root@luciLlinux ~]# /usr/local/php/sbin/php-fpm -t 检测,有无错误php-fpm会显示test is successful
[root@luciLlinux ~]# /etc/init.d/php-fpm restart 重启动
页面访问时是502
502
权限不够502。读取文件不到502。配置不对502。下面502排查:
[root@Linuxhao3 ~]# cd /usr/local/nginx/conf/vhosts/
[root@Linuxhao3 vhosts]# ls
[root@Linuxhao3 vhosts]# vim 111.conf
更改如下:灰色为修改部分
location ~ \.php$ {
include fastcgi_params;
fastcgi_pass unix:/tmp/www.sock;
此处颜色部分为,sock文件地址,配置池的名称为www.sock,可以让不同的域名监听不动的sock,好坏。也可以共享sock文件
#fastcgi_pass 127.0.0.1:9000;
fastcgi_index index.php;
fastcgi_param SCRIPT_FILENAME /data/www$fastcgi_script_name;
保存退出。
[root@Linuxhao3 vhosts]# /usr/local/nginx/sbin/nginx -t 检测
[root@Linuxhao3 vhosts]# /etc/init.d/nginx reload 重新加载
[root@Linuxhao3 vhosts]# curl -x127.0.0.1:80 www.111.com -I
HTTP/1.1 502 Bad Gateway
状态码
[root@Linuxhao3 vhosts]# vim /usr/local/nginx/conf/nginx.conf 进入主配置文件查看错误日志存放地址。
[root@Linuxhao3 vhosts]# cat /usr/local/nginx/logs/nginx_error.log 查看错误日志cucrit表示级别
2017/02/24 20:45:27 [crit] 2160#0: *54 connect() to unix:/tmp/www.sock failed (13: Permission denied) while connecting to upstream, client: 127.0.0.1, server: www.111.com, request: "HEAD http://www.111.com/ HTTP/1.1", upstream: "fastcgi://unix:/tmp/www.sock:", host: "www.111.com"
Permission denied:表示没有权限
(2: No such file or directory) 表示没有这样的文件,跟上面()13的位置一样的
[root@Linuxhao3 vhosts]# ls -l /tmp/www.sock
srw-rw----. 1 root root 0 2月 24 18:46 /tmp/www.sock
[root@Linuxhao3 vhosts]# ps aux | grep nginx 查看进程属主 为nobody
root 1452 0.0 0.1 5188 1384 ? Ss 17:28 0:00 nginx: master process /usr/local/nginx/sbin/nginx -c /usr/local/nginx/conf/nginx.conf
nobody 2160 0.0 0.2 6368 2432 ? S 20:43 0:00 nginx: worker process
nobody 2161 0.0 0.2 6368 2436 ? S 20:43 0:00 nginx: worker process
root 2175 0.0 0.0 6052 804 pts/0 S+ 20:57 0:00 grep nginx
发现用户是nobody
[root@Linuxhao3 vhosts]# vim /usr/local/php/etc/php-fpm.conf 编辑php配置文件的,加入:
listen.owner = nobody 监听的户
listen.group = nobody 监听的组 的指定
[root@aminglinux ~]# vim /usr/local/php/etc/php-fpm.conf
[global]
pid = /usr/local/php/var/run/php-fpm.pid
error_log = /usr/local/php/var/log/php-fpm.log
[www]
listen = /tmp/www.sock
user = nobody
group = nobody
listen.owner = nobody
listen.group = nobody
pm = dynamic
pm.max_children = 50
pm.start_servers = 20
pm.min_spare_servers = 5
pm.max_spare_servers = 35
pm.max_requests = 500
rlimit_files = 1024
slowlog = /tmp/www_slow.log
request_slowlog_timeout = 1
php_admin_value[open_basedir]=/data/www/:/tmp/
按:wq保存退出。
[root@Linuxhao3 vhosts]# /usr/local/nginx/sbin/nginx -t
[root@Linuxhao3 vhosts]# /etc/init.d/nginx reload
[root@Linuxhao3 vhosts]# /etc/init.d/php-fpm restart
nginx: the configuration file /usr/local/nginx/conf/nginx.conf syntax is ok
nginx: configuration file /usr/local/nginx/conf/nginx.conf test is successful
启动nginx:
service nginx start
如果不能启动,请查看 “/usr/local/nginx/logs/error.log” 文件,检查nginx是否启动:
ps aux |grep nginx


 663
663

 被折叠的 条评论
为什么被折叠?
被折叠的 条评论
为什么被折叠?
 到【灌水乐园】发言


