


 这篇博客介绍了如何使用Keras建立深度学习模型,包括解决Happy House问题的简单模型和解决梯度消失问题的残差网络(ResNets)。在Happy House问题中,通过Keras快速建立模型,训练和测试,实现99%的训练准确率和95%的测试准确率。然后,深入探讨了ResNets的结构和解决深层网络训练问题的方法,包括一致块和卷积块,并给出了ResNet-50的实现细节。
Part 1:Keras tutorial - the Happy House
第二周的第一个作业
- 学习使用 Keras
- Keras是一个高层神经网络API,Keras由纯Python编写而成并基Tensorflow、Theano以及CNTK后端。
- 尝试如何在数小时内搭建一个深度学习算法
为什么要使用Keras ?
- 可以让深度学习工程师快速搭建和试验不同的模型。比TensorFlow更加抽象,以最短时间将想法变为模型。
- 但是,由于高度抽象,所以不够灵活,很多复杂的模型仍然需要用TensorFlow模型实现。
- Keras 对于大部分通用模型都可以快速搭建,不过运行速度较慢一些,对于快速搭建和试验也可以了。
在下面练习中,我们将解决 “Happy House” 问题。
导包
import numpy as np
from keras import layers
from keras.layers import Input, Dense, Activation, ZeroPadding2D, BatchNormalization, Flatten, Conv2D
from keras.layers import AveragePooling2D, MaxPooling2D, Dropout, GlobalMaxPooling2D, GlobalAveragePooling2D
from keras.models import Model
from keras.preprocessing import image
from keras.utils import layer_utils
from keras.utils.data_utils import get_file
from keras.applications.imagenet_utils import preprocess_input
import pydot
from IPython.display import SVG
from keras.utils.vis_utils import model_to_dot
from keras.utils import plot_model
from kt_utils import *

import keras.backend as K
K.set_image_data_format('channels_last')
import matplotlib.pyplot as plt
from matplotlib.pyplot import imshow

%matplotlib inline
上面我们导入了很多keras的包,都可以直接调用, 比如:
X = Input(...)
X = ZeroPadding2D(...)
1 The Happy House
下个假期,你打算和五个朋友在校外过一周。下图是一个不错的房子可以做很多事情,最重要的是每个人都想在房子里的时候是快乐的,所以任何想住进这个房子的人都必须证明他们现在的快乐状态。

作为一个深度学习专家,为了保证”happy”规则的严格执行,你打算建立一个算法,利用门口摄像头采集的照片判断该人是否”happy”, 只有”happy”的时候们才打开。
你已经收集并标注了一些摄像头采集的你的和你朋友的照片。

数据标准化
X_train_orig, Y_train_orig, X_test_orig, Y_test_orig, classes = load_dataset()

# Normalize image vectors
X_train = X_train_orig/255.
X_test = X_test_orig/255.

# Reshape
Y_train = Y_train_orig.T
Y_test = Y_test_orig.T

print ("number of training examples = " + str(X_train.shape[0]))
print ("number of test examples = " + str(X_test.shape[0]))
print ("X_train shape: " + str(X_train.shape))
print ("Y_train shape: " + str(Y_train.shape))
print ("X_test shape: " + str(X_test.shape))
print ("Y_test shape: " + str(Y_test.shape))

# number of training examples = 600
# number of test examples = 150
# X_train shape: (600, 64, 64, 3)
# Y_train shape: (600, 1)
# X_test shape: (150, 64, 64, 3)
# Y_test shape: (150, 1)
数据集细节
- 照片大小(64x64x3)
- 训练集:600张
- 测试集:150张
是时候大展身手了,加油!
2 利用Keras建立模型
Keras很擅长快速原型建模,你可以在短时间内得到显著的效果。
举例:
def model(input_shape):
    # Define the input placeholder as a tensor with shape input_shape. Think of this as your input image!
    X_input = Input(input_shape)

    # Zero-Padding: pads the border of X_input with zeroes
    X = ZeroPadding2D((3, 3))(X_input)

    # CONV -> BN -> RELU Block applied to X
    X = Conv2D(32, (7, 7), strides = (1, 1), name = 'conv0')(X)
    X = BatchNormalization(axis = 3, name = 'bn0')(X)
    X = Activation('relu')(X)

    # MAXPOOL
    X = MaxPooling2D((2, 2), name='max_pool')(X)

    # FLATTEN X (means convert it to a vector) + FULLYCONNECTED
    X = Flatten()(X)
    X = Dense(1, activation='sigmoid', name='fc')(X)

    # Create model. This creates your Keras model instance, you'll use this instance to train/test the model.
    model = Model(inputs = X_input, outputs = X, name='HappyModel')

    return model
注意到keras并没有像numpy/TensorFlow那样定义X, Z, A1, Z1, A2,… 而是采用了不同的变量表示方式,输入层X_input, 其他各层都用X迭代。最后利用X_input 和最后的X 来建立模型。
练习:实现 HappyModel()
# GRADED FUNCTION: HappyModel

def HappyModel(input_shape):
    """
    Implementation of the HappyModel.

    Arguments:
    input_shape -- shape of the images of the dataset

    Returns:
    model -- a Model() instance in Keras
    """

    ### START CODE HERE ###
    # Feel free to use the suggested outline in the text above to get started, and run through the whole
    # exercise (including the later portions of this notebook) once. The come back also try out other
    # network architectures as well.

    # Define the input placeholder as a tensor with shape input_shape. Think of this as your input image!
    X_input = Input(input_shape)

    # Zero-Padding: pads the border of X_input with zeroes
    X = ZeroPadding2D((3, 3))(X_input)

    # CONV -> BN -> RELU Block applied to X
    X = Conv2D(32, (7, 7), strides = (1, 1), name = 'conv0')(X)
    X = BatchNormalization(axis = 3, name = 'bn0')(X)
    X = Activation('relu')(X)

    # MAXPOOL
    X = MaxPooling2D((2, 2), name='max_pool')(X)

    # FLATTEN X (means convert it to a vector) + FULLYCONNECTED
    X = Flatten()(X)
    X = Dense(1, activation='sigmoid', name='fc')(X)

    # Create model. This creates your Keras model instance, you'll use this instance to train/test the model.
    model = Model(inputs = X_input, outputs = X, name='HappyModel')

    ### END CODE HERE ###

    return model
现在你已经建立了一个方法来描述你的模型,keras利用下面四步来训练和测试模型
- 建立模型
- model = HappyModel(X_train.shape[1:])
- 编译模型
- model.compile(optimizer = “…”, loss = “…”, metrics = [“accuracy”])
- 训练模型
- model.fit(x = …, y = …, epochs = …, batch_size = …)
- 测试模型
- model.evaluate(x = …, y = …)
第一步:建立模型
### START CODE HERE ### (1 line)
happyModel = HappyModel(X_train.shape[1:])
### END CODE HERE ###
第二步:编译模型
### START CODE HERE ### (1 line)
happyModel.compile(optimizer = "Adam", loss = "binary_crossentropy", metrics = ["accuracy"])
### END CODE HERE ###
第三步:训练模型
### START CODE HERE ### (1 line)
happyModel.fit(x = X_train, y = Y_train, epochs = 10, batch_size = 32)
### END CODE HERE ###
如果你连续两次调用训练模型,它将接着训练而不是从头开始训练,因为X是迭代的。
第四步:测试模型
### START CODE HERE ### (1 line)
preds = happyModel.evaluate(X_test, Y_test)
### END CODE HERE ###
print()
print ("Loss = " + str(preds[0]))
print ("Test Accuracy = " + str(preds[1]))
给你一个参考,我们的模型:
- mini batch size:16
- optimizer:adam
- epochs: 40
- train accuracy: 99%
- test accuracy: 95%
如果你的模型的准确率没有超过80%,可以尝试卷积块:CONV->BATCHNORM->RELU
X = Conv2D(32, (3, 3), strides = (1, 1), name = 'conv0')(X)
X = BatchNormalization(axis = 3, name = 'bn0')(X)
X = Activation('relu')(X)
知道你的图片维度(宽/高)足够小,通道数足够多(比如32个)。这样你讲有用的信息编码到了不同的通道里,然后可以利用全连接层展开通道。
- 几个卷积块后可以尝试MAX_POOL, 将会帮你降低图片的维度(宽/高)
- 修改你的优化器,我们发现 adam 挺好的
- 如果模型跑的很慢或者遇到内存问题,可以降低你的batch-size (12是个不错的妥协值)
- 多跑几个epoch, 知道训练准确性稳定下来
即使你获得了不错的结果,也可以继续改进来获取更好的结果。
如果你在模型上调整超参数,可能会发生过拟合的问题。这个作业中不用考虑这个问题。
3 结论
恭喜你建立了”Happy”模型,现在可以将你的算法连到门上的摄像头上了,这里我们就不详细讨论了。
谨记
- Keras 是一个可以快速建立原型系统的工具
- Keras 四步走:建立模型、编译模型、训练模型、测试模型
4 测试你自己的照片 (可选)
拿一张自己的照片试试吧(因为摄像头照片都是在同一个背景,同一个角度拍摄的,所以对你的照片拟合的可能不是很好,不要担心,试试吧)
### START CODE HERE ###
img_path = 'images/my_image.jpg'
### END CODE HERE ###
img = image.load_img(img_path, target_size=(64, 64))
imshow(img)

x = image.img_to_array(img)
x = np.expand_dims(x, axis=0)
x = preprocess_input(x)

print(happyModel.predict(x))
5 Keras中其他有用的方法 (可选)
两个有用的功能
- model.summary(): 打印表格,展示各层输入输出的大小
- plot_model: 图形化你的模型,可以调用SVG保存图片
happyModel.summary()

# _________________________________________________________________
# Layer (type)                 Output Shape              Param #
# =================================================================
# input_4 (InputLayer)         (None, 64, 64, 3)         0
# _________________________________________________________________
# zero_padding2d_4 (ZeroPaddin (None, 70, 70, 3)         0
# _________________________________________________________________
# conv0 (Conv2D)               (None, 64, 64, 32)        4736
# _________________________________________________________________
# bn0 (BatchNormalization)     (None, 64, 64, 32)        128
# _________________________________________________________________
# activation_4 (Activation)    (None, 64, 64, 32)        0
# _________________________________________________________________
# max_pool (MaxPooling2D)      (None, 32, 32, 32)        0
# _________________________________________________________________
# flatten_4 (Flatten)          (None, 32768)             0
# _________________________________________________________________
# fc (Dense)                   (None, 1)                 32769
# =================================================================
# Total params: 37,633
# Trainable params: 37,569
# Non-trainable params: 64
# _________________________________________________________________
plot_model(happyModel, to_file='HappyModel.png')
SVG(model_to_dot(happyModel).create(prog='dot', format='svg'))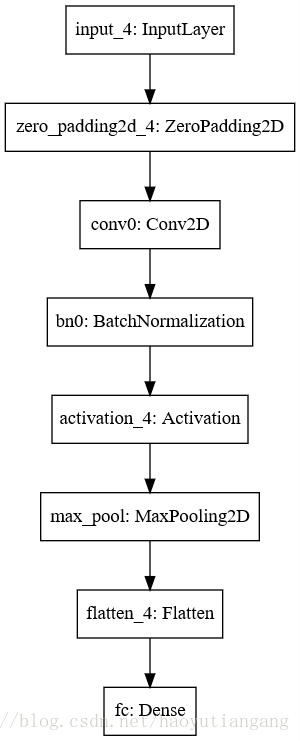
Part 2:Residual Networks
本周的第二个作业将利用Residual Networks (ResNets)建立一个深度卷积神经网络。
理论上很深的卷积神经网络将能够表示非常复杂的功能。
但实际上,很深的网络很难训练。
Residual Network: 允许你创建一个比较深的网络。
- 实现ResNets的基本构建模块
- 集成各个模块,实现并训练 state-of-the-art 的图片分类模型
该作业我们仍然使用Keras完成。
导包
import numpy as np
from keras import layers
from keras.layers import Input, Add, Dense, Activation, ZeroPadding2D, BatchNormalization, Flatten, Conv2D, AveragePooling2D, MaxPooling2D, GlobalMaxPooling2D
from keras.models import Model, load_model
from keras.preprocessing import image
from keras.utils import layer_utils
from keras.utils.data_utils import get_file
from keras.applications.imagenet_utils import preprocess_input
import pydot
from IPython.display import SVG
from keras.utils.vis_utils import model_to_dot
from keras.utils import plot_model
from resnets_utils import *
from keras.initializers import glorot_uniform
import scipy.misc
from matplotlib.pyplot import imshow
%matplotlib inline

import keras.backend as K
K.set_image_data_format('channels_last')
K.set_learning_phase(1)
1 非常深的神经网络存在的问题
目前神经网络的层次越来越深,因为越深的神经网络可以在更抽象的层面学到更复杂的特征。但是,当层次变得很深时,经常发生梯度消失:层次越多,反向传播的每个层次都要乘以权重W,此时梯度会以指数形式取向于零。(少数情况下趋向于最大的梯度爆炸好处理)
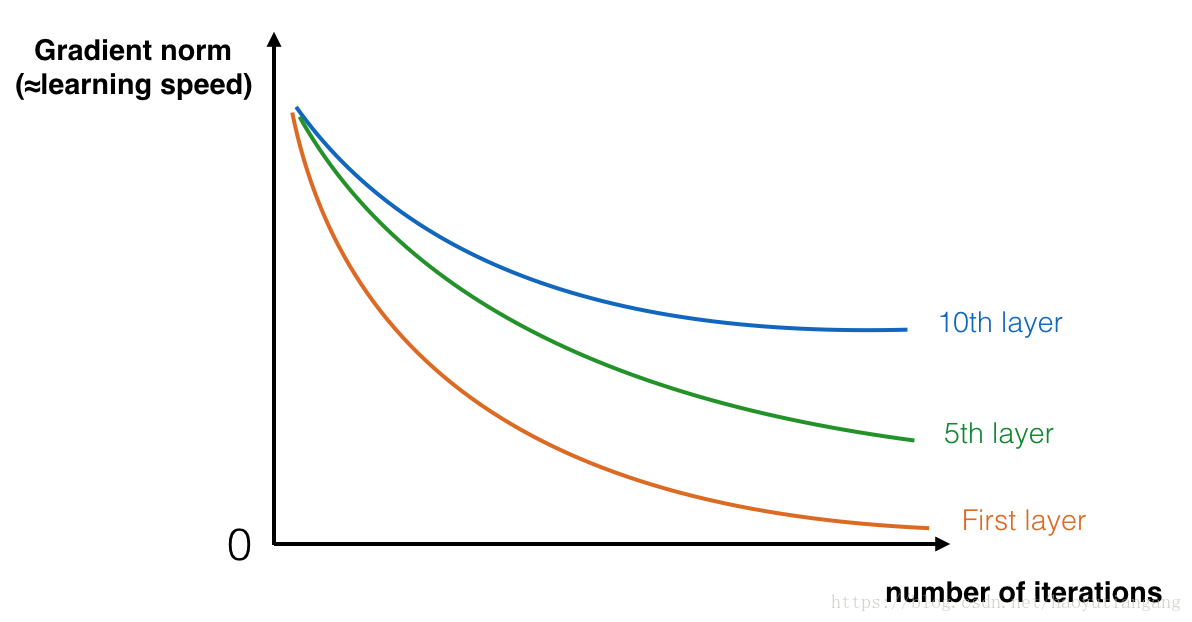
下面我们就要解决深层神经网络的梯度消失问题。
2 建立一个深度残差网络(ResNets)
在深度残差网络中,”跳跃连接” 可以使梯度跨越层次的快速传播
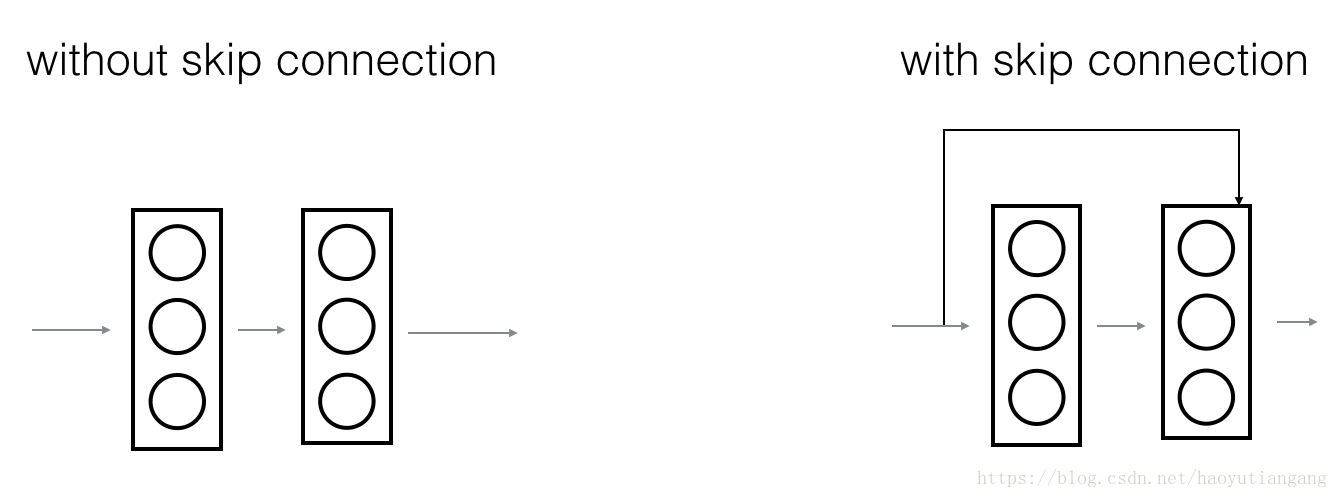
从图中可以看出,带有跳跃连接的残差网络可以更容易学习到前面一致的特征,提高学习速度。有效解决梯度消失问题。
根据输入输出的维度是否相同,ResNets分为两种类型,下面分别讨论实现。
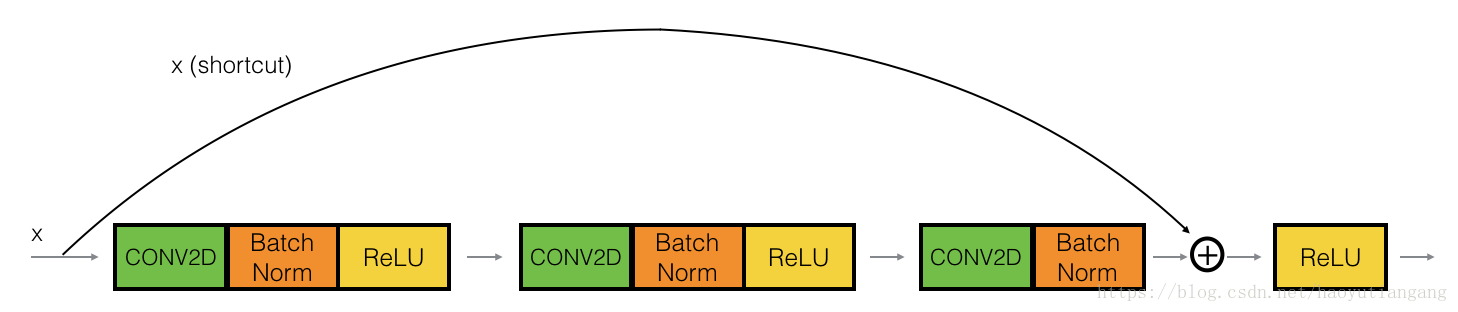
2.1 一致块(The identity block)
一致块是ResNets中的标准块,跳跃连接的两端激活函数维度一致。
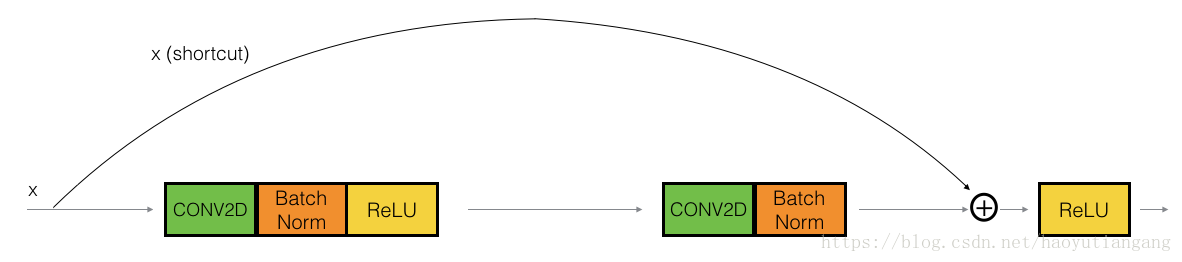
上述跳跃连接跳跃了两个ResNets块, 为了加快训练速度,我们还添加了BatchNorm,在下面的练习中为了实现一个更有力度的一致块,跳跃连接将会跳跃三层。
步骤
- 第一步:
- 第一个二维卷积层CONV2D:
- 卷积核:F1个,shape = (1,1),strid=(1,1), padding=”valid”
- name:conv_name_base + ‘2a’
- 初始化种子为0
- 第一个BatchNorm:bn_name_base + ‘2a’,归一化通道轴
- 激活函数ReLu: 没有name, 没有超参数
- 第一个二维卷积层CONV2D:
- 第二步:
- 第二个二维卷积层CONV2D:
- 卷积核:F2个,shape = (f,f),strid=(1,1), padding=”same”
- name:conv_name_base + ‘2b’
- 初始化种子为0
- 第二个BatchNorm:bn_name_base + ‘2b’,归一化通道轴
- 激活函数ReLu: 没有name, 没有超参数
- 第二个二维卷积层CONV2D:
- 第三步:
- 第三个二维卷积层CONV2D:
- 卷积核:F3个,shape = (1,1),strid=(1,1), padding=”valid”
- name:conv_name_base + ‘2c’
- 初始化种子为0
- 第三个BatchNorm:bn_name_base + ‘2c’,归一化通道轴
- 没有激活函数
- 第三个二维卷积层CONV2D:
- 最后步:
- 将跳跃连接和输入加到一起
- 激活函数ReLu: 没有name, 没有超参数
# GRADED FUNCTION: identity_block

def identity_block(X, f, filters, stage, block):
    """
    Implementation of the identity block as defined in Figure 3

    Arguments:
    X -- input tensor of shape (m, n_H_prev, n_W_prev, n_C_prev)
    f -- integer, specifying the shape of the middle CONV's window for the main path
    filters -- python list of integers, defining the number of filters in the CONV layers of the main path
    stage -- integer, used to name the layers, depending on their position in the network
    block -- string/character, used to name the layers, depending on their position in the network

    Returns:
    X -- output of the identity block, tensor of shape (n_H, n_W, n_C)
    """

    # defining name basis
    conv_name_base = 'res' + str(stage) + block + '_branch'
    bn_name_base = 'bn' + str(stage) + block + '_branch'

    # Retrieve Filters
    F1, F2, F3 = filters

    # Save the input value. You'll need this later to add back to the main path.
    X_shortcut = X

    # First component of main path
    X = Conv2D(filters = F1, kernel_size = (1, 1), strides = (1,1), padding = 'valid', name = conv_name_base + '2a', kernel_initializer = glorot_uniform(seed=0))(X)
    X = BatchNormalization(axis = 3, name = bn_name_base + '2a')(X)
    X = Activation('relu')(X)

    ### START CODE HERE ###

    # Second component of main path (≈3 lines)
    X = Conv2D(filters = F2, kernel_size = (f, f), strides = (1,1), padding = 'same', name = conv_name_base + '2b', kernel_initializer = glorot_uniform(seed=0))(X)
    X = BatchNormalization(axis = 3, name = bn_name_base + '2b')(X)
    X = Activation('relu')(X)

    # Third component of main path (≈2 lines)
    X = Conv2D(filters = F3, kernel_size = (1, 1), strides = (1,1), padding = 'valid', name = conv_name_base + '2c', kernel_initializer = glorot_uniform(seed=0))(X)
    X = BatchNormalization(axis = 3, name = bn_name_base + '2c')(X)

    # Final step: Add shortcut value to main path, and pass it through a RELU activation (≈2 lines)
    X = Add()([X, X_shortcut])
    X = Activation('relu')(X)

    ### END CODE HERE ###

    return X

##################################################

tf.reset_default_graph()

with tf.Session() as test:
    np.random.seed(1)
    A_prev = tf.placeholder("float", [3, 4, 4, 6])
    X = np.random.randn(3, 4, 4, 6)
    A = identity_block(A_prev, f = 2, filters = [2, 4, 6], stage = 1, block = 'a')
    test.run(tf.global_variables_initializer())
    out = test.run([A], feed_dict={A_prev: X, K.learning_phase(): 0})
    print("out = " + str(out[0][1][1][0]))


# out = [ 0.94822985  0.          1.16101444  2.747859    0.           1.36677003]
2.2 卷积块
跳跃连接上有一个卷积块,在跳跃连接的两端激活函数维度不一致时可以使用卷积块来转化为输出的维度,这个卷积转换没有激活函数,仅仅是线性转换。
步骤
- 第一步:
- 第一个二维卷积层CONV2D:
- 卷积核:F1个,shape = (1,1),strid=(s,s), padding=”valid”
- name:conv_name_base + ‘2a’
- 初始化种子为0
- 第一个BatchNorm:bn_name_base + ‘2a’,归一化通道轴
- 激活函数ReLu: 没有name, 没有超参数
- 第一个二维卷积层CONV2D:
- 第二步:
- 第二个二维卷积层CONV2D:
- 卷积核:F2个,shape = (f,f),strid=(1,1), padding=”same”
- name:conv_name_base + ‘2b’
- 初始化种子为0
- 第二个BatchNorm:bn_name_base + ‘2b’,归一化通道轴
- 激活函数ReLu: 没有name, 没有超参数
- 第二个二维卷积层CONV2D:
- 第三步:
- 第三个二维卷积层CONV2D:
- 卷积核:F3个,shape = (1,1),strid=(1,1), padding=”valid”
- name:conv_name_base + ‘2c’
- 初始化种子为0
- 第三个BatchNorm:bn_name_base + ‘2c’,归一化通道轴
- 没有激活函数
- 第三个二维卷积层CONV2D:
- 跳跃连接步
- 跳跃连接二维卷积层CONV2D:
- 卷积核:F3个,shape = (1,1),strid=(s,s), padding=”valid”
- name:conv_name_base + ‘1’
- 初始化种子为0
- 第三个BatchNorm:bn_name_base + ‘1’,归一化通道轴
- 没有激活函数
- 跳跃连接二维卷积层CONV2D:
- 最后步:
- 将跳跃连接和输入加到一起
- 激活函数ReLu: 没有name, 没有超参数
# GRADED FUNCTION: convolutional_block

def convolutional_block(X, f, filters, stage, block, s = 2):
    """
    Implementation of the convolutional block as defined in Figure 4

    Arguments:
    X -- input tensor of shape (m, n_H_prev, n_W_prev, n_C_prev)
    f -- integer, specifying the shape of the middle CONV's window for the main path
    filters -- python list of integers, defining the number of filters in the CONV layers of the main path
    stage -- integer, used to name the layers, depending on their position in the network
    block -- string/character, used to name the layers, depending on their position in the network
    s -- Integer, specifying the stride to be used

    Returns:
    X -- output of the convolutional block, tensor of shape (n_H, n_W, n_C)
    """

    # defining name basis
    conv_name_base = 'res' + str(stage) + block + '_branch'
    bn_name_base = 'bn' + str(stage) + block + '_branch'

    # Retrieve Filters
    F1, F2, F3 = filters

    # Save the input value
    X_shortcut = X


    ##### MAIN PATH #####
    # First component of main path
    X = Conv2D(F1, (1, 1), strides = (s,s), name = conv_name_base + '2a', kernel_initializer = glorot_uniform(seed=0))(X)
    X = BatchNormalization(axis = 3, name = bn_name_base + '2a')(X)
    X = Activation('relu')(X)

    ### START CODE HERE ###

    # Second component of main path (≈3 lines)
    X = Conv2D(F2, (f, f), strides = (1,1), name = conv_name_base + '2b', padding = 'same', kernel_initializer = glorot_uniform(seed=0))(X)
    X = BatchNormalization(axis = 3, name = bn_name_base + '2b')(X)
    X = Activation('relu')(X)

    # Third component of main path (≈2 lines)
    X = Conv2D(F3, (1, 1), strides = (1,1), name = conv_name_base + '2c', kernel_initializer = glorot_uniform(seed=0))(X)
    X = BatchNormalization(axis = 3, name = bn_name_base + '2c')(X)

    ##### SHORTCUT PATH #### (≈2 lines)
    X_shortcut = Conv2D(F3, (1, 1), strides = (s,s), name = conv_name_base + '1', kernel_initializer = glorot_uniform(seed=0))(X_shortcut)
    X_shortcut = BatchNormalization(axis = 3, name = bn_name_base + '1')(X_shortcut)

    # Final step: Add shortcut value to main path, and pass it through a RELU activation (≈2 lines)
    X = Add()([X, X_shortcut])
    X = Activation('relu')(X)

    ### END CODE HERE ###

    return X

########################################################

tf.reset_default_graph()

with tf.Session() as test:
    np.random.seed(1)
    A_prev = tf.placeholder("float", [3, 4, 4, 6])
    X = np.random.randn(3, 4, 4, 6)
    A = convolutional_block(A_prev, f = 2, filters = [2, 4, 6], stage = 1, block = 'a')
    test.run(tf.global_variables_initializer())
    out = test.run([A], feed_dict={A_prev: X, K.learning_phase(): 0})
    print("out = " + str(out[0][1][1][0]))

# out = [ 0.09018463  1.23489773  0.46822017  0.0367176   0.          0.65516603]
3 建立你的第一个ResNets模型(50层)
下图描述了这个神经网络的架构细节,”ID BLOCK” 表示”Identity block (一致块)”, “ID BLOCK x3”表示连续的三个一致块。
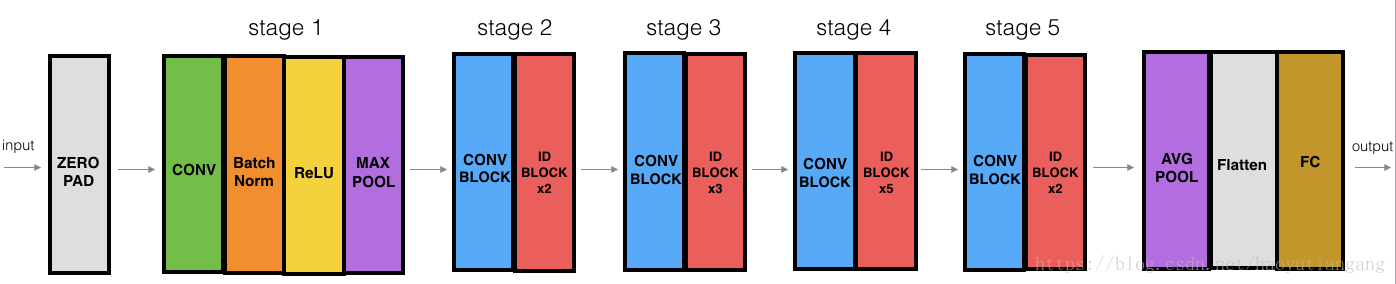
ResNet-50 模型细节
- 起始阶段:Zero-padding:pad = (3,3)
- 第一阶段:
- 2D卷积核:64个(7,7), stride=(2,2),name=”conv1”
- BatchNorm 作用于输入的通道轴
- MaxPooling:window = (3,3), stride=(2,2)
- 第二阶段:
- 1个卷积块:3个(64,64,256), f=3, s=1, block=”a”
- 2个一致块:3个(64,64,256),f=3, block=”b”和”c”
- 第三阶段:
- 1个卷积块:3个(128,128,512), f=3, s=2, block=”a”
- 3个一致块:3个(128,128,512),f=3, block=”b”和”c”和”d”
- 第四阶段:
- 1个卷积块:3个(256,256,1024), f=3, s=2, block=”a”
- 5个一致块:3个(256,256,1024),f=3, block=”b”和”c”和”d”和”e”和”f”
- 第五阶段:
- 1个卷积块:3个(512,512,2048), f=3, s=2, block=”a”
- 2个一致块:3个(512,512,2048),f=3, block=”b”和”c”
- 最后阶段:
- 2D Average Pooling:window=(2,2), name=”avg_pool”
- flatten: 没有任何超参数和name
- 全连接层利用softmax将输入进行分类, name=’fc’ + str(classes)
# GRADED FUNCTION: ResNet50

def ResNet50(input_shape = (64, 64, 3), classes = 6):
    """
    Implementation of the popular ResNet50 the following architecture:
    CONV2D -> BATCHNORM -> RELU -> MAXPOOL -> CONVBLOCK -> IDBLOCK*2 -> CONVBLOCK -> IDBLOCK*3
    -> CONVBLOCK -> IDBLOCK*5 -> CONVBLOCK -> IDBLOCK*2 -> AVGPOOL -> TOPLAYER

    Arguments:
    input_shape -- shape of the images of the dataset
    classes -- integer, number of classes

    Returns:
    model -- a Model() instance in Keras
    """

    # Define the input as a tensor with shape input_shape
    X_input = Input(input_shape)


    # Zero-Padding
    X = ZeroPadding2D((3, 3))(X_input)

    # Stage 1
    X = Conv2D(64, (7, 7), strides = (2, 2), name = 'conv1', kernel_initializer = glorot_uniform(seed=0))(X)
    X = BatchNormalization(axis = 3, name = 'bn_conv1')(X)
    X = Activation('relu')(X)
    X = MaxPooling2D((3, 3), strides=(2, 2))(X)

    # Stage 2
    X = convolutional_block(X, f = 3, filters = [64, 64, 256], stage = 2, block='a', s = 1)
    X = identity_block(X, 3, [64, 64, 256], stage=2, block='b')
    X = identity_block(X, 3, [64, 64, 256], stage=2, block='c')

    ### START CODE HERE ###

    # Stage 3 (≈4 lines)
    X = convolutional_block(X, f = 3, filters = [128, 128, 512], stage = 3, block='a', s = 2)
    X = identity_block(X, 3, [128, 128, 512], stage=3, block='b')
    X = identity_block(X, 3, [128, 128, 512], stage=3, block='c')
    X = identity_block(X, 3, [128, 128, 512], stage=3, block='d')

    # Stage 4 (≈6 lines)
    X = convolutional_block(X, f = 3, filters = [256, 256, 1024], stage = 4, block='a', s = 2)
    X = identity_block(X, 3, [256, 256, 1024], stage=4, block='b')
    X = identity_block(X, 3, [256, 256, 1024], stage=4, block='c')
    X = identity_block(X, 3, [256, 256, 1024], stage=4, block='d')
    X = identity_block(X, 3, [256, 256, 1024], stage=4, block='e')
    X = identity_block(X, 3, [256, 256, 1024], stage=4, block='f')

    # Stage 5 (≈3 lines)
    X = convolutional_block(X, f = 3, filters = [512, 512, 2048], stage = 5, block='a', s = 2)
    X = identity_block(X, 3, [512, 512, 2048], stage=5, block='b')
    X = identity_block(X, 3, [512, 512, 2048], stage=5, block='c')

    # AVGPOOL (≈1 line). Use "X = AveragePooling2D(...)(X)"
    X = AveragePooling2D((2, 2), name='avg_pool')(X)

    ### END CODE HERE ###

    # output layer
    X = Flatten()(X)
    X = Dense(classes, activation='softmax', name='fc' + str(classes), kernel_initializer = glorot_uniform(seed=0))(X)


    # Create model
    model = Model(inputs = X_input, outputs = X, name='ResNet50')

    return model

#######################################################

model = ResNet50(input_shape = (64, 64, 3), classes = 6)

model.compile(optimizer='adam', loss='categorical_crossentropy', metrics=['accuracy'])
接下来导入数据,还是手势数据集
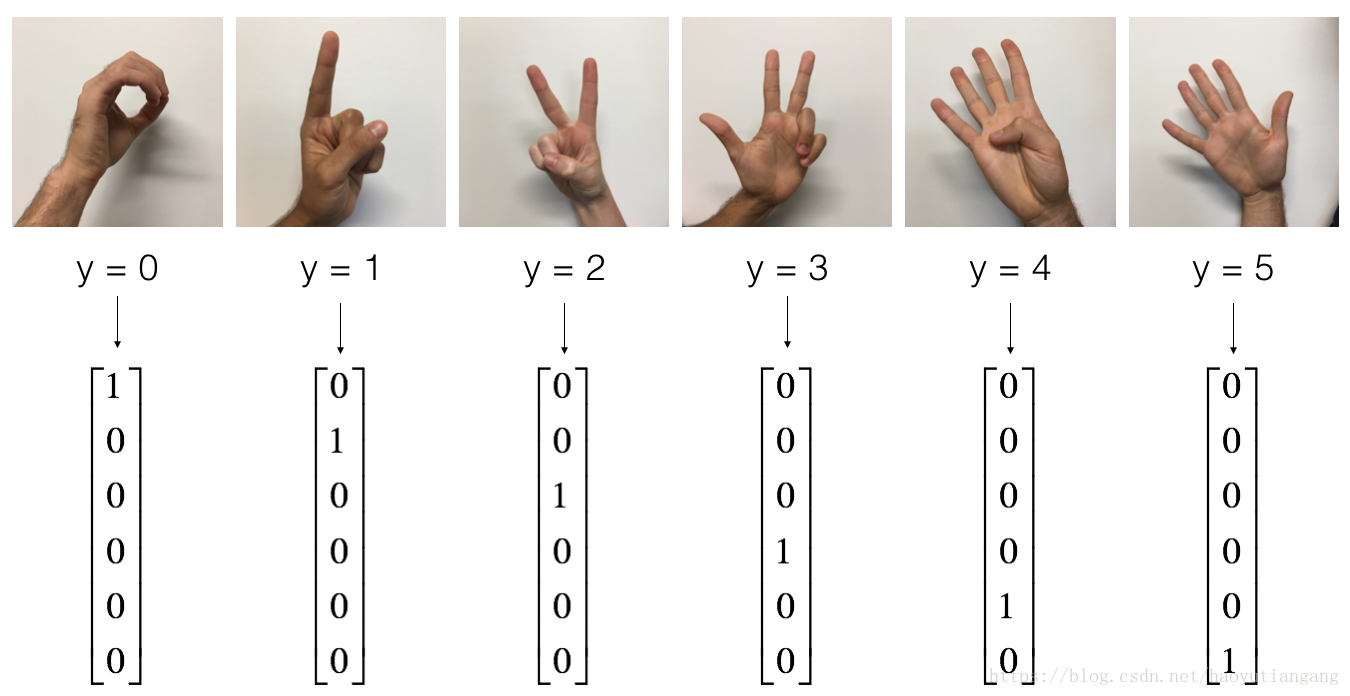
X_train_orig, Y_train_orig, X_test_orig, Y_test_orig, classes = load_dataset()

# Normalize image vectors
X_train = X_train_orig/255.
X_test = X_test_orig/255.

# Convert training and test labels to one hot matrices
Y_train = convert_to_one_hot(Y_train_orig, 6).T
Y_test = convert_to_one_hot(Y_test_orig, 6).T

print ("number of training examples = " + str(X_train.shape[0]))
print ("number of test examples = " + str(X_test.shape[0]))
print ("X_train shape: " + str(X_train.shape))
print ("Y_train shape: " + str(Y_train.shape))
print ("X_test shape: " + str(X_test.shape))
print ("Y_test shape: " + str(Y_test.shape))

# number of training examples = 1080
# number of test examples = 120
# X_train shape: (1080, 64, 64, 3)
# Y_train shape: (1080, 6)
# X_test shape: (120, 64, 64, 3)
# Y_test shape: (120, 6)
运行以下代码训练你的模型:batchSize=32, epochs=2, 5min per epoch
model.fit(X_train, Y_train, epochs = 2, batch_size = 32)

# Epoch 1/2
# 1080/1080 [==============================] - 260s - loss: 2.9406 - acc:  0.2713
# Epoch 2/2
# 1080/1080 [==============================] - 239s - loss: 2.4578 - acc:  0.3083
期待输出: loss = (1, 5), acc = (0.2, 0.5)
测试
preds = model.evaluate(X_test, Y_test)
print ("Loss = " + str(preds[0]))
print ("Test Accuracy = " + str(preds[1]))

# 120/120 [==============================] - 9s
# Loss = 2.14532471498
# Test Accuracy = 0.166666666667
期待输出: Test Accuracy = (0.16, 0.25)
由于模型太大,我们只在CPU上跑了两个epochs,我们已经为你在GPU上跑了这个模型,你可以测试一下效果(导入数据大概需要一分钟)
model = load_model('ResNet50.h5')

preds = model.evaluate(X_test, Y_test)
print ("Loss = " + str(preds[0]))
print ("Test Accuracy = " + str(preds[1]))

# 120/120 [==============================] - 9s
# Loss = 0.530178320408
# Test Accuracy = 0.866666662693
恭喜你完成训练!可以看到RetNet-50在比较多的epochs之后表现良好,希望你学会了。
4 测试你自己的图片 (可选)
img_path = 'images/my_image.jpg'
img = image.load_img(img_path, target_size=(64, 64))
x = image.img_to_array(img)
x = np.expand_dims(x, axis=0)
x = preprocess_input(x)
print('Input image shape:', x.shape)
my_image = scipy.misc.imread(img_path)
imshow(my_image)
print("class prediction vector [p(0), p(1), p(2), p(3), p(4), p(5)] = ")
print(model.predict(x))

# Input image shape: (1, 64, 64, 3)
# class prediction vector [p(0), p(1), p(2), p(3), p(4), p(5)] =
# [[ 1.  0.  0.  0.  0.  0.]]
查看各层细节
model.summary()可视化模型
plot_model(model, to_file='model.png')
SVG(model_to_dot(model).create(prog='dot', format='svg'))
谨记
- 实际应用中普通深度神经网络表现不好,很难有效处理训练时的梯度消失问题
- 跳跃连接可以有效解决梯度消失问题,同时也使ResNets更容易学到一致性特征
- 有两种类型的ResNets块: 一致块(the identity block)和卷积块(the convolutional block)
- 很深的ResNets经常将各个块堆叠在一起
参考
算法来自2015年的论文,实现参考了github
- Kaiming He, Xiangyu Zhang, Shaoqing Ren, Jian Sun - Deep Residual Learning for Image Recognition (2015)
- Francois Chollet’s github repository: https://github.com/fchollet/deep-learning-models/blob/master/resnet50.py


 被折叠的 条评论
为什么被折叠?
被折叠的 条评论
为什么被折叠?
 到【灌水乐园】发言


