


开始
上一期我们讲了怎么封装用户首选项、网络请求库,这一期直接来点绝活,做个叮当买药购物车列表,废话不多说,先上图看看效果!
效果图
点击查看
页面布局
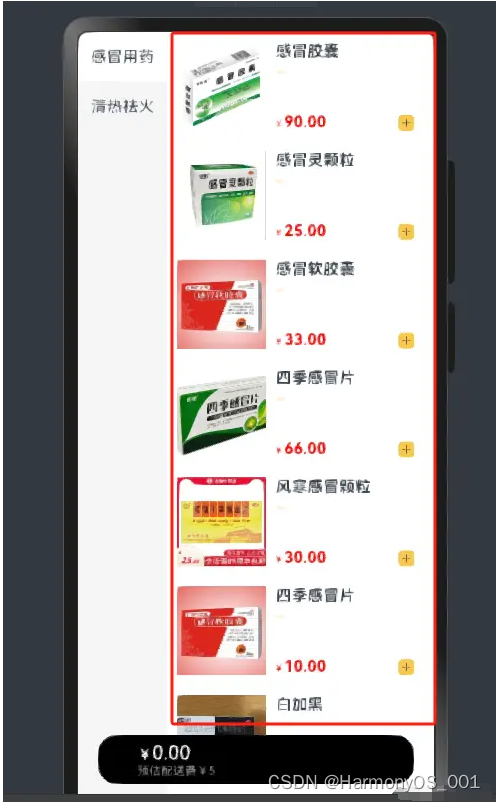
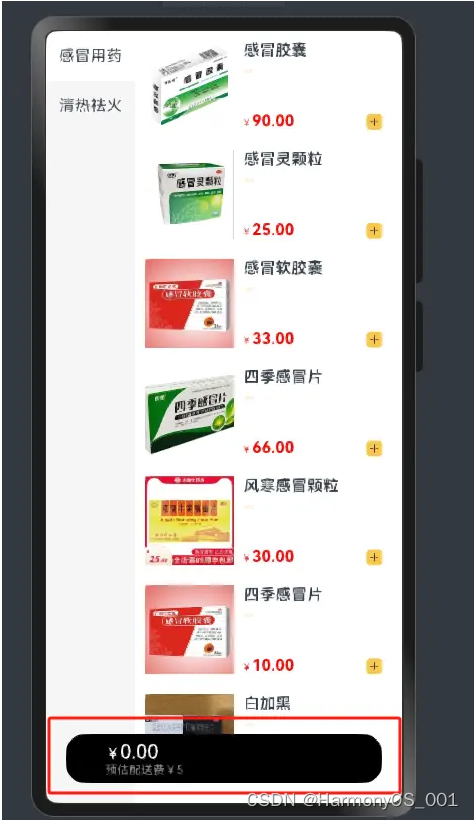
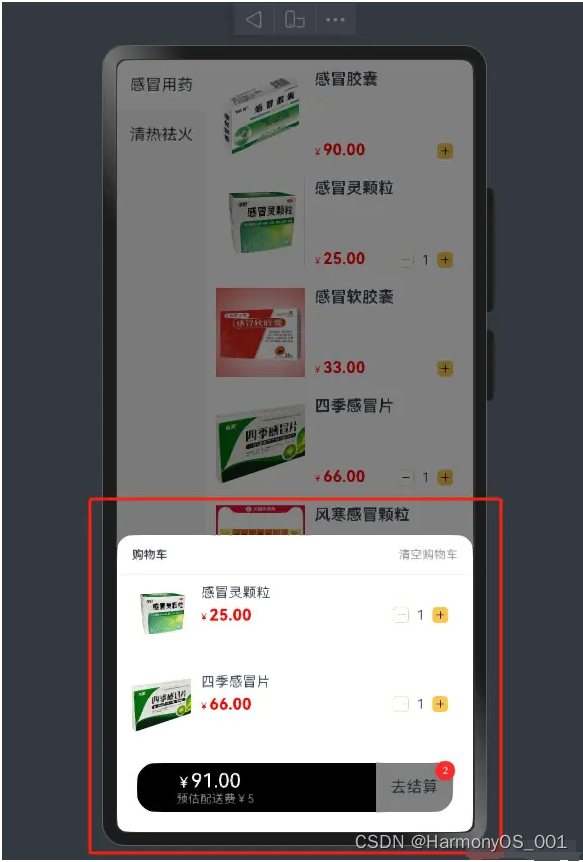
首先,购物车的布局大致可以分成四块
●左侧菜单列表
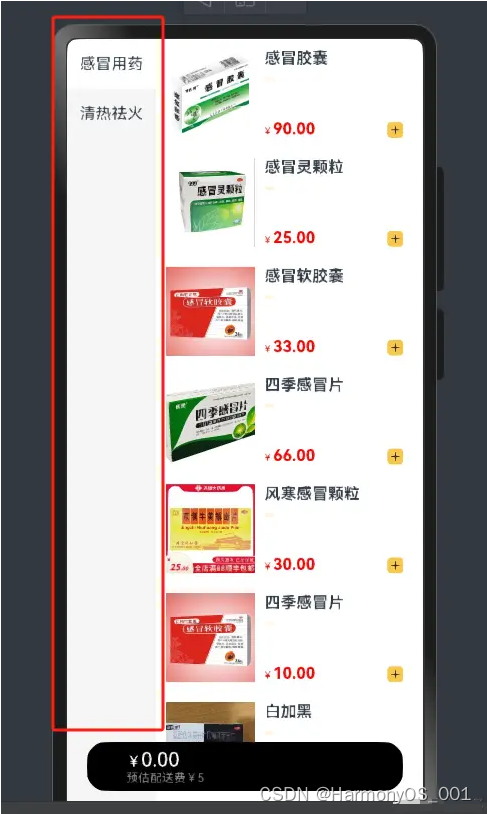
●右侧药品列表
●底部价格展示view
●购物车弹出层
开发环境
●Windows
●DevEco Studio NEXT Developer Preview2
●HarmonyOS next Developer Preview2
●java version “11.0.18” 2023-01-17 LTS
●hdc 1.2.0a
●手机:Mate 60Pro (HarmonyOS NEXT Developer Preview2)
实现思路
●首先准备好数据源
@State list: Category[] = [
  {
    "tag": "318569657",
    "name": "感冒用药",
    "foods": [new FoodItemModel({
      "id": 8078956697,
      "name": "感冒胶囊",
      "like_ratio_desc": "8折 限1份",
      "price": 90,
      "picture": 'https://img1.baidu.com/it/u=3695446799,2653776768&fm=253&fmt=auto&app=138&f=JPEG?w=500&h=500',
      'count': 1
    }), new FoodItemModel({
      "id": 8078956621,
      "name": "感冒灵颗粒",
      "like_ratio_desc": "8折 限1份",
      "price": 25,
      "picture": 'https://img2.baidu.com/it/u=4014310530,4016360647&fm=253&fmt=auto&app=138&f=JPEG?w=500&h=567',
      'count': 1
    }), new FoodItemModel({
      "id": 80789566133,
      "name": "感冒软胶囊",
      "like_ratio_desc": "8折 限1份",
      "price": 33,
      "picture": 'https://roadlady.com/uploads/allimg/190610/011913C11-2.jpg',
      'count': 1
    }), new FoodItemModel({
      "id": 80789566123,
      "name": "四季感冒片",
      "like_ratio_desc": "8折 限1份",
      "price": 66,
      "picture": 'https://img.huopinyuan.com/coll/202110/OT20211012102623937.jpg',
      'count': 1
    }), new FoodItemModel({
      "id": 807895664324,
      "name": "风寒感冒颗粒",
      "like_ratio_desc": "8折 限1份",
      "price": 30,
      "picture": 'https://gimg2.baidu.com/image_search/src=http%3A%2F%2Fimg.alicdn.com%2Fbao%2Fuploaded%2Fi4%2F2209144028871%2FO1CN01Vh5TDK2FOyAXIKOaE_%21%210-item_pic.jpg_300x300.jpg&refer=http%3A%2F%2Fimg.alicdn.com&app=2002&size=f9999,10000&q=a80&n=0&g=0n&fmt=auto?sec=1718075025&t=aa13f0c84fcbef902ef29e954fb8b55e',
      'count': 1
    }), new FoodItemModel({
      "id": 807895663123,
      "name": "四季感冒片",
      "like_ratio_desc": "8折 限1份",
      "price": 10,
      "picture": 'https://roadlady.com/uploads/allimg/190610/011913C11-2.jpg',
      'count': 1
    }), new FoodItemModel({
      "id": 423423423434,
      "name": "白加黑",
      "like_ratio_desc": "8折 限1份",
      "price": 10,
      "picture": 'https://img1.baidu.com/it/u=4135825917,1002141753&fm=253&fmt=auto&app=120&f=JPEG?w=500&h=375',
      'count': 1
    }), new FoodItemModel({
      "id": 343244234,
      "name": "阿木西林",
      "like_ratio_desc": "8折 限1份",
      "price": 10,
      "picture": 'https://gimg2.baidu.com/image_search/src=http%3A%2F%2Fci.xiaohongshu.com%2F346ddbfa-374b-c0ef-1e18-5a08e7515bd3%3FimageView2%2F2%2Fw%2F1080%2Fformat%2Fjpg&refer=http%3A%2F%2Fci.xiaohongshu.com&app=2002&size=f9999,10000&q=a80&n=0&g=0n&fmt=auto?sec=1718074929&t=4e83c1fa11b40681eb6a121d2c5048d7',
      'count': 1
    }), new FoodItemModel({
      "id": 4234234234,
      "name": "板蓝根颗粒",
      "like_ratio_desc": "8折 限1份",
      "price": 10,
      "picture": 'https://img2.baidu.com/it/u=1726541527,3759234806&fm=253&fmt=auto&app=120&f=JPEG?w=607&h=371',
      'count': 1
    })]
  }, {
  "tag": "318569657",
  "name": "清热祛火",
  "foods": [new FoodItemModel({
    "id": 312312312313,
    "name": "板蓝根",
    "like_ratio_desc": "8折 限1份",
    "price": 90,
    "picture": 'https://gimg2.baidu.com/image_search/src=http%3A%2F%2Fimg.alicdn.com%2Fbao%2Fuploaded%2Fi4%2F2209144028871%2FO1CN01Vh5TDK2FOyAXIKOaE_%21%210-item_pic.jpg_300x300.jpg&refer=http%3A%2F%2Fimg.alicdn.com&app=2002&size=f9999,10000&q=a80&n=0&g=0n&fmt=auto?sec=1718075025&t=aa13f0c84fcbef902ef29e954fb8b55e',
    'count': 1
  }), new FoodItemModel({
    "id": 31232312313,
    "name": "感冒清胶囊",
    "like_ratio_desc": "8折 限1份",
    "price": 25,
    "picture": 'https://roadlady.com/uploads/allimg/190610/011913C11-2.jpg',
    'count': 1
  }), new FoodItemModel({
    "id": 3123123123233,
    "name": "清热散接片",
    "like_ratio_desc": "8折 限1份",
    "price": 33,
    "picture": 'https://img1.baidu.com/it/u=4135825917,1002141753&fm=253&fmt=auto&app=120&f=JPEG?w=500&h=375',
    'count': 1
  }), new FoodItemModel({
    "id": 321312312323,
    "name": "凉茶颗粒",
    "like_ratio_desc": "8折 限1份",
    "price": 66,
    "picture": 'https://img2.baidu.com/it/u=1726541527,3759234806&fm=253&fmt=auto&app=120&f=JPEG?w=607&h=371',
    'count': 1
  }), new FoodItemModel({
    "id": 3123123313123,
    "name": "复方鱼腥草",
    "like_ratio_desc": "8折 限1份",
    "price": 30,
    "picture": 'https://roadlady.com/uploads/allimg/190610/011913C11-2.jpg',
    'count': 1
  }), new FoodItemModel({
    "id": 213123123123,
    "name": "牛黄解毒片",
    "like_ratio_desc": "8折 限1份",
    "price": 10,
    "picture": 'https://img.huopinyuan.com/coll/202110/OT20211012102623937.jpg',
    'count': 1
  }), new FoodItemModel({
    "id": 44324234,
    "name": "红茶泻火",
    "like_ratio_desc": "8折 限1份",
    "price": 10,
    "picture": 'https://img1.baidu.com/it/u=3695446799,2653776768&fm=253&fmt=auto&app=138&f=JPEG?w=500&h=500',
    'count': 1
  }), new FoodItemModel({
    "id": 343244234,
    "name": "泻火胶囊",
    "like_ratio_desc": "8折 限1份",
    "price": 10,
    "picture": 'https://img2.baidu.com/it/u=1726541527,3759234806&fm=253&fmt=auto&app=120&f=JPEG?w=607&h=371',
    'count': 1
  }), new FoodItemModel({
    "id": 21232312,
    "name": "牛黄解毒",
    "like_ratio_desc": "8折 限1份",
    "price": 10,
    "picture": 'https://img.huopinyuan.com/coll/202110/OT20211012102623937.jpg',
    'count': 1
  })]
}]
●定义数据model,然后写上了对应的构造方法(为什么要写构造?其实看个人习惯,不写也行),picture字段可以定义ResourceStr,因为ResourceStr可以是本地图片也可以是网络资源
//定义数据模型
export interface FoodItem {
  id: number
  name: string
  like_ratio_desc: string
  price: number
  picture: ResourceStr
  count: number
}


export interface Category {
  tag: string
  name: string
  foods: FoodItem[]
}

export class FoodItemModel implements FoodItem {
  id: number = 0
  name: string = ''
  price: number = 0
  like_ratio_desc: string = ''
  picture: ResourceStr = ''
  count: number = 0

  constructor(model: FoodItem) {
    this.id = model.id
    this.name = model.name
    this.price = model.price
    this.picture = model.picture
    this.count = model.count
  }
}

export class CategoryModel implements Category {
  tag: string = ''
  name: string = ''
  foods: FoodItem[] = []

  constructor(model: Category) {
    this.tag = model.tag
    this.name = model.name
    this.foods = model.foods
  }
}
●页面布局下最上面放一个Stack,让后面的元素盖在前一个元素上面,然后放上主体组件、购物车弹出层、底部价格组件,为什么要判断isShowCar? 因为底部组件默认是隐藏的,只有点击时候才会显示,需要往DrugAddView组件进行传递
@State isShowCar: boolean = false
build() {
  //后面的元素会盖在前一个元素上面
  Stack({ alignContent: Alignment.Bottom }) {
    //主体组件
    CarMain({ categoryList: $list })
    if (this.isShowCar) {
      //购物车弹出层
      DrugCar()
    }
    //底部价格组件
    DrugAddView({ isShowCar: $isShowCar })
  }.height('100%')
}
●主体组件下放上左侧内容、右侧内容,定义一个indexSelect是为了点击时候记住索引,然后通过索引获取右侧药品的信息
/**
 * 主体组件
 */
@Component
struct CarMain {

  @State
  indexSelect: number = 0
  @Link
  categoryList: Category[]

  build() {
    Column() {
      Row() {
        //左侧选中栏目
        Column() {
          ForEach(this.categoryList, (item: Category, index: number) => {
            Text(item.name)
              .width('100%')
              .height(50)
              .textAlign(TextAlign.Center)
              .backgroundColor(this.indexSelect == index ? Color.White : "#f5f5f5")
              .onClick(() => {
                this.indexSelect = index
              })
          })
        }.backgroundColor("#f5f5f5").height('100%').width('90')

        //右侧内容
        List() {
          ForEach(this.categoryList[this.indexSelect]?.foods || [], (item: FoodItem) => {
            ListItem() {
              DrugFoodItem({
                foodItem: item
              })
            }
          })
        }.layoutWeight(1).margin({ bottom: 65 })
      }.alignItems(VerticalAlign.Top)
    }.width('100%').alignItems(HorizontalAlign.Start)
  }
}
●接下来药品列表,foodItem是由主体组件里面的右侧内容通过数据往下进行传递,这里面可以定义Partial,证明里面内容是可选的,也可以通过构造方法进行new,看个人习惯
/**
 * 药品列表
 */
@Component
struct DrugFoodItem {
  foodItem: Partial<FoodItem> = {}

  build() {
    Row() {
      Image(this.foodItem.picture)
        .width(90)
        .aspectRatio(1)
      Stack({ alignContent: Alignment.TopStart }) {

        Column() {
          Text(this.foodItem.name)
            .textOverflow({
              overflow: TextOverflow.Ellipsis,
            })
            .maxLines(2)
            .fontWeight(600)
          Text(this.foodItem.like_ratio_desc)
            .fontSize(10)
            .backgroundColor('#fff5e2')
            .fontColor(Color.Red)
            .padding({ top: 2, bottom: 2, right: 5, left: 5 })
            .borderRadius(2)
            .margin({ top: 10 })
        }.alignItems(HorizontalAlign.Start)

        Row() {
          Text() {
            Span('¥ ')
              .fontColor(Color.Red)
              .fontSize(10)
            Span(this.foodItem.price?.toFixed(2))
              .fontColor(Color.Red)
              .fontWeight(FontWeight.Bold)
          }

          //购物车加减视图
          DrugAddCut({
            item: this.foodItem
          })
        }
        .height(90)
        .alignItems(VerticalAlign.Bottom)
        .justifyContent(FlexAlign.SpaceBetween)
        .width('100%')
      }
      .layoutWeight(1)
      .padding({ left: 10, right: 10 })
    }
    .padding(10)
    .alignItems(VerticalAlign.Top)
  }
}
●上层数据的左侧内容和右侧内容都有了,接下来我们看看点击弹框的view怎么实现?,这个地方为什么要用 @Consume,@Consume是父子共享,也就是说我子控件变化了父控件能监听到,父控件变化了子控件也能监听到,然而@Consume刚好能满足我们的要求,因为弹出的药品列表要和药品列表保持数据同步,@Provide需要定义在父控件也就是最上面,和数据源的地方放一起
@Provide
cardList: FoodItem[] = []

scss复制代码
/**
 * 选中的物品弹框视图
 */
@Component
struct DrugCar {
  @Consume
  cardList: FoodItem[] //接收到上层provide共享的数据

  build() {
    // 购物车弹出层
    Column() {
      Column() {
        Row() {
          Text('购物车')
            .fontSize(12)
            .fontWeight(600)
          Text('清空购物车')
            .fontSize(12)
            .fontColor('#999').onClick(() => {
            clearCats()
          })
        }
        .width('100%')
        .height(40)
        .justifyContent(FlexAlign.SpaceBetween)
        .border({ width: { bottom: 0.5 }, color: '#f5f5f5' })
        .margin({ bottom: 10 })
        .padding({ left: 15, right: 15 })

        List({ space: 30 }) {
          ForEach(this.cardList, (item: FoodItem) => {
            ListItem() {
              DrugItem({ item: item })
            }
          })
        }
        .divider({
          strokeWidth: 0.5,
          color: '#f5f5f5'
        })
        .padding({ left: 15, right: 15, bottom: 100 })
      }
      .backgroundColor('#fff')
      .borderRadius({
        topLeft: 16,
        topRight: 16
      })
    }
    .height('100%')
    .width('100%')
    .justifyContent(FlexAlign.End)
    .backgroundColor('rgba(0,0,0,0.5)')
  }
}
●下面是购物车购物车弹出层的itemView,没别的就是简单的渲染,然后增加了个DrugAddCut购物车加减组件,后面单独讲这个
/**
 * 购物车弹出层的item
 */
@Component
struct DrugItem {
  item: Partial<FoodItem> = {}

  build() {
    Row() {
      Image(this.item.picture)
        .width(60)
        .aspectRatio(1)
        .borderRadius(8)
      Column({ space: 5 }) {
        Text(this.item.name)
          .fontSize(14)
          .textOverflow({
            overflow: TextOverflow.Ellipsis
          })
          .maxLines(2)
        Row() {
          Text() {
            Span('¥ ')
              .fontColor(Color.Red)
              .fontSize(10)
            Span(this.item.price?.toFixed(2))
              .fontColor(Color.Red)
              .fontWeight(FontWeight.Bold)
          }

          //购物车加减视图
          DrugAddCut({ item: this.item })
        }
        .justifyContent(FlexAlign.SpaceBetween)
        .width('100%')
      }
      .layoutWeight(1)
      .alignItems(HorizontalAlign.Start)
      .padding({ left: 10, right: 10 })
    }
    .alignItems(VerticalAlign.Top)
  }
}
●接下来是底部组件,同样定义一个link接收上面传递下面的isShowCar判断点击时候是否显示底部弹出的视图层,然后用父子共享@Consume来和上面数据进行同步,然后封装了两个方法计算了总数量和总价格
/**
 * 底部组件
 */
@Component
struct DrugAddView {
  @Link
  isShowCar: boolean
  @Consume
  cardList: FoodItem[]

  /**
   * 获取总数量
   * @returns
   */
  getAllCount() {
    //箭头函数省略法可以把{}去掉
    return this.cardList.reduce((preValue: number, item: FoodItem) => preValue + item.count, 0)
  }

  /**
   * 获取总价格
   * @returns
   */
  getAllPrice() {
    return this.cardList.reduce((preValue: number, item: FoodItem) => (item.price * item.count + preValue), 0)
  }

  build() {
    Row() {
      Row() {
        Column() {
          Text() {
            Span("¥").fontSize(15).fontColor(Color.White)
            Span(this.getAllPrice().toFixed(2)).fontSize(20).fontColor(Color.White)
          }

          Text("预估配送费¥5").fontSize(12).fontColor(Color.Gray)
        }.alignItems(HorizontalAlign.Start).layoutWeight(1).margin({ left: 40 })


        Badge({
          value: this.getAllCount().toString(),
          position: BadgePosition.RightTop,
          style: { badgeSize: 20, badgeColor: '#FA2A2D' }
        }) {
          //结算按钮
          Text("去结算").margin(15)
        }
        .height(50)
        .backgroundColor(Color.Gray)
        .borderRadius({
          topRight: 20,
          bottomRight: 20
        }).visibility(this.getAllCount() == 0 ? Visibility.None : Visibility.Visible)
      }
      .height(50)
      .width('100%')
      .backgroundColor(Color.Black)
      .borderRadius(20)
      .onClick(() => {
        this.isShowCar = !this.isShowCar
      })
    }.padding({ left: 20, right: 20, bottom: 20 }).width('100%')
  }
}
●重头戏来了!,是不是发现弹出的视图和右侧视图都调用了DrugAddCut组件,那行,我们封装一个DrugAddCut组件供他们调用,同理,每次点击加减右侧内容和弹出层都要变化,无可置疑这个地方继续使用 @Consume 来监听父子组件的双向变化
/**
 * 加减购物车的视图
 */
@Component
struct DrugAddCut {
  item: Partial<FoodItem> = {}
  @Consume
  cardList: FoodItem[]

  getCunt() {
    return this.cardList.find(item => item.id === this.item.id)?.count || 0
  }

  build() {
    Row({ space: 8 }) {
      Row() {
        Image($r('app.media.ic_screenshot_line'))
          .width(10)
          .aspectRatio(1)

      }
      .width(16)
      .aspectRatio(1)
      .justifyContent(FlexAlign.Center)
      .backgroundColor("#fff")
      .borderRadius(4)
      .border({ width: 0.5, color: '#f8c74e' })
      .onClick(() => {
        addCutCart('cut', this.item as FoodItem)
      })
      .visibility(this.getCunt() ? Visibility.Visible : Visibility.Hidden)

      Text(this.getCunt().toString()).fontSize(14).visibility(this.getCunt() ? Visibility.Visible : Visibility.Hidden)
      Row() {
        Image($r('app.media.ic_public_add_filled'))
          .width(10)
          .aspectRatio(1)

      }
      .width(16)
      .aspectRatio(1)
      .justifyContent(FlexAlign.Center)
      .backgroundColor('#f8c74e')
      .borderRadius(4)
      .onClick(() => {
        addCutCart('add', this.item as FoodItem)
      })
    }
  }
}
●其实还有个最重要的,缓存数据,我添加进去了下次进入还想要看到怎么办?鸿蒙给我们提供了用户首选AppStorage,这里我们用AppStorage,因为每次都要观察数据变化 这里我们使用@Watch,Watch有个巨坑,注意:必须写在其他修饰符下面 首次进入不会监听!!!
●然后每次进去后我们要对缓存进行赋值,可以在aboutToAppear生命周期下处理,其实aboutToAppear就相当于安卓的onCreate方法,首次进去会初始化
// 初始化持久化购物车

//获取缓存中的值
@StorageLink
("user_cart")
@Watch
("updateCartJSON") //必须写在其他修饰符下面 首次进入不会监听
cartJson: string = '[]'

PersistentStorage.persistProp("user_cart", '[]')

const getCarts = () => {
  return JSON.parse(AppStorage.get('user_cart') || '[]') as FoodItem[]
}

updateCartJSON() {
  this.cardList = getCarts()
}

aboutToAppear() {
  this.updateCartJSON()
}
接下来就是添加和移出药品、清空购物车方法,比较简单几行代码搞定!
**
 *添加和移出药品方法
 * @param type
 * @param item
 */
const addCutCart = (type: 'add' | 'cut', item: FoodItem) => {
  const list = getCarts()
  const f = list.find(f => f.id === item.id)
  if (type === 'add') {
    // +1
    if (f) {
      f.count++
    } else {
      item.count = 1
      list.unshift(item) // 加入
    }

  } else if (type === 'cut') {
    if (f && f.count > 0) {
      f.count--
      if (f.count === 0) {
        // 移除
        const index = list.findIndex(f => f.id === item.id)
        list.splice(index, 1) // 移除该元素
      }
    }
  }
  AppStorage.set<string>("user_cart", JSON.stringify(list))
}

/**
 * 清空购物车
 */
const clearCats = () => {
  AppStorage.set<string>("user_cart", '[]')
}
总结
●这一期我们写了个购物车功能,其实还能优化,比如右侧内容往下拉到第二组数据的时候能自动定位到左侧内容的第二组数据,等等等…
●在做项目的过程中,个人感觉鸿蒙还是有后发优势,很多控件封装了能直接使用,避免像安卓一样写一大堆自定义view
●对于用惯flutter和安卓 compose应该随便入手,思想都差不多
●该购物车既能在api9运行,也能在api11运行,亲测!


 910
910

 被折叠的 条评论
为什么被折叠?
被折叠的 条评论
为什么被折叠?
 到【灌水乐园】发言


