


##PyqtDeploy 部署 Android 记录
第一次接触PyQt还两年前,写了许多应用后对于PyQt的简单直接很喜欢,用PyQt写Android听起来就好好玩,之前就有过PyQt4 For Android的测试,不过需要另外安装巨大的 Android 运行库 ministro,着实是不方便不好看,ministro还是建立在Qt4时代,现在Qt5已经完全支持Android了,很好
前天开始寻找PyQtDeploy的资料开始编译,国内基本没有什么资料,直接看文档,花了两天时间虽然编译出了Apk,但是没有运行成功,这部分的资料实在是太少了,第一次出现的EGL渲染错误,试验平台Android5.0 EGL3.0,第二次 Android4.4.2 EGL2.0,仍然没有运行成功,希望后期可以解决
##更新
在新的环境下重新进行测试编译已无主要BUG
Qt版本 5.6 5.7 5.8 Ubuntu16.04 Windows1607 Python3.5.2
Download Project Folder:https://download.csdn.net/download/harry159821/10716061

 |  |
###PyQtDeploy
对各个库的静态编译配置
将PyQt代码生成对应C++代码,对应的QtAndroid工程
###相关参考资料
https://pypi.python.org/pypi/pyqtdeploy/
http://pyqt.sourceforge.net/Docs/pyqtdeploy/tutorial.html
https://plashless.wordpress.com/2014/09/16/deploying-pyqt-python-qt-apps-cross-platform-using-pyqtdeploy/
https://plashless.wordpress.com/2014/08/19/using-pyqtdeploy0-5-on-linux-to-cross-compile-a-pyqt-app-for-android/
###相关下载点
http://www.qt.io/download-open-source/
https://riverbankcomputing.com/software/sip/download
https://riverbankcomputing.com/software/pyqt/download5
https://www.python.org/downloads/source/
http://ant.apache.org/bindownload.cgi
###编译环境
全部 32位
- Windows10 Pro
- Ubuntu16.04.02
- Qt5.8.0 Python3.5.2 PyQt-gpl-5.8.2 sip-4.19.2 pyqtdeploy 1.3.2
- Android-sdk23 Android-ndk-r13 Apache-ant-1.9.4
###核心步骤
- 静态编译Qt5.8.0 Python3.5.2 PyQt-gpl-5.8 sip-4.19.2 的 Android 平台版本
http://pyqt.sourceforge.net/Docs/pyqtdeploy/static_builds.html - 编译 Qt工程
使用 QtCreator
##具体操作
###1.准备工作
- 更新好你Android设备平台对应的AndroidSDK
- 环境变量 SYSROOT,主要为编译好的库存放设置,
- 所有路径别加空格
- 下载好除Qt外的Python3.5.2 PyQt5_gpl-5.8.2 sip-4.19.2 pyqtdeploy 1.1源码 放置在SYSROOT/src下
- 安装好Qt,使用带安卓ArmV7支持的Qt
qt-opensource-windows-x86-android-5.8.0.exe,
qt-opensource-linux-x86-android-5.5.0.run - Linux 安装好 GCC Make Java Sip Pip3 等命令工具
- windows 把 mingw32-make 复制一份 重命名成 make,用起来方便
本机编译使用各路径
Windows
D:\Python35
D:\android\android-ndk-r13-windows-x86\android-ndk-r13
D:\android\android-sdk_r23.0.2-windows
D:\android\apache-ant-1.9.4-bin\apache-ant-1.9.4
C:\Program Files\Java\jdk1.8.0_66
F:\Qt\Qt5.8.0
F:\SYSROOT\src\PyQt5_gpl-5.8.2
F:\SYSROOT\src\Python-3.5.2
F:\SYSROOT\src\sip-4.19.2
F:\SYSROOT\src\sip-4.19.2-ForBuild
Linux
/home/harry159821/android/android-ndk-r10e
/home/harry159821/android/android-sdk-linux
/home/harry159821/android/apache-ant-1.9.4
/home/harry159821/Qt5.5.0
/home/harry159821/SYSROOT
/home/harry159821/SYSROOT/src/PyQt-gpl-5.5
/home/harry159821/SYSROOT/src/PyQt-gpl-5.5.1-snapshot-03781fa3b27e
/home/harry159821/SYSROOT/src/Python-3.4.0
/home/harry159821/SYSROOT/src/sip-4.16.9
###2.pip 安装 PyQtdeploy
Windows
pip install PyQt5
pip install pyqtdeploy
Linux
sudo pip3 install PyQt5
sudo pip3 install pyqtdeploy
###3.静态编译 Python3.4.0
Windows
CMD运行
配置环境变量
set path=F:\Qt\Qt5.8.0\Tools\mingw530_32\bin;F:\Qt\Qt5.8.0\5.8\android_armv7\bin\;%path%
set ANDROID_NDK_ROOT=D:\android\android-ndk-r13-windows-x86\android-ndk-r13
set ANDROID_SDK_ROOT=D:\android\android-sdk_r23.0.2-windows\android-sdk-windows
set ANDROID_HOME=D:\android\android-sdk_r23.0.2-windows\android-sdk-windows
set ANDROID_NDK_PLATFORM=18
set JAVA_HOME=C:\Program Files\Java\jdk1.8.0_66
set SYSROOT=F:\SYSROOT

pyqtdeploycli --package python --target android-32 configure
此时打补丁
python.pro 加上
        Modules/_posixsubprocess.c \
        Modules/selectmodule.c \
Modules\config.c 加上
extern PyObject* PyInit__posixsubprocess(void);
extern PyObject* PyInit_select(void);
继续编译
qmake SYSROOT=F:\SYSROOT
mingw32-make -j8
mingw32-make install
Linux
pyqtdeploycli --package python --target android-32 configure
export ANDROID_NDK_ROOT=/home/harry159821/android/android-ndk-r10e
/home/harry159821/Qt5.5.0/5.5/android_armv7/bin/qmake SYSROOT=/home/harry159821/SYSROOT
make
sudo make install
###4.静态编译 sip
Windows
pyqtdeploycli --package sip --target android-32 configure
python configure.py --static --sysroot=F:\SYSROOT --no-tools --use-qmake --configuration=sip-android.cfg
qmake
make -j8
make install
Windows 需要把sip安装到你的系统,另外解压一份Sip源码
python configure.py --platform win32-g++
make -j8
copy sipgen\sip.exe to F:\Qt\Qt5.8.0\Tools\mingw530_32\bin
Linux
pyqtdeploycli --package sip --target android-32 configure
python3 configure.py --static --sysroot=/home/harry159821/SYSROOT --no-tools --use-qmake --configuration=sip-android.cfg --prefix=$HOME/local
export ANDROID_NDK_ROOT=/home/harry159821/android/android-ndk-r10e
export C_INCLUDE_PATH=/usr/include/python3.4
sudo cp /usr/include/python3.4m/pyconfig.h /usr/include/python3.4/arm-linux-gnueabi/python3.4m/pyconfig.h
/home/harry159821/Qt5.5.0/5.5/android_armv7/bin/qmake
make
sudo make install
Linux同样需要把sip安装到你的系统,另外解压一份Sip源码
./configure
make
sudo make install
###5.静态编译 PyQt5
Windows
先打补丁
Edit PyQt5_gpl-5.8.2\configure.py
1.class TargetConfiguration
  Line507: self.qmake_spec = 'win32-g++'

2.def check_qt(target_config):
Line 2807:
    if target_config.qmake_spec == 'win32-g++':
        pass
        # target_config.qmake_variables.append('QMAKE_CFLAGS += -mstackrealign')
        # target_config.qmake_variables.append('QMAKE_CXXFLAGS += -mstackrealign')
编译
python configure.py --static --verbose --sysroot=F:\SYSROOT --no-tools --no-qsci-api --no-designer-plugin --no-qml-plugin --configuration=pyqt5-android.cfg --qmake=F:\Qt\Qt5.8.0\5.8\android_armv7\bin\qmake.exe
make
sudo make install
Linux
pyqtdeploycli --package pyqt5 --target android-32 configure
python3 configure.py --static --verbose --sysroot=/home/harry159821/SYSROOT --no-tools --no-qsci-api --no-designer-plugin --no-qml-plugin --configuration=pyqt5-android.cfg --qmake=/home/harry159821/Qt5.5.0/5.5/android_armv7/bin/qmake
make
sudo make install
###6.PyQtDeploy生成Qt工程
1.创建工程文件夹,创建pyqt代码
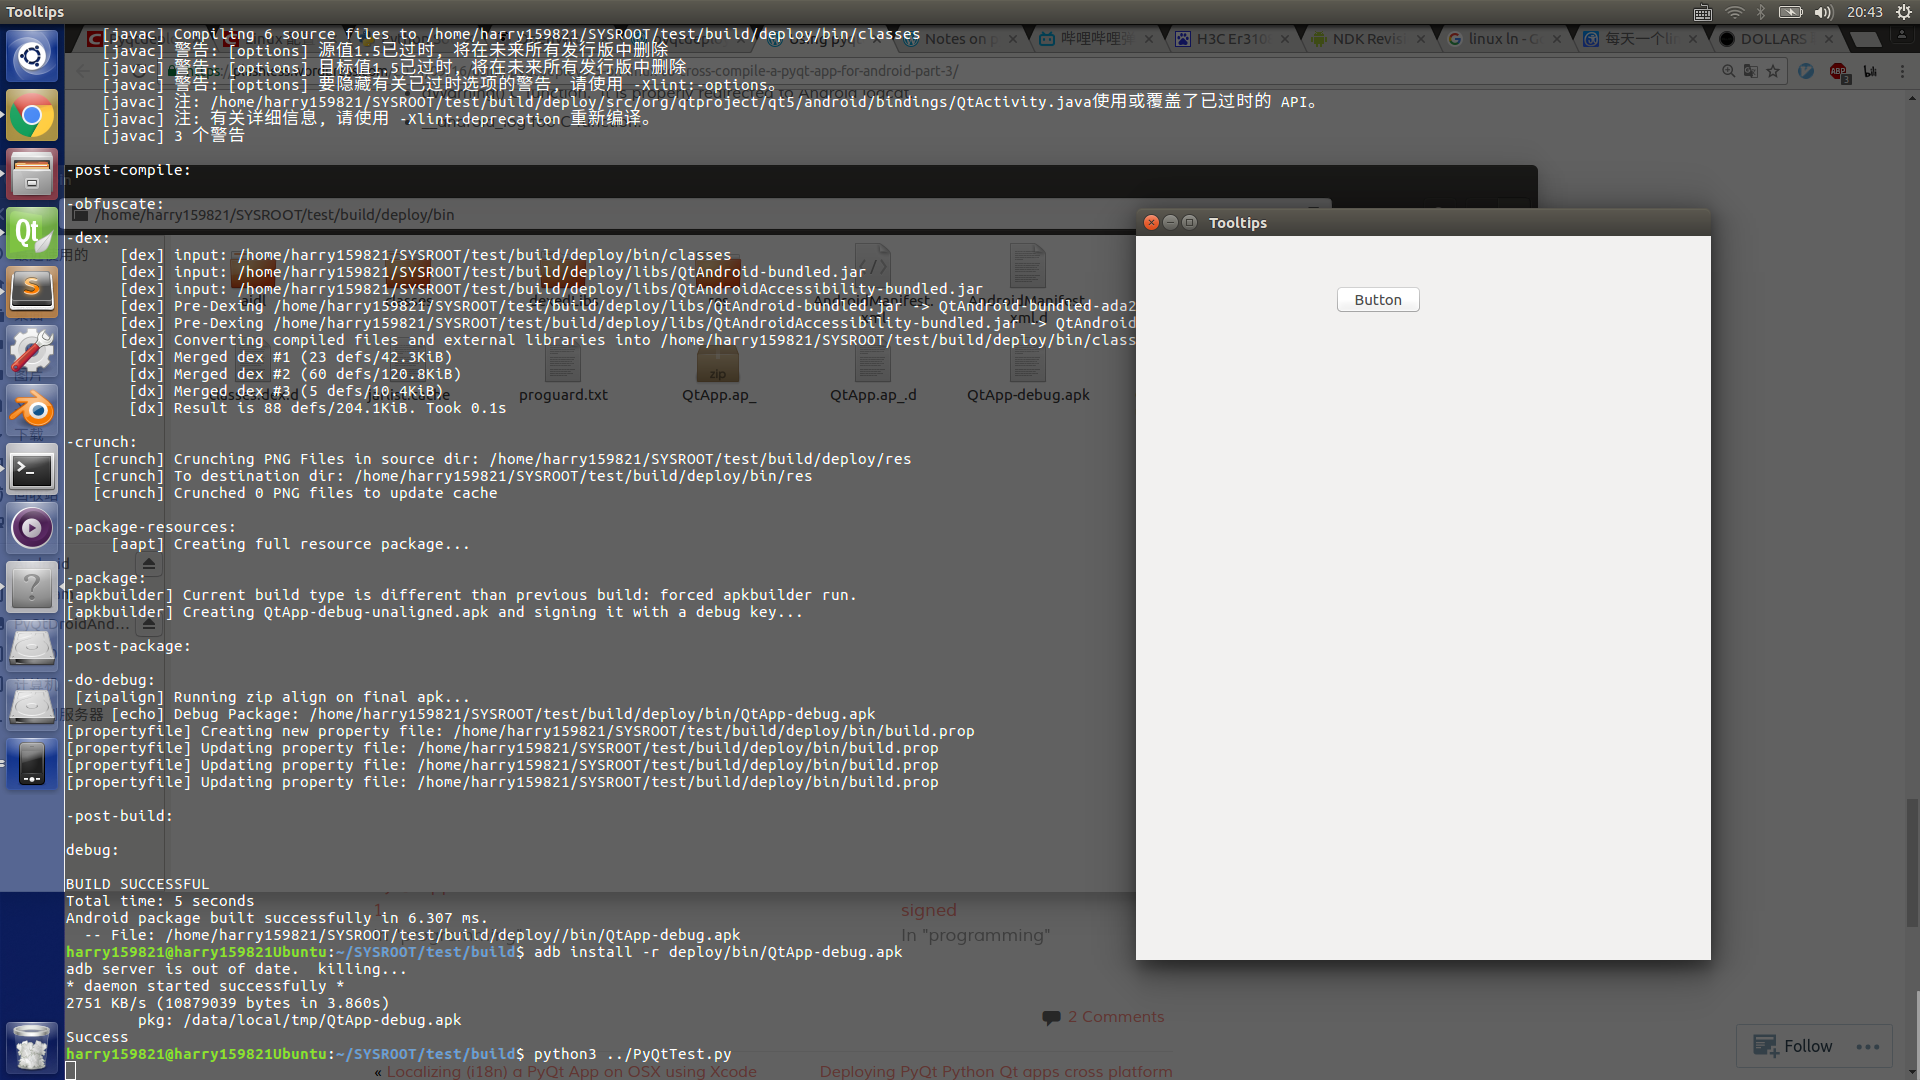
#!/usr/bin/python3
# -*- coding: utf-8 -*-

import sys,os
from PyQt5 import QtGui,QtCore,QtWidgets
from PyQt5.QtWidgets import *

class Example(QWidget):

    def __init__(self):
        super().__init__()
        self.initUI()

    def initUI(self):
        self.btn = QPushButton(self)
        self.btn.setText("helloworldPyQtInWindows")
        self.btn.move(50,100)

        font = self.btn.font()
        font.setPointSizeF(30)
        self.btn.setFont(font)
        self.btn.resize(self.btn.sizeHint())

        lineLayout = QVBoxLayout()
        self.inputLine = QLineEdit("13123123123213",self)
        lineLayout.addWidget(self.inputLine)
        lineLayout.addWidget(self.btn)
        # lineLayout.addWidget(self.btn2)
        self.setLayout(lineLayout)

        self.resize(500, 200)
        self.setWindowTitle('Tooltips')
        self.show()

        # self.btn.move(50,self.size().height()/2.0)

if __name__ == '__main__':
    app = QApplication(sys.argv)
    ex = Example()
    sys.exit(app.exec_())
2.pyqtdeploy 配置
set SYSROOT=F:\SYSROOT
pyqtdeploy helloworld.pdy
逐步设置好路径后Build
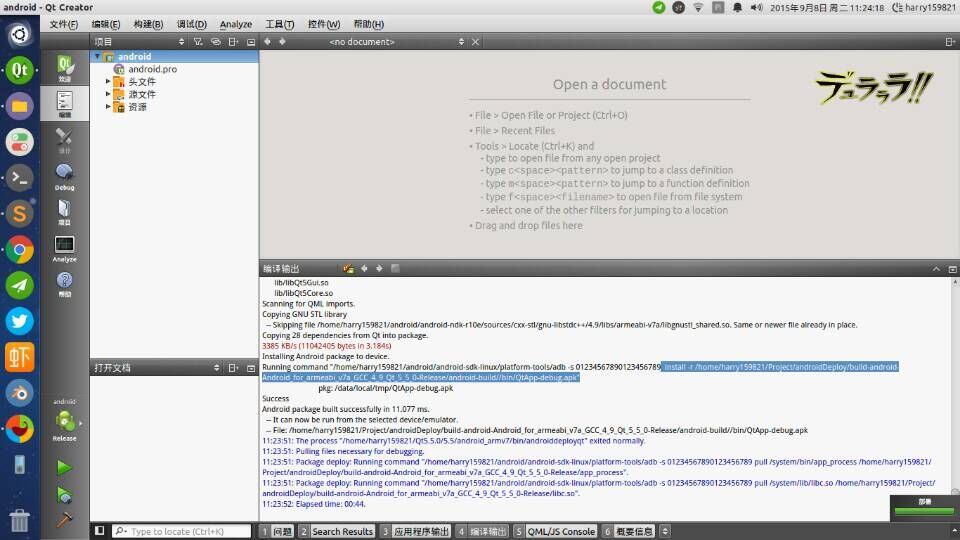
3.QtCreator 打开 build/helloworld.pro
4.编译
##编译过程中的问题
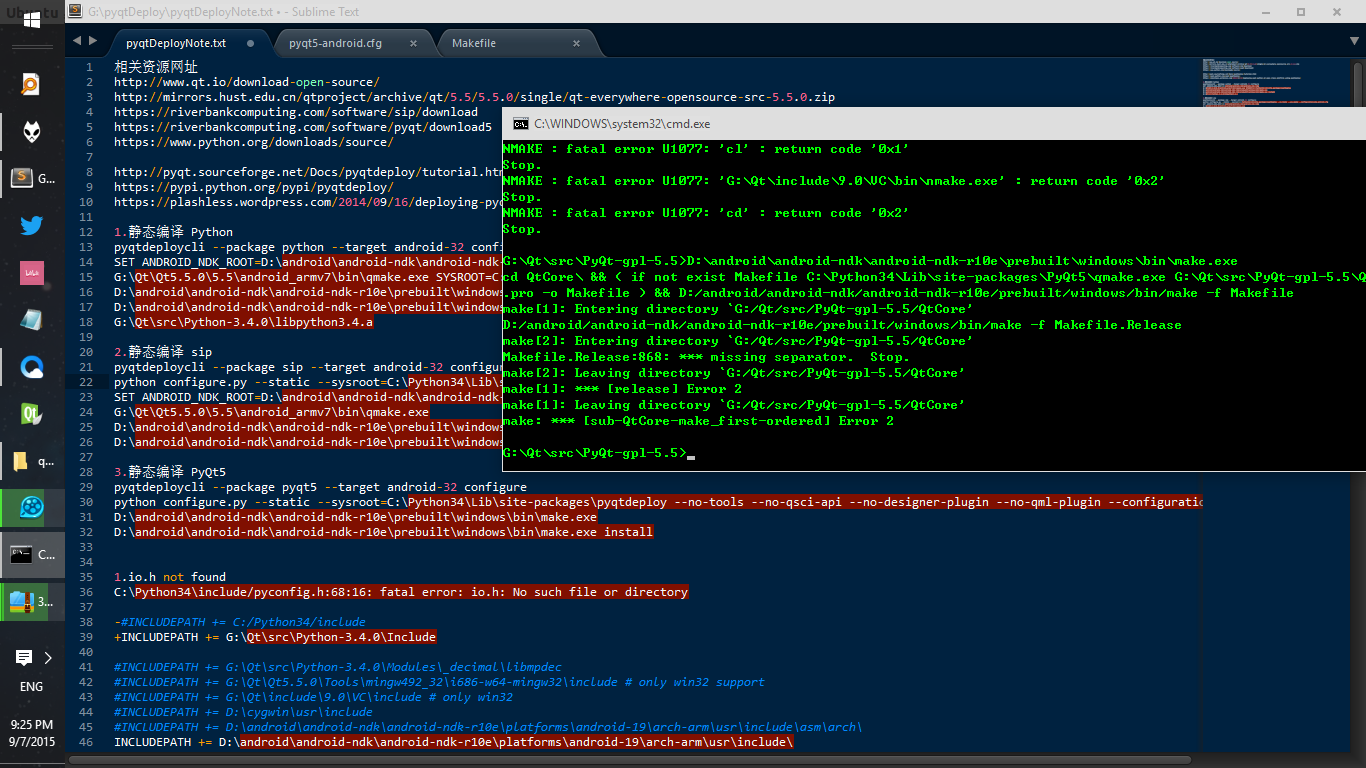
###io.h not found
C:\Python34\include/pyconfig.h:68:16: fatal error: io.h: No such file or directory
编辑Android.pro
INCLUDEPATH += G:\Qt\src\Python-3.4.0\Include
INCLUDEPATH += D:\android\android-ndk\android-ndk-r10e\platforms\android-19\arch-arm\usr\include\
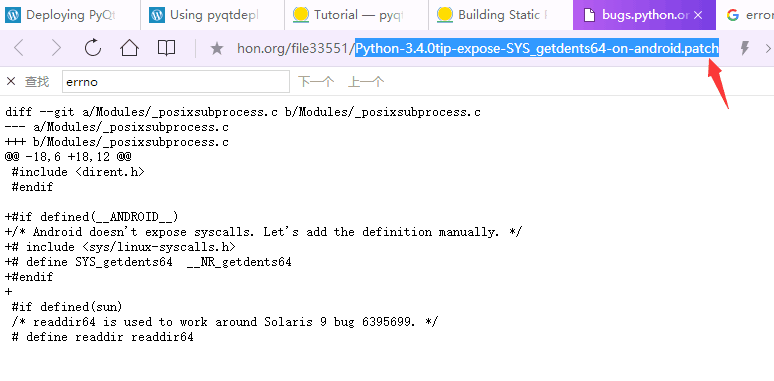
error: errno undeclared
编辑 _math.c mathmodule.c
#include <D:\android\android-ndk\android-ndk-r10e\platforms\android-19\arch-mips\usr\include\errno.h>
error: SYS_getdents64 undeclared
编辑 G:\Qt\src\Python-3.4.0\Modules_posixsubprocess.c
+#if defined(__ANDROID__)
+/* Android doesn't expose syscalls. Let's add the definition manually. */
+# include <sys/linux-syscalls.h>
+# define SYS_getdents64  __NR_getdents64
+#endif
参照 http://bugs.python.org/file33551/Python-3.4.0tip-expose-SYS_getdents64-on-android.patch
####目前错误进度
http://python.6.x6.nabble.com/pyqtdeploy-SIGSEGV-td5091066.html
寻找到的有关链接
http://python.6.x6.nabble.com/template/NamlServlet.jtp?macro=user_nodes&user=371140
http://bugs.python.org/issue23496
http://bugs.python.org/review/23496/#ps14460
https://code.google.com/p/python-for-android/wiki/CrossCompilingPython
其他图


 3355
3355

 被折叠的 条评论
为什么被折叠?
被折叠的 条评论
为什么被折叠?
 到【灌水乐园】发言


