


作者 水云青
原创作品转载请注明出处
《Linux内核分析》MOOC课程http://mooc.study.163.com/course/USTC-1000029000
首先给出运行程序的源代码:链接地址:
mykernel-master.zip 地址:http://pan.baidu.com/s/1dEsqxe5
linux-3.9.4.tar.xz 地址:http://pan.baidu.com/s/1pKlQDR1
mykernel_for_linux3.9.4sc.patch 地址:http://pan.baidu.com/s/1hqW5L8C
也可以在实验楼中,进行试验https://www.shiyanlou.com/courses/195
在实验楼中进入主文件夹,在终端输入如下命令,来启动程序
- cd LinuxKernel/linux-3.9.4
- qemu -kernel arch/x86/boot/bzImage
如果自己搭建环境,文件解压即可,笔者在Ubuntu 15.10中进行试验。
试验目的:
1、熟悉、理解Linux内核工作方式
2、尝试编写自己的内核
3、理解多进程时间片轮转的工作方式
试验过程:
1.编译内核:
。。。。。
具体过程参见word文档
地址:http://pan.baidu.com/s/1pJXD3HT
但是笔者在对着文档进行试验时出现了下面的错误
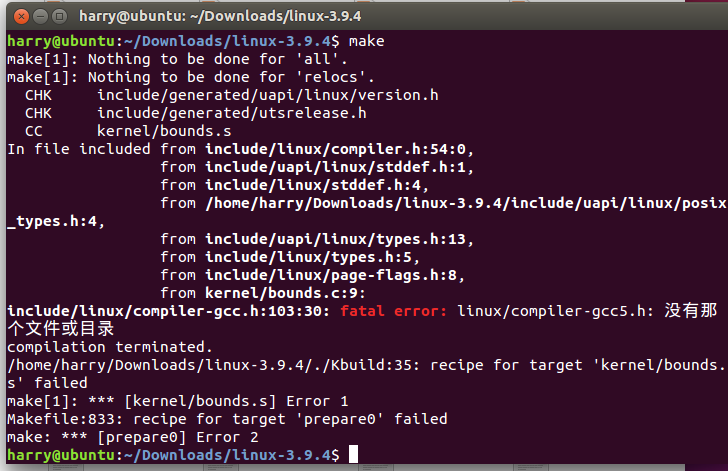
compilation terminated.
这种情况是因为系统太新,手动去网上下一个 compiler-gcc5.h 放你要编译内核模块的内核代码的include/linux下.
现在给出一个compiler-gcc5.h的地址:
http://pan.baidu.com/s/1c1gNsnY
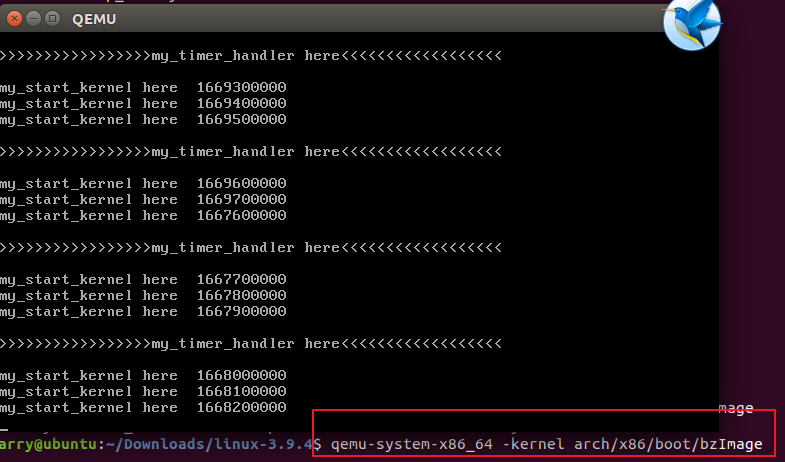
如图是笔者在Ubuntu 15.10中的运行结果
将多进程实践片轮转的mykernel放入linux3.9.4之后,文件下载地址为:
http://pan.baidu.com/s/1kU2nOKB,开始编译,运行,参见word文档。
二、分析
下面对主要代码进行分析
<pre name="code" class="cpp" style="font-size: 13.3333px;">#define MAX_TASK_NUM 4
<pre name="code" class="cpp">#include <linux/types.h>
#include <linux/string.h>
#include <linux/ctype.h>
#include <linux/tty.h>
#include <linux/vmalloc.h>


#include "mypcb.h"

tPCB task[MAX_TASK_NUM];
tPCB * my_current_task = NULL;
volatile int my_need_sched = 0;

void my_process(void);


void __init my_start_kernel(void)
{
    int pid = 0;
    int i;
    /* Initialize process 0*/
    task[pid].pid = pid;
    task[pid].state = 0;/* -1 unrunnable, 0 runnable, >0 stopped */
    task[pid].task_entry = task[pid].thread.ip = (unsigned long)my_process;
    task[pid].thread.sp = (unsigned long)&task[pid].stack[KERNEL_STACK_SIZE-1];
    task[pid].next = &task[pid];
    /*fork more process */
    for(i=1;i<MAX_TASK_NUM;i++)
    {
        memcpy(&task[i],&task[0],sizeof(tPCB));
        task[i].pid = i;
        task[i].state = -1;
        task[i].thread.sp = (unsigned long)&task[i].stack[KERNEL_STACK_SIZE-1];
        task[i].next = task[i-1].next;
        task[i-1].next = &task[i];
    }
    /* start process 0 by task[0] */
    pid = 0;
    my_current_task = &task[pid];
	asm volatile(
    	"movl %1,%%esp\n\t" 	/* set task[pid].thread.sp to esp */
    	"pushl %1\n\t" 	        /* push ebp */
    	"pushl %0\n\t" 	        /* push task[pid].thread.ip */
    	"ret\n\t" 	            /* pop task[pid].thread.ip to eip */
    	"popl %%ebp\n\t"
    	:
    	: "c" (task[pid].thread.ip),"d" (task[pid].thread.sp)	/* input c or d mean %ecx/%edx*/
	);
}
void my_process(void)
{
    int i = 0;
    while(1)
    {
        i++;
        if(i%10000000 == 0)
        {
            printk(KERN_NOTICE "this is process %d -\n",my_current_task->pid);
            if(my_need_sched == 1)
            {
                my_need_sched = 0;
        	    my_schedule();
        	}
        	printk(KERN_NOTICE "this is process %d +\n",my_current_task->pid);
        }
    }
}
void __init my_start_kernel(void)用来初始化和启动线程。
扩充知识:
qemu是一款虚拟化应用程序,可以模拟虚拟机。


 1589
1589

 被折叠的 条评论
为什么被折叠?
被折叠的 条评论
为什么被折叠?
 到【灌水乐园】发言


