【Visual Studio Code中如何配置venv】

Windowns中 Visual Studio Code中如何配置venv

1、在VS code中创建虚拟环境

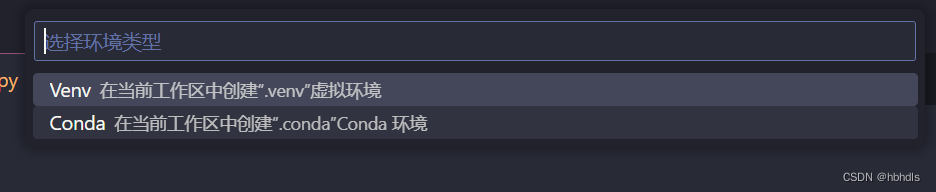
在VS Code里通过“Command+Shift+P”调出交互命令,输入Python: env…,如下图:
在这里插入图片描述
选择在当前目录中创建,还是在Conda工作区创建。
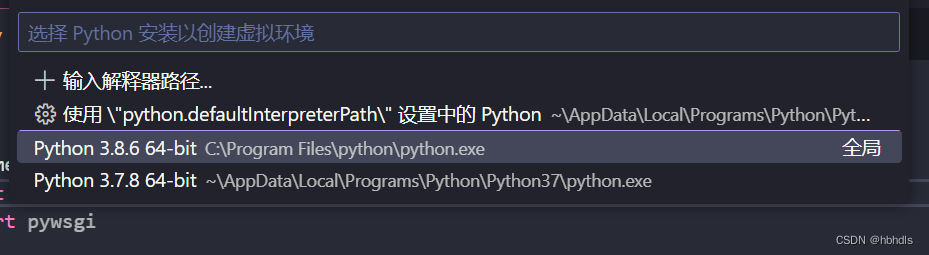
在这里插入图片描述
选择python版本
在这里插入图片描述

2、通过命令创建虚拟环境

VSCode中Python编译器的选取

Ctrl+Shift+P,点击Python: Select Interpreter,他会搜索所有的可用的Python编译器。

venv虚拟环境的配置

1、创建虚拟环境

在VSCodel里面创建虚拟环境(.venv为自定义的虚拟环境的名称):

python -m venv .venv

2、激活虚拟环境

# 运行下面代码激活虚拟环境
.venv/Scripts/activate
# 在创建好虚拟环境后,还需要用如下命令启用,激活进入特定的隔离环境
source venv/bin/activate
# 如果是在Windows系统下,上面的激活命令略有差异:
venv/Scripts/activate

3、退出虚拟环境

使用命令退出

deactivate
  • 0
    点赞
  • 7
    收藏
    觉得还不错? 一键收藏
  • 1
    评论
Visual Studio Code (VS Code) is a popular code editor that can be used for Django development. Here are the steps to set up Django in Visual Studio Code: 1. Install Visual Studio Code: Go to the official website (https://code.visualstudio.com/) and download the appropriate version for your operating system. Install it following the provided instructions. 2. Install Python: Django is a Python web framework, so you need to have Python installed. You can download Python from the official website (https://www.python.org/downloads/) and install it on your machine. 3. Create a virtual environment: It's a good practice to create a virtual environment for each Django project. Open the terminal in VS Code and navigate to your project directory. Run the following command to create a virtual environment: ``` python -m venv venv ``` 4. Activate the virtual environment: To activate the virtual environment, run the appropriate command based on your operating system: - On Windows: `venv\Scripts\activate` - On macOS/Linux: `source venv/bin/activate` 5. Install Django: With the virtual environment activated, install Django using pip: ``` pip install django ``` 6. Create a Django project: Run the following command to create a new Django project: ``` django-admin startproject myproject ``` 7. Open the project in Visual Studio Code: Use the File > Open Folder option in VS Code and select your Django project folder. 8. Install Python extension: In VS Code, go to the Extensions view (Ctrl+Shift+X or View > Extensions) and search for "Python". Install the official Python extension by Microsoft. 9. Configure the Python interpreter: Press Ctrl+Shift+P, type "Python: Select Interpreter", and choose the Python interpreter from the virtual environment you created earlier (venv). 10. Install Django extension: In VS Code, go to the Extensions view again and search for "Django". Install the "Django" extension by Baptiste Darthenay. 11. Start coding: Now you are ready to start coding your Django project in Visual Studio Code. You can use the integrated terminal, code navigation features, and other productivity tools provided by VS Code and the installed extensions. Remember to activate your virtual environment before running Django commands or starting the development server. I hope this helps you get started with Django development in Visual Studio Code! If you have any further questions, feel free to ask.

“相关推荐”对你有帮助么?

  • 非常没帮助
  • 没帮助
  • 一般
  • 有帮助
  • 非常有帮助
提交
评论 1
添加红包

请填写红包祝福语或标题

红包个数最小为10个

红包金额最低5元

当前余额3.43前往充值 >
需支付:10.00
成就一亿技术人!
领取后你会自动成为博主和红包主的粉丝 规则
hope_wisdom
发出的红包
实付
使用余额支付
点击重新获取
扫码支付
钱包余额 0

抵扣说明:

1.余额是钱包充值的虚拟货币,按照1:1的比例进行支付金额的抵扣。
2.余额无法直接购买下载,可以购买VIP、付费专栏及课程。

余额充值