


完成的是针对索引Index的增删改查.环境和前文是一样的.这里直接就开始了,前文教程SpringBoot下使用ElasticSearch教程(一).
一:SpringBoot对索引使用有三种方式,json格式(推荐),Map,內建工具(测试使用)的方式.这里使用內建工具吧.
1. 查询索引数据.
使用GetResponse来实现.(需求是查询id=3的数据.)
import org.elasticsearch.action.delete.DeleteResponse;
import org.elasticsearch.action.get.GetResponse;
import org.elasticsearch.action.index.IndexResponse;
import org.elasticsearch.action.update.UpdateResponse;
import org.elasticsearch.client.transport.TransportClient;
import org.elasticsearch.common.xcontent.XContentFactory;
import org.springframework.beans.factory.annotation.Autowired;
import org.springframework.web.bind.annotation.RequestMapping;
import org.springframework.web.bind.annotation.RestController;
import java.io.IOException;

@RequestMapping("/index")
@RestController
public class IndexController {
    @Autowired
    private TransportClient client;

    @RequestMapping("/get")
    public String get(){
        GetResponse response=client.prepareGet("book","novel","3").get();
        System.out.println(response.getSourceAsString());
        System.out.println("索引名称:"+response.getIndex());
        System.out.println("类型:"+response.getType());
        System.out.println("文档ID:"+response.getId());
        return  "Get Index Success";
    }
测试结果:


2. 创建索引数据.(新增id=14的数据)
@RequestMapping("/create")
public String create() throws IOException {
IndexResponse response=client.prepareIndex("book","novel","14").setSource(XContentFactory.jsonBuilder().startObject().field("title","Java面向对象编程").field("author","Jack").field("word_count",700).field("publish_data","2012-10-15").endObject()).get();
System.out.println("索引名称:"+response.getIndex());
System.out.println("类型:"+response.getType());
System.out.println("文档ID:"+response.getId());
System.out.println("当前实例状态:"+response.status());
return "Create Index Success";
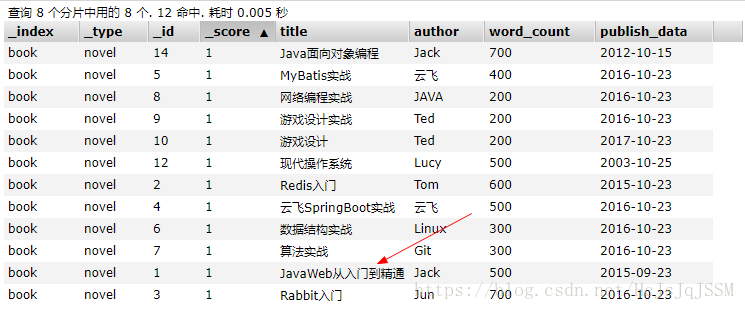
}测试结果:


3. 更新索引数据.(更新id为1的书籍的title)
    @RequestMapping("/update")
    public String update() throws IOException {
        UpdateResponse response=client.prepareUpdate("book","novel","1").setDoc(XContentFactory.jsonBuilder().startObject().field("title","JavaWeb从入门到精通").endObject()).get();
        System.out.println("索引名称:"+response.getIndex());
        System.out.println("类型:"+response.getType());
        System.out.println("文档ID:"+response.getId());
        System.out.println("当前实例状态:"+response.status());
        return "Update Index Success";
    }
测试结果:


4. 删除索引数据.(删除索引为14的数据).
    @RequestMapping("/delete")
    public String delete(){
        DeleteResponse response=client.prepareDelete("book", "novel", "14").get();
        System.out.println("索引名称:"+response.getIndex());
        System.out.println("类型:"+response.getType());
        System.out.println("文档ID:"+response.getId());
        System.out.println("当前实例状态:"+response.status());
        return "Delete Index Success";
    }
测试结果:


5. 注意事项.
注意修改数据的时候的那个jsonBuilder().
导包: import org.elasticsearch.common.xcontent.XContentFactory;
XContentFactory.jsonBuilder().startObject().field("title","JavaWeb从入门到精通").endObject()).get()
至此完成了基于SpringBoot的简单的增删改查.


 1352
1352


 被折叠的 条评论
为什么被折叠?
被折叠的 条评论
为什么被折叠?
 到【灌水乐园】发言


