1.文件存储数据使用了Java中的IO操作来进行文件的保存和读取,只不过Android在Context类中封装好了输入流和输出流的获取方法。
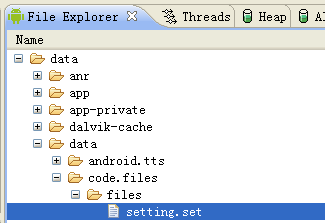
创建的存储文件保存在/data/data/<package name>/files文件夹下。

2.操作。
保存文件内容:通过Context.openFileOutput获取输出流,参数分别为文件名和存储模式。
读取文件内容:通过Context.openFileInput获取输入流,参数为文件名。
删除文件:Context.deleteFile删除指定的文件,参数为将要删除的文件的名称。
获取文件名列表:通过Context.fileList获取files目录下的所有文件名数组。
*获取文件路径的方法:
绝对路径:/data/data/<package name>/files/filename
Context:Context.getFilesDir()可以获取到"/data/data/<package name>/files"
3.四种文件保存的模式。
Context.MODE_PRIVATE 为默认操作模式,代表该文件是私有数据,只能被应用本身访问,在该模式下写入的内容会覆盖原文件的内容。
Context.MODE_APPEND 检查文件是否存在,存在就往文件追加内容,否则就创建新文件。
MODE_WORLD_READABLE 表示当前文件可以被其他应用读取。
MODE_WORLD_WRITEABLE 表示当前文件可以被其他应用写入。
在使用模式时,可以用"+"来选择多种模式,比如openFileOutput(FILENAME, Context.MODE_PRIVATE + MODE_WORLD_READABLE);
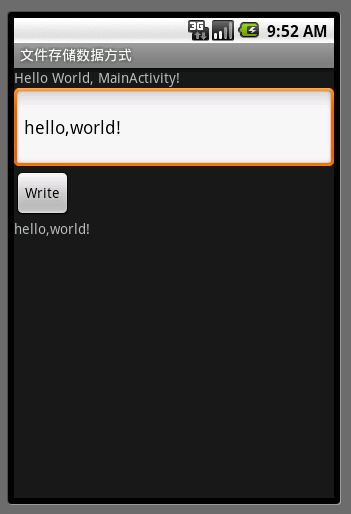
下面通过程序来演示下文件存储的使用。完整代码下载:android_files.rar
- /**
- * MainActivity
- *
- * @author zuolongsnail
- *
- */
- public class MainActivity extends Activity {
- private EditText writeET;
- private Button writeBtn;
- private TextView contentView;
- public static final String FILENAME = "setting.set";
- @Override
- public void onCreate(Bundle savedInstanceState) {
- super.onCreate(savedInstanceState);
- setContentView(R.layout.main);
- writeET = (EditText) findViewById(R.id.write_et);
- writeBtn = (Button) findViewById(R.id.write_btn);
- contentView = (TextView) findViewById(R.id.contentview);
- writeBtn.setOnClickListener(new OperateOnClickListener());
- }
- class OperateOnClickListener implements OnClickListener {
- @Override
- public void onClick(View v) {
- writeFiles(writeET.getText().toString());
- contentView.setText(readFiles());
- System.out.println(getFilesDir());
- }
- }
- // 保存文件内容
- private void writeFiles(String content) {
- try {
- // 打开文件获取输出流,文件不存在则自动创建
- FileOutputStream fos = openFileOutput(FILENAME,
- Context.MODE_PRIVATE);
- fos.write(content.getBytes());
- fos.close();
- } catch (Exception e) {
- e.printStackTrace();
- }
- }
- // 读取文件内容
- private String readFiles() {
- String content = null;
- try {
- FileInputStream fis = openFileInput(FILENAME);
- ByteArrayOutputStream baos = new ByteArrayOutputStream();
- byte[] buffer = new byte[1024];
- int len = 0;
- while ((len = fis.read(buffer)) != -1) {
- baos.write(buffer, 0, len);
- }
- content = baos.toString();
- fis.close();
- baos.close();
- } catch (Exception e) {
- e.printStackTrace();
- }
- return content;
- }
- }
程序截图:

提供一个文件存储数据的工具类:
- /**
- * 文件存储数据方式工具类
- *
- * @author zuolongsnail
- */
- public class FilesUtil {
- /**
- * 保存文件内容
- *
- * @param c
- * @param fileName
- * 文件名称
- * @param content
- * 内容
- */
- private void writeFiles(Context c, String fileName, String content, int mode)
- throws Exception {
- // 打开文件获取输出流,文件不存在则自动创建
- FileOutputStream fos = c.openFileOutput(fileName, mode);
- fos.write(content.getBytes());
- fos.close();
- }
- /**
- * 读取文件内容
- *
- * @param c
- * @param fileName
- * 文件名称
- * @return 返回文件内容
- */
- private String readFiles(Context c, String fileName) throws Exception {
- ByteArrayOutputStream baos = new ByteArrayOutputStream();
- FileInputStream fis = c.openFileInput(fileName);
- byte[] buffer = new byte[1024];
- int len = 0;
- while ((len = fis.read(buffer)) != -1) {
- baos.write(buffer, 0, len);
- }
- String content = baos.toString();
- fis.close();
- baos.close();
- return content;
- }
- }
SQLite的使用
Android中的数据库存储是直接使用了SQLite。在Android应用中创建数据库后数据库文件是存储在/data/ data/应用包名/databases/下。
在Android中使用到SQLite会涉及到以下三个类或接口:
1.SQLiteOpenHelper
*SQLiteOpenHelper 构造方法,一般传递一个要创建的数据库名称name参数
*onCreate 创建数据库时调用
*onUpgrade 版本更新时调用
*getReadableDatabase 创建或打开一个只读数据库
*getWritableDatabase 创建或打开一个读写数据库
2.SQLiteDatabase
*openOrCreateDatabase 打开或者创建数据库
*insert 添加一条记录
*delete 删除一条记录
*query 查询记录
*update 更新记录
*execSQL 执行一条SQL语句
*close 关闭数据库
3.Cursor
*getCount 总记录条数
*isFirst 判断是否第一条记录
*isLast 判断是否最后一条记录
*moveToFirst 移动到第一条记录
*moveToLast 移动到最后一条记录
*move 移动到指定记录
*moveToNext 移动到下一条记录
*moveToPrevious 移动到上一条记录
*getColumnIndexOrThrow根据列名称获得列索引
*getInt 获得指定列索引的int类型值
*getString 获得指定列索引的String类型值
注:某些方法是有重载的,可以结合docs熟悉下。
下面贴上数据库操作的代码,完整代码下载地址:android_sqlite.rar
1.创建数据库只要自定义一个类继承SQLiteOpenHelper即可。在SQLiteOpenHelper的子类中至少需要实现三个方法:
*构造方法,调用父类SQLiteOpenHelper的构造函数。需要四个参数:上下文环境(例如一个Activity);数据库名称;一个可选的游标工厂(通常是null);一个正在使用的数据库版本。
*onCreate方法,需要一个SQLiteDatabase对象作为参数,根据需要对这个对象填充表和初始化数据。
*onUpgrade方法,需要三个参数:一个SQLiteDatabase对象,一个旧的版本号和一个新的版本号。
- /**
- * 数据库操作助手类
- *
- * @author zuolongsnail
- */
- public class AndroidSQLiteOpenHelper extends SQLiteOpenHelper {
- // 数据库名称
- public static final String DBNAME = "android.db";
- // 数据库版本
- public static final int VERSION = 2;
- // 建表语句,大小写不敏感
- private static final String CREATETABLE = "create table "
- + Person.TABLENAME
- + "(id string, name string, gender int, age int)";
- public AndroidSQLiteOpenHelper(Context context) {
- super(context, DBNAME, null, VERSION);
- }
- // 创建表
- @Override
- public void onCreate(SQLiteDatabase db) {
- db.execSQL(CREATETABLE);
- }
- // 更新表
- @Override
- public void onUpgrade(SQLiteDatabase db, int oldVersion, int newVersion) {
- this.deleteDB(db);
- this.onCreate(db);
- }
- // 删除表
- private void deleteDB(SQLiteDatabase db) {
- db.execSQL("drop table if exists " + Person.TABLENAME);
- }
- }
2.对数据库表进行操作,包括添加、删除、修改和查询。(下面的代码使用的是第一种方法)
有两种方法可以对数据库表进行操作:使用execSQL方法执行SQL语句;使用insert、delete、update和query方法,把SQL语句的一部分作为参数。
注:查询数据库时执行SQL语句是使用SQLiteDatabase的rawQuery方法而不是execSQL。
- /**
- * 数据库管理类
- *
- * @author zuolongsnail
- *
- */
- public class DatabaseManager {
- private AndroidSQLiteOpenHelper dbHelper;
- public DatabaseManager(Context context) {
- dbHelper = new AndroidSQLiteOpenHelper(context);
- }
- // 插入记录
- public int insert(Person person) {
- Log.e("SQLite", "----insert----");
- SQLiteDatabase db = dbHelper.getWritableDatabase();
- db.beginTransaction();
- try {
- db.execSQL("insert into " + Person.TABLENAME
- + " values(?, ?, ?, ?)", new Object[] { person.id,
- person.name, person.gender, person.age });
- db.setTransactionSuccessful();
- } catch (Exception e) {
- return 0;
- } finally {
- db.endTransaction();
- }
- db.close();
- return 1;
- }
- // 删除记录
- public int delete(Person person) {
- Log.e("SQLite", "----delete----");
- SQLiteDatabase db = dbHelper.getWritableDatabase();
- db.beginTransaction();
- try {
- db.execSQL("delete from " + Person.TABLENAME + " where id = ?",
- new Object[] { person.id });
- db.setTransactionSuccessful();
- } catch (Exception e) {
- return 0;
- } finally {
- db.endTransaction();
- }
- db.close();
- return 1;
- }
- // 更新记录
- public int update(Person person) {
- Log.e("SQLite", "----update----");
- SQLiteDatabase db = dbHelper.getWritableDatabase();
- db.beginTransaction();
- try {
- db.execSQL("update " + Person.TABLENAME
- + " set name=?, gender=?, age=? where id=?", new Object[] {
- person.name, person.gender, person.age, person.id });
- db.setTransactionSuccessful();
- } catch (Exception e) {
- return 0;
- } finally {
- db.endTransaction();
- }
- db.close();
- return 1;
- }
- // 查询记录
- public ArrayList<Person> query(String id) {
- Log.e("SQLite", "----query----");
- SQLiteDatabase db = dbHelper.getReadableDatabase();
- Cursor cursor;
- Person person;
- ArrayList<Person> list = new ArrayList<Person>();
- // 若fileId为null或""则查询所有记录
- if (id == null || id.equals("")) {
- cursor = db.rawQuery("select * from " + Person.TABLENAME, null);
- } else {
- cursor = db.rawQuery("select * from " + Person.TABLENAME
- + " where id=?", new String[] { id });
- }
- while (cursor.moveToNext()) {
- person = new Person();
- person.id = cursor.getString(cursor.getColumnIndex("id"));
- person.name = cursor.getString(cursor.getColumnIndex("name"));
- person.gender = cursor.getString(cursor.getColumnIndex("gender"));
- person.age = cursor.getInt(cursor.getColumnIndex("age"));
- Log.e("SQLite", person.toString());
- list.add(person);
- }
- cursor.close();
- db.close();
- if (list.size() == 0) {
- Log.e("SQLite", "****表中无数据****");
- }
- return list;
- }
- }
3.在shell中进入sqlite并使用sql语句操作数据库,如下图所示。

*启动命令行,执行adb shell命令,前提是启动了一个模拟器。
*进入/data/ data/应用包名/databases文件夹下,我们这里是/data/data/code.sqlite/databases(确保此应用已经建立数据库,不然包名下是没有databases目录的)。
*查看databases目录下的数据库文件,这里可以看到数据库文件是android.db。
*使用sqlite3命令进入sqlite来使用sql语句操作数据库,我们执行"sqlite3 android.db"命令。
*使用".tables"命令查询数据库下有哪些表。可见我们这里有一张person表。
*使用sql语句可以操作这张表,比如我们使用"select * from person;"可以查询到表中记录。
*使用".quit"命令可以退出sqlite。
ContentProvider(内容提供者)是Android中的四大组件之一。主要用于对外共享数据,也就是通过ContentProvider把应用中的数据共享给其他应用访问,其他应用可以通过ContentProvider对指定应用中的数据进行操作。ContentProvider分为系统的和自定义的,系统的也就是例如联系人,图片等数据。
以下这段是Google Doc中对ContentProvider的大致概述。
内容提供者将一些特定的应用程序数据供给其它应用程序使用。数据可以存储于文件系统、SQLite数据库或其它方式。内容提供者继承于ContentProvider 基类,为其它应用程序取用和存储它管理的数据实现了一套标准方法。然而,应用程序并不直接调用这些方法,而是使用一个 ContentResolver 对象,调用它的方法作为替代。ContentResolver可以与任意内容提供者进行会话,与其合作来对所有相关交互通讯进行管理。
1.ContentProvider
Android提供了一些主要数据类型的ContentProvider,比如音频、视频、图片和私人通讯录等。可在android.provider包下面找到一些Android提供的ContentProvider。通过获得这些ContentProvider可以查询它们包含的数据,当然前提是已获得适当的读取权限。
主要方法:
public boolean onCreate() 在创建ContentProvider时调用
public Cursor query(Uri, String[], String, String[], String) 用于查询指定Uri的ContentProvider,返回一个Cursor
public Uri insert(Uri, ContentValues) 用于添加数据到指定Uri的ContentProvider中
public int update(Uri, ContentValues, String, String[]) 用于更新指定Uri的ContentProvider中的数据
public int delete(Uri, String, String[]) 用于从指定Uri的ContentProvider中删除数据
public String getType(Uri) 用于返回指定的Uri中的数据的MIME类型
*如果操作的数据属于集合类型,那么MIME类型字符串应该以vnd.android.cursor.dir/开头。
例如:要得到所有person记录的Uri为content://contacts/person,那么返回的MIME类型字符串为"vnd.android.cursor.dir/person"。
*如果要操作的数据属于非集合类型数据,那么MIME类型字符串应该以vnd.android.cursor.item/开头。
例如:要得到id为10的person记录的Uri为content://contacts/person/10,那么返回的MIME类型字符串应为"vnd.android.cursor.item/person"。
2.ContentResolver
当外部应用需要对ContentProvider中的数据进行添加、删除、修改和查询操作时,可以使用ContentResolver类来完成,要获取ContentResolver对象,可以使用Context提供的getContentResolver()方法。
- ContentResolver cr = getContentResolver();
ContentResolver提供的方法和ContentProvider提供的方法对应的有以下几个方法。
public Uri insert(Uri uri, ContentValues values) 用于添加数据到指定Uri的ContentProvider中。
public int delete(Uri uri, String selection, String[] selectionArgs) 用于从指定Uri的ContentProvider中删除数据。
public int update(Uri uri, ContentValues values, String selection, String[] selectionArgs) 用于更新指定Uri的ContentProvider中的数据。
public Cursor query(Uri uri, String[] projection, String selection, String[] selectionArgs, String sortOrder) 用于查询指定Uri的ContentProvider。
3.Uri
Uri指定了将要操作的ContentProvider,其实可以把一个Uri看作是一个网址,我们把Uri分为三部分。
第一部分是"content://"。可以看作是网址中的"http://"。
第二部分是主机名或authority,用于唯一标识这个ContentProvider,外部应用需要根据这个标识来找到它。可以看作是网址中的主机名,比如"blog.csdn.net"。
第三部分是路径名,用来表示将要操作的数据。可以看作网址中细分的内容路径。

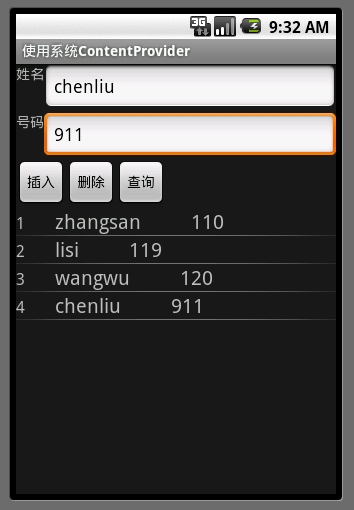
下面是用ContentProvider读取联系人数据,属于系统数据。完整代码下载:android_contentprovider_system.rar
注意:这里的联系人操作有点乱,关键是我还不是很熟,SDK1.6和SDK2.1的联系人操作很有很大不同,希望哪位大侠指点一下。
- /**
- * MainActivity
- *
- * @author zuolongsnail
- */
- public class MainActivity extends Activity {
- private EditText nameET;
- private EditText numberET;
- private Button insertBtn;
- private Button deleteBtn;
- private Button queryBtn;
- private ListView contentView;
- @Override
- public void onCreate(Bundle savedInstanceState) {
- super.onCreate(savedInstanceState);
- setContentView(R.layout.main);
- nameET = (EditText) findViewById(R.id.name);
- numberET = (EditText) findViewById(R.id.number);
- insertBtn = (Button) findViewById(R.id.insert);
- deleteBtn = (Button) findViewById(R.id.delete);
- queryBtn = (Button) findViewById(R.id.query);
- // 用于显示数据
- contentView = (ListView) findViewById(R.id.content);
- insertBtn.setOnClickListener(new OperateOnClickListener());
- deleteBtn.setOnClickListener(new OperateOnClickListener());
- queryBtn.setOnClickListener(new OperateOnClickListener());
- }
- class OperateOnClickListener implements OnClickListener {
- @Override
- public void onClick(View v) {
- String name = nameET.getText().toString();
- String number = numberET.getText().toString();
- Person p = new Person(name, number);
- switch (v.getId()) {
- // 插入数据
- case R.id.insert:
- insert(p);
- view();
- break;
- // 删除数据
- case R.id.delete:
- delete(name);
- view();
- break;
- // 查询数据
- case R.id.query:
- view();
- break;
- }
- }
- }
- // 显示数据
- private void view() {
- Cursor c = query("");
- ListAdapter listAdapter = new SimpleCursorAdapter(this, R.layout.list,
- c, new String[] { People._ID, People.NAME, People.NUMBER },
- new int[] { R.id.id, R.id.name, R.id.number });
- contentView.setAdapter(listAdapter);
- }
- // 插入联系人
- private void insert(Person p) {
- // 获得ContentResolver对象
- ContentResolver cr = getContentResolver();
- ContentValues values = new ContentValues();
- values.put(People.NAME, p.name);
- // 表示是否把联系人添加到收藏(加星),1表示加入,0表示不加入,这行代码注释默认是不加入。
- values.put(Contacts.People.STARRED, 1);
- Uri uri = Contacts.People.createPersonInMyContactsGroup(cr, values);
- // 获得联系人People表的Uri
- Uri url = Uri.withAppendedPath(uri,
- Contacts.People.Phones.CONTENT_DIRECTORY);
- values.clear();
- values.put(Contacts.Phones.TYPE, Contacts.Phones.NUMBER);
- values.put(Contacts.Phones.NUMBER, p.number);
- // 插入操作
- cr.insert(url, values);
- }
- // 插入联系人
- private void delete(String name) {
- // 获得ContentResolver对象
- ContentResolver cr = getContentResolver();
- Uri url = Contacts.People.CONTENT_URI;
- // 设置删除条件
- String where = People.NAME + "=?";
- String[] selectionArgs = { name };
- cr.delete(url, where, selectionArgs);
- }
- // 查询联系人
- private Cursor query(String name) {
- // 获得ContentResolver对象
- ContentResolver cr = getContentResolver();
- Uri uri = Contacts.People.CONTENT_URI;
- // 查询对象
- String[] projection = { People._ID, People.NAME, People.NUMBER };
- // 设置查询条件,这里我把selection和selectionArgs参数都设为null,表示查询全部数据
- String selection = null;
- String[] selectionArgs = null;
- if (!"".equals(name)) {
- selection = People.NAME + "=?";
- selectionArgs = new String[] { name };
- }
- // 设置排序条件
- String sortOrder = Contacts.People._ID;
- Cursor c = cr.query(uri, projection, selection, selectionArgs,
- sortOrder);
- // if (c.moveToFirst()) {
- // for (int i = 0; i < c.getCount(); i++) {
- // c.moveToPosition(i);
- // String name = c.getString(c.getColumnIndexOrThrow(People.NAME));
- // String number = c.getString(c
- // .getColumnIndexOrThrow(People.NUMBER));
- // }
- // }
- return c;
- }
- }
程序截图:

Intent组件
Intent是不同组件之间相互通讯的纽带,封装了不同组件之间通讯的条件。Intent本身是定义为一个类别(Class),一个Intent对象表达一个目的(Goal)或期望(Expectation),叙述其所期望的服务或动作、与动作有关的数据等。Android则根据此Intent对象之叙述,负责配对,找出相配的组件,然后将 Intent对象传递给所找到的组件,Android的媒婆任务就完成了。
在Google Doc中是这样描述Intent的(摘自Android中文翻译组)
当接收到ContentResolver发出的请求后,内容提供者被激活。而其它三种组件──activity、服务和广播接收器被一种叫做intent的异步消息所激活。intent是一个保存着消息内容的Intent对 象。对于activity和服务来说,它指明了请求的操作名称以及作为操作对象的数据的URI和其它一些信息。比如说,它可以承载对一个activity 的请求,让它为用户显示一张图片,或者让用户编辑一些文本。而对于广播接收器而言,Intent对象指明了声明的行为。比如,它可以对所有感兴趣的对象声 明照相按钮被按下。
对于每种组件来说,激活的方法是不同的:
1.通过传递一个Intent对象至 Context.startActivity()或Activity.startActivityForResult()以载入(或指定新工作给)一个activity。相应的activity可以通过调用 getIntent() 方法来查看激活它的intent。Android通过调用activity的onNewIntent()方法来传递给它继发的intent。
一个activity经常启动了下一个。如果它期望它所启动的那个activity返回一个结果,它会以调用startActivityForResult()来取代startActivity()。比如说,如果它启动了另外一个activity以使用户挑选一张照片,它也许想知道哪张照片被选中了。结果将会被封装在一个Intent对象中,并传递给发出调用的activity的onActivityResult() 方法。
2.通过传递一个Intent对象至Context.startService()将启动一个服务(或给予正在运行的服务以一个新的指令)。Android调用服务的onStart()方法并将Intent对象传递给它。
与此类似,一个Intent可以被调用组件传递给 Context.bindService()以获取一个正在运行的目标服务的连接。这个服务会经由onBind() 方法的调用获取这个Intent对象(如果服务尚未启动,bindService()会先启动它)。比如说,一个activity可以连接至前述的音乐回放服务,并提供给用户一个可操作的(用户界面)以对回放进行控制。这个activity可以调用 bindService() 来建立连接,然后调用服务中定义的对象来影响回放。
3.应用程序可以凭借将Intent对象传递给 Context.sendBroadcast() ,Context.sendOrderedBroadcast(), 以及Context.sendStickyBroadcast()和其它类似方法来产生一个广播。Android会调用所有对此广播有兴趣的广播接收器的 onReceive()方法将intent传递给它们。
Intent对象包含的内容
在Intent类的Java源代码中定义了Intent相关内容的变量,如下:
- // Action
- private String mAction;
- // Data
- private Uri mData;
- private String mType;
- private String mPackage;
- // ComponentName
- private ComponentName mComponent;
- // Flag
- private int mFlags;
- // category
- private HashSet<String> mCategories;
- // extras
- private Bundle mExtras;
1.componentName(组件名称),指定Intent的目标组件的类名称。组件名称是可选的,如果填写,Intent对象会发送给指定组件名称的组件,否则也可以通过其他Intent信息定位到适合的组件。组件名称是个ComponentName类型的对象。
用法:
- Intent intent = new Intent();
- // 构造的参数为当前Context和目标组件的类路径名
- ComponentName cn = new ComponentName(HelloActivity.this, "com.byread.activity.OtherActivity");
- intent.setComponent(cn);
- startActivity(intent);
- Intent intent = new Intent();
- intent.setClass(HelloActivity.this, OtherActivity.class);
- startActivity(intent);
Intent类中也包含一个初始化ComponentName的构造函数:
- public Intent(Context packageContext, Class<?> cls) {
- mComponent = new ComponentName(packageContext, cls);
- }
2.action(动作),指定Intent的执行动作,比如调用拨打电话组件。
- public Intent(String action) {
- mAction = action;
- }
3.data(数据),起到表示数据和数据MIME类型的作用。不同的action是和不同的data类型配套的,通过设置data的Uri来获得。
- public Intent(String action, Uri uri) {
- mAction = action;
- mData = uri;
- }
比如调用拨打电话组件:
- Uri uri = Uri.parse("tel:10086");
- // 参数分别为调用拨打电话组件的Action和获取Data数据的Uri
- Intent intent = new Intent(Intent.ACTION_DIAL, uri);
- startActivity(intent);
4.category(类别),被执行动作的附加信息。例如应用的启动Activity在intent-filter中设置category。
- <intent-filter>
- <action android:name="android.intent.action.MAIN" />
- <category android:name="android.intent.category.LAUNCHER" />
- </intent-filter>
5.extras(附加信息),为处理Intent组件提供附加的信息。可通过putXX()和getXX()方法存取信息;也可以通过创建Bundle对象,再通过putExtras()和getExtras()方法来存取。
6.flags(标记),指示Android如何启动目标Activity,设置方法为调用Intent的setFlags方法。常用的Flags参数有:
FLAG_ACTIVITY_CLEAR_TOP
FLAG_ACTIVITY_NEW_TASK
FLAG_ACTIVITY_NO_HISTORY
FLAG_ACTIVITY_SINGLE_TOP
Intent的投递
1.显式方式。直接设置目标组件的ComponentName,用于一个应用内部的消息传递,比如启动另一个Activity或者一个services。
通过Intent的setComponent和setClass来制定目标组件的ComponentName。
2.隐式方式。ComponentName为空,用于调用其他应用中的组件。需要包含足够的信息,这样系统才能根据这些信息使用intent filter在所有的组件中过滤action、data或者category来匹配目标组件。可参考Android中Activity组件详解(5.Activity的Intent Filter)
如果Intent指明定了action,则目标组件的IntentFilter的action列表中就必须包含有这个action,否则不能匹配;
如果Intent没有提供type,系统将从data中得到数据类型。和action一样,目标组件的数据类型列表中必须包含Intent的数据类型,否则不能匹配;
如果Intent中的数据不是content: 类型的URI,而且Intent也没有明确指定它的type,将根据Intent中数据的scheme (比如 http: 或者mailto: ) 进行匹配。同上,Intent 的scheme必须出现在目标组件的scheme列表中;
如果Intent指定了一个或多个category,这些类别必须全部出现在组建的类别列表中。比如 Intent中包含了两个类别:LAUNCHER_CATEGORY 和 ALTERNATIVE_CATEGORY,解析得到的目标组件必须至少包含这两个类别。
Intent调用常见系统组件
- // 调用浏览器
- Uri webViewUri = Uri.parse("http://blog.csdn.net/zuolongsnail");
- Intent intent = new Intent(Intent.ACTION_VIEW, webViewUri);
- // 调用地图
- Uri mapUri = Uri.parse("geo:100,100");
- Intent intent = new Intent(Intent.ACTION_VIEW, mapUri);
- // 播放mp3
- Uri playUri = Uri.parse("file:///sdcard/test.mp3");
- Intent intent = new Intent(Intent.ACTION_VIEW, playUri);
- intent.setDataAndType(playUri, "audio/mp3");
- // 调用拨打电话
- Uri dialUri = Uri.parse("tel:10086");
- Intent intent = new Intent(Intent.ACTION_DIAL, dialUri);
- // 直接拨打电话,需要加上权限<uses-permission id="android.permission.CALL_PHONE" />
- Uri callUri = Uri.parse("tel:10086");
- Intent intent = new Intent(Intent.ACTION_CALL, callUri);
- // 调用发邮件(这里要事先配置好的系统Email,否则是调不出发邮件界面的)
- Uri emailUri = Uri.parse("mailto:zuolongsnail@163.com");
- Intent intent = new Intent(Intent.ACTION_SENDTO, emailUri);
- // 直接发邮件
- Intent intent = new Intent(Intent.ACTION_SEND);
- String[] tos = { "zuolongsnail@gmail.com" };
- String[] ccs = { "zuolongsnail@163.com" };
- intent.putExtra(Intent.EXTRA_EMAIL, tos);
- intent.putExtra(Intent.EXTRA_CC, ccs);
- intent.putExtra(Intent.EXTRA_TEXT, "the email text");
- intent.putExtra(Intent.EXTRA_SUBJECT, "subject");
- intent.setType("text/plain");
- Intent.createChooser(intent, "Choose Email Client");
- // 发短信
- Intent intent = new Intent(Intent.ACTION_VIEW);
- intent.putExtra("sms_body", "the sms text");
- intent.setType("vnd.android-dir/mms-sms");
- // 直接发短信
- Uri smsToUri = Uri.parse("smsto:10086");
- Intent intent = new Intent(Intent.ACTION_SENDTO, smsToUri);
- intent.putExtra("sms_body", "the sms text");
- // 发彩信
- Uri mmsUri = Uri.parse("content://media/external/images/media/23");
- Intent intent = new Intent(Intent.ACTION_SEND);
- intent.putExtra("sms_body", "the sms text");
- intent.putExtra(Intent.EXTRA_STREAM, mmsUri);
- intent.setType("image/png");
- // 卸载应用
- Uri uninstallUri = Uri.fromParts("package", "com.app.test", null);
- Intent intent = new Intent(Intent.ACTION_DELETE, uninstallUri);
- // 安装应用
- Intent intent = new Intent(Intent.ACTION_VIEW);
- intent.setDataAndType(Uri.fromFile(new File("/sdcard/test.apk"), "application/vnd.android.package-archive");
- // 在Android Market中查找应用
- Uri uri = Uri.parse("market://search?q=愤怒的小鸟");
- Intent intent = new Intent(Intent.ACTION_VIEW, uri);
注意:有的需要配置一定的权限


 1万+
1万+

 被折叠的 条评论
为什么被折叠?


