


2012年到2014年支持Android设备的种类从3997增长到18796。同时各大厂商定制的屏幕尺寸也非常多。这将非常不利于我们进行屏幕适配。这要求我们必须掌握屏幕适配技能,以便使我们的app可以适用于不同屏幕尺寸的设备上。
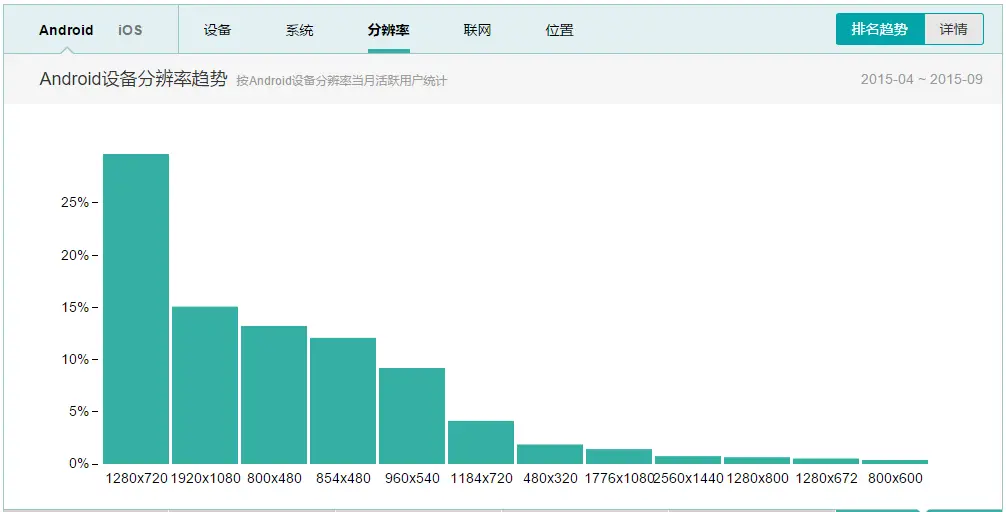
从上图可以看出,主流的分辨率是前六种:1280×720、1920×1080、800×480、854×480、960×540、1184×720,不过我们有解决方案。看完这篇文章,想必你就可以解决常见的屏幕适配问题。
接下来正式进入正题。
一. 核心概念与单位详解
介绍几个在Android屏幕适配上非常重要的名词:
1. 什么是屏幕尺寸、屏幕分辨率、屏幕像素密度?
屏幕尺寸是指屏幕对角线的长度。单位是英寸,1英寸=2.54厘米
屏幕分辨率是指在横纵向上的像素点数,单位是px,1px=1像素点,一般是纵向像素横向像素,如1280×720
屏幕像素密度是指每英寸上的像素点数,单位是dpi,即“dot per inch”的缩写,像素密度和屏幕尺寸和屏幕分辨率有关
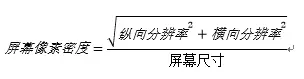
例如:计算Nexus5的屏幕像素密度:
屏幕尺寸:4.95inch、分辨率:1920×1080,屏幕像素密度:445

和官方给出的一样,说明我们计算正确。
2. 什么是dp、dip、dpi、sp、px?之间的关系是什么?
dip:Density Independent Pixels(密度无关像素)的缩写。以160dpi为基准,1dp=1px
dp:同dip
dpi:屏幕像素密度的单位,“dot per inch”的缩写
px:像素,物理上的绝对单位
sp:Scale-Independent Pixels的缩写,可以根据文字大小首选项自动进行缩放。Google推荐我们使用12sp以上的大小,通常可以使用12sp,14sp,18sp,22sp,最好不要使用奇数和小数。

说明:如果A设备的参数为480×320,160dpi,B设置的参数为800×480,240dpi。我们要画出一条和屏幕宽度一样长的直线,如果使用px作为单位,必须在A设备上设置为320px,在B设备上设置480px。但是如果我们使用dp作为单位,由于以160dpi为基准,1dp=1px,所以A设备上设置为320dp就等于屏幕宽度(320px),在B设备上设置为320dp就等于320×(240/160)=480px,即B设备的屏幕宽度。这样,使用dp作为单位就可以实现简单的屏幕适配。这知识一种巧合,也有B设备的像素密度不是这样刚刚好的,就需要我们运用别的屏幕适配技术。
3. 什么是mdpi、hdpi、xdpi、xxdpi、xxxdpi?如何计算和区分?
用于区分不同的像素密度。
| 名称 | 像素密度范围 | 图片大小 |
|---|---|---|
| mdpi | 120dp~160dp | 48×48px |
| hdpi | 160dp~240dp | 72×72px |
| xhdpi | 240dp~320dp | 96×96px |
| xxhdpi | 320dp~480dp | 144×144px |
| xxxhdpi | 480dp~640dp | 192×192px |
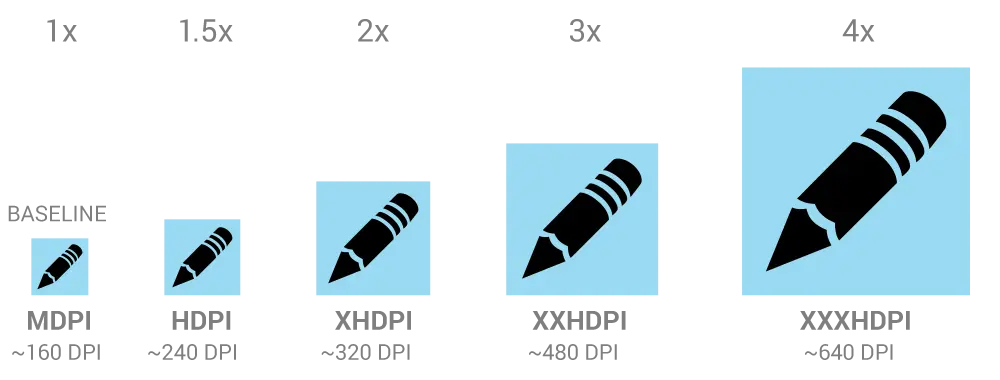
在Google官方开发文档中,说明了 mdpi:hdpi:xhdpi:xxhdpi:xxxhdpi=2:3:4:6:8 的尺寸比例进行缩放。例如,一个图标的大小为48×48dp,表示在mdpi上,实际大小为48×48px,在hdpi像素密度上,实际尺寸为mdpi上的1.5倍,即72×72px,以此类推。
二. 解决方案-支持各种屏幕尺寸
我们可以通过以下几种方式来支持各种屏幕尺寸:
1. 使用wrap_content、math_parent、weight
wrap_content:根据控件的内容设置控件的尺寸
math_parent:根据父控件的尺寸大小设置控件的尺寸
weight:权重,在线性布局中可以使用weight属性设置控件所占的比例
例如,我们要实现下图所显示的效果:当屏幕尺寸改变时,new reader控件两边的控件大小不变,new reader控件会占完剩余的空间。
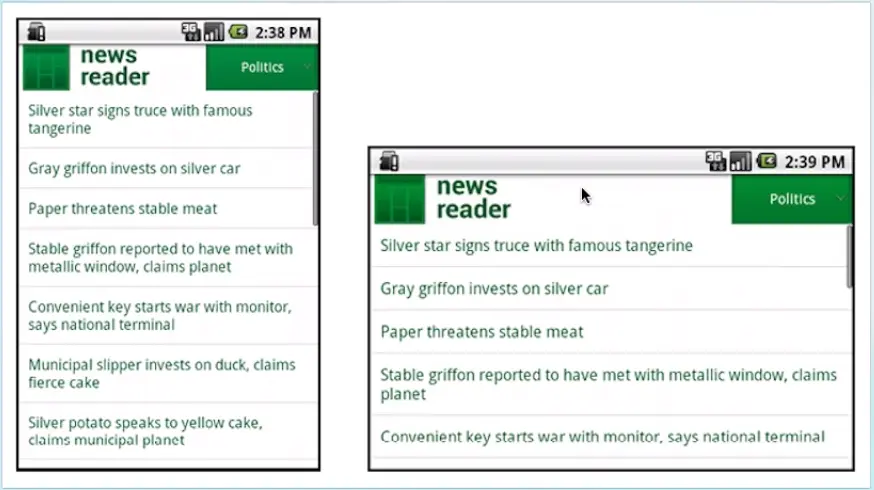
实现:通过给new reader控件设置属性:android:layout_width="wrap_content",android:layout_weight="1",两边两个控件为固定大小,android:layout_weight="0"
具体布局文件如下:
<?xml version="1.0" encoding="utf-8"?>
<LinearLayout xmlns:android="http://schemas.android.com/apk/res/android"
android:layout_width="match_parent"
android:layout_height="match_parent"
android:orientation="horizontal">
<TextView
      android:layout_width="80dp"
      android:layout_height="80dp"
      android:layout_weight="0"
      android:background="#028330"/>
<TextView
      android:layout_width="wrap_content"
      android:layout_height="80dp"
      android:text="new
reader"
      android:textSize="22sp"
      android:layout_weight="1"/>
<TextView
      android:layout_width="160dp"
      android:layout_height="80dp"
      android:text="Politics"
      android:textSize="18sp"
      android:layout_weight="0"
      android:background="#028330"/>
</LinearLayout>小插曲:关于android:layout_weight属性
公式:所占宽度=原来宽度+剩余空间所占百分比的宽度
一般情况,我们都是设置要进行比例分配的方向的宽度为0dp,然后再用权重进行分配。如下:
<Button
      android:layout_width="0dp"
      android:layout_height="wrap_content"
      android:layout_weight="1"
      android:text="Button1" />
<Button
     android:layout_width="0dp"
     android:layout_height="wrap_content"
     android:layout_weight="2"
     android:text="Button2" />
效果为:

设屏幕宽度为L,
根据公式,
button1宽度=0+L×1/(1+2)=1/3L
button2宽度=0+L×2/(1+2)=2/3L
但如果设置为match_parent:
<Button
      android:layout_width="match_parent"
      android:layout_height="wrap_content"
      android:layout_weight="1"
      android:text="Button1" />
<Button
     android:layout_width="match_parent"
     android:layout_height="wrap_content"
     android:layout_weight="2"
     android:text="Button2" />
效果为:

button1宽度=L+(L-2L)×1/3=2/3L
button2宽度=L+(L-2L)×2/3=1/3L
当然,还有其他的方式,都可以运用此公式进行计算。
在实际开发中,我们一般使用0dp的方式,而不使用其他方式。
2. 使用相对布局,禁用绝对布局
简单的布局一般都使用线性布局,而略微复杂点的布局,我们使用相对布局,大多数时候,我们都是使用这两种布局的嵌套。
我们使用相对布局的原因是,相对布局能在各种尺寸的屏幕上保持控件间的相对位置。
3. 使用限定符
-
使用尺寸限定符
当我们要在大屏幕上显示不同的布局,就要使用large限定符。例如,在宽的屏幕左边显示列表右边显示列表项的详细信息,在一般宽度的屏幕只显示列表,不显示列表项的详细信息,我们就可以使用large限定符。res/layout/main.xml单面板:<LinearLayout xmlns:android="http://schemas.android.com/apk/res/android" android:orientation="vertical" android:layout_width="match_parent" android:layout_height="match_parent"> <!-- 列表 --> <fragment android:id="@+id/headlines" android:layout_height="fill_parent" android:name="com.example.android.newsreader.HeadlinesFragment" android:layout_width="match_parent" /> </LinearLayout>res/layout-large/main.xml双面板:<LinearLayout xmlns:android="http://schemas.android.com/apk/res/android" android:layout_width="fill_parent" android:layout_height="fill_parent" android:orientation="horizontal"> <!-- 列表 --> <fragment android:id="@+id/headlines" android:layout_height="fill_parent" android:name="com.example.android.newsreader.HeadlinesFragment" android:layout_width="400dp" android:layout_marginRight="10dp"/> <!-- 列表项的详细信息 --> <fragment android:id="@+id/article" android:layout_height="fill_parent" android:name="com.example.android.newsreader.ArticleFragment" android:layout_width="fill_parent" /> </LinearLayout>如果这个程序运行在屏幕尺寸大于7inch的设备上,系统就会加载
res/layout-large/main.xml而不是res/layout/main.xml,在小于7inch的设备上就会加载res/layout/main.xml。需要注意的是,这种通过
large限定符分辨屏幕尺寸的方法,适用于android3.2之前。在android3.2之后,为了更精确地分辨屏幕尺寸大小,Google推出了最小宽度限定符。 -
使用最小宽度限定符
最小宽度限定符的使用和large基本一致,只是使用了具体的宽度限定。
res/layout/main.xml,单面板(默认)布局:<LinearLayout xmlns:android="http://schemas.android.com/apk/res/android" android:orientation="vertical" android:layout_width="match_parent" android:layout_height="match_parent"> <fragment android:id="@+id/headlines" android:layout_height="fill_parent" android:name="com.example.android.newsreader.HeadlinesFragment" android:layout_width="match_parent" /> </LinearLayout>res/layout-sw600dp/main.xml,双面板布局: Small Width 最小宽度<LinearLayout xmlns:android="http://schemas.android.com/apk/res/android" android:layout_width="fill_parent" android:layout_height="fill_parent" android:orientation="horizontal"> <fragment android:id="@+id/headlines" android:layout_height="fill_parent" android:name="com.example.android.newsreader.HeadlinesFragment" android:layout_width="400dp" android:layout_marginRight="10dp"/> <fragment android:id="@+id/article" android:layout_height="fill_parent" android:name="com.example.android.newsreader.ArticleFragment" android:layout_width="fill_parent" /> </LinearLayout>这种方式是不区分屏幕方向的。这种最小宽度限定符适用于android3.2之后,所以如果要适配android全部的版本,就要使用
large限定符和sw600dp文件同时存在于项目res目录下。这就要求我们维护两个相同功能的文件。为了避免繁琐操作,我们就要使用布局别名。
-
使用布局别名
res/layout/main.xml: 单面板布局
res/layout-large/main.xml: 多面板布局
res/layout-sw600dp/main.xml: 多面板布局由于后两个文具文件一样,我们可以用以下两个文件代替上面三个布局文件:
res/layout/main.xml单面板布局
res/layout/main_twopanes.xml双面板布局然后在
res下建立
res/values/layout.xml、
res/values-large/layout.xml、
res/values-sw600dp/layout.xml三个文件。默认布局
res/values/layout.xml:<resources> <item name="main" type="layout">@layout/main</item> </resources>Android3.2之前的平板布局
res/values-large/layout.xml:<resources> <item name="main" type="layout">@layout/main_twopanes</item> </resources>Android3.2之后的平板布局
res/values-sw600dp/layout.xml:<resources> <item name="main" type="layout">@layout/main_twopanes</item> </resources>这样就有了
main为别名的布局。
在activity中setContentView(R.layout.main);这样,程序在运行时,就会检测手机的屏幕大小,如果是平板设备就会加载
res/layout/main_twopanes.xml,如果是手机设备,就会加载res/layout/main.xml。我们就解决了只使用一个布局文件来适配android3.2前后的所有平板设备。 -
使用屏幕方向限定符
如果我们要求给横屏、竖屏显示的布局不一样。就可以使用
屏幕方向限定符来实现。
例如,要在平板上实现横竖屏显示不用的布局,可以用以下方式实现。
res/values-sw600dp-land/layouts.xml:横屏<resources> <item name="main" type="layout">@layout/main_twopanes</item> </resources>res/values-sw600dp-port/layouts.xml:竖屏<resources> <item name="main" type="layout">@layout/main</item> </resources>
4. 使用自动拉伸位图
自动拉伸位图,即android下特有的.9.png图片格式。
当我们需要使图片在拉伸后还能保持一定的显示效果,比如,不能使图片中的重要像素拉伸,不能使内容区域受到拉伸的影响,我们就可以使用.9.png图来实现。
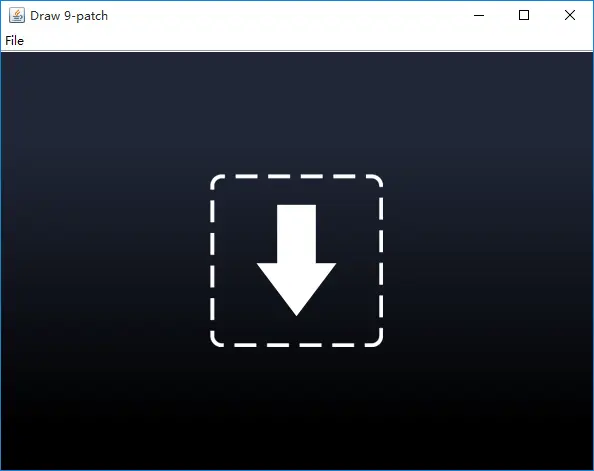
要使用.9.png,必须先得创建.9.png图片,androidSDK给我们提供了的工具就包含.9.png文件的创建和修改工具。双击SDK安装目录 oolsdraw9patch.bat,就会打开下图所示的窗口。
-
直接把图片拖进去,选择Filesave.9.png,即可保存为
.9.png图片。
不过,这和原图没有什么区别,我们要制作成自动拉伸的图片,还需要进行简单的处理。 -
在左边和上边点下一个像素或多个像素点,是选择了拉伸的像素,即把选择的像素点进行拉伸。选择的像素点越多,拉伸的程度也越大。
-
右边和下边是选择内容区域,在右边和下边画上直线,交叉的区域就是内容区域。
-
什么事内容区域呢?
比如,我们给Button设置了一个.9.png作为背景,还要设置其android:text属性,设置的text所占的位置就是内容区域。 -
我们必须保证内容区域包含text文本,才会正常显示出text文本的内容。
下面是一个例子:

上图是我们制作的.9.png,设置好了左上拉伸像素点和内容区域。
Button属性设置:
<Button
    android:layout_width="300dp"
    android:layout_height="300dp"
    android:background="@drawable/button"
    android:text="Button" />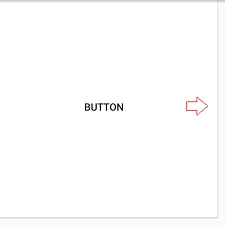
如果我们选择的内容区域偏差太大,可能就不会显示出text值BUTTON。
三. 解决方案-支持各种屏幕密度
- 解决屏幕宽度不一致问题
思路:把任何设备的手机宽度像素均分为320份,高度像素均分为480份,使用我们写好的程序自动生成资源values-***×***文件夹,里面包含lay_x.xml和lay_y.xml,分别对应宽度和高度的像素。
程序代码如下:
public class MakeXml {
    private final static String rootPath = "F:\\layoutroot\\values-{0}x{1}\\";

    private final static float dw = 320f;
    private final static float dh = 480f;

    private final static String WTemplate = "<dimen name=\"x{0}\">{1}px</dimen>\n";
    private final static String HTemplate = "<dimen name=\"y{0}\">{1}px</dimen>\n";

    public static void main(String[] args) {
        makeString(320, 480);
        makeString(480, 800);
        makeString(480, 854);
        makeString(540, 960);
        makeString(600, 1024);
        makeString(720, 1184);
        makeString(720, 1196);
        makeString(720, 1280);
        makeString(768, 1024);
        makeString(800, 1280);
        makeString(1080, 1812);
        makeString(1080, 1920);
        makeString(1440, 2560);
    }

    public static void makeString(int w, int h) {

        StringBuffer sb = new StringBuffer();
        sb.append("<?xml version=\"1.0\" encoding=\"utf-8\"?>\n");
        sb.append("<resources>");
        float cellw = w / dw;
        for (int i = 1; i < 320; i++) {
            sb.append(WTemplate.replace("{0}", i + "").replace("{1}",
                    change(cellw * i) + ""));
        }
        sb.append(WTemplate.replace("{0}", "320").replace("{1}", w + ""));
        sb.append("</resources>");

        StringBuffer sb2 = new StringBuffer();
        sb2.append("<?xml version=\"1.0\" encoding=\"utf-8\"?>\n");
        sb2.append("<resources>");
        float cellh = h / dh;
        for (int i = 1; i < 480; i++) {
            sb2.append(HTemplate.replace("{0}", i + "").replace("{1}",
                    change(cellh * i) + ""));
        }
        sb2.append(HTemplate.replace("{0}", "480").replace("{1}", h + ""));
        sb2.append("</resources>");

        String path = rootPath.replace("{0}", h + "").replace("{1}", w + "");
        File rootFile = new File(path);
        if (!rootFile.exists()) {
            rootFile.mkdirs();
        }
        File layxFile = new File(path + "lay_x.xml");
        File layyFile = new File(path + "lay_y.xml");
        try {
            PrintWriter pw = new PrintWriter(new FileOutputStream(layxFile));
            pw.print(sb.toString());
            pw.close();
            pw = new PrintWriter(new FileOutputStream(layyFile));
            pw.print(sb2.toString());
            pw.close();
        } catch (FileNotFoundException e) {
            e.printStackTrace();
        }

    }

    public static float change(float a) {
        int temp = (int) (a * 100);
        return temp / 100f;
    }

}
执行上面程序,会生成下面这些文件夹和文件:


F:\layoutroot\values-480x320\lay_x.xml
<?xml version="1.0" encoding="utf-8"?>
<resources><dimen name="x1">1.0px</dimen>
<dimen name="x2">2.0px</dimen>
<dimen name="x3">3.0px</dimen>
<dimen name="x4">4.0px</dimen>
<dimen name="x5">5.0px</dimen>
...省略...
<dimen name="x316">316.0px</dimen>
<dimen name="x317">317.0px</dimen>
<dimen name="x318">318.0px</dimen>
<dimen name="x319">319.0px</dimen>
<dimen name="x320">320px</dimen>
</resources>
F:\layoutroot\values-480x320\lay_y.xml
<?xml version="1.0" encoding="utf-8"?>
<resources><dimen name="y1">1.0px</dimen>
<dimen name="y2">2.0px</dimen>
<dimen name="y3">3.0px</dimen>
<dimen name="y4">4.0px</dimen>
<dimen name="y5">5.0px</dimen>
...省略...
<dimen name="y476">476.0px</dimen>
<dimen name="y477">477.0px</dimen>
<dimen name="y478">478.0px</dimen>
<dimen name="y479">479.0px</dimen>
<dimen name="y480">480px</dimen>
</resources>
在480×320的设备上,x2就代表2.0px,y2就代表3.0px。
在800×480的设备上,x2就代表3.0px,y2就代表3.33px。依次类推。
如何使用:
<Button
        android:background="#abd123"
        android:layout_width="@dimen/x160"
        android:layout_height="@dimen/y240"
        android:text="Button" />
这样设置,在各种屏幕宽度的设备上,此Button的宽度和高度就都占屏幕的一半。
效果如下:

我们看到这种方式可以支持大部分屏幕宽度的设备,但是我们也看到了一些设备,如Nexus9、Nexus10上并没有显示出Button,这是因为我们生成的尺寸资源文件里没有对应分辨率的xml文件。
- 提供备用位图
为了让我们提供的图片符合各种屏幕密度的要求。我们需要为不同屏幕密度提供大小不同的图片。
上篇文章中我们提到了在Google官方开发文档中,说明了 mdpi:hdpi:xhdpi:xxhdpi:xxxhdpi=2:3:4:6:8 的尺寸比例进行缩放。例如,一个图标的大小为48×48dp,表示在mdpi上,实际大小为48×48px,在hdpi像素密度上,实际尺寸为mdpi上的1.5倍,即72×72px,以此类推。
因此,我们要在drawable、drawable-hdpi、drawable-mdpi、drawable-xdpi、drawable-xhdpi等文件夹下放置相同名称、符合上述比例的图片资源。系统会根据屏幕密度的不同,而选择对应的图片进行加载。
在布局文件中的简单使用:
 <Button
        android:layout_height="wrap_content"
        android:layout_width="wrap_content"
        android:background="@drawable/ic_launcher" />
小插曲:
如果我们只提供一个图片来适配不同屏幕密度的设备的话,就要考虑放在哪个文件夹下了。
我们以Nexus5为例,如果我们把图片放在drawable-xxhdpi下,占用的内存最小(凯子哥的例子是11.65M),如果放在drawable或drawable-mdpi下,占用的内存将会非常大(凯子哥的例子是74.95M)。如果放在drawable-hdpi下占用的为35.38M(同一张图片),所以,我们要提供不同尺寸的图片来适配不同的屏幕密度,否则可能会很大程度上浪费内存。
四. 解决方案-实施自适应用户界面流程
我们如果为手机和平板设备适配了不同的布局,如我们使用的单面板和双面板,这样就导致了用户操作流程的不同。所以,我们必须做出一些必须的判断来适应用户界面流程。
-
确定当前布局
要确定当前设备使用的布局,可以通过布局是否显示出来做出判断。public class NewsReaderActivity extends FragmentActivity { boolean mIsDualPane; @Override public void onCreate(Bundle savedInstanceState) { super.onCreate(savedInstanceState); setContentView(R.layout.main_layout); View articleView = findViewById(R.id.article); mIsDualPane = articleView != null && articleView.getVisibility() == View.VISIBLE; } }在对某些组件执行操作前先查看它们是否可用,比如菜单按钮,在api11以上用actionbar中的按钮代替了。
Button catButton = (Button) findViewById(R.id.categorybutton); OnClickListener listener = /* create your listener here */; if (catButton != null) { catButton.setOnClickListener(listener); } - 根据当前布局做出响应
例如,在单面板模式下,用户点击了新闻标题,我们要打开一个新的activity来显示新闻详细信息;在双面板模式下,用户点击了新闻标题,我们要在右边面板上显示详细信息。
@Override
public void onHeadlineSelected(int index) {
    mArtIndex = index;
    if (mIsDualPane) {
        /* display article on the right pane */
        mArticleFragment.displayArticle(mCurrentCat.getArticle(index));
    } else {
        /* start a separate activity */
        Intent intent = new Intent(this, ArticleActivity.class);
        intent.putExtra("catIndex", mCatIndex);
        intent.putExtra("artIndex", index);
        startActivity(intent);
    }
}
同样,如果该应用处于双面板模式下,就应设置带导航标签的操作栏;但如果该应用处于单面板模式下,就应使用下拉菜单设置导航栏。因此我们的代码还应确定哪种情况比较合适:
final String CATEGORIES[] = { "热门报道", "政治", "经济", "Technology" };

public void onCreate(Bundle savedInstanceState) {
    ....
    if (mIsDualPane) {
        /* use tabs for navigation */
        actionBar.setNavigationMode(android.app.ActionBar.NAVIGATION_MODE_TABS);
        int i;
        for (i = 0; i < CATEGORIES.length; i++) {
            actionBar.addTab(actionBar.newTab().setText(
                CATEGORIES[i]).setTabListener(handler));
        }
        actionBar.setSelectedNavigationItem(selTab);
    }
    else {
        /* use list navigation (spinner) */
        actionBar.setNavigationMode(android.app.ActionBar.NAVIGATION_MODE_LIST);
        SpinnerAdapter adap = new ArrayAdapter(this,
                R.layout.headline_item, CATEGORIES);
        actionBar.setListNavigationCallbacks(adap, handler);
    }
}
原文链接:http://www.jianshu.com/p/6319e43572fa


 289
289

 被折叠的 条评论
为什么被折叠?
被折叠的 条评论
为什么被折叠?
 到【灌水乐园】发言


