


目录
使用redis镜像执行redis-cli命令连接到刚启动的容器,主机IP为172.17.0.1
搜索官方仓库镜像
[root@VM-1-34-centos ~]# docker search centos
NAME                              DESCRIPTION                                     STARS     OFFICIAL   AUTOMATED
centos                            The official build of CentOS.                   7080      [OK]
centos/systemd                    systemd enabled base container.                 106                  [OK]
centos/mysql-57-centos7           MySQL 5.7 SQL database server                   92
centos/postgresql-96-centos7      PostgreSQL is an advanced Object-Relational …   45
centos/httpd-24-centos7           Platform for running Apache httpd 2.4 or bui…   43
centos/python-35-centos7          Platform for building and running Python 3.5…   39
centos/php-56-centos7             Platform for building and running PHP 5.6 ap…   34
centos/mysql-56-centos7           MySQL 5.6 SQL database server                   22
centos/postgresql-10-centos7      PostgreSQL is an advanced Object-Relational …   19
kasmweb/centos-7-desktop          CentOS 7 desktop for Kasm Workspaces            17
centos/nginx-112-centos7          Platform for running nginx 1.12 or building …   16
centos/nodejs-8-centos7           Platform for building and running Node.js 8 …   14
centos/mariadb-101-centos7        MariaDB 10.1 SQL database server                13
centos/mongodb-36-centos7         MongoDB NoSQL database server                   8
centos/redis-32-centos7           Redis in-memory data structure store, used a…   6
centos/mongodb-34-centos7         MongoDB NoSQL database server                   3
centos/ruby-25-centos7            Platform for building and running Ruby 2.5 a…   3
continuumio/centos5_gcc5_base                                                     3
kasmweb/core-centos-7             CentOS 7 base image for Kasm Workspaces         1
ibmcom/fhe-toolkit-centos         The IBM Fully Homomorphic Encryption (FHE) T…   0
datadog/centos-i386                                                               0
bitnami/centos-extras-base                                                        0
ibmcom/fhe-toolkit-centos-amd64   The IBM Fully Homomorphic Encryption (FHE) T…   0
bitnami/centos-base-buildpack     Centos base compilation image                   0                    [OK]
centos/nginx-110-centos7          Platform for running nginx 1.10 or building …   0
[root@VM-1-34-centos ~]#
列表说明
| 参数 | 说明 |
| NAME | 镜像名称 |
| DESCRIPTION | 镜像说明 |
| STARS | 点赞数量 |
| OFFICIAL | 是否是官方的 |
| AUTOMATED | 是否是自动构建的 |
查看系统版本
[root@VM-1-34-centos ~]# cat /etc/centos-release
CentOS Linux release 7.5.1804 (Core)
docker 拉取镜像
[root@VM-1-34-centos ~]# docker pull ljmict/centos7.5_python3
Using default tag: latest
latest: Pulling from ljmict/centos7.5_python3
aeb7866da422: Pull complete
88d917c9116f: Pull complete
04fedbf5fa03: Pull complete
67065a3502f7: Pull complete
163a480b52f3: Pull complete
04266e046cf8: Pull complete
818af62feaec: Pull complete
Digest: sha256:6b978aff2030dcb5077174c46921c6190674c64773bd0fcffedc6246480c8299
Status: Downloaded newer image for ljmict/centos7.5_python3:latest
docker.io/ljmict/centos7.5_python3:latest
[root@VM-1-34-centos ~]# docker images
REPOSITORY                 TAG       IMAGE ID       CREATED        SIZE
hello-world                latest    feb5d9fea6a5   6 months ago   13.3kB
centos                     latest    5d0da3dc9764   6 months ago   231MB
ljmict/centos7.5_python3   latest    ef9b15207f9e   3 years ago    954MB
docker 列表
[root@VM-1-34-centos ~]# docker images
REPOSITORY    TAG       IMAGE ID       CREATED        SIZE
hello-world   latest    feb5d9fea6a5   6 months ago   13.3kB
centos        latest    5d0da3dc9764   6 months ago   231MB
查询所有的容器 ,包括已经停止的
[root@VM-1-34-centos ~]# docker ps -a
CONTAINER ID   IMAGE         COMMAND       CREATED          STATUS                        PORTS     NAMES
4cb654404138   centos        "/bin/bash"   32 minutes ago   Exited (130) 30 minutes ago             blissful_robinson
c929a366d983   hello-world   "/hello"      13 hours ago     Exited (0) 13 hours ago                 admiring_tesla
ede86ef90151   hello-world   "/hello"      13 hours ago     Exited (0) 13 hours ago                 optimistic_hopper
启动一个容器
#参数:-it 可交互终端
[root@VM-1-34-centos ~]# docker run -it centos:latest  /bin/bash
[root@b25daec9f208 /]# ls
bin  dev  etc  home  lib  lib64  lost+found  media  mnt  opt  proc  root  run  sbin  srv  sys  tmp  usr  var
[root@b25daec9f208 /]# cat /etc/c
centos-release           centos-release-upstream  chkconfig.d/             crypto-policies/         crypttab                 csh.cshrc                csh.login
[root@b25daec9f208 /]# cat /etc/centos-release
CentOS Linux release 8.4.2105
[root@b25daec9f208 /]#
退出 容器
同时按住ctrl+d退出容器且关闭容器,docker ps查看无
[root@b25daec9f208 /]# ls
bin  dev  etc  home  lib  lib64  lost+found  media  mnt  opt  proc  root  run  sbin  srv  sys  tmp  usr  var
[root@b25daec9f208 /]# python
bash: python: command not found
[root@b25daec9f208 /]# exit
删除镜像
[root@VM-1-34-centos ~]# docker images
REPOSITORY                 TAG       IMAGE ID       CREATED        SIZE
hello-world                latest    feb5d9fea6a5   6 months ago   13.3kB
ljmict/centos7.5_python3   latest    ef9b15207f9e   3 years ago    954MB
[root@VM-1-34-centos ~]# docker image rm ljmict/centos7.5_python3:latest
Untagged: ljmict/centos7.5_python3:latest
Untagged: ljmict/centos7.5_python3@sha256:6b978aff2030dcb5077174c46921c6190674c64773bd0fcffedc6246480c8299
Deleted: sha256:ef9b15207f9e18cbcaf0e7eac84f73c656e46768098f9fda857aa2159b56faa2
Deleted: sha256:88b06b6c717f26ce6acaecd3a34100afa956332b1db892fedcc335e68cb5d075
Deleted: sha256:6d0ba3384fb15a272d39860bc1557e28926b487b92e3040e94e613f119d10157
Deleted: sha256:7c77e8047515f9c81c42eaf3802404fc3e9ff0430a285d7c3fa1fd746d1d781b
Deleted: sha256:812512e410668f16ad7083e7efbe96ab985af00b91b050c4cf977facb1b176da
Deleted: sha256:d9af827924a953005118030b930dbfbdbcbf8385c8c579d72dc379c96294e6ee
Deleted: sha256:89b906a4b293e448f2f335e2a709f4b7aaeb165e9a6563475b23819dfe9716ee
Deleted: sha256:f972d139738dfcd1519fd2461815651336ee25a8b54c358834c50af094bb262f
centos7 安装python3.8.3
https://blog.csdn.net/fanxl10/article/details/106854062
MYSQL docker运行
制作镜像 ,在原有的基础上 提交镜像 ,形成自己的镜像文件
[root@6117dfd17377 /]#
[root@6117dfd17377 /]# exit
exit
[root@VM-1-34-centos ~]# docker commit -m "python383 centos7" -a "toby" 6117dfd17377 hjwdock/centos7ppy38:v1.0
sha256:d7fe6256af0d9609593c41ab78956f1d5364ba0bf8b6123f9a1cb9128bbd04d7
[root@VM-1-34-centos ~]# docker images
REPOSITORY             TAG       IMAGE ID       CREATED          SIZE
hjwdock/centos7ppy38   v1.0      d7fe6256af0d   12 seconds ago   1.16GB
lanvv/centos7.5-yum    latest    89f8a97db0b5   3 years ago      200MB
mysql 8 docker 下载
[root@VM-1-34-centos ~]# docker pull mysql:8.0.18
8.0.18: Pulling from library/mysql
804555ee0376: Pull complete
c53bab458734: Pull complete
ca9d72777f90: Pull complete
2d7aad6cb96e: Pull complete
8d6ca35c7908: Pull complete
6ddae009e760: Pull complete
327ae67bbe7b: Pull complete
0e26af624120: Pull complete
5e70feb9365d: Pull complete
f5595dde544e: Pull complete
87399808d2ba: Pull complete
7312ab6d79b5: Pull complete
Digest: sha256:e1b0fd480a11e5c37425a2591b6fbd32af886bfc6d6f404bd362be5e50a2e632
Status: Downloaded newer image for mysql:8.0.18
docker.io/library/mysql:8.0.18
后台启动 mysql
[root@VM-1-34-centos ~]# docker run -itd --name sql8 -p 3306:3306 -e MYSQL_ROOT_PASSWORD=123456 mysql:8.0.18
run:启动容器的命令
--name:并容器的命名
-d:让容器后台运行(其他对应参数:-i交互式操作,-t开启一个伪终端)
-e MYSQL_ROOT_PASSWORD:初始化root用户的密码为123456
-p:将容器的3306端口映射到主机的3307端口
mysql:5.7.28:mysql镜像的仓库名与标签,也可直接通过镜像id启动
$ docker run -itd --name mysql-test -p 3306:3306 -e MYSQL_ROOT_PASSWORD=123456 mysql
命令说明:

-p 3306:3306:将容器的3306端口映射到主机的3306端口
-v /opt/docker_v/mysql/conf:/etc/mysql/conf.d:将主机/opt/docker_v/mysql/conf目录挂载到容器的/etc/mysql/conf.d
-e MYSQL_ROOT_PASSWORD=123456:初始化root用户的密码
-d: 后台运行容器,并返回容器ID
imageID: mysql镜像ID

总是运行, 重启的时间  生产环境中总是自动重启
[root@VM-1-34-centos ~]# docker run -itd --name sql01 -p 3306:3306 -e MYSQL_ROOT_PASSWORD=123456  --restart=always hjwdock/mysql8
启动后查看
[root@VM-1-34-centos ~]# docker ps -a
CONTAINER ID   IMAGE                       COMMAND                  CREATED             STATUS                      PORTS                                                  NAMES
a7ff11f6b4d6   mysql:8.0.18                "docker-entrypoint.s…"   48 seconds ago      Up 47 seconds               0.0.0.0:3306->3306/tcp, :::3306->3306/tcp, 33060/tcp   sql8
登录镜像 ,连接数据库
[root@VM-1-34-centos ~]# docker exec -it sql8 bash
root@a7ff11f6b4d6:/#
root@a7ff11f6b4d6:/# mysql -u root -p
Enter password:
Welcome to the MySQL monitor.  Commands end with ; or \g.
Your MySQL connection id is 8
Server version: 8.0.18 MySQL Community Server - GPL

Copyright (c) 2000, 2019, Oracle and/or its affiliates. All rights reserved.

Oracle is a registered trademark of Oracle Corporation and/or its
affiliates. Other names may be trademarks of their respective
owners.

Type 'help;' or '\h' for help. Type '\c' to clear the current input statement.

mysql>
持久化docke中的数据保存到宿主机中
[root@VM-1-34-centos ~]# docker run -itd --name sql011 -p 3306:3306 -v /home/sqldocker/data:/var/lib/mysql -e MYSQL_ROOT_PASSWORD=123456 --restart=always hjwdock/mysql8
-v /home/sqldocker/data:/var/lib/mysql
home/sqldocker/data : 保存数据的位置
保存到的数据,不利于迁移 , 可以使用myqldump 命令 保存下来
[root@VM-1-34-centos ~]# docker exec 215ba3f4e1a3 sh -c 'exec mysqldump --all-databases -uroot -p123456' > /root/alldatamysql
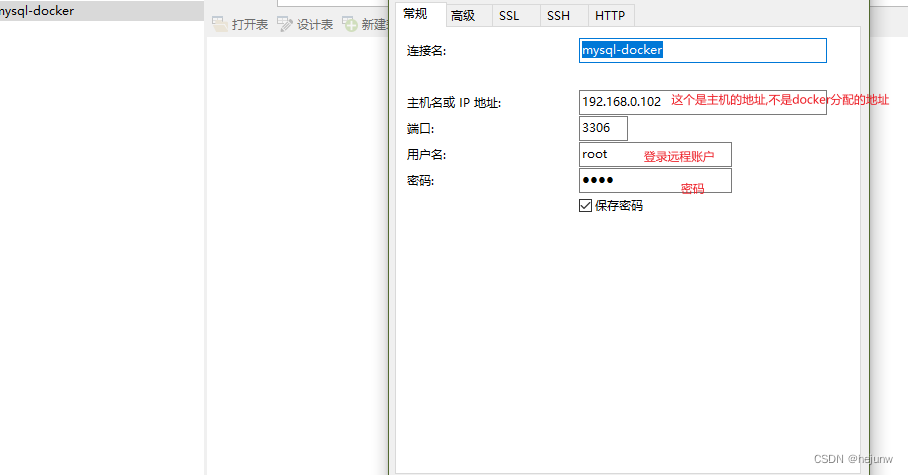
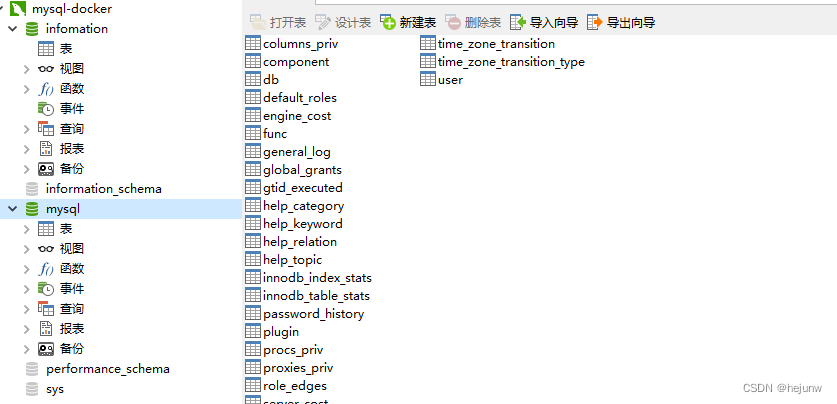
使用navicat 链接搭建好的 docker mysql
使用docker安装mysql8.0,远程登录后提示 caching_sha2_password 。
解决办法如下:
1、进入docker中的mysql:docker exec -it mysql容器id /bin/bash (如果使用portainer-ce启动 ,这一步省略过去)
2、登录: mysql -uroot -p你的密码
3、进入之后:
切换数据库:use mysql;
查询用户加密方式:SELECT Host, User, plugin from user;
是否为 caching_sha2_password
ALTER USER 'root'@'%' IDENTIFIED WITH mysql_native_password BY 'root';
BY 后面跟的是密码 root ,也可以设置成"123456"
ALTER USER 'root'@'localhost' IDENTIFIED WITH mysql_native_password BY 'root';
FLUSH PRIVILEGES;
运行: SELECT Host, User, plugin from user; 查看是否生效
本文参考了CSDN博主「尘风随缘」的原创文章,遵循CC 4.0 BY-SA版权协议,
原文链接:https://blog.csdn.net/qq_29305715/article/details/122836215
python 文件在docker 中执行
1.本地下载的image
[root@VM-1-34-centos ~]# docker images
REPOSITORY TAG IMAGE ID CREATED SIZE
hjwdock/centos7ppy38 v1.0 d7fe6256af0d 43 minutes ago 1.16GB
mysql 8.0.18 ed1ffcb5eff3 2 years ago 456MB
lanvv/centos7.5-yum latest 89f8a97db0b5 3 years ago 200MB
2.本地文件 ,在docker中运行 ,本地的文件映射到docker环境中执行
[root@VM-1-34-centos ~]# docker run -v $PWD/test:/usr/src/test -w /usr/src/test hjwdock/centos7ppy38:v1.0 python hello.py
命令说明:
-v $PWD/test:/usr/src/test: 将主机中当前目录下的 test挂载到容器的 /usr/src/test。
-w /usr/src/test: 指定容器的 /usr/src/test目录为工作目录。
python helloworld.py: 使用容器的 python 命令来执行工作目录中的 helloworld.py 文件。
docker 基本命令
docker基本命令:
查看所有镜像 docker images
删除镜像(会提示先停止使用中的容器) docker rmi 镜像name/镜像id
查看所有容器 docker ps -a
查看容器运行日志 docker logs 容器名称/容器id
停止容器运行 docker stop 容器name/容器id
终止容器后运行 docker start 容器name/容器id
容器重启 docker restart 容器name/容器id
删除容器 docker rm 容器name/容器id
Redis docker
先配置redis.confi文件
②创建文件夹,新建配置文件贴入从官网下载的配置文件并修改
mkdir /usr/local/docker
vi /usr/local/docker/redis.conf
③修改启动默认配置(从上至下依次):
bind 127.0.0.1 #注释掉这部分,这是限制redis只能本地访问
protected-mode no #默认yes,开启保护模式,限制为本地访问
daemonize no#默认no,改为yes意为以守护进程方式启动,可后台运行,除非kill进程,改为yes会使配置文件方式启动redis失败
databases 16 #数据库个数(可选),我修改了这个只是查看是否生效。。
dir ./ #输入本地redis数据库存放文件夹(可选)
appendonly yes #redis持久化(可选)
远程链接到这个docker redis上需要修改
1.bind 127.0.0.1 修改为 bind 0.0.0.0
127.0.0.1 表示只允许本地访问,无法远程连接
0.0.0.0 表示任何ip都可以访问2.protected-mode yes 改为 protected-mode no
yes 保护模式,只允许本地链接
no 保护模式关闭3.daemonize yes 改为 daemonize no
yes: 代表开启守护进程模式。此时是单进程多线程的模式,redis将在后台运行。
no: 当前界面将进入redis的命令行界面,exit强制退出或者关闭连接工具都会导致redis进程退出
遇到的坑
这个配置会和dcoker run中-d参数冲突,导致容器一直启动不了
daemonize yes 要注释
启动 ,查询
[root@VM-1-34-centos ~]# docker run -itd --name redis-lastes -p 6382:6382 redis
bd9e318e18acab3f5297a850fc21ba9d8d17736c83c9a0694f76029f031db000
[root@VM-1-34-centos ~]# docker ps
CONTAINER ID   IMAGE                                COMMAND                  CREATED         STATUS         PORTS                                                 NAMES
bd9e318e18ac   redis                                "docker-entrypoint.s…"   7 seconds ago   Up 6 seconds   6379/tcp, 0.0.0.0:6382->6382/tcp, :::6382->6382/tcp   redis-lastes
0521634a7159   hunter202103/redis6.2.1:redis6.2.1   "docker-entrypoint.s…"   3 minutes ago   Up 3 minutes   6379/tcp, 0.0.0.0:6381->6381/tcp, :::6381->6381/tcp   redis-test1
运行容器
root@localhost:~/redis$ docker run -p 6379:6379 -v $PWD/data:/data  -d redis:3.2 redis-server --appendonly yes

43f7a65ec7f8bd64eb1c5d82bc4fb60e5eb31915979c4e7821759aac3b62f330

root@localhost:~/redis$
命令解释说明:
-p 6379:6379 端口映射:前表示主机部分,:后表示容器部分。
--name myredis 指定该容器名称,查看和进行操作都比较方便。
-v 挂载目录,规则与端口映射相同。
为什么需要挂载目录:个人认为docker是个沙箱隔离级别的容器,这个是它的特点及安全机制,不能随便访问外部(主机)资源目录,所以需要这个挂载目录机制。
-d redis 表示后台启动redis
redis-server /etc/redis/redis.conf 以配置文件启动redis,加载容器内的conf文件,最终找到的是挂载的目录/usr/local/docker/redis.conf
redis-server --appendonly yes :在容器执行redis-server启动命令,并打开redis持久化配置
这个是最正确的 :
docker run -p 6389:6379 --name myredis -v /usr/local/redis/redis.conf:/etc/redis.conf -v /usr/local/docker/data:/data -d redis:latest redis-server /etc/redis.conf --appendonly yes
–name:给容器起一个名
-p:端口映射 宿主机:容器
-v:宿主机绝对路径目录:/容器内目录 镜像名
-d:后台运行
redis-server --appendonly yes: 在容器执行redis-server启动命令,并打开redis持久化配置docker run -it -v /宿主机绝对路径目录:/容器内目录 镜像名
删除容器
#删除指定名称的容器
docker container rm container_name
启动 redis docker
[root@VM-1-34-centos ~]# docker run -itd --name redis -p 6383:6383 redis
a2a4d4a87aa60866a74d31708aa73adfc306590b27cea9d74a47a735de2a6605
查询是否启动
[root@VM-1-34-centos ~]# docker ps
CONTAINER ID   IMAGE     COMMAND                  CREATED          STATUS          PORTS                                                 NAMES
a2a4d4a87aa6   redis     "docker-entrypoint.s…"   15 seconds ago   Up 14 seconds   6379/tcp, 0.0.0.0:6383->6383/tcp, :::6383->6383/tcp   redis
我们通过 redis-cli 连接测试使用 redis 服务
[root@VM-1-34-centos ~]# docker exec -it redis /bin/bash
root@a2a4d4a87aa6:/data# redis-cli
127.0.0.1:6379> set test 1
OK
127.0.0.1:6379>
使用redis镜像执行redis-cli命令连接到刚启动的容器,主机IP为172.17.0.1
root@localhost:~/redis$ docker run -it redis:3.2 redis-cli -h 172.17.0.1
172.17.0.1:6379> info
# Server
redis_version:3.2.0
redis_git_sha1:00000000
redis_git_dirty:0
redis_build_id:f449541256e7d446
redis_mode:standalone
os:Linux 4.2.0-16-generic x86_64
arch_bits:64
multiplexing_api:epoll
...
查询 容器的日志 (容器)
[root@VM-1-34-centos ~]# docker logs a2a4d4a87aa6
上传到dockhub 上
1. Docker Hub 上先注册一个账户 ,记录下 docker id 和密码 这个后面需要使用
2 .Create Repository 创建一个仓库
3. centos 登录
docker login
login 登录的时间 ,使用的是上面获取的到的docker id 和密码 ,不是登录账户
要记得先打标签
docker tag redis:latest newtag_xxx:xxxx
记得这里的 REPOSITORY:TAG 一定要和仓库的名称一样
上传完成后 ,就可以在dock hub 中看到 repository
docker push REPOSITORY:TAG MongoDB的使用
首先要下载docker mongo 4的版本 ,mongo 5.0以上需要cpu支持 AVX , 我看了下我使用的这个vm的centos 7 是不支持的 ,所以使用4的版本
docker pull mongo:4.4.9
创建配置文件和目录
mkdir -p /data/mongo/conf
mkdir -p /data/mongo/data
mkdir -p /data/mongo/log
cd /data/mongo/conf
vim mongodb.conf
然后将下面配置文件内容粘贴复制#端口
port=27017
#数据库文件存放目录
dbpath=/data/mongo/data
#日志文件存放路径
logpath=/data/mongo/log
#使用追加方式写日志
logappend=true
#以守护线程的方式运行,创建服务器进程
fork=true
#最大同时连接数
maxConns=100
#不启用验证
#noauth=true
#每次写入会记录一条操作日志
journal=true
#存储引擎有mmapv1、wiredTiger、mongorocks
storageEngine=wiredTiger
#访问IP
bind_ip=0.0.0.0
#用户验证
#auth=true
启动mongo 容器
把配置文件都进行一一的对应起来 ,然后启动起来
docker run -d -p 27017:27017 -v /mongo_data/mongo/data:/mongo_data/db -v /mongo_data/mongo/conf:/mongo_data/conf -v /mongo_data/mongo/log:/mongo_data/log --name mongo mongo:4.4.9
下载 influxdb 和grafana
docker pull grafana/grafana

docker pull influxdb:2.0.9
查询
[root@VM-1-34-centos ~]# docker images
REPOSITORY             TAG       IMAGE ID       CREATED         SIZE
grafana/grafana        latest    c876b1dbac21   2 days ago      286MB
influxdb               2.0.9     6884608e9b76   2 weeks ago     342MB
启动 influxdb
[root@VM-1-34-centos ~]# docker run -d -p 8086:10000 --name=jmeterdb influxdb:2.0.9
[root@VM-1-34-centos ~]# docker exec -it jmeterdb /bin/bash
启动 grafa
[root@VM-1-34-centos ~]# docker  run -d -p 3000:3000 --name=jmeterGraf  grafana/grafana:latest
c8a9aa07d9f590196c57b95e712a87d8f5c254adc0701937e5281b4d245f0361
[root@VM-1-34-centos ~]# docker ps
CONTAINER ID   IMAGE                    COMMAND                  CREATED          STATUS          PORTS                                                   NAMES
c8a9aa07d9f5   grafana/grafana:latest   "/run.sh"                5 seconds ago    Up 4 seconds    0.0.0.0:3000->3000/tcp, :::3000->3000/tcp               jmeterGraf
e779db624d5c   influxdb:2.0.9           "/entrypoint.sh infl…"   13 minutes ago   Up 13 minutes   8086/tcp, 0.0.0.0:8086->10000/tcp, :::8086->10000/tcp   jmeterdb
[root@VM-1-34-centos ~]#
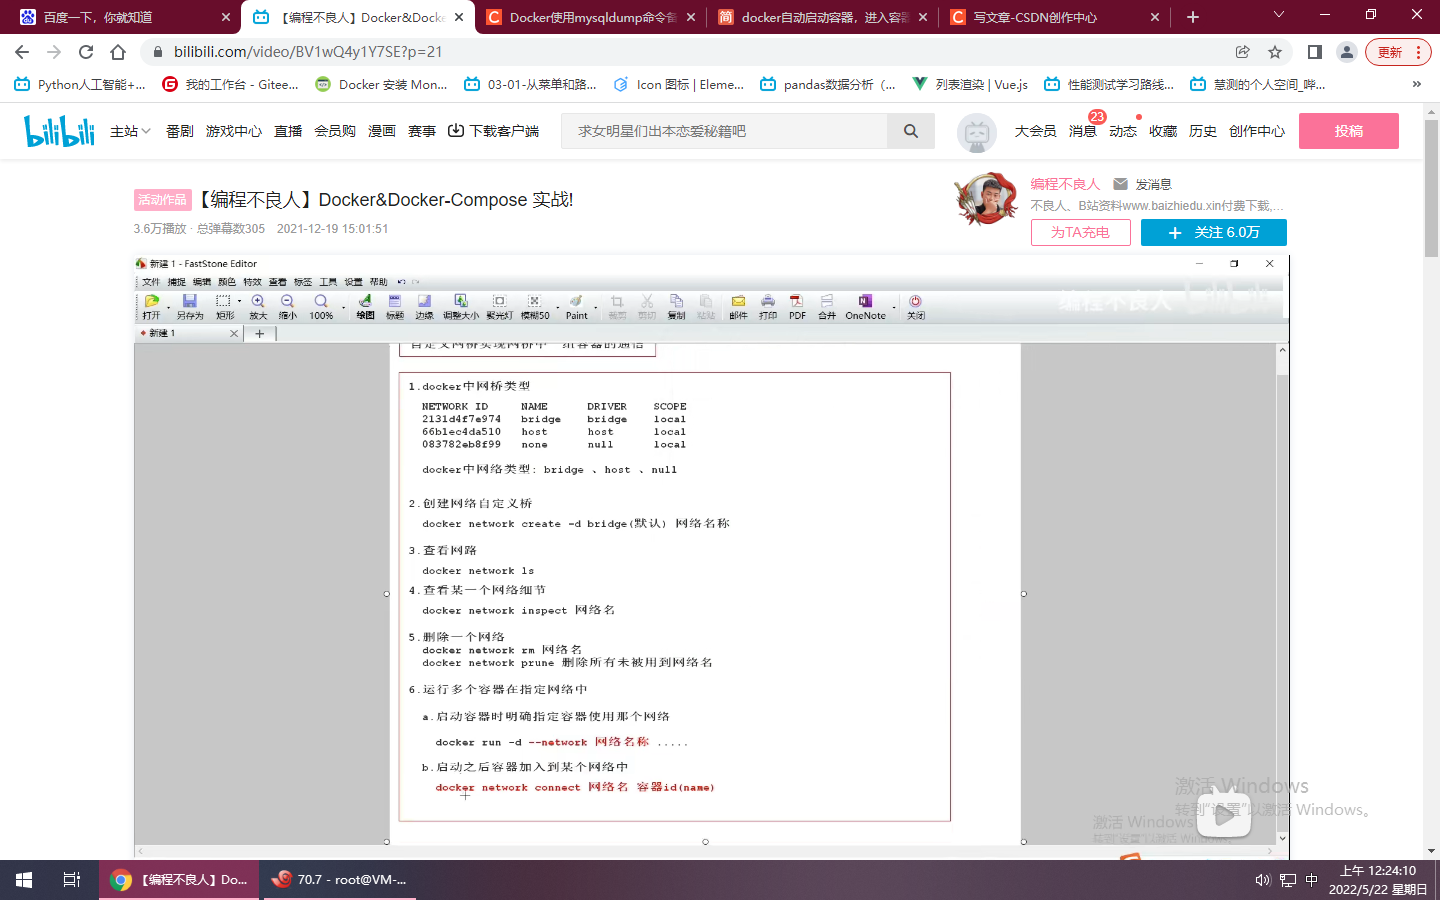
docker 容器通信
创建docker网桥 查询
[root@VM-1-34-centos ~]# docker network

Usage:  docker network COMMAND

Manage networks

Commands:
  connect     Connect a container to a network
  create      Create a network
  disconnect  Disconnect a container from a network
  inspect     Display detailed information on one or more networks
  ls          List networks
  prune       Remove all unused networks
  rm          Remove one or more networks

Run 'docker network COMMAND --help' for more information on a command.
[root@VM-1-34-centos ~]# docker network ls
NETWORK ID     NAME      DRIVER    SCOPE
909205b9bd87   bridge    bridge    local
5319c1965259   host      host      local
b9e56e58c231   none      null      local

[root@VM-1-34-centos ~]# docker network create  test
9f03e239e638d7ea2fea52148f780ecd485224b4b75ca1fdb12222a1ad3adfec
[root@VM-1-34-centos ~]# docker network ls
NETWORK ID     NAME      DRIVER    SCOPE
909205b9bd87   bridge    bridge    local
5319c1965259   host      host      local
b9e56e58c231   none      null      local
9f03e239e638   test      bridge    local
运行多个容器在同一个网络中
docker compose
官方开源项目 ,对dock 容器的快速编排
安装
$ sudo curl -L "https://github.com/docker/compose/releases/download/v2.2.2/docker-compose-$(uname -s)-$(uname -m)" -o /usr/local/bin/docker-compose将可执行权限应用于二进制文件:
$ sudo chmod +x /usr/local/bin/docker-compose创建软链:然后验证下是否成功
$ sudo ln -s /usr/local/bin/docker-compose /usr/bin/docker-compose


$ docker-compose --version


 被折叠的 条评论
为什么被折叠?
被折叠的 条评论
为什么被折叠?
 到【灌水乐园】发言


