


 本文详细介绍了如何在Windows XP环境中搭建XPCOM开发环境。包括下载并配置必要的软件包如xulrunner和gecko-sdk,设置环境变量,生成组件文件等步骤。同时提供了常见错误的解决方案。
How to build the environment of XPCOM in Windows XP
1. Download xulrunner-1.8.0.4.en-US.win32.zip and extract it in the appropriate folder, for example ‘C:/XXX/ xulrunner-1.8.0.4’.
2. Download gecko-sdk-win32-msvc-1.8.0.4.zip and extract it in the appropriate folder, for example ‘C:/XXX/ xulrunner-1.8.0.4/ gecko-sdk-1.8.0.4’.
3. Click ‘My Computer’ by the right button of mouse, and select ‘Properties’ menu item.
4. Select ‘Advanced’ tab page in the dialog, please refer the figure-1 below.
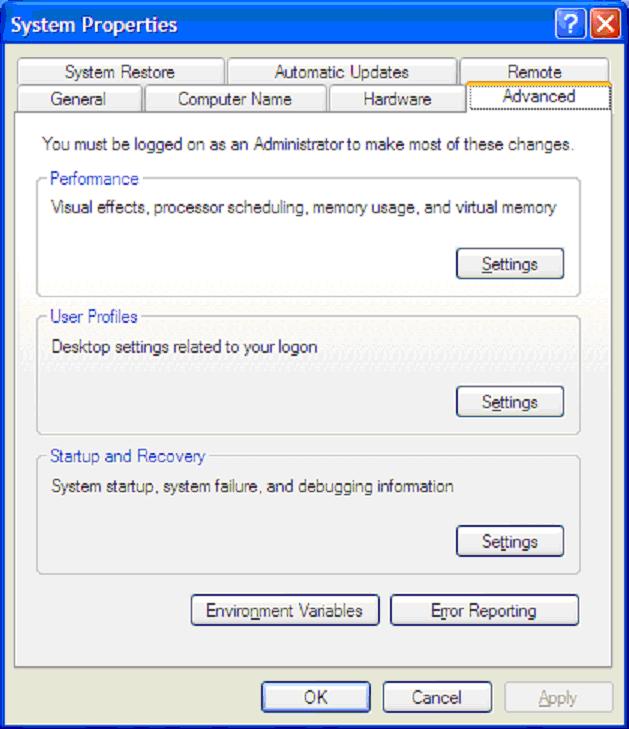
Figure-1
5. Click ‘Environment Variables’ button and add ‘C:/XXX/xulrunner-1.8.0.4/ gecko-sdk-1.8.0.4/bin’ into the environment variable of ‘path’, and then click ok until closing all dialogs.
6. Download wintools.zip and extract ‘wintools/buildtools/windows/bin/x86/glib-1.2.dll, libIDL-0.6.dll’ into ‘C:/XXX/ xulrunner-1.8.0.4/ gecko-sdk-1.8.0.4/bin’. If you are a perfectionist, please extract ‘buildtools/windows/lib/ glib-1.2.lib, libIDL-0.6.lib’ into ‘C:/XXX/ xulrunner-1.8.0.4/ gecko-sdk-1.8.0.4/lib’J.
Ok, if you there any ‘*.idl’ files to generate ‘*.h’ and ‘*.xpt’, now you can try.
For instance:
| C:/YYY>xpidl.exe -m header -I c:/XXX/xulrunner-1.8.0.4/gecko-sdk-1.8.0.4/idl IMyComponent.idl C:/YYY>xpidl.exe -m typelib -I c:/XXX/xulrunner-1.8.0.4/gecko-sdk-1.8.0.4/idl IMyComponent.idl Notice: XXX indicates the root directory of xulrunner-1.8.0.4 and YYY contains the ‘*.idl’. For this case, it is IMyComponent.idl. |
When you finish buiding, ‘IMyComponent.h’ and ‘IMyComponent.xpt’ are found in the current directory. Otherwise, please recheck the related configuration!
7. Download mozilla-win32-1.8b1.zip and unpack it into appropriate folder. For example, ‘C:/ XXX/xulrunner-1.8.0.4/mozilla-1.8b1’.
8. If you ‘*.dll’ and ‘*.xpt’ are available now, please copy them into ‘C:/ XXX/xulrunner-1.8.0.4/mozilla-1.8b1/components’, then use ‘regxpcom.exe’ to register them into mozilla.
For example:
| C:> regxpcom.exe -x “C:/ XXX/xulrunner-1.8.0.4/mozilla-1.8b1/components” Notice: 1. If the path includes blackspaces, the double quotation(“) must be used. 2. When you meet the trouble with the following errors, please use xpidl.exe to regenerate ‘*.h’ and ‘*.xpt’ in your environment. As you know, some samples utilize the new/old version to do that, and will not wholly match your configuration for ever. “Can not initialize XPCOM Glue” “Can not aquire component registrar” “Registration failed: (c1f30001) Files/Mozilla” “Can not initialize XPCOM Glue” “Can not aquire component registrar” “Registration failed: (c1f30001) mozilla/components” |
8. If all javascript and html files are ready, please use mozilla to open and check the result.
[summarization and suggestions]
1. It only introduces HOWTO for mozilla browser, but it is common way to other, such as firefox, etc.
2. Please keep aware that the versions between mozilla and geck-sdk had better be coherent, otherwise it maybe brings about some unknown issues(Free source codes are free for anythings including bugsJ).
3. If you can not decide whether or not registeration is successful, please use XPCOMViewer into your browser to check.
4. If you fail to register XPCOM after invoking regxpcom.exe, please add an empty file ‘.autoreg’ in the mozill/firefox folder. For instance, ‘C:/XXX/xulrunner-1.8.0.4/mozilla-1.8b1’ or ‘C:/Program Files/Mozilla Firefox’. Try it again.
5. When you compile your source codes, you must take aware of MACROs and LIBs depended. For example, if mozilla or firefox is used to load your program, please DO NOT define XPCOM_GLUE and only link xpcom.lib xpcomglue_s.lib, otherwise xpcomglue.lib is available. In some special cases, you must add nspr4.lib for the former, however, you must try you best to avoid this scenario. Moreover, if you want to be compatible to the old version of browser, please add MOZILLA_STRICT_API for preprocesser. I strongly recommend that you had better read the related notices before you test.
6. Please do you best to find the proper SDK when you decide to build environement. If XULRunner-SDK and Gecko-SDK have been integrated in the package, and it is luckyJ.


 被折叠的 条评论
为什么被折叠?
被折叠的 条评论
为什么被折叠?
 到【灌水乐园】发言


