


flink cdc 连接posgresql 数据库
01 、flink posgresql cdc
前置工作
1,更改配置文件postgresql.conf
# 更改wal日志方式为logical
wal_level = logical # minimal, replica, or logical
# 更改solts最大数量(默认值为10),flink-cdc默认一张表占用一个slots
max_replication_slots = 20 # max number of replication slots
# 更改wal发送最大进程数(默认值为10),这个值和上面的solts设置一样
max_wal_senders = 20 # max number of walsender processes
# 中断那些停止活动超过指定毫秒数的复制连接,可以适当设置大一点(默认60s)
wal_sender_timeout = 180s # in milliseconds; 0 disable
wal_level是必须更改的,其它参数选着性更改,如果同步表数量超过10张建议修改为合适的值
更改配置文件postgresql.conf完成,需要重启pg服务生效,所以一般是在业务低峰期更改
2,新建用户并且给用户复制流权限
-- pg新建用户
CREATE USER user WITH PASSWORD 'pwd';

-- 给用户复制流权限
ALTER ROLE user replication;

-- 给用户登录数据库权限
grant CONNECT ON DATABASE test to user;

-- 把当前库public下所有表查询权限赋给用户
GRANT SELECT ON ALL TABLES IN SCHEMA public TO user;
3,发布表
-- 设置发布为true
update pg_publication set puballtables=true where pubname is not null;
-- 把所有表进行发布
CREATE PUBLICATION dbz_publication FOR ALL TABLES;
-- 查询哪些表已经发布
select * from pg_publication_tables;
DataStream Api
1: maveny依赖引入
<dependency>
            <groupId>org.apache.flink</groupId>
            <artifactId>flink-scala_2.11</artifactId>
            <version>1.13.2</version>
        </dependency>

        <!-- https://mvnrepository.com/artifact/org.apache.flink/flink-streaming-scala -->
        <dependency>
            <groupId>org.apache.flink</groupId>
            <artifactId>flink-streaming-scala_2.11</artifactId>
            <version>1.13.2</version>
        </dependency>

       <dependency>
            <groupId>com.ververica</groupId>
            <artifactId>flink-connector-postgres-cdc</artifactId>
            <version>2.0.2</version>
        </dependency>

        <dependency>
            <groupId>org.apache.flink</groupId>
            <artifactId>flink-connector-kafka_2.11</artifactId>
            <version>1.13.2</version>
        </dependency>
2.postgresqlCDC2Kafka.java代码
import com.ververica.cdc.connectors.postgres.PostgreSQLSource;
import org.apache.flink.api.common.restartstrategy.RestartStrategies;
import org.apache.flink.api.java.utils.ParameterTool;
import org.apache.flink.runtime.state.filesystem.FsStateBackend;
import org.apache.flink.streaming.api.CheckpointingMode;
import org.apache.flink.streaming.api.datastream.DataStreamSource;
import org.apache.flink.streaming.api.environment.CheckpointConfig;
import org.apache.flink.streaming.api.environment.StreamExecutionEnvironment;
import org.apache.flink.streaming.api.functions.source.SourceFunction;
import org.apache.flink.streaming.connectors.kafka.FlinkKafkaProducer;
import org.apache.flink.streaming.util.serialization.SimpleStringSchema;

import java.util.Properties;

public class postgresqlCDC2Kafka {
    public static void main(String[] args) throws Exception {

        String fileName = args[0];
        ParameterTool parameterTool = ParameterTool.fromPropertiesFile(fileName);
        StreamExecutionEnvironment env = StreamExecutionEnvironment.getExecutionEnvironment();
        env.disableOperatorChaining();
        env.enableCheckpointing(5000L);
        //指定 CK 的一致性语义
        env.getCheckpointConfig().setCheckpointingMode(CheckpointingMode.EXACTLY_ONCE);
        //设置任务关闭的时候保留最后一次 CK 数据
        env.getCheckpointConfig().enableExternalizedCheckpoints(CheckpointConfig.ExternalizedCheckpointCleanup.RETAIN_ON_CANCELLATION);
        // 指定从 CK 自动重启策略
        env.setRestartStrategy(RestartStrategies.fixedDelayRestart(Integer.MAX_VALUE, 2000L));
        //设置状态后端
        env.setStateBackend(new FsStateBackend("hdfs://ip:8020/../.."));
        //设置访问 HDFS 的用户名
        System.setProperty("HADOOP_USER_NAME", "hadoop");


        Properties properties = new Properties();
        properties.setProperty("snapshot.mode", "initial");
        properties.setProperty("debezium.slot.name", "pg_cdc");
        properties.setProperty("debezium.slot.drop.on.stop", "true");
        properties.setProperty("include.schema.changes", "true");

        SourceFunction<String> sourceFunction = PostgreSQLSource.<String>builder()
                .hostname("192.168.1.xxx")
                .port(5432)
                .database("databseName") // monitor postgres database
                .schemaList("schemaName")  // monitor inventory snachema
                .tableList("schemaName.table1,scheamName.tabl2,...") // monitor products table
                .username("userName")
                .password("password")
                .decodingPluginName("pgoutput")
                .deserializer(new CustomerDeserialization()) // converts SourceRecord to JSON String
                .debeziumProperties(properties)
                .build();

        DataStreamSource<String> pgDataStream =
                env
                .addSource(sourceFunction)
                .setParallelism(1); // use parallelism 1 for sink to keep message ordering

        // 设置kafka配置
        Properties kafkaProps = new Properties();
        kafkaProps.setProperty("bootstrap.servers","ip1:9092");
        kafkaProps.setProperty("transaction.max.timeout.ms",90000);
//         sink到kafka
        FlinkKafkaProducer flinkKafkaProducer = new FlinkKafkaProducer<>("topicName"), new SimpleStringSchema(), kafkaProps);
        pgDataStream.addSink(flinkKafkaProducer).name("sink2Kafka");

        env.execute("pg_cdc job");

    }
}
注意:postgresql 11以上,decodingPluginName为pgoutput
02、flink cdc错误整理
1:mysql-cdc指定剔除不需要监听的字段信息时抛出异常:
即指定"‘debezium.column.blacklist’"配置信息时抛出异常
org.apache.kafka.connect.errors.DataException: order_sales is not a valid field name
  at org.apache.kafka.connect.data.Struct.lookupField(Struct.java:254)
  at org.apache.kafka.connect.data.Struct.get(Struct.java:74)
  at com.alibaba.ververica.cdc.debezium.table.RowDataDebeziumDeserializeSchema.lambda$createRowConverter$508c5858$1(RowDataDebeziumDeserializeSchema.java:364)
  at com.alibaba.ververica.cdc.debezium.table.RowDataDebeziumDeserializeSchema.lambda$wrapIntoNullableConverter$7b91dc26$1(RowDataDebeziumDeserializeSchema.java:390)
  at com.alibaba.ververica.cdc.debezium.table.RowDataDebeziumDeserializeSchema.extractAfterRow(RowDataDebeziumDeserializeSchema.java:126)
  at com.alibaba.ververica.cdc.debezium.table.RowDataDebeziumDeserializeSchema.deserialize(RowDataDebeziumDeserializeSchema.java:101)
  at com.alibaba.ververica.cdc.debezium.internal.DebeziumChangeConsumer.handleBatch(DebeziumChangeConsumer.java:97)
  at io.debezium.embedded.ConvertingEngineBuilder.lambda$notifying$2(ConvertingEngineBuilder.java:81)
  at io.debezium.embedded.EmbeddedEngine.run(EmbeddedEngine.java:812)
  at io.debezium.embedded.ConvertingEngineBuilder$2.run(ConvertingEngineBuilder.java:170)
  at java.util.concurrent.ThreadPoolExecutor.runWorker(ThreadPoolExecutor.java:1142)
  at java.util.concurrent.ThreadPoolExecutor$Worker.run(ThreadPoolExecutor.java:617)
  at java.lang.Thread.run(Thread.java:745)
分析:指定debezium.column.blacklist该参数的意思是指在debezium监听到事件后会把记录中的指定字段删除,然后在flink做解析转换的时候找不到字段。
2:cdc source扫描mysql表期间,进行加锁操作。
解决方案:
       给使用的mysql用户授予reload权限即可。详细见:https://github.com/ververica/flink-cdc-connectors/wiki/mysql-cdc-connector#setup-mysql-server
       使用'debezium.snapshot.locking.mode'='none'
3:同步锁表
User does not have the 'LOCK TABLES' privilege required to obtain a consistent snapshot by preventing concurrent writes to tables.
原因是连接MySQL的用户缺乏必要的CDC权限。
Flink CDC基于Debezium实现。当启动MySQL CDC源时,它将获取一个全局读取锁(FLUSH TABLES WITH READ LOCK),该锁将阻止其他数据库的写入,然后读取当前binlog位置以及数据库和表的schema,之后将释放全局读取锁。然后它扫描数据库表并从先前记录的位置读取binlog,Flink将定期执行checkpoints以记录binlog位置。如果发生故障,作业将重新启动并从checkpoint完成的binlog位置恢复,因此它保证了仅一次的语义。
解决办法:创建一个新的MySQL用户并授予其必要的权限。
mysql> CREATE USER 'user'@'localhost' IDENTIFIED BY 'password';
mysql> GRANT SELECT, RELOAD, SHOW DATABASES, REPLICATION SLAVE, REPLICATION CLIENT ON *.* TO 'user' IDENTIFIED BY 'password';
mysql> FLUSH PRIVILEGES;
4:Flink作业扫描MySQL全量数据出现fail-over
Flink 作业在扫描 MySQL 全量数据时,checkpoint 超时,出现作业 failover,如下图:
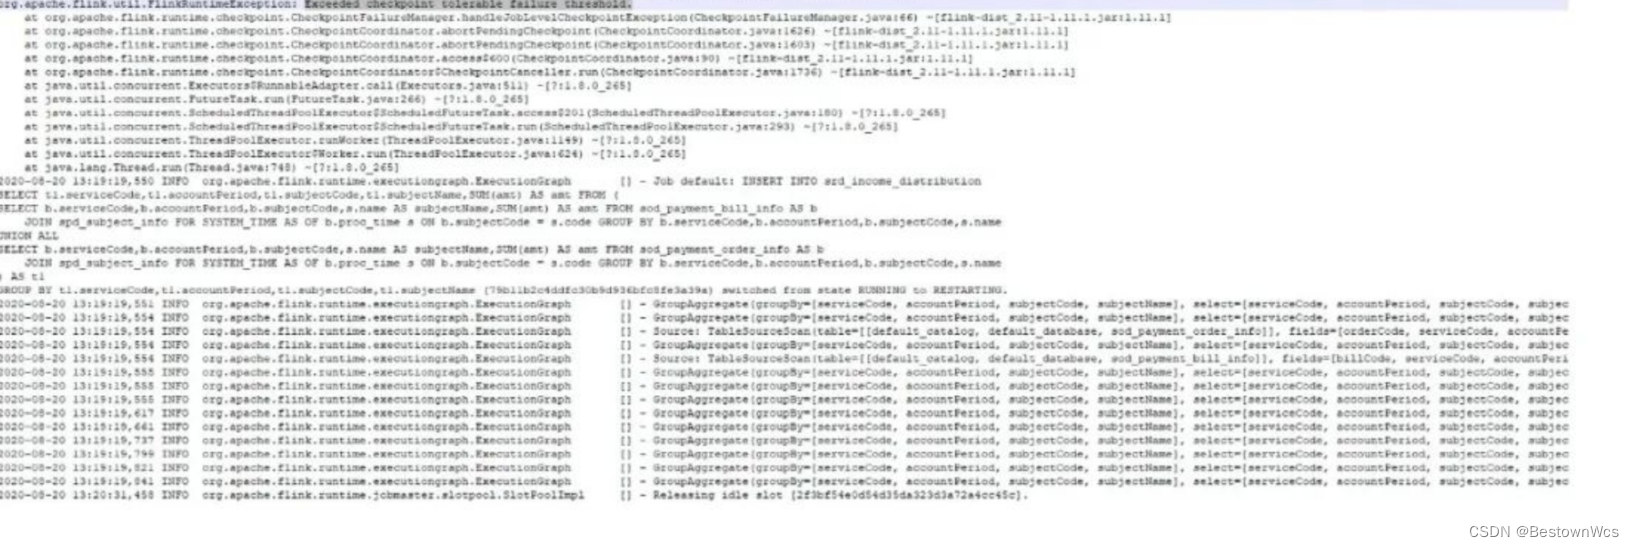
原因:Flink CDC 在 scan 全表数据(我们的实收表有千万级数据)需要小时级的时间(受下游聚合反压影响),而在 scan 全表过程中是没有 offset 可以记录的(意味着没法做 checkpoint),但是 Flink 框架任何时候都会按照固定间隔时间做 checkpoint,所以此处 mysql-cdc source 做了比较取巧的方式,即在 scan 全表的过程中,会让执行中的 checkpoint 一直等待甚至超时。超时的 checkpoint 会被仍未认为是 failed checkpoint,默认配置下,这会触发 Flink 的 failover 机制,而默认的 failover 机制是不重启。所以会造成上面的现象。
解决办法:在 flink-conf.yaml 配置 failed checkpoint 容忍次数,以及失败重启策略,如下:
execution.checkpointing.interval: 10min   # checkpoint间隔时间
execution.checkpointing.tolerable-failed-checkpoints: 100  # checkpoint 失败容忍次数
restart-strategy: fixed-delay  # 重试策略
restart-strategy.fixed-delay.attempts: 2147483647   # 重试次数
5:作业在运行时 mysql cdc source 报 no viable alternative at input ‘alter table std’
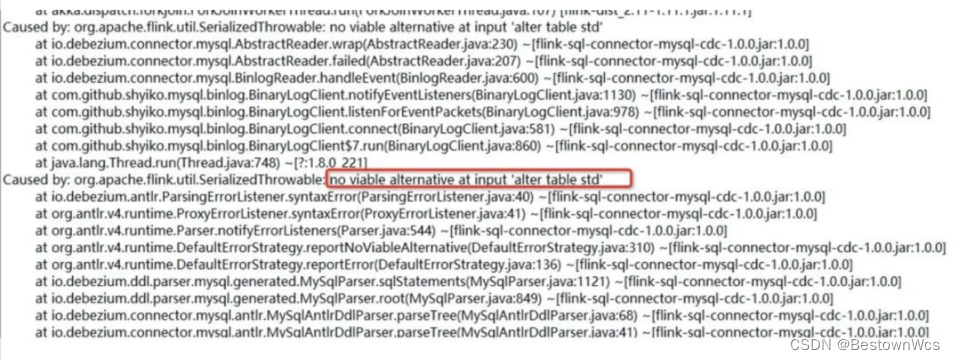
原因:因为数据库中别的表做了字段修改,CDC source 同步到了 ALTER DDL 语句,但是解析失败抛出的异常。
解决方法:在 flink-cdc-connectors 最新版本中已经修复该问题(跳过了无法解析的 DDL)。升级 connector jar 包到最新版本 1.1.0:flink-sql-connector-mysql-cdc-1.1.0.jar,替换 flink/lib 下的旧包。
6:多个作业共用同一张 source table 时,没有修改 server id 导致读取出来的数据有丢失。
原因:MySQL binlog 数据同步的原理是,CDC source 会伪装成 MySQL 集群的一个 slave(使用指定的 server id 作为唯一 id),然后从 MySQL 拉取 binlog 数据。如果一个 MySQL 集群中有多个 slave 有同样的 id,就会导致拉取数据错乱的问题。
解决方法:默认会随机生成一个 server id,容易有碰撞的风险。所以建议使用动态参数(table hint)在 query 中覆盖 server id。如下所示:
FROM bill_info /*+ OPTIONS('server-id'='123456') */ ;
7: flinksql cdc时区差8小时的问题
在连接参数中设置 ‘server-time-zone’ = ‘Asia/Shanghai’

比如:WITH (

‘connector’ = ‘mysql-cdc’,

‘hostname’ = ‘xxx’,

‘port’ = ‘3306’,

‘username’ = ‘root’,

‘password’ = ‘root’,

‘database-name’ = ‘xxx’,

‘table-name’ = ‘xxx’,

‘server-time-zone’ = ‘Asia/Shanghai’
不设置的话可能会改变MySQL中时间字段比如datetime减8小时
在sql语句中使用LOCALTIMESTAMP或者手动给时间戳加8小时而不要用current_date等
补充:
如果要sink到MySQL的话,在url后加&serverTimezone=Asia/Shanghai 否则时区也会对不上或者在url上
添加
jdbc:mysql://${hostname}/${db_name}useUnicode=true&characterEncoding=UTF-8&zeroDateTimeBehavior=convertToNull&tinyInt1isBit=false&serverTimezone=Asia/Shanghai&useSSL=true&dontTrackOpenResources=true&defaultFetchSize=10000&useCursorFetch=true
8:flink cdc Encountered chage event for table xxx.xxxx whose schema isn’t known to this connector
解决方案:
inconsistent.schema.handing.mode=''warn'
9: Flinksql From Mysql-cdc Sink to Hbase Cause Miss Data
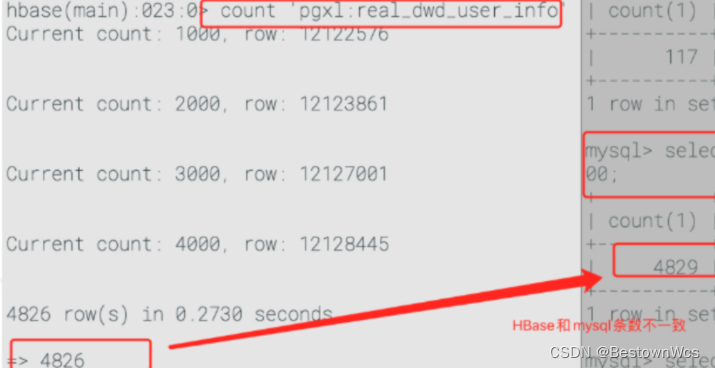
定位:
1:改源码,增加log
2:查看写入逻辑
#open逻辑,有个定时任务刷新
if (bufferFlushIntervalMillis > 0 && bufferFlushMaxMutations != 1) {
        this.executor = Executors.newScheduledThreadPool(
          1, new ExecutorThreadFactory("hbase-upsert-sink-flusher"));
        this.scheduledFuture = this.executor.scheduleWithFixedDelay(() -> {
          if (closed) {
            return;
          }
          try {
            flush();
          } catch (Exception e) {
            // fail the sink and skip the rest of the items
            // if the failure handler decides to throw an exception
            failureThrowable.compareAndSet(null, e);
          }
        }, bufferFlushIntervalMillis, bufferFlushIntervalMillis, TimeUnit.MILLISECONDS);
      }

# invoke逻辑
if (bufferFlushMaxMutations > 0 && numPendingRequests.incrementAndGet() >= bufferFlushMaxMutations) {
      flush();
}

# snapshot逻辑,当队列中还有数据请求未刷新时才满足
while (numPendingRequests.get() != 0) {
      flush();
}
以RowKey=0为例发现操作已经被封住在Mutation中,且已经被刷新了。但在hbase中并未找到该key.猜测可能在Mutator处理乱序数据了。
搜索查证资料:
https://www.jianshu.com/p/1a753ffcbe2ahttps://issues.apache.org/jira/browse/HBASE-8626?focusedCommentId=13669455&page=com.atlassian.jira.plugin.system.issuetabpanels%3Acomment-tabpanel#comment-13669455
解决方案:
1:短期方案:设置'sink.buffer-flush.max-rows'='2'暂时规避该问题,但对rs会有较大压力
2:彻底解决:基于issue改造源码
10:相关参数说明:
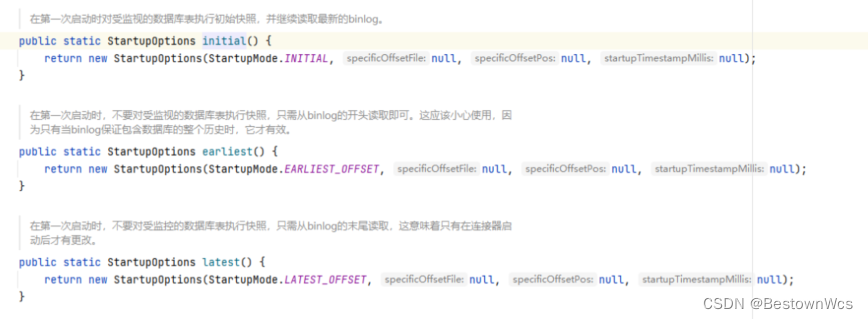
snapshot.mode的各种参数,以下是测试效果
properties.setProperty("snapshot.mode", "never");//Encountered change event for table sensor_offset.offset_manager whose schema isn't known to this connector
properties.setProperty("snapshot.mode", "initial");每次重启都会读全量
properties.setProperty("snapshot.mode", "initial_only");//读不到数据
properties.setProperty("snapshot.mode", "when_needed");//跟initial效果类似
properties.setProperty("snapshot.mode", "schema_only");//只会记录最新的更改,历史全量读不到
properties.setProperty("snapshot.mode", "schema_only_recovery");//Could not find existing binlog information while attempting schema only recovery snapshot


 644
644


 被折叠的 条评论
为什么被折叠?
被折叠的 条评论
为什么被折叠?
 到【灌水乐园】发言


