


文章目录
设备信息
手机:Pixel 4XL
下载AOSP并切换分支
在清华大学开源软件镜像站下载初始化包aosp-latest.tar。
解压缩,切换到Pixel 4XL对应的AOSP 13分支然后同步代码。
tar xf aosp-latest.tar
cd aosp
repo init -b android-13.0.0_r31 #切换代码分支
repo sync
获取设备驱动
在https://source.android.com/docs/setup/about/build-numbers?hl=zh-cn中获取build ID。
以android-13.0.0_r31为例,对应build ID为TP1A.221005.002.B2

根据build ID在https://developers.google.com/android/drivers?hl=zh-cn中下载驱动文件。
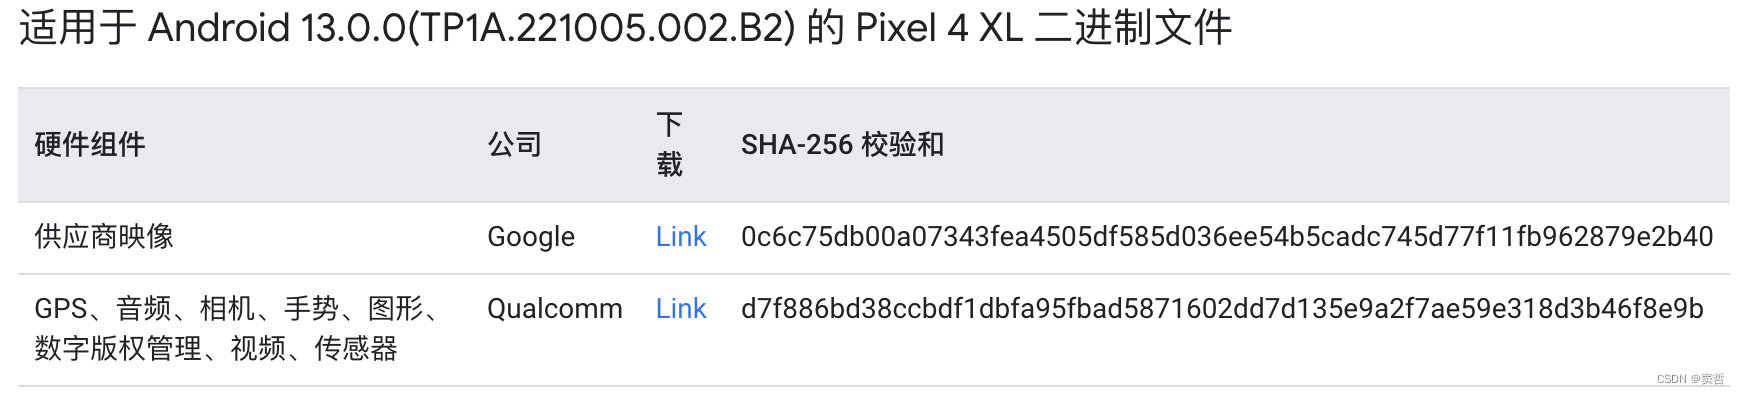
驱动文件解压缩后是sh脚本文件,把sh脚本文件移动到aosp根目录下并执行,输入 I ACCEPT 获取驱动文件。
编译系统
在aosp根目录执行下面命令。
source build/envsetup.sh
lunch XXX
m
编译遇到的问题Cannot allocate memory
解决方法:
ulimit -n 20480
分析部分:
从表面上看,分配内存失败,以为是内存不够,但是我这是64G的内存,以前在16G内存+16G虚拟内存情况下都能正常编译,现在转到服务器上怎么就有问题呢?报错期间,查看内存是有剩余的。期间从网上找了不同的解决方法,一个是去掉oat,WITH_DEXPREOPT 和WITH_DEXPREOPT_BOOT_IMG_AND_SYSTEM_SERVER_ONLY改为false,测试无效;另一个是修改dalvik.vm.dex2oat-Xmx 和dalvik.vm.image-dex2oat-Xmx等配置,调大,仍然无效。

没办法,自己看看dex2oatd代码,从报错的位置跟到mapmem,发现mmap报错位置是fd.get()==-1,难道是内有文件描述符的问题吗?通过cat /proc/sys/fs/file-nr命令查看,

10720 0 9223372036854775807服务器最大文件描述符很大,根本用不完,那就是每个用户的数量受限了?ulimit -n查看是1024,既然服务器这么大,那调整一下,ulimit -n 20480。

再次编译的时候,没有报错,一次通过,删除out目录,再次重新编译,也是一次通过。
原文链接:https://blog.csdn.net/fuyl1985/article/details/134378503
Note
WSL2中的Ubuntu执行 ulimit -n ***** 就会报错,问题讨论和解决方法参考链接https://github.com/Microsoft/WSL/issues/1688
解决方法:
I was running into this error with WSL2 also. After changing everything outlined through this issue the limits for ulimit wouldn’t be raised and wouldn’t let me modify the values past the limits, but when checking the rights for the user I was running my command as: sudo su username --shell /bin/bash --command “ulimit -n” The ulimit would return the raised value. I then logged into myself from myself su username --shell /bin/bash and I was able to raise the ulimit values as expected, but only for that session. This makes me think that the initial WSL shell is restricted in some way.
Ubuntu设置USB调试
Ubuntu设置后才能adb连接到手机。
sudo usermod -aG plugdev $LOGNAME
apt-get install android-sdk-platform-tools-common
刷机
进入编译后产生的镜像的目录…/aosp/out/target/product/XXX(这个是你机型的代号,每种机器都不一样)
adb reboot bootloader
fastboot devices #确认是否连接上手机
fastboot flashall -w #刷机
WSL2中配置adb和fastboot
1. WSL2 Ubuntu中的adb等命令不识别设备
解决方式:WSL2中支持adb.exe命令。把Windows中的platform-tools目录复制到Ubuntu中,使用ln创建连接。
//把Windows中的platform-tools复制到Ubuntu的用户目录下
sudo cp -r /<windows-path-to>/platform-tools /home/<username>

//Ubuntu中使用ln创建adb和fastboot连接
sudo ln -s /home/<username>/platform-tools/adb.exe /usr/bin/adb
sudo ln -s /home/<username>/platform-tools/fastboot.exe /usr/bin/fastboot
如果直接把platform-tools文件夹拷贝到\wsl$\Ubuntu\,需要使用 sudo chmod +x adb 和 sudo chmod +x fastboot,添加执行权限。
2. Windows中刷机时,环境变量配置和fastboot命令不识别解决
2.1 环境变量配置
在WSL2 Ubuntu中编译AOSP后,可以通过在WIndow中配置环境变量,在cms中执行fastboot flashall -w刷机命令。
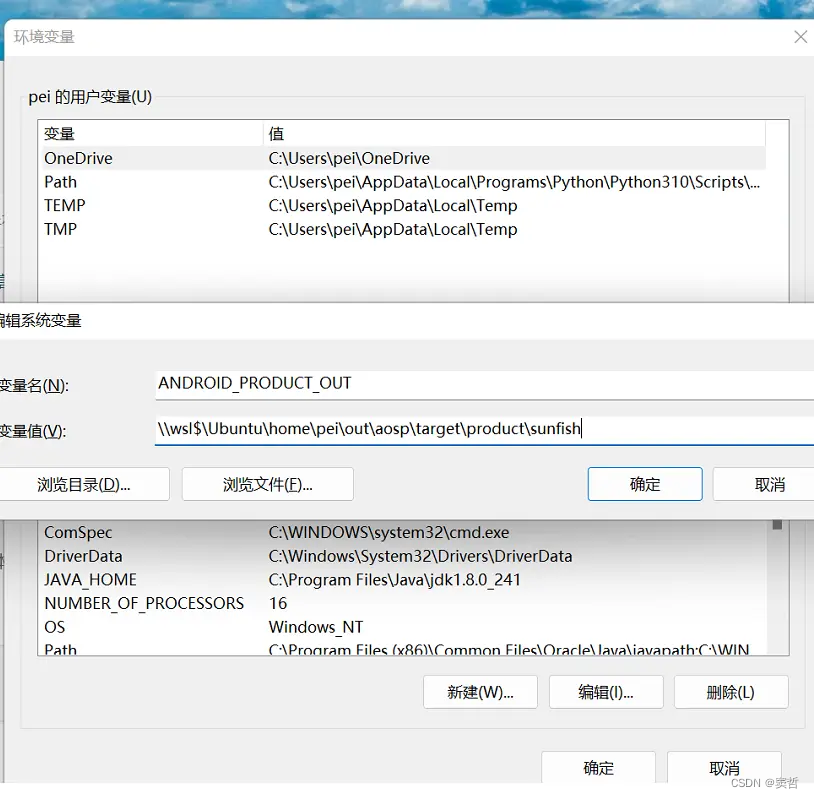
在Windows的添加环境变量:
key值:ANDROID_PRODUCT_OUT
value值:\wsl$\Ubuntu\home<username><aosp-source-code-dir>\out\target\product<device-platform-name>
2.2 Windows中fastboot命令不识别
现象:当通过 adb reboot bootloader 重启手机进入fastboot模式时,在Windows cmd中执行 fastboot devices 命令,不显示已连接的手机。
原因:Windows中没有安装Google USB Driver。
解决:
以Windows10为例,其他Windows平台可以参考https://developer.android.com/studio/run/oem-usb?hl=zh-cn#InstallingDriver
如果要在 Windows 10 系统上首次安装 Android USB 驱动程序,请执行以下操作:
- 将您的 Android 设备连接到计算机的 USB 端口。
- 在 Windows 资源管理器中,打开计算机管理。
- 在计算机管理左侧窗格中,选择设备管理器。
- 在设备管理器右侧窗格中,找到并展开便携设备或其他设备,具体取决于您看到的是哪一项。
- 右键点击已连接设备的名称,然后选择更新驱动程序软件。
- 在硬件更新向导中,选择浏览计算机以查找驱动程序软件,然后点击下一步。
- 点击浏览,然后找到 USB 驱动程序文件夹。例如,Google USB 驱动程序位于 android_sdk\extras\google\usb_driver\。
USB驱动文件可以通过Android Studio -> SDK Manager -> Android SDK -> SDK Tools -> Google Usb Driver下载。
NOTE:
如果要用官方刷机网站https://flash.android.com/刷系统时,需要安装Google Web Driver。
- 点击下一步以安装驱动程序
Windows下安装完Google USB Driver后,cmd中就可以正常使用 fastboot 命令刷机了。
参考链接
https://source.android.com/docs/setup/about/build-numbers?hl=zh-cn
https://yanke.info/?id=128
https://blog.csdn.net/fuyl1985/article/details/134378503
https://developer.android.com/studio/run/device.html?hl=zh-cn#setting-up
https://source.android.com/docs/setup/build/running?hl=zh-cn
https://www.jianshu.com/p/edd46edfd6ab
https://developer.android.com/studio/run/oem-usb?hl=zh-cn#InstallingDriver


 1960
1960


 被折叠的 条评论
为什么被折叠?
被折叠的 条评论
为什么被折叠?
 到【灌水乐园】发言


