


接上一篇博客:https://blog.csdn.net/Henry41132220011/article/details/104631037
三.天气数据爬取(保存至本地excel表格中)
要实现断网也可查询天气数据,思路:
1.现在写一个爬虫 把所有城市的所需要的数据爬下来 存到文件(excel首选) 存储的字段是 城市 日期 跟详情
2.给爬虫加一个定时任务 (每天一次爬取到文件)
3.修改查询代码 每次查询根据 日期+城市 唯一性去文件里面查。然后取出详情 展示到页面
上代码:
# coding=gbk
import sys
import urllib.request
import gzip
import json
import xlwt
import xlrd
import datetime
import time
city = []
date = []
data = []

def creat_city_list():
	with open('city.txt','r',encoding = 'utf-8') as f:
		for line in f:
			city.append(line.strip('\n').replace(' ',''))

def find_data(city):
	city_data = city
	for city_name in city_data:
		url1 = 'http://wthrcdn.etouch.cn/weather_mini?city='+urllib.parse.quote(city_name)
		weather_data = urllib.request.urlopen(url1).read()
		weather_data = gzip.decompress(weather_data).decode('utf-8')
		weather_dict = json.loads(weather_data)
		if weather_dict.get('desc') == 'invilad-citykey':
			print('你输入的城市名有误,或者天气中心未收录你所在城市')
		elif weather_dict.get('desc') =='OK':
			forecast = weather_dict.get('data').get('forecast')
			date.append(forecast[0].get('date'))
			data.append('温度:'+weather_dict.get('data').get('wendu')+'℃ \n' +'感冒:'+weather_dict.get('data').get('ganmao')+'\n'
			+'高温:'+forecast[0].get('high') + '低温:'+forecast[0].get('low') + '\n'+'天气:'+forecast[0].get('type'))
def creat_data(city,date,data):
	myxls=xlwt.Workbook()  #创建excel表格
	sheet1=myxls.add_sheet(u'weather',cell_overwrite_ok=True)
	for i in range(0,len(city)):  #写入数据
		sheet1.write(i,0,city[i])
	for i in range(0,len(date)):
		sheet1.write(i,1,date[i])
	for i in range(0,len(data)):
		sheet1.write(i,2,data[i])
	myxls.save('weather.xlsx')  #保存表格到文件下

def run():
	creat_city_list()
	find_data(city)
	creat_data(city,date,data)

def main(h=12,m=0): #每天中文12点获取数据
	while True:
		now = datetime.datetime.now()
		# print(now.hour, now.minute)
		if now.hour == h and now.minute == m:
			break
		# 每隔60秒检测一次
		time.sleep(60)
	run()
main()
结果:
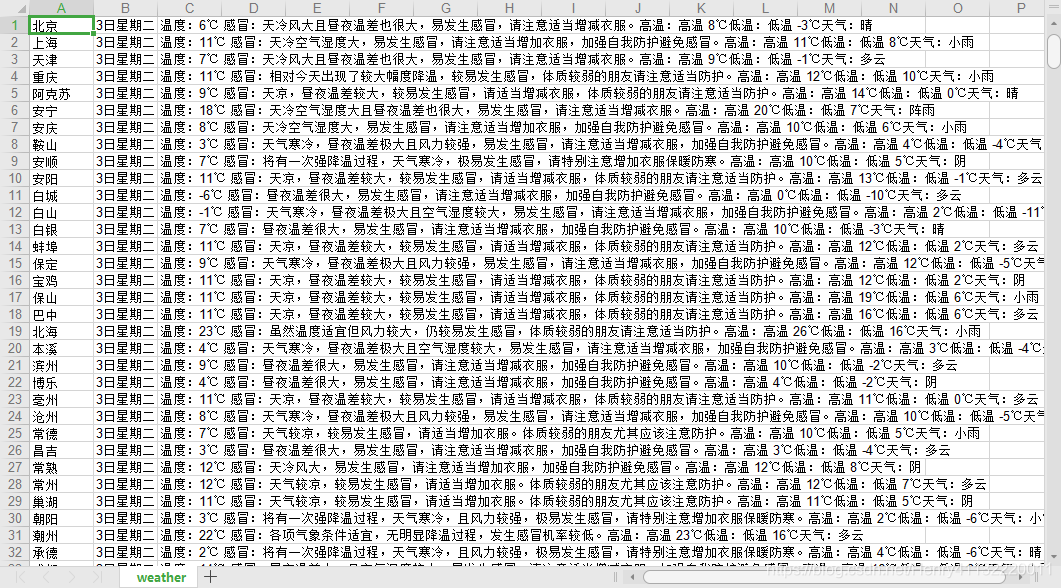
这样所有城市的天气数据都可以爬取下来,断网时查询天气调用这些数据即可。
city.txt为全国城市名称,用于遍历循环网站,网络上有很多,不做说明。
四.爬取图片数据(保存至本地)
思路和三差不多,也是循环获取数据,上代码:
# coding=gbk
import requests
from bs4 import BeautifulSoup
import os
from xpinyin import Pinyin
import time as t
city = []
def creat_city_list():
	with open('city.txt','r',encoding = 'utf-8') as f:
		for line in f:
			city.append(line.strip('\n').replace(' ',''))

# 获取网址
def getUrl(url):
    try:
        headers = {"User-Agent":"Mozilla/5.0 (Windows NT 10.0; Win64; x64) AppleWebKit/537.36 (KHTML, like Gecko) Chrome/80.0.3987.122 Safari/537.36"}
        read = requests.get(url,headers = headers)  #获取url
        read.raise_for_status()   #状态响应 返回200连接成功
        read.encoding = read.apparent_encoding  #从内容中分析出响应内容编码方式
        return read.text    #Http响应内容的字符串,即url对应的页面内容
    except:
        return "连接失败!"

# 获取图片地址并保存下载
def getPic(html,pinyin):
    today_time = t.localtime(t.time())
    year = today_time.tm_year
    month = today_time.tm_mon
    day = today_time.tm_mday
    soup = BeautifulSoup(html, "html.parser")
    #通过分析网页内容,查找img的统一父类及属性
    all_img = soup.find('a',href = './2020-' + str(month) +'-' +str(day)  + '.html').find('div', class_='mt').find_all('img') #img为图片的标
    for img in all_img[:1]:
        src = img['src']  #获取img标签里的src内容
        img_url = src
        print(img_url)
        root = "F:/Pic/" + str(month) + '-' + str(day) + "/" #保存的路径
        path = root + pinyin + ".png"  #保存	img的文件名
        print(path)
        try:
            if not os.path.exists(root):  #判断是否存在文件并下载img
                os.mkdir(root)
            if not os.path.exists(path):
                read = requests.get(img_url)
                with open(path, "wb")as f:
                    f.write(read.content)
                    f.close()
                    print("文件保存成功!")
            else:
                    print("文件已存在!")
        except:
            print("文件爬取失败!")


# 主函数
if __name__  == "__main__":
    creat_city_list()
    for city_name in city:
        p = Pinyin()
        city_pinyin =  p.get_pinyin(city_name,"")
        html_url=getUrl("https://tianqi.911cha.com/" +city_pinyin)
        try:  #防止pinyin个别城市解析异常,影响循环
          getPic(html_url,city_pinyin)
        except:
          print("fail")
          continue
结果: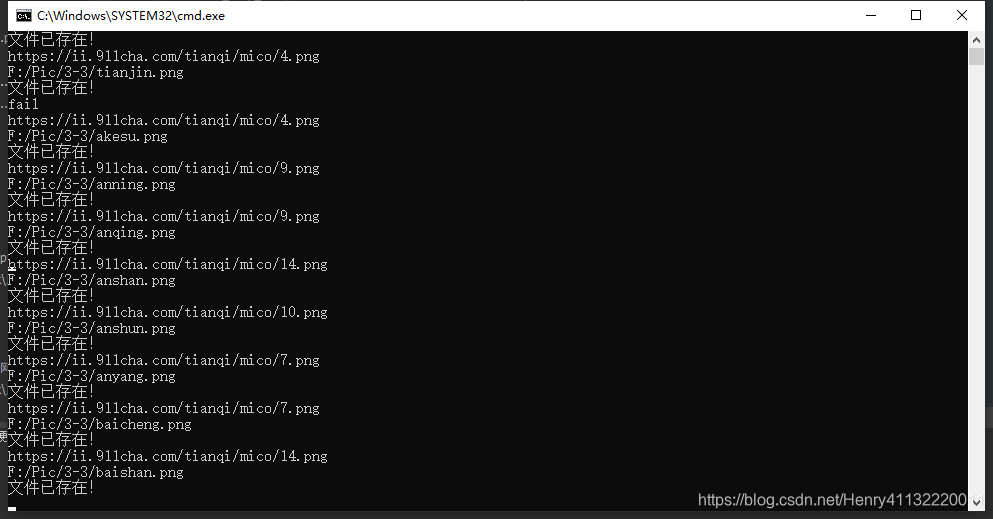

五.制作UI界面
制作界面需要用到pycharm中的Qt designer和Pyuic工具,安装教程网络上有很多,不做说明。

确定各个控件的位置,大小后保存再本地项目下,利用Pyuic转为python文件名为Ui.py后获得代码:
# -*- coding: utf-8 -*-

# Form implementation generated from reading ui file 'new_UI界面.ui'
#
# Created by: PyQt5 UI code generator 5.14.1
#
# WARNING! All changes made in this file will be lost!


from PyQt5 import QtCore, QtGui, QtWidgets
from PyQt5.QtWidgets import QApplication,QLineEdit,QFormLayout,QWidget
from PyQt5.QtGui import QIntValidator,QDoubleValidator,QFont
from PyQt5.QtCore import Qt
from PyQt5.QtGui import QPalette
import sys
import qtawesome

class Ui_Form(object):
    def setupUi(self, Form):
        Form.setObjectName("Form")
        Form.resize(575, 432)
        Form.setStyleSheet("background-image: url(\"F://Pic//th.jpg\")")
        self.listView = QtWidgets.QListView(Form)
        self.listView.setGeometry(QtCore.QRect(450, 240, 131, 121))
        self.listView.setStyleSheet("background-image: url(\"F://Pic//00.png\")")
        self.listView.setObjectName("listView")
        self.textBrowser = QtWidgets.QTextBrowser(Form)
        self.textBrowser.setGeometry(QtCore.QRect(0, 90, 581, 271))
        self.textBrowser.setStyleSheet("background-color: rgb(85, 170, 255)")
        self.textBrowser.setObjectName("textBrowser")
        self.label = QtWidgets.QLabel(Form)
        self.label.setGeometry(QtCore.QRect(470, 190, 111, 41))
        self.label.setStyleSheet("background-color: blue")
        self.label.setObjectName("label")
        self.pushButton = QtWidgets.QPushButton(Form)
        self.pushButton.setGeometry(QtCore.QRect(110, 390, 75, 23))
        self.pushButton.setStyleSheet("background-color: blue\n""")
        self.pushButton.setObjectName("pushButton")
        self.pushButton_2 = QtWidgets.QPushButton(Form)
        self.pushButton_2.setGeometry(QtCore.QRect(350, 390, 75, 23))
        self.pushButton_2.setStyleSheet("background-color: blue")
        self.pushButton_2.setObjectName("pushButton_2")
        self.lineEdit = QtWidgets.QLineEdit(Form)
        self.lineEdit.setGeometry(QtCore.QRect(220, 40, 261, 31))
        self.lineEdit.setObjectName("lineEdit")
        self.label_2 = QtWidgets.QLabel(Form)
        self.label_2.setGeometry(QtCore.QRect(80, 40, 121, 31))
        self.label_2.setObjectName("label_2")
        self.label_2.raise_()
        self.label_3 = QtWidgets.QLabel(Form)
        self.label_3.setGeometry(QtCore.QRect(150, 210, 51, 51))
        self.label_3.setObjectName("label_3")
        self.textBrowser.raise_()
        self.listView.raise_()
        self.label.raise_()
        self.pushButton.raise_()
        self.pushButton_2.raise_()
        self.lineEdit.raise_()
        self.label_3.raise_()

        self.retranslateUi(Form)
        QtCore.QMetaObject.connectSlotsByName(Form)

    def retranslateUi(self, Form):
        _translate = QtCore.QCoreApplication.translate
        Form.setWindowTitle(_translate("Form", "Form"))
        self.label.setText(_translate("Form", "<html><head/><body><p><span style=\" font-size:12pt;\">获取更多信息</span></p></body></html>"))
        self.pushButton.setToolTip(_translate("Form", "<html><head/><body><p><span style=\" font-size:12pt;\">查询</span></p></body></html>"))
        self.pushButton.setText(_translate("Form", "查询"))
        self.pushButton_2.setText(_translate("Form", "退出"))
        self.label_2.setText(_translate("Form", "<html><head/><body><p><span style=\" font-size:12pt;\">输入城市名称:</span></p></body></html>"))
        # 调整透明度
        Form.setWindowOpacity(0.9)
        Form.setWindowTitle("天气预报")
        # 美化查询按钮
        self.pushButton_2.setStyleSheet('''QPushButton{background:'white';border-radius:15px;}
                        QPushButton:hover{background:green;}''')
        spin_icon2 = qtawesome.icon('fa.ban', color='black')
        self.pushButton_2.setIcon(spin_icon2)
        # 美化退出按钮
        self.pushButton.setStyleSheet('''QPushButton{background:'white';border-radius:15px;}
                        QPushButton:hover{background:green;}''')
        spin_icon = qtawesome.icon('fa.search', color='black')
        self.pushButton.setIcon(spin_icon)  # Qpushbutton设置图标
        # 美化标签
        self.label.setStyleSheet('''QLabel{color:black;font-size:40px;font-family:Roman times;}''')

        #美化输出框
        self.textBrowser.setFontPointSize(14)
        self.textBrowser.setFontItalic(False)
        #美化输入框
        self.lineEdit.setFont(QFont('Arial', 12))
对控件的美化直接在retranslateUi函数后加入代码
六.显示界面
将保存好的天气文字数据和图片数据直接调用即可。
上代码:
# -*- coding: utf-8 -*-

# Form implementation generated from reading ui file 'connect_me.ui'
#
# Created by: PyQt5 UI code generator 5.11.3
#
# WARNING! All changes made in this file will be lost!
#导入程序运行必须模块
import sys
import urllib.request
import gzip
import json
import xlrd
import xlwt
from PyQt5 import QtCore, QtGui, QtWidgets
from PyQt5.QtWidgets import QApplication, QMainWindow, QMessageBox, QRadioButton
from PyQt5.QtGui import QPixmap,QPainter
from Ui import Ui_Form
from xpinyin import Pinyin
import time as t


class MyMainForm(QMainWindow, Ui_Form):
    def __init__(self, parent=None):
        super(MyMainForm, self).__init__(parent)
        self.setupUi(self)
        #添加查询按钮信号和槽。注意display和showMsg函数不加小括号()
        self.pushButton.clicked.connect(self.display)
        self.pushButton.clicked.connect(self.showMsg)
        #添加退出按钮信号和槽。调用close函数
        self.pushButton_2.clicked.connect(self.close)


    def showMsg(self): #显示天气图片数据
        today_time = t.localtime(t.time()) #今天日期
        year = today_time.tm_year
        month = today_time.tm_mon
        day = today_time.tm_mday
        city = self.lineEdit.text()
        p = Pinyin()
        city_pinyin = p.get_pinyin(city, "")
        self.label_3.setStyleSheet("background-image: url(\"F://Pic//" + str(month) +'-'+ str(day) + '//' + city_pinyin + ".png\")")  #在“当天天气情况:”后的label标签显示对应城市天气图片
    def display(self):  #显示天气文字数据
        datas = xlrd.open_workbook('D:\\断网天气预报\\weather.xlsx')
        w = datas.sheets()[0]  #打开表单
        city = self.lineEdit.text()   #获取输入的城市名称
        number = int(w.nrows) #循环查找对应城市数据
        for i in range(number):
            city_name = w.cell(i, 0).value
            if city == city_name:
                date = w.cell(i, 1).value
                data = w.cell(i, 2).value
                self.textBrowser.setText(date + '\n' + data + '\n' + "当天天气情况:")


if __name__ == "__main__":
    #固定的,PyQt5程序都需要QApplication对象。sys.argv是命令行参数列表,确保程序可以双击运行
    app = QApplication(sys.argv)
    #初始化
    myWin = MyMainForm()
    #将窗口控件显示在屏幕上
    myWin.show()
    #程序运行,sys.exit方法确保程序完整退出。
    sys.exit(app.exec_())
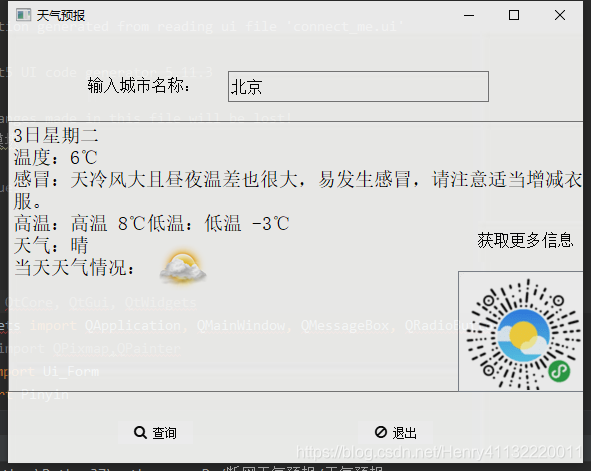
最终效果图:


 3777
3777


 被折叠的 条评论
为什么被折叠?
被折叠的 条评论
为什么被折叠?
 到【灌水乐园】发言


