介绍
在图片开发过程中经常会涉及到PixelMap的深拷贝,本例通过使用PixelMap的readPixelsToBuffer方法来实现深拷贝。在创建源PixelMap的时候,需要将解码参数设置为BGRA_8888,而在深拷贝创建目标PixelMap的时候需要将解码参数设置为RGBA_8888。
效果图预览

使用说明
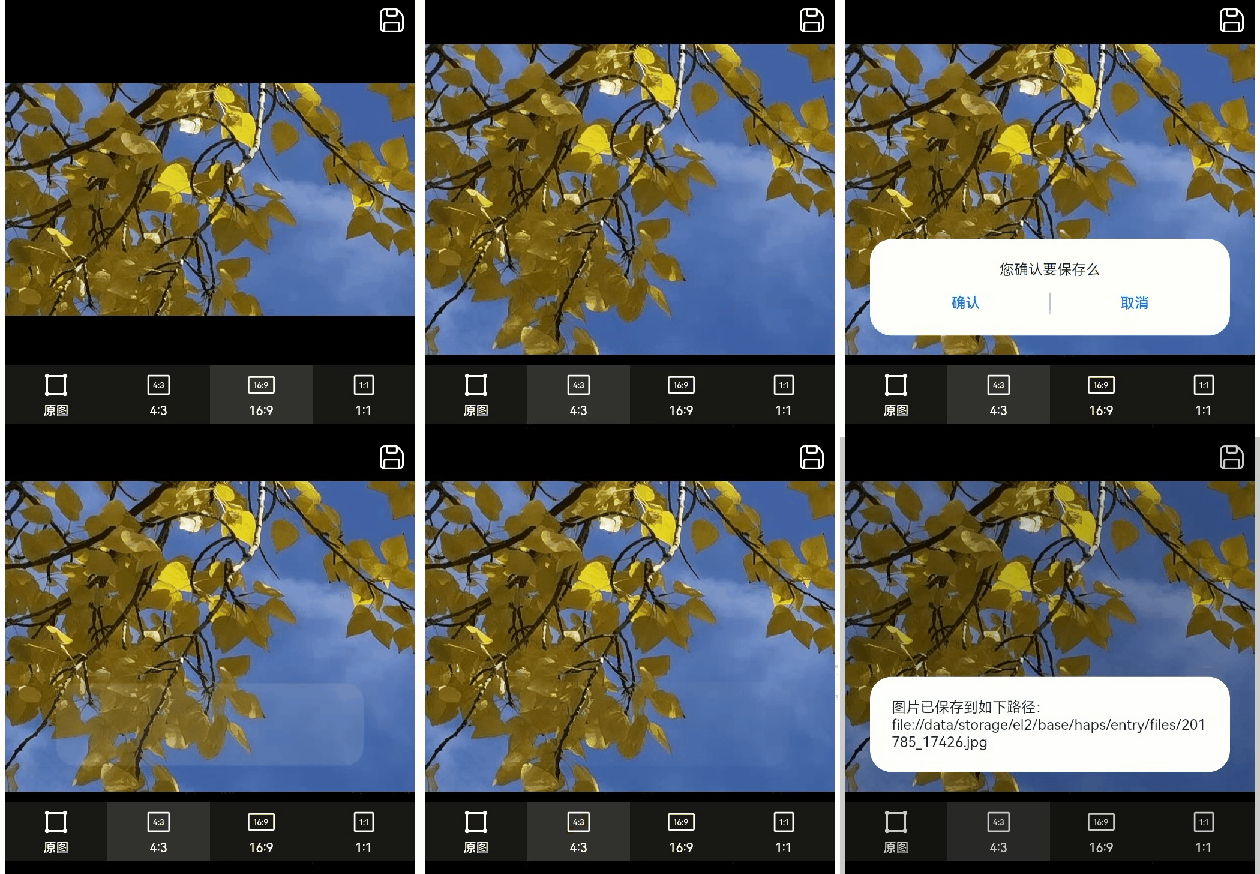
- 进入页面,显示的即为rawfile中图片的PixelMap经过深拷贝过后的PixelMap对象。点击底部的按钮,对原始PixelMap进行深拷贝后再根据相应的比例进行裁剪。点击顶部的保存图标,可以保存当前图片。
实现思路
- PixelMap深拷贝方法。通过readPixelsToBuffer读取图片资源的PixelMap到ArrayBuffer,再通过createPixelMap得到目标PixelMap。
   async function copyPixelMap(pm: PixelMap): Promise<PixelMap> {
     const imageInfo: image.ImageInfo = await pm.getImageInfo();
     const buffer: ArrayBuffer = new ArrayBuffer(pm.getPixelBytesNumber());
     // TODO 知识点:通过readPixelsToBuffer实现PixelMap的深拷贝,其中readPixelsToBuffer输出为BGRA_8888
     await pm.readPixelsToBuffer(buffer);
     // TODO 知识点:readPixelsToBuffer输出为BGRA_8888,此处createPixelMap需转为RGBA_8888
     const opts: image.InitializationOptions = {
       editable: true,
       pixelFormat: image.PixelMapFormat.RGBA_8888,
       size: { height: imageInfo.size.height, width: imageInfo.size.width }
     };
     return await image.createPixelMap(buffer, opts);
   }
- 初始化时,通过深拷贝从原始PixelMap创建目标PixelMap。
   async aboutToAppear(): Promise<void> {
     const context: Context = getContext(this);
     // 获取resourceManager资源管理
     const resourceMgr: resourceManager.ResourceManager = context.resourceManager;
     // 获取rawfile中的图片资源
     const fileData: Uint8Array = await resourceMgr.getRawFileContent(ImageCropConstants.RAWFILE_PICPATH);
     // 获取图片的ArrayBuffer
     const buffer = fileData.buffer.slice(fileData.byteOffset, fileData.byteLength + fileData.byteOffset);
     // 保存用于恢复原图的imageSource
     this.imageSource = image.createImageSource(buffer);
     // TODO 知识点: 创建源图片的用于深拷贝的PixelMap,因readPixelsToBuffer输出为BGRA_8888。故此处desiredPixelFormat需为BGRA_8888
     const decodingOptions: image.DecodingOptions = {
       editable: false, // 是否可编辑。当取值为false时,图片不可二次编辑。
       desiredPixelFormat: image.PixelMapFormat.BGRA_8888,
     }
     // 保存用于深拷贝的pixelMap
     this.pixelMapSrc = await this.imageSource.createPixelMap(decodingOptions);
     // TODO 知识点: 通过readPixelsToBuffer进行深拷贝
     this.pixelMapDst = await copyPixelMap(this.pixelMapSrc!);
   }
- 图片裁剪。
    ...
    // TODO 知识点:通过readPixelsToBuffer拷贝到PixelMap对象
    const pixelMapTemp = await copyPixelMap(this.pixelMapSrc);
    const imageInfo: image.ImageInfo = await pixelMapTemp.getImageInfo();
    if (!imageInfo) {
      logger.error(TAG, `imageInfo is null`);
      return;
    }
    let imageHeight: number = imageInfo.size.height;
    let imageWith: number = imageInfo.size.width;
    if (proportion === ImageCropConstants.ONE_ONE) {
      if (imageHeight > imageWith) {
        imageHeight = imageWith;
      } else {
        imageWith = imageHeight;
      }
    }
    try {
      logger.info(TAG, `imageInfo imageHeight = ${JSON.stringify(imageHeight / proportion)}, imageWith = ${JSON.stringify(imageWith)}`);
      // PixelMap按比例裁剪
      await pixelMapTemp.crop({
        size: { height: imageHeight / proportion, width: imageWith },
        x: 0,
        y: 0
      });
      this.pixelMapDst = pixelMapTemp;
    } catch (error) {
      logger.error(TAG, `imageInfo crop error = ${JSON.stringify(error)}`);
    }
- 保存图片。将裁剪后的图片保存到沙箱路径。
   export async function savePixelMap(context: Context, pm: PixelMap): Promise<string> {
     if (pm === null) {
       logger.error(TAG, '传入的pm为空');
       return '';
     }
     const imagePackerApi: image.ImagePacker = image.createImagePacker();
     const packOpts: image.PackingOption = { format: 'image/jpeg', quality: 30 };
     try {
       packToFile(context, pm);
       const data: ArrayBuffer = await imagePackerApi.packing(pm, packOpts);
       return await saveFile(context, data);
     } catch (err) {
       logger.error(TAG, '保存文件失败,err=' + JSON.stringify(err));
       return '';
     }
   }

   async function saveFile(context: Context, data: ArrayBuffer): Promise<string> {
     let uri: string = context.filesDir + '/' + getTimeStr() + '.jpg';
     const file: fileIo.File = fs.openSync(uri, fs.OpenMode.READ_WRITE | fs.OpenMode.CREATE);
     fs.writeSync(file.fd, data);
     fs.closeSync(file);
     // 加上file://前缀
     uri = 'file:/' + uri;
     return uri;
   }
高性能知识点
不涉及
工程结构&模块类型
   imagedepthcopy                               // har类型
   |---view
   |   |---ImageDepthCopy.ets                   // 视图层-图片深拷贝页面
   |---constants
   |   |---ImageCropConstants.ets               // 常量
   |---model
   |   |---AdjustData.ets                       // 裁剪选项资源
   |---util
   |   |---CopyObj.ets                          // 业务层-图片深拷贝处理
   |   |---FileUtil.ets                         // 业务层-图片保存
模块依赖
本示例依赖common模块来实现 日志 的打印、 动态路由模块 来实现页面的动态加载。
写在最后
如果你觉得这篇内容对你还蛮有帮助,我想邀请你帮我三个小忙:
- 点赞,转发,有你们的 『点赞和评论』,才是我创造的动力。
- 关注小编,同时可以期待后续文章ing🚀,不定期分享原创知识。
- 想要获取更多完整鸿蒙最新学习知识点,请移步前往小编:
https://gitcode.com/HarmonyOS_MN


 被折叠的 条评论
为什么被折叠?


