


转载请注明出处:http://blog.csdn.net/guolin_blog/article/details/34093441
在上一篇文章当中,我们学习了DiskLruCache的概念和基本用法,但仅仅是掌握理论知识显然是不够的,那么本篇文章我们就来继续进阶一下,看一看在实战当中应该怎样合理使用DiskLruCache。还不熟悉DiskLruCache用法的朋友可以先去参考我的上一篇文章 Android DiskLruCache完全解析,硬盘缓存的最佳方案 。
其实,在真正的项目实战当中如果仅仅是使用硬盘缓存的话,程序是有明显短板的。而如果只使用内存缓存的话,程序当然也会有很大的缺陷。因此,一个优秀的程序必然会将内存缓存和硬盘缓存结合到一起使用,那么本篇文章我们就来看一看,如何才能将LruCache和DiskLruCache完美结合到一起。
在 Android照片墙应用实现,再多的图片也不怕崩溃 这篇文章当中,我编写了一个照片墙的应用程序,但当时只是单纯使用到了内存缓存而已,而今天我们就对这个例子进行扩展,制作一个完整版的照片墙。
那我们开始动手吧,新建一个Android项目,起名叫PhotoWallDemo,这里我使用的是Android 4.0的API。然后新建一个libcore.io包,并将DiskLruCache.java文件拷贝到这个包下,这样就把准备工作完成了。
接下来首先需要考虑的仍然是图片源的问题,简单起见,我仍然是吧所有图片都上传到了我的CSDN相册当中,然后新建一个Images类,将所有相册中图片的网址都配置进去,代码如下所示:
public class Images { public final static String[] imageThumbUrls = new String[] { "https://img-my.csdn.net/uploads/201407/26/1406383299_1976.jpg", "https://img-my.csdn.net/uploads/201407/26/1406383291_6518.jpg", "https://img-my.csdn.net/uploads/201407/26/1406383291_8239.jpg", "https://img-my.csdn.net/uploads/201407/26/1406383290_9329.jpg", "https://img-my.csdn.net/uploads/201407/26/1406383290_1042.jpg", "https://img-my.csdn.net/uploads/201407/26/1406383275_3977.jpg", "https://img-my.csdn.net/uploads/201407/26/1406383265_8550.jpg", "https://img-my.csdn.net/uploads/201407/26/1406383264_3954.jpg", "https://img-my.csdn.net/uploads/201407/26/1406383264_4787.jpg", "https://img-my.csdn.net/uploads/201407/26/1406383264_8243.jpg", "https://img-my.csdn.net/uploads/201407/26/1406383248_3693.jpg", "https://img-my.csdn.net/uploads/201407/26/1406383243_5120.jpg", "https://img-my.csdn.net/uploads/201407/26/1406383242_3127.jpg", "https://img-my.csdn.net/uploads/201407/26/1406383242_9576.jpg", "https://img-my.csdn.net/uploads/201407/26/1406383242_1721.jpg", "https://img-my.csdn.net/uploads/201407/26/1406383219_5806.jpg", "https://img-my.csdn.net/uploads/201407/26/1406383214_7794.jpg", "https://img-my.csdn.net/uploads/201407/26/1406383213_4418.jpg", "https://img-my.csdn.net/uploads/201407/26/1406383213_3557.jpg", "https://img-my.csdn.net/uploads/201407/26/1406383210_8779.jpg", "https://img-my.csdn.net/uploads/201407/26/1406383172_4577.jpg", "https://img-my.csdn.net/uploads/201407/26/1406383166_3407.jpg", "https://img-my.csdn.net/uploads/201407/26/1406383166_2224.jpg", "https://img-my.csdn.net/uploads/201407/26/1406383166_7301.jpg", "https://img-my.csdn.net/uploads/201407/26/1406383165_7197.jpg", "https://img-my.csdn.net/uploads/201407/26/1406383150_8410.jpg", "https://img-my.csdn.net/uploads/201407/26/1406383131_3736.jpg", "https://img-my.csdn.net/uploads/201407/26/1406383130_5094.jpg", "https://img-my.csdn.net/uploads/201407/26/1406383130_7393.jpg", "https://img-my.csdn.net/uploads/201407/26/1406383129_8813.jpg", "https://img-my.csdn.net/uploads/201407/26/1406383100_3554.jpg", "https://img-my.csdn.net/uploads/201407/26/1406383093_7894.jpg", "https://img-my.csdn.net/uploads/201407/26/1406383092_2432.jpg", "https://img-my.csdn.net/uploads/201407/26/1406383092_3071.jpg", "https://img-my.csdn.net/uploads/201407/26/1406383091_3119.jpg", "https://img-my.csdn.net/uploads/201407/26/1406383059_6589.jpg", "https://img-my.csdn.net/uploads/201407/26/1406383059_8814.jpg", "https://img-my.csdn.net/uploads/201407/26/1406383059_2237.jpg", "https://img-my.csdn.net/uploads/201407/26/1406383058_4330.jpg", "https://img-my.csdn.net/uploads/201407/26/1406383038_3602.jpg", "https://img-my.csdn.net/uploads/201407/26/1406382942_3079.jpg", "https://img-my.csdn.net/uploads/201407/26/1406382942_8125.jpg", "https://img-my.csdn.net/uploads/201407/26/1406382942_4881.jpg", "https://img-my.csdn.net/uploads/201407/26/1406382941_4559.jpg", "https://img-my.csdn.net/uploads/201407/26/1406382941_3845.jpg", "https://img-my.csdn.net/uploads/201407/26/1406382924_8955.jpg", "https://img-my.csdn.net/uploads/201407/26/1406382923_2141.jpg", "https://img-my.csdn.net/uploads/201407/26/1406382923_8437.jpg", "https://img-my.csdn.net/uploads/201407/26/1406382922_6166.jpg", "https://img-my.csdn.net/uploads/201407/26/1406382922_4843.jpg", "https://img-my.csdn.net/uploads/201407/26/1406382905_5804.jpg", "https://img-my.csdn.net/uploads/201407/26/1406382904_3362.jpg", "https://img-my.csdn.net/uploads/201407/26/1406382904_2312.jpg", "https://img-my.csdn.net/uploads/201407/26/1406382904_4960.jpg", "https://img-my.csdn.net/uploads/201407/26/1406382900_2418.jpg", "https://img-my.csdn.net/uploads/201407/26/1406382881_4490.jpg", "https://img-my.csdn.net/uploads/201407/26/1406382881_5935.jpg", "https://img-my.csdn.net/uploads/201407/26/1406382880_3865.jpg", "https://img-my.csdn.net/uploads/201407/26/1406382880_4662.jpg", "https://img-my.csdn.net/uploads/201407/26/1406382879_2553.jpg", "https://img-my.csdn.net/uploads/201407/26/1406382862_5375.jpg", "https://img-my.csdn.net/uploads/201407/26/1406382862_1748.jpg", "https://img-my.csdn.net/uploads/201407/26/1406382861_7618.jpg", "https://img-my.csdn.net/uploads/201407/26/1406382861_8606.jpg", "https://img-my.csdn.net/uploads/201407/26/1406382861_8949.jpg", "https://img-my.csdn.net/uploads/201407/26/1406382841_9821.jpg", "https://img-my.csdn.net/uploads/201407/26/1406382840_6603.jpg", "https://img-my.csdn.net/uploads/201407/26/1406382840_2405.jpg", "https://img-my.csdn.net/uploads/201407/26/1406382840_6354.jpg", "https://img-my.csdn.net/uploads/201407/26/1406382839_5779.jpg", "https://img-my.csdn.net/uploads/201407/26/1406382810_7578.jpg", "https://img-my.csdn.net/uploads/201407/26/1406382810_2436.jpg", "https://img-my.csdn.net/uploads/201407/26/1406382809_3883.jpg", "https://img-my.csdn.net/uploads/201407/26/1406382809_6269.jpg", "https://img-my.csdn.net/uploads/201407/26/1406382808_4179.jpg", "https://img-my.csdn.net/uploads/201407/26/1406382790_8326.jpg", "https://img-my.csdn.net/uploads/201407/26/1406382789_7174.jpg", "https://img-my.csdn.net/uploads/201407/26/1406382789_5170.jpg", "https://img-my.csdn.net/uploads/201407/26/1406382789_4118.jpg", "https://img-my.csdn.net/uploads/201407/26/1406382788_9532.jpg", "https://img-my.csdn.net/uploads/201407/26/1406382767_3184.jpg", "https://img-my.csdn.net/uploads/201407/26/1406382767_4772.jpg", "https://img-my.csdn.net/uploads/201407/26/1406382766_4924.jpg", "https://img-my.csdn.net/uploads/201407/26/1406382766_5762.jpg", "https://img-my.csdn.net/uploads/201407/26/1406382765_7341.jpg" };}<LinearLayout xmlns:android="http://schemas.android.com/apk/res/android" xmlns:tools="http://schemas.android.com/tools" android:layout_width="match_parent" android:layout_height="match_parent" > <GridView android:id="@+id/photo_wall" android:layout_width="match_parent" android:layout_height="match_parent" android:columnWidth="@dimen/image_thumbnail_size" android:gravity="center" android:horizontalSpacing="@dimen/image_thumbnail_spacing" android:numColumns="auto_fit" android:stretchMode="columnWidth" android:verticalSpacing="@dimen/image_thumbnail_spacing" > </GridView></LinearLayout><RelativeLayout xmlns:android="http://schemas.android.com/apk/res/android" xmlns:tools="http://schemas.android.com/tools" android:layout_width="wrap_content" android:layout_height="wrap_content" > <ImageView android:id="@+id/photo" android:layout_width="match_parent" android:layout_height="match_parent" android:layout_centerInParent="true" android:scaleType="fitXY" /></RelativeLayout>仍然很简单,photo_layout.xml布局中只有一个ImageView控件,就是用它来显示图片的。这样我们就把所有的布局文件都写好了。
接下来新建PhotoWallAdapter做为GridView的适配器,代码如下所示:
public class PhotoWallAdapter extends ArrayAdapter<String> { /** * 记录所有正在下载或等待下载的任务。 */ private Set<BitmapWorkerTask> taskCollection; /** * 图片缓存技术的核心类,用于缓存所有下载好的图片,在程序内存达到设定值时会将最少最近使用的图片移除掉。 */ private LruCache<String, Bitmap> mMemoryCache; /** * 图片硬盘缓存核心类。 */ private DiskLruCache mDiskLruCache; /** * GridView的实例 */ private GridView mPhotoWall; /** * 记录每个子项的高度。 */ private int mItemHeight = 0; public PhotoWallAdapter(Context context, int textViewResourceId, String[] objects, GridView photoWall) { super(context, textViewResourceId, objects); mPhotoWall = photoWall; taskCollection = new HashSet<BitmapWorkerTask>(); // 获取应用程序最大可用内存 int maxMemory = (int) Runtime.getRuntime().maxMemory(); int cacheSize = maxMemory / 8; // 设置图片缓存大小为程序最大可用内存的1/8 mMemoryCache = new LruCache<String, Bitmap>(cacheSize) { @Override protected int sizeOf(String key, Bitmap bitmap) { return bitmap.getByteCount(); } }; try { // 获取图片缓存路径 File cacheDir = getDiskCacheDir(context, "thumb"); if (!cacheDir.exists()) { cacheDir.mkdirs(); } // 创建DiskLruCache实例,初始化缓存数据 mDiskLruCache = DiskLruCache .open(cacheDir, getAppVersion(context), 1, 10 * 1024 * 1024); } catch (IOException e) { e.printStackTrace(); } } @Override public View getView(int position, View convertView, ViewGroup parent) { final String url = getItem(position); View view; if (convertView == null) { view = LayoutInflater.from(getContext()).inflate(R.layout.photo_layout, null); } else { view = convertView; } final ImageView imageView = (ImageView) view.findViewById(R.id.photo); if (imageView.getLayoutParams().height != mItemHeight) { imageView.getLayoutParams().height = mItemHeight; } // 给ImageView设置一个Tag,保证异步加载图片时不会乱序 imageView.setTag(url); imageView.setImageResource(R.drawable.empty_photo); loadBitmaps(imageView, url); return view; } /** * 将一张图片存储到LruCache中。 * * @param key * LruCache的键,这里传入图片的URL地址。 * @param bitmap * LruCache的键,这里传入从网络上下载的Bitmap对象。 */ public void addBitmapToMemoryCache(String key, Bitmap bitmap) { if (getBitmapFromMemoryCache(key) == null) { mMemoryCache.put(key, bitmap); } } /** * 从LruCache中获取一张图片,如果不存在就返回null。 * * @param key * LruCache的键,这里传入图片的URL地址。 * @return 对应传入键的Bitmap对象,或者null。 */ public Bitmap getBitmapFromMemoryCache(String key) { return mMemoryCache.get(key); } /** * 加载Bitmap对象。此方法会在LruCache中检查所有屏幕中可见的ImageView的Bitmap对象, * 如果发现任何一个ImageView的Bitmap对象不在缓存中,就会开启异步线程去下载图片。 */ public void loadBitmaps(ImageView imageView, String imageUrl) { try { Bitmap bitmap = getBitmapFromMemoryCache(imageUrl); if (bitmap == null) { BitmapWorkerTask task = new BitmapWorkerTask(); taskCollection.add(task); task.execute(imageUrl); } else { if (imageView != null && bitmap != null) { imageView.setImageBitmap(bitmap); } } } catch (Exception e) { e.printStackTrace(); } } /** * 取消所有正在下载或等待下载的任务。 */ public void cancelAllTasks() { if (taskCollection != null) { for (BitmapWorkerTask task : taskCollection) { task.cancel(false); } } } /** * 根据传入的uniqueName获取硬盘缓存的路径地址。 */ public File getDiskCacheDir(Context context, String uniqueName) { String cachePath; if (Environment.MEDIA_MOUNTED.equals(Environment.getExternalStorageState()) || !Environment.isExternalStorageRemovable()) { cachePath = context.getExternalCacheDir().getPath(); } else { cachePath = context.getCacheDir().getPath(); } return new File(cachePath + File.separator + uniqueName); } /** * 获取当前应用程序的版本号。 */ public int getAppVersion(Context context) { try { PackageInfo info = context.getPackageManager().getPackageInfo(context.getPackageName(), 0); return info.versionCode; } catch (NameNotFoundException e) { e.printStackTrace(); } return 1; } /** * 设置item子项的高度。 */ public void setItemHeight(int height) { if (height == mItemHeight) { return; } mItemHeight = height; notifyDataSetChanged(); } /** * 使用MD5算法对传入的key进行加密并返回。 */ public String hashKeyForDisk(String key) { String cacheKey; try { final MessageDigest mDigest = MessageDigest.getInstance("MD5"); mDigest.update(key.getBytes()); cacheKey = bytesToHexString(mDigest.digest()); } catch (NoSuchAlgorithmException e) { cacheKey = String.valueOf(key.hashCode()); } return cacheKey; } /** * 将缓存记录同步到journal文件中。 */ public void fluchCache() { if (mDiskLruCache != null) { try { mDiskLruCache.flush(); } catch (IOException e) { e.printStackTrace(); } } } private String bytesToHexString(byte[] bytes) { StringBuilder sb = new StringBuilder(); for (int i = 0; i < bytes.length; i++) { String hex = Integer.toHexString(0xFF & bytes[i]); if (hex.length() == 1) { sb.append('0'); } sb.append(hex); } return sb.toString(); } /** * 异步下载图片的任务。 * * @author guolin */ class BitmapWorkerTask extends AsyncTask<String, Void, Bitmap> { /** * 图片的URL地址 */ private String imageUrl; @Override protected Bitmap doInBackground(String... params) { imageUrl = params[0]; FileDescriptor fileDescriptor = null; FileInputStream fileInputStream = null; Snapshot snapShot = null; try { // 生成图片URL对应的key final String key = hashKeyForDisk(imageUrl); // 查找key对应的缓存 snapShot = mDiskLruCache.get(key); if (snapShot == null) { // 如果没有找到对应的缓存,则准备从网络上请求数据,并写入缓存 DiskLruCache.Editor editor = mDiskLruCache.edit(key); if (editor != null) { OutputStream outputStream = editor.newOutputStream(0); if (downloadUrlToStream(imageUrl, outputStream)) { editor.commit(); } else { editor.abort(); } } // 缓存被写入后,再次查找key对应的缓存 snapShot = mDiskLruCache.get(key); } if (snapShot != null) { fileInputStream = (FileInputStream) snapShot.getInputStream(0); fileDescriptor = fileInputStream.getFD(); } // 将缓存数据解析成Bitmap对象 Bitmap bitmap = null; if (fileDescriptor != null) { bitmap = BitmapFactory.decodeFileDescriptor(fileDescriptor); } if (bitmap != null) { // 将Bitmap对象添加到内存缓存当中 addBitmapToMemoryCache(params[0], bitmap); } return bitmap; } catch (IOException e) { e.printStackTrace(); } finally { if (fileDescriptor == null && fileInputStream != null) { try { fileInputStream.close(); } catch (IOException e) { } } } return null; } @Override protected void onPostExecute(Bitmap bitmap) { super.onPostExecute(bitmap); // 根据Tag找到相应的ImageView控件,将下载好的图片显示出来。 ImageView imageView = (ImageView) mPhotoWall.findViewWithTag(imageUrl); if (imageView != null && bitmap != null) { imageView.setImageBitmap(bitmap); } taskCollection.remove(this); } /** * 建立HTTP请求,并获取Bitmap对象。 * * @param imageUrl * 图片的URL地址 * @return 解析后的Bitmap对象 */ private boolean downloadUrlToStream(String urlString, OutputStream outputStream) { HttpURLConnection urlConnection = null; BufferedOutputStream out = null; BufferedInputStream in = null; try { final URL url = new URL(urlString); urlConnection = (HttpURLConnection) url.openConnection(); in = new BufferedInputStream(urlConnection.getInputStream(), 8 * 1024); out = new BufferedOutputStream(outputStream, 8 * 1024); int b; while ((b = in.read()) != -1) { out.write(b); } return true; } catch (final IOException e) { e.printStackTrace(); } finally { if (urlConnection != null) { urlConnection.disconnect(); } try { if (out != null) { out.close(); } if (in != null) { in.close(); } } catch (final IOException e) { e.printStackTrace(); } } return false; } }}代码有点长,我们一点点进行分析。首先在PhotoWallAdapter的构造函数中,我们初始化了LruCache类,并设置了内存缓存容量为程序最大可用内存的1/8,紧接着调用了DiskLruCache的open()方法来创建实例,并设置了硬盘缓存容量为10M,这样我们就把LruCache和DiskLruCache的初始化工作完成了。
接着在getView()方法中,我们为每个ImageView设置了一个唯一的Tag,这个Tag的作用是为了后面能够准确地找回这个ImageView,不然异步加载图片会出现乱序的情况。然后在getView()方法的最后调用了loadBitmaps()方法,加载图片的具体逻辑也就是在这里执行的了。
进入到loadBitmaps()方法中可以看到,实现是调用了getBitmapFromMemoryCache()方法来从内存中获取缓存,如果获取到了则直接调用ImageView的setImageBitmap()方法将图片显示到界面上。如果内存中没有获取到,则开启一个BitmapWorkerTask任务来去异步加载图片。
那么在BitmapWorkerTask的doInBackground()方法中,我们就灵活运用了上篇文章中学习的DiskLruCache的各种用法。首先根据图片的URL生成对应的MD5 key,然后调用DiskLruCache的get()方法来获取硬盘缓存,如果没有获取到的话则从网络上请求图片并写入硬盘缓存,接着将Bitmap对象解析出来并添加到内存缓存当中,最后将这个Bitmap对象显示到界面上,这样一个完整的流程就执行完了。
那么我们再来分析一下上述流程,每次加载图片的时候都优先去内存缓存当中读取,当读取不到的时候则回去硬盘缓存中读取,而如果硬盘缓存仍然读取不到的话,就从网络上请求原始数据。不管是从硬盘缓存还是从网络获取,读取到了数据之后都应该添加到内存缓存当中,这样的话我们下次再去读取图片的时候就能迅速从内存当中读取到,而如果该图片从内存中被移除了的话,那就重复再执行一遍上述流程就可以了。
这样我们就把LruCache和DiskLruCache完美结合到一起了。接下来还需要编写MainActivity的代码,非常简单,如下所示:
public class MainActivity extends Activity { /** * 用于展示照片墙的GridView */ private GridView mPhotoWall; /** * GridView的适配器 */ private PhotoWallAdapter mAdapter; private int mImageThumbSize; private int mImageThumbSpacing; @Override protected void onCreate(Bundle savedInstanceState) { super.onCreate(savedInstanceState); setContentView(R.layout.activity_main); mImageThumbSize = getResources().getDimensionPixelSize( R.dimen.image_thumbnail_size); mImageThumbSpacing = getResources().getDimensionPixelSize( R.dimen.image_thumbnail_spacing); mPhotoWall = (GridView) findViewById(R.id.photo_wall); mAdapter = new PhotoWallAdapter(this, 0, Images.imageThumbUrls, mPhotoWall); mPhotoWall.setAdapter(mAdapter); mPhotoWall.getViewTreeObserver().addOnGlobalLayoutListener( new ViewTreeObserver.OnGlobalLayoutListener() { @Override public void onGlobalLayout() { final int numColumns = (int) Math.floor(mPhotoWall .getWidth() / (mImageThumbSize + mImageThumbSpacing)); if (numColumns > 0) { int columnWidth = (mPhotoWall.getWidth() / numColumns) - mImageThumbSpacing; mAdapter.setItemHeight(columnWidth); mPhotoWall.getViewTreeObserver() .removeGlobalOnLayoutListener(this); } } }); } @Override protected void onPause() { super.onPause(); mAdapter.fluchCache(); } @Override protected void onDestroy() { super.onDestroy(); // 退出程序时结束所有的下载任务 mAdapter.cancelAllTasks(); }}上述代码中,我们通过getViewTreeObserver()的方式监听View的布局事件,当布局完成以后,我们重新修改一下GridView中子View的高度,以保证子View的宽度和高度可以保持一致。
到这里还没有结束,最后还需要配置一下AndroidManifest.xml文件,并加入相应的权限,如下所示:
<manifest xmlns:android="http://schemas.android.com/apk/res/android" package="com.example.photoswalldemo" android:versionCode="1" android:versionName="1.0" > <uses-sdk android:minSdkVersion="14" android:targetSdkVersion="17" /> <uses-permission android:name="android.permission.INTERNET" /> <uses-permission android:name="android.permission.WRITE_EXTERNAL_STORAGE" /> <application android:allowBackup="true" android:icon="@drawable/ic_launcher" android:label="@string/app_name" android:theme="@style/AppTheme" > <activity android:name="com.example.photoswalldemo.MainActivity" android:label="@string/app_name" > <intent-filter> <action android:name="android.intent.action.MAIN" /> <category android:name="android.intent.category.LAUNCHER" /> </intent-filter> </activity> </application></manifest>好了,全部代码都在这儿了,让我们来运行一下吧,效果如下图所示:
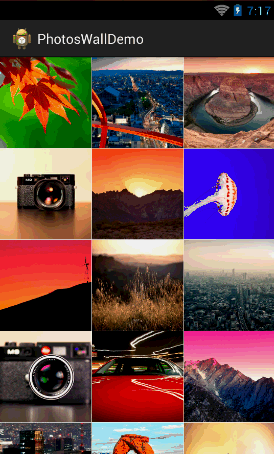
第一次从网络上请求图片的时候有点慢,但之后加载图片就会非常快了,滑动起来也很流畅。
那么我们最后再检查一下这些图片是不是已经正确缓存在指定地址了,进入 /sdcard/Android/data/<application package>/cache/thumb 这个路径,如下图所示:
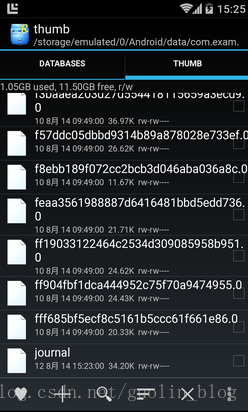
可以看到,每张图片的缓存以及journal文件都在这里了,说明我们的硬盘缓存已经成功了。
好了,今天的讲解就到这里,有疑问的朋友可以在下面留言。
关注我的技术公众号,每天都有优质技术文章推送。关注我的娱乐公众号,工作、学习累了的时候放松一下自己。
微信扫一扫下方二维码即可关注:


再分享一下我老师大神的人工智能教程吧。零基础!通俗易懂!风趣幽默!还带黄段子!希望你也加入到我们人工智能的队伍中来!https://blog.csdn.net/jiangjunshow


 206
206


 被折叠的 条评论
为什么被折叠?
被折叠的 条评论
为什么被折叠?
 到【灌水乐园】发言


