


RichFaces树组件的用法
原创:版权所有chszs
RichFaces Tree组件提供了一个缺省的数据模型,允许显示简单的树结构,无需创建自己的树模型类集。
下面的例子说明了从属性文件的数据生成树目录。
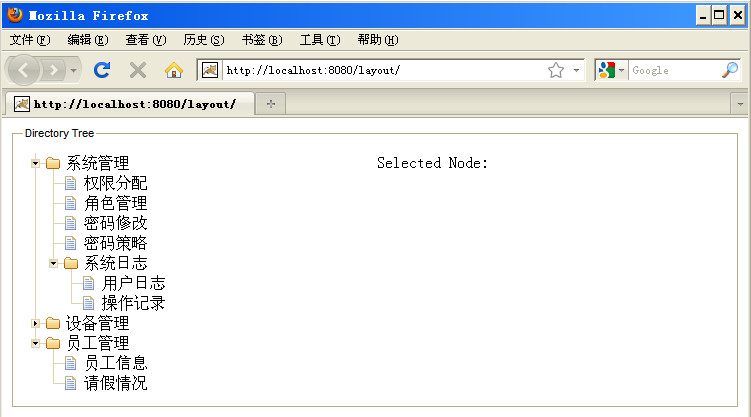
选择左边树组件的节点,右边会显示出相应的节点名。如图所示:

如上图所示,建立图示页面的步骤如下:
一、搭建RichFaces开发环境,这一步省略;
二、编辑页面:
<ui:composition xmlns="http://www.w3.org/1999/xhtml" xmlns:ui="http://java.sun.com/jsf/facelets" xmlns:h="http://java.sun.com/jsf/html" xmlns:f="http://java.sun.com/jsf/core" xmlns:rich="http://richfaces.org/rich" xmlns:a4j="http://richfaces.org/a4j"><mce:style><!--.col,.col2 { width: 50%; vertical-align: top;}--></mce:style><style mce_bogus="1">.col,.col2 { width: 50%; vertical-align: top;}</style> <h:form> <fieldset> <legend>Directory Tree</legend> <h:panelGrid columns="2" width="100%" columnClasses="col1,col2"> <rich:tree style="width:150px;" nodeSelectListener="#{simpleTreeBean.processSelection}" reRender="selectedNode" ajaxSubmitSelection="true" switchType="client" value="#{simpleTreeBean.treeNode}" var="item"> </rich:tree> <h:outputText escape="false" value="Selected Node:#{simpleTreeBean.nodeTitle}" id="selectedNode" /> </h:panelGrid> </fieldset> </h:form></ui:composition>
页面文件需说明两点:
1)<rich:tree>组件的ajaxSubmitSelection属性,为真时表示支持Ajax提交;
2)<rich:tree>组件的value属性,其值是org.richfaces.model.TreeNode类的实例。
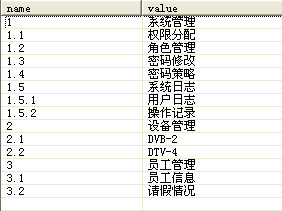
三、属性文件:
1=/u7CFB/u7EDF/u7BA1/u74061.1=/u6743/u9650/u5206/u914D1.2=/u89D2/u8272/u7BA1/u74061.3=/u5BC6/u7801/u4FEE/u65391.4=/u5BC6/u7801/u7B56/u75651.5=/u7CFB/u7EDF/u65E5/u5FD71.5.1=/u7528/u6237/u65E5/u5FD71.5.2=/u64CD/u4F5C/u8BB0/u5F552=/u8BBE/u5907/u7BA1/u74062.1=DVB-22.2=DTV-43=/u5458/u5DE5/u7BA1/u74063.1=/u5458/u5DE5/u4FE1/u606F3.2=/u8BF7/u5047/u60C5/u51B5
转码后的文字如图所示:
四、托管Bean文件
package chcms.view.mbeans;import org.richfaces.component.html.HtmlTree;import org.richfaces.event.NodeSelectedEvent;import org.richfaces.model.TreeNode;import org.richfaces.model.TreeNodeImpl;import java.io.IOException;import java.io.InputStream;import java.util.*;import javax.faces.FacesException;import javax.faces.context.ExternalContext;import javax.faces.context.FacesContext;public class SimpleTreeBean { private TreeNode rootNode = null; private List<String> selectedNodeChildren = new ArrayList<String>(); private String nodeTitle; private static final String DATA_PATH="/test/simple-tree-data.properties"; public TreeNode getTreeNode(){ if(rootNode == null){ loadTree(); } return rootNode; } public String getNodeTitle(){ return nodeTitle; } public void setNodeTitle(String nodeTitle){ this.nodeTitle = nodeTitle; } private void addNodes(String path, TreeNode node, Properties properties){ boolean end = false; int counter = 1; while(!end){ String key = path != null ? path+'.'+counter:String.valueOf(counter); String value = properties.getProperty(key); if(value!=null){ TreeNodeImpl nodeImpl = new TreeNodeImpl(); nodeImpl.setData(value); node.addChild(new Integer(counter), nodeImpl); addNodes(key, nodeImpl, properties); counter++; }else{ end = true; } } } private void loadTree(){ FacesContext facesContext = FacesContext.getCurrentInstance(); ExternalContext externalContext = facesContext.getExternalContext(); InputStream dataStream = externalContext.getResourceAsStream(DATA_PATH); try{ Properties properties = new Properties(); properties.load(dataStream); rootNode = new TreeNodeImpl(); addNodes(null, rootNode, properties); }catch(IOException e){ throw new FacesException(e.getMessage()); }finally{ if(dataStream!=null){ try{ dataStream.close(); }catch(IOException e){ externalContext.log(e.getMessage(), e); } } } } public void processSelection(NodeSelectedEvent event){ HtmlTree tree = (HtmlTree)event.getComponent(); nodeTitle = (String)tree.getRowData(); selectedNodeChildren.clear(); TreeNode currentNode = tree.getModelTreeNode(tree.getRowKey()); if(currentNode.isLeaf()){ selectedNodeChildren.add((String)currentNode.getData()); }else{ Iterator<Map.Entry<Object, TreeNode>> it = currentNode.getChildren(); while(it!=null && it.hasNext()){ Map.Entry<Object, TreeNode> entry = it.next(); selectedNodeChildren.add(entry.getValue().getData().toString()); } } }}
托管Bean需说明几点:
1)DATA_PATH表示属性文件的路径;
2)addNodes()方法采用了递归算法,需注意;
3)需理解java.util.Properties的用法;
4)理解构造树组件的缺省实现类org.richfaces.model.TreeNodeImpl类。
五、RichFaces配置文件:
<managed-bean> <managed-bean-name>simpleTreeBean</managed-bean-name> <managed-bean-class>chcms.view.mbeans.SimpleTreeBean</managed-bean-class> <managed-bean-scope>request</managed-bean-scope> </managed-bean>
以上内容能实现图示例子。一些次要步骤省略!
再分享一下我老师大神的人工智能教程吧。零基础!通俗易懂!风趣幽默!还带黄段子!希望你也加入到我们人工智能的队伍中来!https://blog.csdn.net/jiangjunshow


 被折叠的 条评论
为什么被折叠?
被折叠的 条评论
为什么被折叠?
 到【灌水乐园】发言


